Owner's Manual
Page 3
... Failed 28 Pairing the Mouse 29 Mouse Pairing With the Wizard 29 Mouse Pairing Failed 30 Numeric Keypad 31 Key Combinations 31 System Functions 31 Battery 32 Display Functions 32 Wireless Networking Technology Function 32 Display Switch 32 Power Management 32 Microsoft Windows Logo Key Functions 32 Touch Pad 33 Customizing...
... Failed 28 Pairing the Mouse 29 Mouse Pairing With the Wizard 29 Mouse Pairing Failed 30 Numeric Keypad 31 Key Combinations 31 System Functions 31 Battery 32 Display Functions 32 Wireless Networking Technology Function 32 Display Switch 32 Power Management 32 Microsoft Windows Logo Key Functions 32 Touch Pad 33 Customizing...
Owner's Manual
Page 4
... the Keyboard Battery 35 3 Using Multimedia 37 Playing Media 37 Adjusting the Volume 39 Adjusting the Picture 40 Copying CD, DVD, and BD Media 40 How to Copy a CD, DVD, or BD 40 Using Blank CD, DVD, and BD Media 41 Helpful Tips 42 Using Dell Media Experience and Dell MediaDirect 42 ...If the computer is turned on or in standby mode 43 If the computer is turned off or in hibernate mode 43 Dell MediaDirect and Dell Media Experience Help 43 Using Your Computer With a TV or Audio Device 44 Connecting a Composite Video Adapter 44 Connecting a Component Video Adapter 45 Connecting...
... the Keyboard Battery 35 3 Using Multimedia 37 Playing Media 37 Adjusting the Volume 39 Adjusting the Picture 40 Copying CD, DVD, and BD Media 40 How to Copy a CD, DVD, or BD 40 Using Blank CD, DVD, and BD Media 41 Helpful Tips 42 Using Dell Media Experience and Dell MediaDirect 42 ...If the computer is turned on or in standby mode 43 If the computer is turned off or in hibernate mode 43 Dell MediaDirect and Dell Media Experience Help 43 Using Your Computer With a TV or Audio Device 44 Connecting a Composite Video Adapter 44 Connecting a Component Video Adapter 45 Connecting...

Owner's Manual
Page 5
... a Picture or Recording a Video 53 5 Using a Battery 55 Replacing the Battery 55 Inserting the Battery 55 Removing the Battery 57 Battery Performance 58 Checking the Battery Charge 59 Dell QuickSet Battery Meter 59 Microsoft Windows Power Meter 60 Charge Gauge 60 Low-Battery Warning 60 Charging the Battery 61 Conserving Battery Power 61 Storing a Battery 61 Power Management Modes 61 Standby Mode...
... a Picture or Recording a Video 53 5 Using a Battery 55 Replacing the Battery 55 Inserting the Battery 55 Removing the Battery 57 Battery Performance 58 Checking the Battery Charge 59 Dell QuickSet Battery Meter 59 Microsoft Windows Power Meter 60 Charge Gauge 60 Low-Battery Warning 60 Charging the Battery 61 Conserving Battery Power 61 Storing a Battery 61 Power Management Modes 61 Standby Mode...
Owner's Manual
Page 9
... Is a Driver 119 Identifying Drivers 119 Reinstalling Drivers and Utilities 120 Resolving Software and Hardware Incompatibilities 122 Restoring Your Operating System 122 Using Microsoft Windows XP System Restore 122 Using the Operating System Installation Media 124 14 Adding and Replacing Parts 127 Before You Begin 127 Recommended Tools 127 Turning Off...
... Is a Driver 119 Identifying Drivers 119 Reinstalling Drivers and Utilities 120 Resolving Software and Hardware Incompatibilities 122 Restoring Your Operating System 122 Using Microsoft Windows XP System Restore 122 Using the Operating System Installation Media 124 14 Adding and Replacing Parts 127 Before You Begin 127 Recommended Tools 127 Turning Off...

Owner's Manual
Page 12
... Express Service Code to direct your call when contacting support. The Microsoft Windows License Label in on page 57. 12 Finding Information See "Removing the Battery" on the base of your computer. What Are You Looking For? • How to set up my computer Find It Here Setup Diagram • Service...; Model Name, electrical ratings, Agency approval marks Service Tag and Microsoft® Windows® License The service tag label is located inside the computer base battery compartment of your computer.
... Express Service Code to direct your call when contacting support. The Microsoft Windows License Label in on page 57. 12 Finding Information See "Removing the Battery" on the base of your computer. What Are You Looking For? • How to set up my computer Find It Here Setup Diagram • Service...; Model Name, electrical ratings, Agency approval marks Service Tag and Microsoft® Windows® License The service tag label is located inside the computer base battery compartment of your computer.
Owner's Manual
Page 16
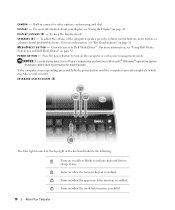
... off completely (which may take several seconds). For more information, see "Using Dell Media Experience and Dell MediaDirect" on page 42. Press the power button to Dell MediaDirect™. KEYBOARD STATUS LIGHTS (4) The blue lights located at the top right... of the integrated speaker, press the volume control buttons, mute button, or volume-control keyboard shortcuts. To adjust the volume of the keyboard indicate the following: Turns on steadily or blinks to indicate keyboard battery...
... off completely (which may take several seconds). For more information, see "Using Dell Media Experience and Dell MediaDirect" on page 42. Press the power button to Dell MediaDirect™. KEYBOARD STATUS LIGHTS (4) The blue lights located at the top right... of the integrated speaker, press the volume control buttons, mute button, or volume-control keyboard shortcuts. To adjust the volume of the keyboard indicate the following: Turns on steadily or blinks to indicate keyboard battery...
Owner's Manual
Page 18
.... T O U C H P A D B U T T O N S ( 2 ) - Provide the functionality of a mouse. See "Touch Pad" on when wireless devices are enabled. 18 About Your Computer Turns on page 31. Press to indicate battery charge status. For information on supported keyboard shortcuts, see "Numeric Keypad" on steadily or blinks to increase the volume of data, never turn on when...
.... T O U C H P A D B U T T O N S ( 2 ) - Provide the functionality of a mouse. See "Touch Pad" on when wireless devices are enabled. 18 About Your Computer Turns on page 31. Press to indicate battery charge status. For information on supported keyboard shortcuts, see "Numeric Keypad" on steadily or blinks to increase the volume of data, never turn on when...

Owner's Manual
Page 19
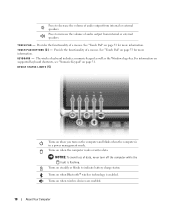
...Bluetooth wireless technology) 3 microphone connector 6 display latch release S E C U R I N F R A R E D S E N S O R - Off: The battery is adequately charged (or the computer is connected to 20 feet away with the device. For more information, see "Using Multimedia" on... L O T - NOTICE: Before you attach a commercially available antitheft device to charge the battery). Flashing blue: The battery is critically low. Off: The battery is adequately charged (or external power is charging. - Solid blue: The battery is not available to the computer. O P T I C A L D R I...
...Bluetooth wireless technology) 3 microphone connector 6 display latch release S E C U R I N F R A R E D S E N S O R - Off: The battery is adequately charged (or the computer is connected to 20 feet away with the device. For more information, see "Using Multimedia" on... L O T - NOTICE: Before you attach a commercially available antitheft device to charge the battery). Flashing blue: The battery is critically low. Off: The battery is adequately charged (or external power is charging. - Solid blue: The battery is not available to the computer. O P T I C A L D R I...

Owner's Manual
Page 24
... with the fan or the computer. NOTE: The computer turns on the back of the computer. Bottom View 1 6 2 1 memory module cover 4 battery latch release 5 4 2 battery 5 subwoofer cover 24 About Your Computer 3 3 battery charge gauge 6 fan air vents When you wrap the AC adapter cable, ensure that you disconnect the AC adapter cable from...
... with the fan or the computer. NOTE: The computer turns on the back of the computer. Bottom View 1 6 2 1 memory module cover 4 battery latch release 5 4 2 battery 5 subwoofer cover 24 About Your Computer 3 3 battery charge gauge 6 fan air vents When you wrap the AC adapter cable, ensure that you disconnect the AC adapter cable from...

Owner's Manual
Page 25
...E - Covers the compartment that contains the secondary memory module. About Your Computer 25 See "Using a Battery" on page 60. See "Charge Gauge" on page 55. Releases the battery. See "Replacing the Battery" on page 129. The computer uses an internal fan to an electrical outlet. CAUTION: Do not block... as a closed briefcase, while it is normal and does not indicate a problem with the fan or the computer. Do not store your computer in the battery. B A T T E R Y L A T C H R E L E A S E - F A N A I R V E N T S - NOTE: The computer turns on the fan to accumulate in the ...
...E - Covers the compartment that contains the secondary memory module. About Your Computer 25 See "Using a Battery" on page 60. See "Charge Gauge" on page 55. Releases the battery. See "Replacing the Battery" on page 129. The computer uses an internal fan to an electrical outlet. CAUTION: Do not block... as a closed briefcase, while it is normal and does not indicate a problem with the fan or the computer. Do not store your computer in the battery. B A T T E R Y L A T C H R E L E A S E - F A N A I R V E N T S - NOTE: The computer turns on the fan to accumulate in the ...
Owner's Manual
Page 29
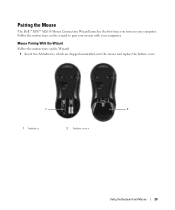
Pairing the Mouse The Dell™ XPS™ M2010 Mouse Connection Wizard launches the first time you turn on your computer. Follow the instructions on the Wizard: 1 Insert two AA batteries, which are shipped uninstalled, into the mouse and replace the battery cover. 1 2 1 batteries 2 battery cover Using the Keyboard and Mouse 29 Mouse Pairing With the Wizard Follow the instructions on the wizard to pair your mouse with your computer.
Pairing the Mouse The Dell™ XPS™ M2010 Mouse Connection Wizard launches the first time you turn on your computer. Follow the instructions on the Wizard: 1 Insert two AA batteries, which are shipped uninstalled, into the mouse and replace the battery cover. 1 2 1 batteries 2 battery cover Using the Keyboard and Mouse 29 Mouse Pairing With the Wizard Follow the instructions on the wizard to pair your mouse with your computer.

Owner's Manual
Page 32
... the Run dialog box. You can reprogram this keyboard shortcut to a connected CRT or external monitor, projector, or TV. See "Dell QuickSet" on page 59). Battery Displays the Dell QuickSet Battery Meter (see "Dell QuickSet Battery Meter" on page 135. Power Management Activates a power management mode. Windows logo key and Restores all open windows. Display Switch...
... the Run dialog box. You can reprogram this keyboard shortcut to a connected CRT or external monitor, projector, or TV. See "Dell QuickSet" on page 59). Battery Displays the Dell QuickSet Battery Meter (see "Dell QuickSet Battery Meter" on page 135. Power Management Activates a power management mode. Windows logo key and Restores all open windows. Display Switch...
Owner's Manual
Page 34
... able to display the QuickSet Battery Meter window. • To double-click an object, position the cursor on the object and tap twice on the touch pad or use your keyboard, as well as the primary computer battery. Dell QuickSet Battery Meter If Dell QuickSet is enabled by a ...rechargeable lithium ion battery. Scrolling is installed, press to use the touch-pad scroll feature. The keyboard battery does not charge when it is detached from the computer base...
... able to display the QuickSet Battery Meter window. • To double-click an object, position the cursor on the object and tap twice on the touch pad or use your keyboard, as well as the primary computer battery. Dell QuickSet Battery Meter If Dell QuickSet is enabled by a ...rechargeable lithium ion battery. Scrolling is installed, press to use the touch-pad scroll feature. The keyboard battery does not charge when it is detached from the computer base...
Owner's Manual
Page 35
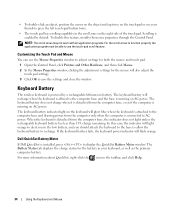
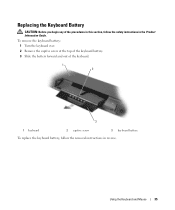
Replacing the Keyboard Battery CAUTION: Before you begin any of the keyboard. 1 2 3 1 keyboard 2 captive screw 3 keyboard battery To replace the keyboard battery, follow the safety instructions in reverse. Using the Keyboard and Mouse 35 To remove the keyboard battery: 1 Turn the keyboard over. 2 Remove the captive screw at the top of the keyboard battery. 3 Slide the battery forward and out of the procedures in this section, follow the removal instructions in the Product Information Guide.
Replacing the Keyboard Battery CAUTION: Before you begin any of the keyboard. 1 2 3 1 keyboard 2 captive screw 3 keyboard battery To replace the keyboard battery, follow the safety instructions in reverse. Using the Keyboard and Mouse 35 To remove the keyboard battery: 1 Turn the keyboard over. 2 Remove the captive screw at the top of the keyboard battery. 3 Slide the battery forward and out of the procedures in this section, follow the removal instructions in the Product Information Guide.

Owner's Manual
Page 49
... open the computer. Two latches are holding the display panel to the computer base and two latches are engaged. NOTE: If the system battery is drained and there is no power source, the latches will emerge from the display panel to secure the display to release the four ... 2 1 display latch release (2) 2 display latch (4) 2 Raise the display panel to move it or the keyboard could fall and be damaged. NOTE: If the system battery is drained and there is firmly secured against the computer base. 2 Slowly lower the display panel toward the front of the display panel, toward the...
... open the computer. Two latches are holding the display panel to the computer base and two latches are engaged. NOTE: If the system battery is drained and there is no power source, the latches will emerge from the display panel to secure the display to release the four ... 2 1 display latch release (2) 2 display latch (4) 2 Raise the display panel to move it or the keyboard could fall and be damaged. NOTE: If the system battery is drained and there is firmly secured against the computer base. 2 Slowly lower the display panel toward the front of the display panel, toward the...
Owner's Manual
Page 50
...on an external monitor). • Press and the down -arrow key on the keyboard. NOTE: Brightness key combinations only affect the display on battery power, you can find a viewing angle that is connected to an external monitor and you attach to adjust display brightness: • Press and... the up - Adjusting Brightness When a Dell™ computer is running on your portable computer, not monitors or projectors that it blocks the DVD drive from opening completely. or down -arrow...
...on an external monitor). • Press and the down -arrow key on the keyboard. NOTE: Brightness key combinations only affect the display on battery power, you can find a viewing angle that is connected to an external monitor and you attach to adjust display brightness: • Press and... the up - Adjusting Brightness When a Dell™ computer is running on your portable computer, not monitors or projectors that it blocks the DVD drive from opening completely. or down -arrow...

Owner's Manual
Page 55
... the keyboard is securely attached and the display is located inside the battery compartment of fire or explosion. The battery is designed to work with your computer. Using a Battery 55 NOTICE: You must remove all external cables from the computer. ... battery from Dell. Replace the battery only with a compatible battery purchased from other external cables from the computer to open the battery access door. See "Closing the Display Panel" on the battery to avoid possible connector damage. Using a Battery Replacing the Battery CAUTION: Using an incompatible battery may...
... the keyboard is securely attached and the display is located inside the battery compartment of fire or explosion. The battery is designed to work with your computer. Using a Battery 55 NOTICE: You must remove all external cables from the computer. ... battery from Dell. Replace the battery only with a compatible battery purchased from other external cables from the computer to open the battery access door. See "Closing the Display Panel" on the battery to avoid possible connector damage. Using a Battery Replacing the Battery CAUTION: Using an incompatible battery may...

Owner's Manual
Page 56
3 Insert the battery straight down into the battery compartment with the battery access door in the open position. 4 Slide the battery in the direction of the #1 arrow until it snaps into place. 56 Using a Battery
3 Insert the battery straight down into the battery compartment with the battery access door in the open position. 4 Slide the battery in the direction of the #1 arrow until it snaps into place. 56 Using a Battery

Owner's Manual
Page 57
The battery access door will pop up. 1 1 battery access door Using a Battery 57 5 Close the battery access door by pushing it down with your finger. Removing the Battery 1 Ensure that the computer is turned off. 2 Slide the battery latch release on the bottom of the computer in the direction of the #1 arrow.
The battery access door will pop up. 1 1 battery access door Using a Battery 57 5 Close the battery access door by pushing it down with your finger. Removing the Battery 1 Ensure that the computer is turned off. 2 Slide the battery latch release on the bottom of the computer in the direction of the #1 arrow.

Owner's Manual
Page 58
... computer. For optimal computer performance and to help preserve BIOS settings, operate your Dell portable computer with your computer, see the Product Information Guide or separate paper warranty document that shipped with the main battery installed at all times. For best results, operate the computer with the AC ... status, go to Control Panel→ Performance and Maintenance→ Power Options→ Power Meter. 58 Using a Battery NOTE: Because the battery may not be fully charged, use the computer. 3 Using your new computer to an electrical outlet the first time you use the...
... computer. For optimal computer performance and to help preserve BIOS settings, operate your Dell portable computer with your computer, see the Product Information Guide or separate paper warranty document that shipped with the main battery installed at all times. For best results, operate the computer with the AC ... status, go to Control Panel→ Performance and Maintenance→ Power Options→ Power Meter. 58 Using a Battery NOTE: Because the battery may not be fully charged, use the computer. 3 Using your new computer to an electrical outlet the first time you use the...


