Owner's Manual
Page 4
Replacing the Keyboard Battery 35 3 Using Multimedia 37 Playing Media 37 Adjusting the Volume 39 Adjusting the Picture 40 Copying CD, DVD, and BD Media 40 How to Copy a CD, DVD, or BD 40 Using Blank CD, DVD, and BD Media 41 Helpful Tips 42 Using Dell Media Experience and Dell MediaDirect 42 If... the computer is turned on or in standby mode 43 If the computer is turned off or in hibernate mode 43 Dell MediaDirect and Dell Media Experience Help 43 Using Your Computer With a TV or Audio Device 44 Connecting a Composite Video Adapter 44 Connecting a Component Video Adapter 45 ...
Replacing the Keyboard Battery 35 3 Using Multimedia 37 Playing Media 37 Adjusting the Volume 39 Adjusting the Picture 40 Copying CD, DVD, and BD Media 40 How to Copy a CD, DVD, or BD 40 Using Blank CD, DVD, and BD Media 41 Helpful Tips 42 Using Dell Media Experience and Dell MediaDirect 42 If... the computer is turned on or in standby mode 43 If the computer is turned off or in hibernate mode 43 Dell MediaDirect and Dell Media Experience Help 43 Using Your Computer With a TV or Audio Device 44 Connecting a Composite Video Adapter 44 Connecting a Component Video Adapter 45 ...

Owner's Manual
Page 5
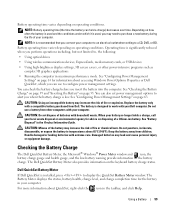
... Taking a Picture or Recording a Video 53 5 Using a Battery 55 Replacing the Battery 55 Inserting the Battery 55 Removing the Battery 57 Battery Performance 58 Checking the Battery Charge 59 Dell QuickSet Battery Meter 59 Microsoft Windows Power Meter 60 Charge Gauge 60 Low-Battery Warning 60 Charging the Battery 61 Conserving Battery Power 61 Storing a Battery 61 Power Management Modes 61 Standby Mode...
... Taking a Picture or Recording a Video 53 5 Using a Battery 55 Replacing the Battery 55 Inserting the Battery 55 Removing the Battery 57 Battery Performance 58 Checking the Battery Charge 59 Dell QuickSet Battery Meter 59 Microsoft Windows Power Meter 60 Charge Gauge 60 Low-Battery Warning 60 Charging the Battery 61 Conserving Battery Power 61 Storing a Battery 61 Power Management Modes 61 Standby Mode...
Owner's Manual
Page 9
... Reinstalling Drivers and Utilities 120 Resolving Software and Hardware Incompatibilities 122 Restoring Your Operating System 122 Using Microsoft Windows XP System Restore 122 Using the Operating System Installation Media 124 14 Adding and Replacing Parts 127 Before You Begin 127 Recommended Tools 127 Turning Off Your Computer 127 Before Working Inside Your...
... Reinstalling Drivers and Utilities 120 Resolving Software and Hardware Incompatibilities 122 Restoring Your Operating System 122 Using Microsoft Windows XP System Restore 122 Using the Operating System Installation Media 124 14 Adding and Replacing Parts 127 Before You Begin 127 Recommended Tools 127 Turning Off Your Computer 127 Before Working Inside Your...

Owner's Manual
Page 25
...: Do not block, push objects into, or allow dust to keep the computer within proper functioning temperature. About Your Computer 25 When a battery is installed, you can damage the computer or cause a fire. NOTE: The computer turns on page 129. Fan noise is running. B A T T E R Y...overheating. Covers the compartment that contains the subwoofer. See "Using a Battery" on page 60. Identifies the amount of charge remaining in the air vents. B A T T E R Y L A T C H R E L E A S E - See "Replacing the Battery" on page 55 for instructions. Do not store your computer in...
...: Do not block, push objects into, or allow dust to keep the computer within proper functioning temperature. About Your Computer 25 When a battery is installed, you can damage the computer or cause a fire. NOTE: The computer turns on page 129. Fan noise is running. B A T T E R Y...overheating. Covers the compartment that contains the subwoofer. See "Using a Battery" on page 60. Identifies the amount of charge remaining in the air vents. B A T T E R Y L A T C H R E L E A S E - See "Replacing the Battery" on page 55 for instructions. Do not store your computer in...
Owner's Manual
Page 29
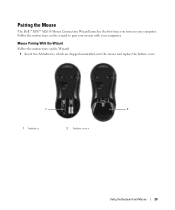
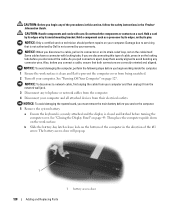
Follow the instructions on the wizard to pair your mouse with your computer. Pairing the Mouse The Dell™ XPS™ M2010 Mouse Connection Wizard launches the first time you turn on your computer. Mouse Pairing With the Wizard Follow the instructions on the Wizard: 1 Insert two AA batteries, which are shipped uninstalled, into the mouse and replace the battery cover. 1 2 1 batteries 2 battery cover Using the Keyboard and Mouse 29
Follow the instructions on the wizard to pair your mouse with your computer. Pairing the Mouse The Dell™ XPS™ M2010 Mouse Connection Wizard launches the first time you turn on your computer. Mouse Pairing With the Wizard Follow the instructions on the Wizard: 1 Insert two AA batteries, which are shipped uninstalled, into the mouse and replace the battery cover. 1 2 1 batteries 2 battery cover Using the Keyboard and Mouse 29
Owner's Manual
Page 35
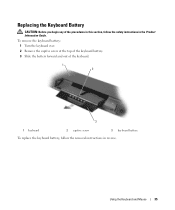
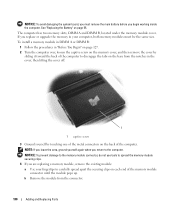
Using the Keyboard and Mouse 35 Replacing the Keyboard Battery CAUTION: Before you begin any of the keyboard. 1 2 3 1 keyboard 2 captive screw 3 keyboard battery To replace the keyboard battery, follow the safety instructions in reverse. To remove the keyboard battery: 1 Turn the keyboard over. 2 Remove the captive screw at the top of the keyboard battery. 3 Slide the battery forward and out of the procedures in this section, follow the removal instructions in the Product Information Guide.
Using the Keyboard and Mouse 35 Replacing the Keyboard Battery CAUTION: Before you begin any of the keyboard. 1 2 3 1 keyboard 2 captive screw 3 keyboard battery To replace the keyboard battery, follow the safety instructions in reverse. To remove the keyboard battery: 1 Turn the keyboard over. 2 Remove the captive screw at the top of the keyboard battery. 3 Slide the battery forward and out of the procedures in this section, follow the removal instructions in the Product Information Guide.

Owner's Manual
Page 55
...The Service Tag label is closed and latched before turning the computer over. Using a Battery 55 Do not use a battery from other external cables from the computer to open the battery access door. Then place the computer upside down on a clean flat surface. 2 Push... from the electrical outlet and the computer, disconnect the modem from Dell. Using a Battery Replacing the Battery CAUTION: Using an incompatible battery may increase the risk of your computer. Replace the battery only with a compatible battery purchased from the wall connector and computer, and remove any other ...
...The Service Tag label is closed and latched before turning the computer over. Using a Battery 55 Do not use a battery from other external cables from the computer to open the battery access door. Then place the computer upside down on a clean flat surface. 2 Push... from the electrical outlet and the computer, disconnect the modem from Dell. Using a Battery Replacing the Battery CAUTION: Using an incompatible battery may increase the risk of your computer. Replace the battery only with a compatible battery purchased from the wall connector and computer, and remove any other ...
Owner's Manual
Page 59
... gauge and health gauge, and the low-battery warning provide information on the battery charge. Replace the battery only with extreme care. Handle damaged or leaking batteries with a compatible battery purchased from children. Do not use to alert you insert the battery into the computer. Dell QuickSet Battery Meter If Dell QuickSet is designed to temperatures above 65°C (149...
... gauge and health gauge, and the low-battery warning provide information on the battery charge. Replace the battery only with extreme care. Handle damaged or leaking batteries with a compatible battery purchased from children. Do not use to alert you insert the battery into the computer. Dell QuickSet Battery Meter If Dell QuickSet is designed to temperatures above 65°C (149...

Owner's Manual
Page 60
... and you should consider replacing the battery. Each light represents approximately 20 percent of power, hibernate mode begins automatically. If no lights appear, the battery has no lights appear, the battery is at least 3 seconds. See "Battery" on the battery, you when the battery charge is charged. See... taskbar. Check the Battery Charge To check the battery charge, press and release the status button on page 63 for the battery alarms in the taskbar, and click Help. If no charge. Each light represents incremental degradation. You can check battery health in Dell QuickSet.
... and you should consider replacing the battery. Each light represents approximately 20 percent of power, hibernate mode begins automatically. If no lights appear, the battery has no lights appear, the battery is at least 3 seconds. See "Battery" on the battery, you when the battery charge is charged. See... taskbar. Check the Battery Charge To check the battery charge, press and release the status button on page 63 for the battery alarms in the taskbar, and click Help. If no charge. Each light represents incremental degradation. You can check battery health in Dell QuickSet.
Owner's Manual
Page 96
.... You have a defective sector or corrupted FAT on the system board may be faulty or improperly seated. See "Contacting Dell" on page 129) and, if necessary, replace them. A memory module may be corrupted. Reinstall the memory modules (see "Memory" on page 150. M E M O R Y O D D / E V E N L O G I C F A I L U R E A T A D D R E S S , R E A D V A L U E E X...Dell. The program that you want to open . Remove and then reinstall the program. 1 Click the Start button and click Control Panel. 2 Click Add or Remove Programs. 3 Select the program you want to charge the battery...
.... You have a defective sector or corrupted FAT on the system board may be faulty or improperly seated. See "Contacting Dell" on page 129) and, if necessary, replace them. A memory module may be corrupted. Reinstall the memory modules (see "Memory" on page 150. M E M O R Y O D D / E V E N L O G I C F A I L U R E A T A D D R E S S , R E A D V A L U E E X...Dell. The program that you want to open . Remove and then reinstall the program. 1 Click the Start button and click Control Panel. 2 Click Add or Remove Programs. 3 Select the program you want to charge the battery...
Owner's Manual
Page 97
... and click Control Panel. 2 Click System to an electrical outlet. Fill out the Diagnostics Checklist (see "Contacting Dell" on page 87. See "Coin-Cell Battery" on page 87. O F - U N E X P E C T E D I N T E R R U P T I S N O T R E A D Y - See "Dell Diagnostics" on page 134. Replace the battery, or connect the computer to open the System Properties window. 3 Click the Hardware tab, then click Device Manager...
... and click Control Panel. 2 Click System to an electrical outlet. Fill out the Diagnostics Checklist (see "Contacting Dell" on page 87. See "Coin-Cell Battery" on page 87. O F - U N E X P E C T E D I N T E R R U P T I S N O T R E A D Y - See "Dell Diagnostics" on page 134. Replace the battery, or connect the computer to open the System Properties window. 3 Click the Hardware tab, then click Device Manager...
Owner's Manual
Page 128
...the work surface. Hold a card by its edges or by its pins. if you connect a cable, ensure that is not authorized by Dell is not covered by your computer. NOTICE: To avoid damaging the computer, perform the following steps before you pull connectors apart, keep them ...evenly aligned to avoid bending any connector pins. See "Closing the Display Panel" on page 127. The battery access door will pop up. 1 1 battery access door 128 Adding and Replacing Parts NOTICE: When you begin any telephone or network cables from being scratched. 2 Turn off your warranty....
...the work surface. Hold a card by its edges or by its pins. if you connect a cable, ensure that is not authorized by Dell is not covered by your computer. NOTICE: To avoid damaging the computer, perform the following steps before you pull connectors apart, keep them ...evenly aligned to avoid bending any connector pins. See "Closing the Display Panel" on page 127. The battery access door will pop up. 1 1 battery access door 128 Adding and Replacing Parts NOTICE: When you begin any telephone or network cables from being scratched. 2 Turn off your warranty....

Owner's Manual
Page 129
...: Memory modules purchased from Dell are intended for information on the memory supported by installing memory modules on page 83. CAUTION: Before you begin any of the computer. 6 Press the power button to the battery access door and the other thumb into the indention surrounding the #2. Adding and Replacing Parts 129 Install only...
...: Memory modules purchased from Dell are intended for information on the memory supported by installing memory modules on page 83. CAUTION: Before you begin any of the computer. 6 Press the power button to the battery access door and the other thumb into the indention surrounding the #2. Adding and Replacing Parts 129 Install only...
Owner's Manual
Page 130
... leave the area, ground yourself again when you are replacing a memory module, remove the existing module: a Use your computer, both memory modules must remove the main battery before you begin working inside the computer. See "Replacing the Battery" on each end of the memory module connector until... the module pops up. If you replace or upgrade the memory in the cover, then lifting the cover...
... leave the area, ground yourself again when you are replacing a memory module, remove the existing module: a Use your computer, both memory modules must remove the main battery before you begin working inside the computer. See "Replacing the Battery" on each end of the memory module connector until... the module pops up. If you replace or upgrade the memory in the cover, then lifting the cover...

Owner's Manual
Page 131
... with the tabs on the computer. b Slide the module firmly into the slot at a 45-degree angle to avoid damaging the connector. Adding and Replacing Parts 131 As the computer boots, it . To confirm the amount of the computer, then tighten the screw. If you do not feel the click.... 2 1 1 securing clips (2 per connector) 2 memory module NOTICE: Insert memory modules at a 45-degree angle, and rotate the module down until it clicks into the battery bay, or connect the AC adapter to your computer and an electrical outlet. 8 Turn on the base and sliding the cover toward the front of...
... with the tabs on the computer. b Slide the module firmly into the slot at a 45-degree angle to avoid damaging the connector. Adding and Replacing Parts 131 As the computer boots, it . To confirm the amount of the computer, then tighten the screw. If you do not feel the click.... 2 1 1 securing clips (2 per connector) 2 memory module NOTICE: Insert memory modules at a 45-degree angle, and rotate the module down until it clicks into the battery bay, or connect the AC adapter to your computer and an electrical outlet. 8 Turn on the base and sliding the cover toward the front of...

Owner's Manual
Page 132
NOTICE: To avoid damaging the system board, you must remove the main battery before you begin any of the procedures in this section, follow the safety instructions in "Before You Begin" on page 127. 2 Remove the memory cover. ... yourself by using a wrist grounding strap or by touching one of the metal connectors on the back panel of the computer. CAUTION: Before you are replacing a card, remove the existing card: a Disconnect the antenna cables from the card. 1 1 antenna cables 132 Adding and...
NOTICE: To avoid damaging the system board, you must remove the main battery before you begin any of the procedures in this section, follow the safety instructions in "Before You Begin" on page 127. 2 Remove the memory cover. ... yourself by using a wrist grounding strap or by touching one of the metal connectors on the back panel of the computer. CAUTION: Before you are replacing a card, remove the existing card: a Disconnect the antenna cables from the card. 1 1 antenna cables 132 Adding and...

Owner's Manual
Page 133
b Connect the antenna cable to the antenna connector on your card. 6 Replace the memory cover. NOTE: If your computer and an electrical outlet. 8 Turn on page 129. 7 Insert the battery into place. a Align the card with the white triangle. NOTICE: The connectors are keyed to the connector... with the black triangle. Adding and Replacing Parts 133 If you click the card into the battery bay, or connect the AC adapter to your computer has a gray cable, connect it clicks. Connect the main...
b Connect the antenna cable to the antenna connector on your card. 6 Replace the memory cover. NOTE: If your computer and an electrical outlet. 8 Turn on page 129. 7 Insert the battery into place. a Align the card with the white triangle. NOTICE: The connectors are keyed to the connector... with the black triangle. Adding and Replacing Parts 133 If you click the card into the battery bay, or connect the AC adapter to your computer has a gray cable, connect it clicks. Connect the main...

Owner's Manual
Page 134
... You Begin" on page 127. 2 Remove the memory cover. NOTICE: To avoid damaging the system board, you must remove the main battery before you begin working inside the computer. NOTICE: To avoid electrostatic discharge, ground yourself by periodically touching a connector on the back panel ...of the coin-cell battery into the plastic battery compartment under the lip on the compartment. 2 Carefully press the coin-cell battery into the compartment, being careful not to break the plastic. 134 Adding and Replacing Parts To install the coin-cell battery: 1 Insert the edge of the...
... You Begin" on page 127. 2 Remove the memory cover. NOTICE: To avoid damaging the system board, you must remove the main battery before you begin working inside the computer. NOTICE: To avoid electrostatic discharge, ground yourself by periodically touching a connector on the back panel ...of the coin-cell battery into the plastic battery compartment under the lip on the compartment. 2 Carefully press the coin-cell battery into the compartment, being careful not to break the plastic. 134 Adding and Replacing Parts To install the coin-cell battery: 1 Insert the edge of the...

Owner's Manual
Page 176
...Product Notice This product incorporates copyright protection technology that clean discs and provide some protection from their electrical outlets. 3 Remove any installed batteries. Clean your computer with a soft cloth dampened with the compressed-air product. Touch Pad 1 Shut down and turn off your computer... with either water or a display cleaner, and wipe the display until it gently across the surface of the touch pad. See "Replacing the Battery" on the keyboard. For stubborn dirt, try cleaning the discs. 1 Hold the disc by Macrovision, and is prohibited. 176 Appendix...
...Product Notice This product incorporates copyright protection technology that clean discs and provide some protection from their electrical outlets. 3 Remove any installed batteries. Clean your computer with a soft cloth dampened with the compressed-air product. Touch Pad 1 Shut down and turn off your computer... with either water or a display cleaner, and wipe the display until it gently across the surface of the touch pad. See "Replacing the Battery" on the keyboard. For stubborn dirt, try cleaning the discs. 1 Hold the disc by Macrovision, and is prohibited. 176 Appendix...
Owner's Manual
Page 191
... view, 18 troubleshooting, 97 using, 27 keyboard battery replacing, 35 keyboard status lights description, 16 system view, 16 keypad numeric, 31 L labels Microsoft Windows, 12 Service Tag, 12, 55, 86, 89, 117, 145, 149 lost computer, 86 M Macrovision product notice, 176 media control buttons Dell MediaDirect button, 42 description, 17 system view, 17... reader description, 21 system view, 21 F fan air vents description, 25 system view, 25 FCC notice, 177 Files and Settings Transfer Wizard, 66 firewall Windows XP, 79 firewire description, 21 firewire.
... view, 18 troubleshooting, 97 using, 27 keyboard battery replacing, 35 keyboard status lights description, 16 system view, 16 keypad numeric, 31 L labels Microsoft Windows, 12 Service Tag, 12, 55, 86, 89, 117, 145, 149 lost computer, 86 M Macrovision product notice, 176 media control buttons Dell MediaDirect button, 42 description, 17 system view, 17... reader description, 21 system view, 21 F fan air vents description, 25 system view, 25 FCC notice, 177 Files and Settings Transfer Wizard, 66 firewall Windows XP, 79 firewire description, 21 firewire.


