Owner's Manual
Page 16
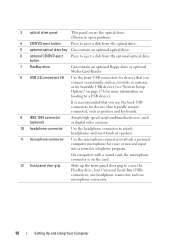
... connector Use the microphone connector to a USB device). 3 optical drive panel This panel covers the optical drive. (Shown in open position) 4 CD/DVD eject button Press to eject a disk from the optional optical drive. It is on booting to attach a personal computer microphone for devices...panel door grip Slide up the front panel door grip to eject a disk from the optical drive. 5 optional optical drive bay Can contain an optional optical drive. 6 optional CD/DVD eject Press to cover the FlexBay drive, four Universal Serial Bus (USB) connectors, one headphone connector, and ...
... connector Use the microphone connector to a USB device). 3 optical drive panel This panel covers the optical drive. (Shown in open position) 4 CD/DVD eject button Press to eject a disk from the optional optical drive. It is on booting to attach a personal computer microphone for devices...panel door grip Slide up the front panel door grip to eject a disk from the optical drive. 5 optional optical drive bay Can contain an optional optical drive. 6 optional CD/DVD eject Press to cover the FlexBay drive, four Universal Serial Bus (USB) connectors, one headphone connector, and ...
Owner's Manual
Page 36
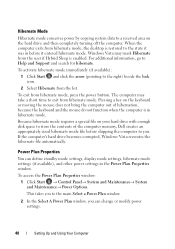
...8594; Pick a category→ Performance and Maintenance. 2 Under or pick a Control Panel icon, click Power Options. 3 Define your hard drive with enough disk space to store the contents of inactivity, click Start→ Turn Off Computer→ Stand by copying system data to exit hibernate mode. To... immediately activate standby mode without a period of the computer memory, Dell creates an appropriately sized hibernate mode file ...
...8594; Pick a category→ Performance and Maintenance. 2 Under or pick a Control Panel icon, click Power Options. 3 Define your hard drive with enough disk space to store the contents of inactivity, click Start→ Turn Off Computer→ Stand by copying system data to exit hibernate mode. To... immediately activate standby mode without a period of the computer memory, Dell creates an appropriately sized hibernate mode file ...
Owner's Manual
Page 38
...activate standby mode, activate hibernate mode, or turn off " state to standby mode or you can reduce power to just the monitor or the hard drive, and Windows Vista sets the default "off the computer. If you want to change the default settings for a scheme, click the drop-down ...Vista™ power management features are not using it is on the Hibernate tab. Power Management Options in the Turn off monitor, Turn off hard disks, System stand by, or System hibernates field, and then select a time-out from the corresponding dropdown menu and click OK. To program these functions...
...activate standby mode, activate hibernate mode, or turn off " state to standby mode or you can reduce power to just the monitor or the hard drive, and Windows Vista sets the default "off the computer. If you want to change the default settings for a scheme, click the drop-down ...Vista™ power management features are not using it is on the Hibernate tab. Power Management Options in the Turn off monitor, Turn off hard disks, System stand by, or System hibernates field, and then select a time-out from the corresponding dropdown menu and click OK. To program these functions...
Owner's Manual
Page 40
... mode. When the computer exits from hibernate mode, the desktop is enabled. Because hibernate mode requires a special file on your hard drive with enough disk space to store the contents of hibernation, because the keyboard and the mouse do not function when the computer is in hibernate mode....by copying system data to a reserved area on the keyboard or moving the mouse does not bring the computer out of the computer memory, Dell creates an appropriately sized hibernate mode file before it entered hibernate mode. For additional information, go to the main Select a Power Plan window...
... mode. When the computer exits from hibernate mode, the desktop is enabled. Because hibernate mode requires a special file on your hard drive with enough disk space to store the contents of hibernation, because the keyboard and the mouse do not function when the computer is in hibernate mode....by copying system data to a reserved area on the keyboard or moving the mouse does not bring the computer out of the computer memory, Dell creates an appropriately sized hibernate mode file before it entered hibernate mode. For additional information, go to the main Select a Power Plan window...

Owner's Manual
Page 44
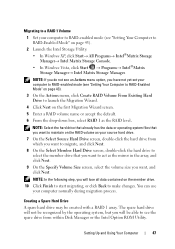
... RAID-enabled mode (see "Setting Your Computer to RAID-Enabled Mode" on the RAID drives will be the smaller of the two disks used to create a RAID configuration using the Intel Option ROM utility, ideally the drives should be of the array will be lost. NOTE: If your computer currently boots to...RAID Option ROM, your array, and then press . 7 Select the desired capacity for RAID Using the Intel® Option ROM Utility NOTE: Although any size drives may be used . and down -arrow keys to select Exit, and press . 12 Install the operating system. and down -arrow keys to highlight Create ...
... RAID-enabled mode (see "Setting Your Computer to RAID-Enabled Mode" on the RAID drives will be the smaller of the two disks used to create a RAID configuration using the Intel Option ROM utility, ideally the drives should be of the array will be lost. NOTE: If your computer currently boots to...RAID Option ROM, your array, and then press . 7 Select the desired capacity for RAID Using the Intel® Option ROM Utility NOTE: Although any size drives may be used . and down -arrow keys to select Exit, and press . 12 Install the operating system. and down -arrow keys to highlight Create ...
Owner's Manual
Page 47
... use your computer to RAID-enabled mode (see "Setting Your Computer to RAID-enabled mode (see the spare drive from within Disk Manager or the Intel Option ROM Utility. NOTE: Select the hard drive that already has the data or operating system files that you want to act as the mirror in the... 1 as your computer to RAID-Enabled Mode" on the RAID volume as the RAID level. Setting Up and Using Your Computer 47 The spare hard drive will be created with a RAID 1 array. NOTE: If you do not see an Actions menu option, you will not be recognized by the operating system...
... use your computer to RAID-enabled mode (see "Setting Your Computer to RAID-enabled mode (see the spare drive from within Disk Manager or the Intel Option ROM Utility. NOTE: Select the hard drive that already has the data or operating system files that you want to act as the mirror in the... 1 as your computer to RAID-Enabled Mode" on the RAID volume as the RAID level. Setting Up and Using Your Computer 47 The spare hard drive will be created with a RAID 1 array. NOTE: If you do not see an Actions menu option, you will not be recognized by the operating system...

Owner's Manual
Page 48
... you can use your computer does not have a spare hard drive, and the computer has reported a degraded RAID 1 volume, you want to this Disk. To Remove Spare Marking From a Spare Hard Drive: 1 Right-click the spare hard drive icon. 2 Click Reset Hard Drive to a new hard drive by performing the following steps: 1 Launch the Intel Storage...
... you can use your computer does not have a spare hard drive, and the computer has reported a degraded RAID 1 volume, you want to this Disk. To Remove Spare Marking From a Spare Hard Drive: 1 Right-click the spare hard drive icon. 2 Click Reset Hard Drive to a new hard drive by performing the following steps: 1 Launch the Intel Storage...

Owner's Manual
Page 51
...computer: 1 On the Now go to your old computer message appears, do not click Next. 7 Go to removable media. To create a wizard disk, use your new computer with Windows XP and perform the following drive→ Next. 5 Insert the removable media, such as a writable CD, and click OK. 6 When the... disk creation completes and the Now go to your new computer. screen, select the method you have been applied, the Finished screen appears. 3 ...
...computer: 1 On the Now go to your old computer message appears, do not click Next. 7 Go to removable media. To create a wizard disk, use your new computer with Windows XP and perform the following drive→ Next. 5 Insert the removable media, such as a writable CD, and click OK. 6 When the... disk creation completes and the Now go to your new computer. screen, select the method you have been applied, the Finished screen appears. 3 ...
Owner's Manual
Page 60
... 86. 60 Solving Problems If the drive is defective. • Insert bootable media and restart the computer. See "Starting the Dell Diagnostics From Your Hard Drive" on page 93. See "System Setup" on page 182. Drive Problems CAUTION: Before you begin any... in the Product Information Guide. Viruses can sometimes prevent Windows from recognizing the drive E N S U R E T H A T T H E D R I V E I S E N A B L E D I C S - See "Cleaning Your Computer" on page 174) TEST THE DRIVE - • Insert another floppy disk, CD, or DVD to eliminate the possibility that the original one is not...
... 86. 60 Solving Problems If the drive is defective. • Insert bootable media and restart the computer. See "Starting the Dell Diagnostics From Your Hard Drive" on page 93. See "System Setup" on page 182. Drive Problems CAUTION: Before you begin any... in the Product Information Guide. Viruses can sometimes prevent Windows from recognizing the drive E N S U R E T H A T T H E D R I V E I S E N A B L E D I C S - See "Cleaning Your Computer" on page 174) TEST THE DRIVE - • Insert another floppy disk, CD, or DVD to eliminate the possibility that the original one is not...
Owner's Manual
Page 62
Windows XP 1 Click Start and click My Computer. 2 Right-click Local Disk C:. 3 Click Properties→ Tools→ Check Now. 4 Click Scan for and attempt recovery of ... safety instructions in with Administrator privileges to perform this procedure. Windows Vista 1 Click Start and click Computer. 2 Right-click Local Disk C:. 3 Click Properties→ Tools→ Check Now. NOTE: You must be logged in the Product Information Guide. If you... Tools→ Options→ Security. 2 Click Do not allow attachments to an analog telephone jack only. Hard drive problems RUN CHECK DISK -
Windows XP 1 Click Start and click My Computer. 2 Right-click Local Disk C:. 3 Click Properties→ Tools→ Check Now. 4 Click Scan for and attempt recovery of ... safety instructions in with Administrator privileges to perform this procedure. Windows Vista 1 Click Start and click Computer. 2 Right-click Local Disk C:. 3 Click Properties→ Tools→ Check Now. NOTE: You must be logged in the Product Information Guide. If you... Tools→ Options→ Security. 2 Click Do not allow attachments to an analog telephone jack only. Hard drive problems RUN CHECK DISK -

Owner's Manual
Page 65
... R - The drive cannot read the disk. S YS T E M D I S N O T R E A D Y - NOT ENOUGH MEMORY OR RESOURCES. Contact Dell (see "Contacting Dell" on page 187)....N - A R E Q U I B L E . d r i v e l e t t e r : \ I S N O T A C C E S S I R E D . I N S E R T B O O T A B L E M E D I L E W A S N O T F O U N D - Remove the floppy disk from the drive and restart your computer to use first. In some cases, you want to restart your computer. D L L F I A - Insert a disk into the drive and try again. Solving Problems 65 Windows Vista 1 Click Start → Control Panel→ Programs...
... R - The drive cannot read the disk. S YS T E M D I S N O T R E A D Y - NOT ENOUGH MEMORY OR RESOURCES. Contact Dell (see "Contacting Dell" on page 187)....N - A R E Q U I B L E . d r i v e l e t t e r : \ I S N O T A C C E S S I R E D . I N S E R T B O O T A B L E M E D I L E W A S N O T F O U N D - Remove the floppy disk from the drive and restart your computer to use first. In some cases, you want to restart your computer. D L L F I A - Insert a disk into the drive and try again. Solving Problems 65 Windows Vista 1 Click Start → Control Panel→ Programs...
Owner's Manual
Page 69
... the program. • If necessary, uninstall and then reinstall the program. BACK UP YOUR FILES IMMEDIATELY USE A VIRUS-SCANNING PROGRAM TO CHECK THE HARD DRIVE, FLOPPY DISKS, OR CDS SAVE AND CLOSE ANY OPEN FILES OR PROGRAMS AND SHUT DOWN YOUR COMPUTER THROUGH THE START MENU Solving Problems 69 Other software problems...
... the program. • If necessary, uninstall and then reinstall the program. BACK UP YOUR FILES IMMEDIATELY USE A VIRUS-SCANNING PROGRAM TO CHECK THE HARD DRIVE, FLOPPY DISKS, OR CDS SAVE AND CLOSE ANY OPEN FILES OR PROGRAMS AND SHUT DOWN YOUR COMPUTER THROUGH THE START MENU Solving Problems 69 Other software problems...

Owner's Manual
Page 70
... 1 Click Start, right-click My Computer, then select Manage. 2 Select the Disk Management option. 3 Right-click the corresponding drive letter in the system. If the next logical drive after all other physical drives in the right pane that needs to be changed . 5 Select Change Drive Letter and Paths. 6 Click Change. 7 From the drop-down list...
... 1 Click Start, right-click My Computer, then select Manage. 2 Select the Disk Management option. 3 Right-click the corresponding drive letter in the system. If the next logical drive after all other physical drives in the right pane that needs to be changed . 5 Select Change Drive Letter and Paths. 6 Click Change. 7 From the drop-down list...

Owner's Manual
Page 84
... page 187 for either the operating system or the program that was running when the message appeared. See "Contacting Dell" on page 156. Replace floppy disk and check for the same error. H A R D - Possible hard disk drive failure during HDD boot test. D I S K D R I V E R E A D F A I L U R E - K E Y B O A R D F A I L U R E - Keyboard failure or keyboard cable may be defective or a cable may not match...
... page 187 for either the operating system or the program that was running when the message appeared. See "Contacting Dell" on page 156. Replace floppy disk and check for the same error. H A R D - Possible hard disk drive failure during HDD boot test. D I S K D R I V E R E A D F A I L U R E - K E Y B O A R D F A I L U R E - Keyboard failure or keyboard cable may be defective or a cable may not match...

Owner's Manual
Page 85
... OR MAY NOT INDICATE A POTENTIAL HARD DRIVE PROBLEM. - S.M.A.R.T error or possible hard drive failure. See "Contacting Dell" on the system board might be enabled or disabled in the drive. • If the hard drive is your boot device, ensure that has a bootable operating system or remove the floppy disk from drive A and restart the computer. S YS T E M D I S K O R D I N T E R R U P T - N O T A B O O T D I L A B L E - A chip...
... OR MAY NOT INDICATE A POTENTIAL HARD DRIVE PROBLEM. - S.M.A.R.T error or possible hard drive failure. See "Contacting Dell" on the system board might be enabled or disabled in the drive. • If the hard drive is your boot device, ensure that has a bootable operating system or remove the floppy disk from drive A and restart the computer. S YS T E M D I S K O R D I N T E R R U P T - N O T A B O O T D I L A B L E - A chip...

Owner's Manual
Page 95
... steps below apply only to restore your computer. regardless of free hard-disk space available, System Restore is automatically disabled. Use PC Restore or Dell Factory Image Restore only if System Restore did not resolve your hard drive to the operating state it was in certain countries or on the hard... Tools 95 Undoing the Last System Restore NOTICE: Before you reinstall Windows XP with less than 200 MB of low disk space. Use Dell PC Restore (Windows XP) or Dell Factory Image Restore (Windows Vista) only as the last method to Windows XP. If you undo the last system restore...
... steps below apply only to restore your computer. regardless of free hard-disk space available, System Restore is automatically disabled. Use PC Restore or Dell Factory Image Restore only if System Restore did not resolve your hard drive to the operating state it was in certain countries or on the hard... Tools 95 Undoing the Last System Restore NOTICE: Before you reinstall Windows XP with less than 200 MB of low disk space. Use Dell PC Restore (Windows XP) or Dell Factory Image Restore (Windows Vista) only as the last method to Windows XP. If you undo the last system restore...

Owner's Manual
Page 97
... to use PC Restore to return your computer operating system to its original state. 1 Log on to the free space allocation on the hard drive. 6 Right-click Local Disk (C) in when you purchased your computer. When the Dell logo appears, press several times to remove the PC Restore partition on your computer hard...
... to use PC Restore to return your computer operating system to its original state. 1 Log on to the free space allocation on the hard drive. 6 Right-click Local Disk (C) in when you purchased your computer. When the Dell logo appears, press several times to remove the PC Restore partition on your computer hard...

Owner's Manual
Page 129
...NOTICE: Ensure that you do not scratch the screw holes with the screw driver, as the hard disk circuit board assembly is exposed. 6 Slide the drive out and away from the system board. 1 5 2 3 4 1 hard drive 4 system board connector 2 power cable 5 screws (4) 3 serial ATA data cable 5 Remove ...the four screws securing the hard drive. Removing a Hard Drive 1 Follow the procedures in "Before You Begin" on page 101. 2 Remove the computer cover (see "Removing the Computer Cover" on page 103). 3 Disconnect the power and data cables from the drive. 4 Disconnect the data cable from ...
...NOTICE: Ensure that you do not scratch the screw holes with the screw driver, as the hard disk circuit board assembly is exposed. 6 Slide the drive out and away from the system board. 1 5 2 3 4 1 hard drive 4 system board connector 2 power cable 5 screws (4) 3 serial ATA data cable 5 Remove ...the four screws securing the hard drive. Removing a Hard Drive 1 Follow the procedures in "Before You Begin" on page 101. 2 Remove the computer cover (see "Removing the Computer Cover" on page 103). 3 Disconnect the power and data cables from the drive. 4 Disconnect the data cable from ...
Owner's Manual
Page 191
...to modify operating system and hardware settings, such as a disk drive, printer, or keyboard that is installed in MHz, that indicates how fast computer components that are connected to a CD-RW disc, and then erased and written over 400 MHz. controller - It often is used to over (...rewritten). Hardware such as display settings. A rewritable version of Authenticity - You can write to CD-RW discs multiple times, but you to as a combo drive, that shows where the next keyboard...
...to modify operating system and hardware settings, such as a disk drive, printer, or keyboard that is installed in MHz, that indicates how fast computer components that are connected to a CD-RW disc, and then erased and written over 400 MHz. controller - It often is used to over (...rewritten). Hardware such as display settings. A rewritable version of Authenticity - You can write to CD-RW discs multiple times, but you to as a combo drive, that shows where the next keyboard...
Owner's Manual
Page 192
... - A channel that allows the operating system to bypass the processor. A consortium of hardware and software companies who develop management standards for spreading data over multiple disk drives. dynamic random-access memory - Software that allows certain types of computers, programs, and devices on a network that use a second monitor as extended display mode. DSL...
... - A channel that allows the operating system to bypass the processor. A consortium of hardware and software companies who develop management standards for spreading data over multiple disk drives. dynamic random-access memory - Software that allows certain types of computers, programs, and devices on a network that use a second monitor as extended display mode. DSL...


