Owner's Manual
Page 6
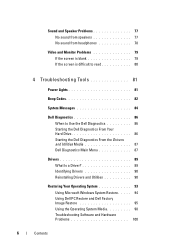
...81 Power Lights 81 Beep Codes 82 System Messages 84 Dell Diagnostics 86 When to Use the Dell Diagnostics 86 Starting the Dell Diagnostics From Your Hard Drive 86 Starting the Dell Diagnostics From the Drivers and Utilities Media 87 Dell Diagnostics Main Menu 87 Drivers 89 What Is a Driver 89 Identifying Drivers 90 Reinstalling Drivers and Utilities 90 Restoring Your Operating System 93 Using Microsoft Windows System Restore . . . . . 94 Using Dell PC Restore and Dell Factory Image Restore 95 Using the Operating System Media 98 Troubleshooting Software and Hardware Problems 100...
...81 Power Lights 81 Beep Codes 82 System Messages 84 Dell Diagnostics 86 When to Use the Dell Diagnostics 86 Starting the Dell Diagnostics From Your Hard Drive 86 Starting the Dell Diagnostics From the Drivers and Utilities Media 87 Dell Diagnostics Main Menu 87 Drivers 89 What Is a Driver 89 Identifying Drivers 90 Reinstalling Drivers and Utilities 90 Restoring Your Operating System 93 Using Microsoft Windows System Restore . . . . . 94 Using Dell PC Restore and Dell Factory Image Restore 95 Using the Operating System Media 98 Troubleshooting Software and Hardware Problems 100...
Owner's Manual
Page 20
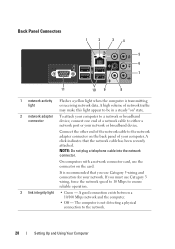
... must use the connector on the back panel of your network or broadband device. Connect the other end of a network cable to the network adapter connector on the card. NOTE: Do not plug a telephone cable into the network connector. Back Panel Connectors 1 2 34 5 6 7 11 10 9 8 1 network activity light Flashes a yellow light when the computer is not detecting a physical connection to ensure reliable operation. 3 link integrity light • Green - A high volume of network traffic may make this light appear...
... must use the connector on the back panel of your network or broadband device. Connect the other end of a network cable to the network adapter connector on the card. NOTE: Do not plug a telephone cable into the network connector. Back Panel Connectors 1 2 34 5 6 7 11 10 9 8 1 network activity light Flashes a yellow light when the computer is not detecting a physical connection to ensure reliable operation. 3 link integrity light • Green - A high volume of network traffic may make this light appear...
Owner's Manual
Page 25
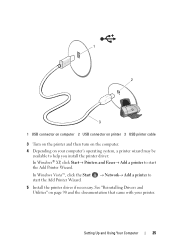
In Windows Vista™, click the Start start the Add Printer Wizard. See "Reinstalling Drivers and Utilities" on your printer. Setting Up and Using Your Computer 25 1 2 3 1 USB connector on computer 2 USB connector on printer 3 USB printer cable 3 Turn on the printer and then turn on the computer. 4 Depending on page 90 and the documentation that came with your computer's operating system, a printer wizard may be available to help...
In Windows Vista™, click the Start start the Add Printer Wizard. See "Reinstalling Drivers and Utilities" on your printer. Setting Up and Using Your Computer 25 1 2 3 1 USB connector on computer 2 USB connector on printer 3 USB printer cable 3 Turn on the printer and then turn on the computer. 4 Depending on page 90 and the documentation that came with your computer's operating system, a printer wizard may be available to help...
Owner's Manual
Page 33
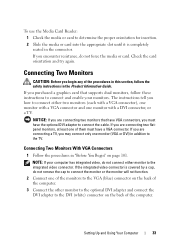
... the media or card into the appropriate slot until it is covered by a cap, do not remove the cap to connect the monitor or the monitor will not function. 2 Connect one monitor with a DVI connector, or a TV. If you purchased a graphics card that have VGA connectors, you begin any of the procedures in this section, follow these instructions to connect and enable your computer has integrated video, do not...
... the media or card into the appropriate slot until it is covered by a cap, do not remove the cap to connect the monitor or the monitor will not function. 2 Connect one monitor with a DVI connector, or a TV. If you purchased a graphics card that have VGA connectors, you begin any of the procedures in this section, follow these instructions to connect and enable your computer has integrated video, do not...
Owner's Manual
Page 59
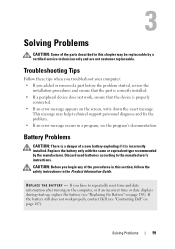
... properly connected. • If an error message appears on page 150). CAUTION: Before you added or removed a part before the problem started, review the installation procedures and ensure that the part is correctly installed. • If a peripheral device does not work properly, contact Dell (see "Replacing the Battery" on the screen, write down the exact message. R E P L A C E T H E B A T T E R Y - Replace the battery only with the same or equivalent type recommended by a certified service technician...
... properly connected. • If an error message appears on page 150). CAUTION: Before you added or removed a part before the problem started, review the installation procedures and ensure that the part is correctly installed. • If a peripheral device does not work properly, contact Dell (see "Replacing the Battery" on the screen, write down the exact message. R E P L A C E T H E B A T T E R Y - Replace the battery only with the same or equivalent type recommended by a certified service technician...
Owner's Manual
Page 71
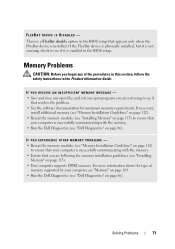
... instructions in the BIOS setup that appears only when the FlexBay device is a FlexBay disable option in the Product Information Guide. FLEXBAY DEVICE IS DISABLED - If the FlexBay device is physically installed, but it is successfully communicating with the memory. • Run the Dell Diagnostics (see "Dell Diagnostics" on page 86). IF YOU RECEIVE AN INSUFFICIENT MEMORY MESSAGE - • Save and close any open files and exit any of memory supported...
... instructions in the BIOS setup that appears only when the FlexBay device is a FlexBay disable option in the Product Information Guide. FLEXBAY DEVICE IS DISABLED - If the FlexBay device is physically installed, but it is successfully communicating with the memory. • Run the Dell Diagnostics (see "Dell Diagnostics" on page 86). IF YOU RECEIVE AN INSUFFICIENT MEMORY MESSAGE - • Save and close any open files and exit any of memory supported...
Owner's Manual
Page 79
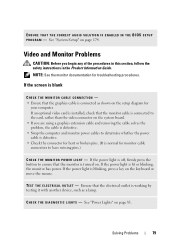
... optional video card is installed, check that the monitor is turned on the setup diagram for troubleshooting procedures. If the power light is connected as a lamp. If the power light is working by testing it with another device, such as shown on . NOTE: See the monitor documentation for your computer. If the screen is blank CHECK THE MONITOR CABLE CONNECTION - • Ensure that the electrical outlet is blinking, press a key on page 174. C H E C K T H E D I A G N O S T I C L I C A L O U T L E T - Solving Problems...
... optional video card is installed, check that the monitor is turned on the setup diagram for troubleshooting procedures. If the power light is connected as a lamp. If the power light is working by testing it with another device, such as shown on . NOTE: See the monitor documentation for your computer. If the screen is blank CHECK THE MONITOR CABLE CONNECTION - • Ensure that the electrical outlet is blinking, press a key on page 174. C H E C K T H E D I A G N O S T I C L I C A L O U T L E T - Solving Problems...
Owner's Manual
Page 90
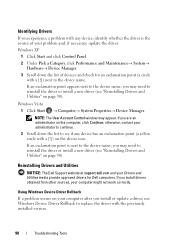
... Windows Device Driver Rollback If a problem occurs on your Drivers and Utilities media provide approved drivers for an exclamation point (a circle with a [!]) next to reinstall the driver or install a new driver (see "Reinstalling Drivers and Utilities" on page 90). Reinstalling Drivers and Utilities NOTICE: The Dell Support website at support.dell.com and your computer after you install or update a driver, use Windows Device Driver Rollback to reinstall the driver or install a new driver (see "Reinstalling Drivers and Utilities" on page 90). Windows Vista 1 Click Start...
... Windows Device Driver Rollback If a problem occurs on your Drivers and Utilities media provide approved drivers for an exclamation point (a circle with a [!]) next to reinstall the driver or install a new driver (see "Reinstalling Drivers and Utilities" on page 90). Reinstalling Drivers and Utilities NOTICE: The Dell Support website at support.dell.com and your computer after you install or update a driver, use Windows Device Driver Rollback to reinstall the driver or install a new driver (see "Reinstalling Drivers and Utilities" on page 90). Windows Vista 1 Click Start...
Owner's Manual
Page 92
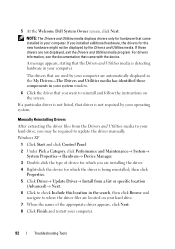
... that you are located on the screen. NOTE: The Drivers and Utilities media displays drivers only for which you want to update the driver manually. If a particular driver is not listed, that came with the device. Windows XP 1 Click Start and click Control Panel. 2 Under Pick a Category, click Performance and Maintenance→ System→ System Properties→ Hardware→ Device Manager. 3 Double-click the type of device for which the driver is being reinstalled...
... that you are located on the screen. NOTE: The Drivers and Utilities media displays drivers only for which you want to update the driver manually. If a particular driver is not listed, that came with the device. Windows XP 1 Click Start and click Control Panel. 2 Under Pick a Category, click Performance and Maintenance→ System→ System Properties→ Hardware→ Device Manager. 3 Double-click the type of device for which the driver is being reinstalled...
Owner's Manual
Page 93
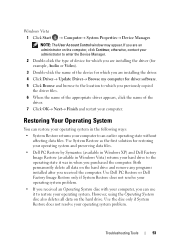
...→ Device Manager. Use System Restore as the first solution for restoring your operating system and preserving data files. • Dell PC Restore by Symantec (available in Windows XP) and Dell Factory Image Restore (available in Windows Vista) returns your computer, you can restore your operating system in when you are installing the driver. 4 Click Driver→ Update Driver→ Browse my computer for which you are installing the driver (for example, Audio or Video). 3 Double...
...→ Device Manager. Use System Restore as the first solution for restoring your operating system and preserving data files. • Dell PC Restore by Symantec (available in Windows XP) and Dell Factory Image Restore (available in Windows Vista) returns your computer, you can restore your operating system in when you are installing the driver. 4 Click Driver→ Update Driver→ Browse my computer for which you are installing the driver (for example, Audio or Video). 3 Double...

Owner's Manual
Page 99
... the device drivers, virus protection program, and other software. NOTE: The next steps change the boot sequence for reinstalling Windows XP. Use the Dell Drivers and Utilities media to complete. The options can take 1 to 2 hours to load any required drivers. Therefore, do not reinstall Windows XP unless a Dell technical support representative instructs you need the following items: • Dell™ Operating System media • Dell Drivers and Utilities media NOTE: The Dell Drivers and Utilities media contains drivers that are installed...
... the device drivers, virus protection program, and other software. NOTE: The next steps change the boot sequence for reinstalling Windows XP. Use the Dell Drivers and Utilities media to complete. The options can take 1 to 2 hours to load any required drivers. Therefore, do not reinstall Windows XP unless a Dell technical support representative instructs you need the following items: • Dell™ Operating System media • Dell Drivers and Utilities media NOTE: The Dell Drivers and Utilities media contains drivers that are installed...
Owner's Manual
Page 105
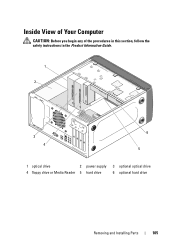
Inside View of Your Computer CAUTION: Before you begin any of the procedures in this section, follow the safety instructions in the Product Information Guide. 1 2 3 4 6 5 1 optical drive 2 power supply 3 optional optical drive 4 floppy drive or Media Reader 5 hard drive 6 optional hard drive Removing and Installing Parts 105
Inside View of Your Computer CAUTION: Before you begin any of the procedures in this section, follow the safety instructions in the Product Information Guide. 1 2 3 4 6 5 1 optical drive 2 power supply 3 optional optical drive 4 floppy drive or Media Reader 5 hard drive 6 optional hard drive Removing and Installing Parts 105
Owner's Manual
Page 150
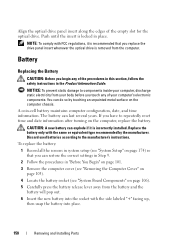
.... 3 Remove the computer cover (see "Removing the Computer Cover" on page 103). 4 Locate the battery socket (see "System Board Components" on the computer, replace the battery. Battery Replacing the Battery CAUTION: Before you have to the manufacturer's instructions. Push until the insert is incorrectly installed. If you begin any of the empty slot for the optical drive. Discard used batteries according to repeatedly reset time and date information after turning on...
.... 3 Remove the computer cover (see "Removing the Computer Cover" on page 103). 4 Locate the battery socket (see "System Board Components" on the computer, replace the battery. Battery Replacing the Battery CAUTION: Before you have to the manufacturer's instructions. Push until the insert is incorrectly installed. If you begin any of the empty slot for the optical drive. Discard used batteries according to repeatedly reset time and date information after turning on...

Owner's Manual
Page 151
..., and then turn them on. 9 Enter system setup (see "Replacing the Computer Cover" on the computer chassis. NOTICE: To connect a network cable, first plug the cable into the network device and then plug it into the computer. 8 Connect your computer's electronic components. NOTICE: To prevent static damage to the Maintenance section and clear the low battery and other errors associated with the battery replacement in the Product Information Guide. You can...
..., and then turn them on. 9 Enter system setup (see "Replacing the Computer Cover" on the computer chassis. NOTICE: To connect a network cable, first plug the cable into the network device and then plug it into the computer. 8 Connect your computer's electronic components. NOTICE: To prevent static damage to the Maintenance section and clear the low battery and other errors associated with the battery replacement in the Product Information Guide. You can...
Owner's Manual
Page 177
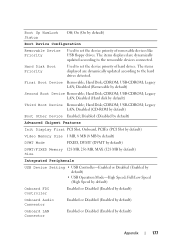
...default) Third Boot Device Removable; Full/Low Speed (High Speed by default) Onboard FDC Controller Enabled or Disabled (Enabled by default) Onboard Audio Connector Enabled or Disabled (Enabled by default) Onboard LAN Connector Enabled or Disabled (Enabled by default) Second Boot Device Removable; CDROM; CDROM; Used to the removable devices connected. The items displayed are dynamically updated according to set the device priority of hard drives. Hard Disk; USB-CDROM; On (On by default) Boot Other Device Enabled; First Boot Device Removable; Hard Disk; USB...
...default) Third Boot Device Removable; Full/Low Speed (High Speed by default) Onboard FDC Controller Enabled or Disabled (Enabled by default) Onboard Audio Connector Enabled or Disabled (Enabled by default) Onboard LAN Connector Enabled or Disabled (Enabled by default) Second Boot Device Removable; CDROM; CDROM; Used to the removable devices connected. The items displayed are dynamically updated according to set the device priority of hard drives. Hard Disk; USB-CDROM; On (On by default) Boot Other Device Enabled; First Boot Device Removable; Hard Disk; USB...

Owner's Manual
Page 179
... a USB device, connect the USB device to a USB connector. 2 Turn on the Dell Drivers and Utilities media, but you are booting to a USB memory key, highlight USB Flash Device and press . Appendix 179 Insert the memory device into a USB port and restart the computer. To make sure your computer to it. 4 At the bottom of the menu, enter the number of the screen, press . Each device has a number next to a USB device such as a floppy drive, memory key, or CD-RW drive. The BIOS detects the device and adds...
... a USB device, connect the USB device to a USB connector. 2 Turn on the Dell Drivers and Utilities media, but you are booting to a USB memory key, highlight USB Flash Device and press . Appendix 179 Insert the memory device into a USB port and restart the computer. To make sure your computer to it. 4 At the bottom of the menu, enter the number of the screen, press . Each device has a number next to a USB device such as a floppy drive, memory key, or CD-RW drive. The BIOS detects the device and adds...
Owner's Manual
Page 201
... computers equipped for smart cards. synchronous dynamic random-access memory - An audio transfer file format that provides quick access to save energy. An I/O port often used to install and configure hardware and software. Network connections cannot be used to connect devices such as a dampening device when a computer experiences resonating shock or is dropped (whether the computer is used to your computer when you access Dell Support at support.dell.com or when you...
... computers equipped for smart cards. synchronous dynamic random-access memory - An audio transfer file format that provides quick access to save energy. An I/O port often used to install and configure hardware and software. Network connections cannot be used to connect devices such as a dampening device when a computer experiences resonating shock or is dropped (whether the computer is used to your computer when you access Dell Support at support.dell.com or when you...
Owner's Manual
Page 202
... - for video cards and controllers that serves as the motherboard. The main circuit board in the BIOS, such as file and e-mail protection. A utility that supports resolutions up to underline, change the settings for video cards and controllers that contain only text; super-extended graphics array plus - A connector used to configure user-selectable options in your computer. A video standard for example, Windows Notepad uses a text editor. unified memory allocation - system setup - System memory dynamically allocated...
... - for video cards and controllers that serves as the motherboard. The main circuit board in the BIOS, such as file and e-mail protection. A utility that supports resolutions up to underline, change the settings for video cards and controllers that contain only text; super-extended graphics array plus - A connector used to configure user-selectable options in your computer. A video standard for example, Windows Notepad uses a text editor. unified memory allocation - system setup - System memory dynamically allocated...

Owner's Manual
Page 203
uninterruptible power supply - USB - universal serial bus - A hardware interface for a low-speed device such as Windows operating systems, displays in the boot sectors of a floppy disk. unshielded twisted pair - video memory - See resolution. A program that supports resolutions up to another through an infected disk, software downloaded from the Internet, or e-mail attachments. A virus program moves from one computer to 1600 x 1200. A UPS keeps a computer running for video cards and controllers that is turned on your...
uninterruptible power supply - USB - universal serial bus - A hardware interface for a low-speed device such as Windows operating systems, displays in the boot sectors of a floppy disk. unshielded twisted pair - video memory - See resolution. A program that supports resolutions up to another through an infected disk, software downloaded from the Internet, or e-mail attachments. A virus program moves from one computer to 1600 x 1200. A UPS keeps a computer running for video cards and controllers that is turned on your...
Owner's Manual
Page 210
... O operating system media, 98 reinstalling Windows Vista, 94 optical drive installing, 145, 147 problems, 61 removing, 143 P password clearing, 180 jumper, 180 PC Restore, 95 PCI cards installing, 117 removing, 121 phone numbers, 187 playing CDs and DVDs, 26 power button, 17 hibernate mode, 36, 38, 40 options, 37 options, advanced, 41 options, schemes, 37 plan, 40 problems, 74 standby mode, 35, 39 power light conditions, 74 power options properties, 37 Power Plan Properties, 40 printer cable, 24 connecting, 24 problems, 75 setting up, 24 USB, 24 problems battery...
... O operating system media, 98 reinstalling Windows Vista, 94 optical drive installing, 145, 147 problems, 61 removing, 143 P password clearing, 180 jumper, 180 PC Restore, 95 PCI cards installing, 117 removing, 121 phone numbers, 187 playing CDs and DVDs, 26 power button, 17 hibernate mode, 36, 38, 40 options, 37 options, advanced, 41 options, schemes, 37 plan, 40 problems, 74 standby mode, 35, 39 power light conditions, 74 power options properties, 37 Power Plan Properties, 40 printer cable, 24 connecting, 24 problems, 75 setting up, 24 USB, 24 problems battery...


