
Interactive Projector Quick Start Guide
Page 1
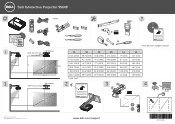
...Mode AAAAAA AAA AAA AAA AAA Documentation Dell Interactive Projector S560P/S560T 018TWNA00 Contents: • User's Guide • Setup Utility • Touch Setup Guide (S560T only) INSTALLATION INSTRUCTIONS P/N 18TWN Rev. Documentation Dell Interactive Projector S560P/S560T 018TWNA00 Contents: • User....8 [452] 18.9 [480] MSP-DCCUST21 3.74" [95.0mm] 2 INSTALLATION INSTRUCTIONS 3 4 Documentation Dell Interactive Projector S560P/S560T 018T WNA00 Contents: • User's Guide • Setup Utility • Touch Setup Guide (S560T only) P/N 18TWN Rev. MSP-DCCUST21 www...
...Mode AAAAAA AAA AAA AAA AAA Documentation Dell Interactive Projector S560P/S560T 018TWNA00 Contents: • User's Guide • Setup Utility • Touch Setup Guide (S560T only) INSTALLATION INSTRUCTIONS P/N 18TWN Rev. Documentation Dell Interactive Projector S560P/S560T 018TWNA00 Contents: • User....8 [452] 18.9 [480] MSP-DCCUST21 3.74" [95.0mm] 2 INSTALLATION INSTRUCTIONS 3 4 Documentation Dell Interactive Projector S560P/S560T 018T WNA00 Contents: • User's Guide • Setup Utility • Touch Setup Guide (S560T only) P/N 18TWN Rev. MSP-DCCUST21 www...

Interactive Projector Users Guide
Page 1
Dell Interactive Projector S560P/ S560T User's Guide
Dell Interactive Projector S560P/ S560T User's Guide
Interactive Projector Users Guide
Page 3
... Your Dell Projector 5 Projector Box Contents 5 Projector Top and Bottom View 7 Projector Connections 8 Adjusting Image Size 10 Remote Control 12 2 Using Interactive Pen (Only for S560P) . . . . . 16 System Requirements 16 About Your Interactive Pen 17 Replacing the Interactive Pen Tips 18 Replacing the Interactive Pen Batteries 19 Using Interactive Pen with S560P 20 Touch Area Setting 21 Pen Calibration 23 3 Using Interactive Touch...
... Your Dell Projector 5 Projector Box Contents 5 Projector Top and Bottom View 7 Projector Connections 8 Adjusting Image Size 10 Remote Control 12 2 Using Interactive Pen (Only for S560P) . . . . . 16 System Requirements 16 About Your Interactive Pen 17 Replacing the Interactive Pen Tips 18 Replacing the Interactive Pen Batteries 19 Using Interactive Pen with S560P 20 Touch Area Setting 21 Pen Calibration 23 3 Using Interactive Touch...
Interactive Projector Users Guide
Page 6
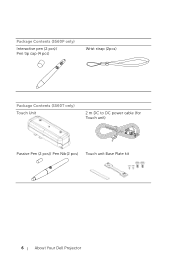
Package Contents (S560P only) Interactive pen (2 pcs)/ Pen tip cap (4 pcs) Wrist strap (2pcs) Package Contents (S560T only) Touch Unit 2 m DC to DC power cable (for Touch unit) Passive Pen (2 pcs)/ Pen Nib(2 pcs) Touch unit Base Plate kit 6 About Your Dell Projector
Package Contents (S560P only) Interactive pen (2 pcs)/ Pen tip cap (4 pcs) Wrist strap (2pcs) Package Contents (S560T only) Touch Unit 2 m DC to DC power cable (for Touch unit) Passive Pen (2 pcs)/ Pen Nib(2 pcs) Touch unit Base Plate kit 6 About Your Dell Projector

Interactive Projector Users Guide
Page 16
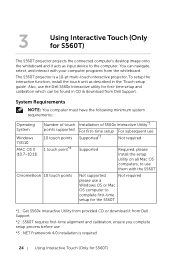
... programs from Dell Support *2 : S560P requires first-time calibration, ensure you calibrate the interactive pen(s) before use a Windows OS or Mac OS computer to complete first-time setup for S560P) You can navigate, select, and interact with the S560P ChromeBook 10 touch points Not supported, Not required please use *3 : .NET Framework 4.0 installation is a pen-based interactive projector. System...
... programs from Dell Support *2 : S560P requires first-time calibration, ensure you calibrate the interactive pen(s) before use a Windows OS or Mac OS computer to complete first-time setup for S560P) You can navigate, select, and interact with the S560P ChromeBook 10 touch points Not supported, Not required please use *3 : .NET Framework 4.0 installation is a pen-based interactive projector. System...

Interactive Projector Users Guide
Page 17
... Touch setup Guide" Troubleshooting Q2. About Your Interactive Pen The interactive pen allows user to interact with projected content in different display modes, please go to open and replace batteries. 5 Pen tip Using Interactive Pen (Only for S560P) 17 NOTE: For better accuracy, you turn... on the pen, the power indicator flashes a few seconds and goes off. More details about touch function and calibration in the same fashion as a mouse input. 3 2 1 4 5 1 Power switch 2 Power indicator As you should set to "Projector...
... Touch setup Guide" Troubleshooting Q2. About Your Interactive Pen The interactive pen allows user to interact with projected content in different display modes, please go to open and replace batteries. 5 Pen tip Using Interactive Pen (Only for S560P) 17 NOTE: For better accuracy, you turn... on the pen, the power indicator flashes a few seconds and goes off. More details about touch function and calibration in the same fashion as a mouse input. 3 2 1 4 5 1 Power switch 2 Power indicator As you should set to "Projector...
Interactive Projector Users Guide
Page 20
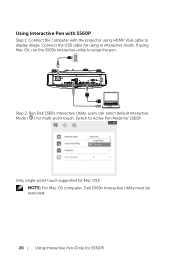
MOLEX MOLEX Step 2. If using Mac OS, run the S560x Interactive utility to display image. Using Interactive Pen with S560P Step 1: Connect the computer with the projector using HDMI/ VGA cable to setup the pen. Only single-point touch supported for Mac OSX NOTE: For Mac OS computer, Dell S560x Interactive Utility must be executed. 20 Using Interactive Pen (Only for multi-point touch. Run Dell S560x Interactive Utility, users can select default Interactive Mode ( ) for S560P) Connect the USB cable for S560P. Switch to Active Pen Mode for using in interactive mode.
MOLEX MOLEX Step 2. If using Mac OS, run the S560x Interactive utility to display image. Using Interactive Pen with S560P Step 1: Connect the computer with the projector using HDMI/ VGA cable to setup the pen. Only single-point touch supported for Mac OSX NOTE: For Mac OS computer, Dell S560x Interactive Utility must be executed. 20 Using Interactive Pen (Only for multi-point touch. Run Dell S560x Interactive Utility, users can select default Interactive Mode ( ) for S560P) Connect the USB cable for S560P. Switch to Active Pen Mode for using in interactive mode.
Interactive Projector Users Guide
Page 21
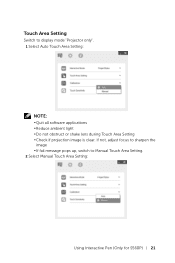
Touch Area Setting Switch to Manual Touch Area Setting. 2 Select Manual Touch Area Setting: Using Interactive Pen (Only for S560P) 21 If not, adjust focus to sharpen the image •If fail message pops up, switch to display mode "Projector only". 1 Select Auto Touch Area Setting: NOTE: •Quit all software applications •Reduce ambient light •Do not obstruct or shake lens during Touch Area Setting •Check if projection image is clear.
Touch Area Setting Switch to Manual Touch Area Setting. 2 Select Manual Touch Area Setting: Using Interactive Pen (Only for S560P) 21 If not, adjust focus to sharpen the image •If fail message pops up, switch to display mode "Projector only". 1 Select Auto Touch Area Setting: NOTE: •Quit all software applications •Reduce ambient light •Do not obstruct or shake lens during Touch Area Setting •Check if projection image is clear.
Interactive Projector Users Guide
Page 23
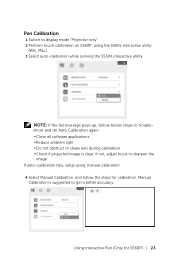
NOTE: If the fail message pops up, follow the steps for S560P) 23 Pen Calibration 1 Switch to get a better accuracy. Using Interactive Pen (Only for calibration. Manual Calibration is clear, if not, adjust focus to sharpen the image If auto-calibration fails, setup using 'manual calibration...8226;Reduce ambient light •Do not obstruct or shake lens during calibration •Check if projected image is suggested to display mode "Projector only". 2 Perform touch calibration on S560P using the S560x interactive utility (Win, Mac). 3 Select auto-calibration while running the S560X...
NOTE: If the fail message pops up, follow the steps for S560P) 23 Pen Calibration 1 Switch to get a better accuracy. Using Interactive Pen (Only for calibration. Manual Calibration is clear, if not, adjust focus to sharpen the image If auto-calibration fails, setup using 'manual calibration...8226;Reduce ambient light •Do not obstruct or shake lens during calibration •Check if projected image is suggested to display mode "Projector only". 2 Perform touch calibration on S560P using the S560x interactive utility (Win, Mac). 3 Select auto-calibration while running the S560X...
Interactive Projector Users Guide
Page 24
... use a Windows OS or Mac OS computer to use them with your computer programs from Dell Support *2 : S560T requires first-time alignment and calibration, ensure you complete setup process before use *3 : NET Framework 4.0 installation is a 10-pt multi-touch interactive projector. You can be found in the 'Touch setup guide'. To setup the...
... use a Windows OS or Mac OS computer to use them with your computer programs from Dell Support *2 : S560T requires first-time alignment and calibration, ensure you complete setup process before use *3 : NET Framework 4.0 installation is a 10-pt multi-touch interactive projector. You can be found in the 'Touch setup guide'. To setup the...

Interactive Projector Users Guide
Page 25
... "S560T Touch setup Guide" Troubleshooting Q2. Using Interactive Touch (Only for using HDMI/ VGA cable to "Projector Only" display mode before calibration. Using Interactive Touch with S560T Step 1: Connect the computer with the projector using in the 'Touch setup guide'. Setting Up Interactive Touch To setup the interactive function, install the touch unit as described in...
... "S560T Touch setup Guide" Troubleshooting Q2. Using Interactive Touch (Only for using HDMI/ VGA cable to "Projector Only" display mode before calibration. Using Interactive Touch with S560T Step 1: Connect the computer with the projector using in the 'Touch setup guide'. Setting Up Interactive Touch To setup the interactive function, install the touch unit as described in...

Interactive Projector Users Guide
Page 27
If not, adjust focus to sharpen the image •If fail message pops up, switch to display mode "Projector only". 1 Select Auto Touch Area Setting: NOTE: •Quit all software applications •Reduce ambient light •Do not obstruct or shake lens during Touch Area Setting •Check if projection image is clear. Touch Area Setting Switch to Manual Touch Area Setting. 2 Select Manual Touch Area Setting: Using Interactive Touch (Only for S560T) 27
If not, adjust focus to sharpen the image •If fail message pops up, switch to display mode "Projector only". 1 Select Auto Touch Area Setting: NOTE: •Quit all software applications •Reduce ambient light •Do not obstruct or shake lens during Touch Area Setting •Check if projection image is clear. Touch Area Setting Switch to Manual Touch Area Setting. 2 Select Manual Touch Area Setting: Using Interactive Touch (Only for S560T) 27
Interactive Projector Users Guide
Page 29
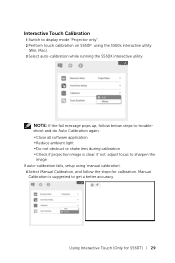
... (Only for calibration. NOTE: If the fail message pops up, follow the steps for S560T) 29 Interactive Touch Calibration 1 Switch to display mode "Projector only". 2 Perform touch calibration on S560P using 'manual calibration'. 4 Select Manual Calibration, and follow below steps to troubleshoot and do Auto Calibration again. •Close all software application •...
... (Only for calibration. NOTE: If the fail message pops up, follow the steps for S560T) 29 Interactive Touch Calibration 1 Switch to display mode "Projector only". 2 Perform touch calibration on S560P using 'manual calibration'. 4 Select Manual Calibration, and follow below steps to troubleshoot and do Auto Calibration again. •Close all software application •...

Interactive Projector Users Guide
Page 30
... touch operation, use the 'freeze' key or the 'blank screen' key on the remote. 1 Freeze: Use the freeze key to pause the image on the projector. Press the key to toggle between white background/ black background and to resume touch operation. During 'blank screen' mode, touch operation is suspended. Freeze Freeze... touch functionality Press the freeze key again to resume normal operation. Freeze Info Blank Screen Calibrate Touch VGA HDMI Video Mode Blank Screen 30 Using Interactive Touch (Only for S560T)
... touch operation, use the 'freeze' key or the 'blank screen' key on the remote. 1 Freeze: Use the freeze key to pause the image on the projector. Press the key to toggle between white background/ black background and to resume touch operation. During 'blank screen' mode, touch operation is suspended. Freeze Freeze... touch functionality Press the freeze key again to resume normal operation. Freeze Info Blank Screen Calibrate Touch VGA HDMI Video Mode Blank Screen 30 Using Interactive Touch (Only for S560T)

Interactive Projector Users Guide
Page 43
... fail and cease light output. Lamp life is defined as the time it takes a lamp to 5000 hours NOTE: The lamp life rating for any projector is a measure of RCA connector (Red/White) Microphone : One 3.5 mm stereo mini phone jack (Pink). Lamp Lamp life VGA input: One 15-pin D-sub... In, for the specified lamp. HDMI input: Two HDMI connectors for support dongle power. USB (mini USB) port: One mini USB slave for firmware upgrade/ interactive. 5V/1.8A output: One USB type A 5V DC / 1.8 A output for supporting HDMI 1.4a. Composite Video input: One Yellow RCA jack for CVBS signal. Analog...
... fail and cease light output. Lamp life is defined as the time it takes a lamp to 5000 hours NOTE: The lamp life rating for any projector is a measure of RCA connector (Red/White) Microphone : One 3.5 mm stereo mini phone jack (Pink). Lamp Lamp life VGA input: One 15-pin D-sub... In, for the specified lamp. HDMI input: Two HDMI connectors for support dongle power. USB (mini USB) port: One mini USB slave for firmware upgrade/ interactive. 5V/1.8A output: One USB type A 5V DC / 1.8 A output for supporting HDMI 1.4a. Composite Video input: One Yellow RCA jack for CVBS signal. Analog...

Interactive Projector Users Guide
Page 47
Index A Adjusting Projector Focus 10, 31 C Changing the Lamp 38 Connection Ports Audio Input connector 8 Audio Output connector 8 Audio RCA connector 8 Composite Video connector 8 HDMI 1 connector 8 HDMI 2 connector 8 ... B) 8 Power cord connector 8 RJ 45 connector 8 RS232 connector 8 Touch Unit power 8 USB A connector 8 VGA In connector 8 VGA Out connector (monitor loop through) 8 Contact Dell 5, 38 D Dell contacting 45, 46 I Interactive Pen Battery 17 Pen tip 17 Power indicator 17 Power switch 17 Wrist strap holder 17 M Main Unit 7 Camera 7 Infrared (IR) receivers 7 Lamp...
Index A Adjusting Projector Focus 10, 31 C Changing the Lamp 38 Connection Ports Audio Input connector 8 Audio Output connector 8 Audio RCA connector 8 Composite Video connector 8 HDMI 1 connector 8 HDMI 2 connector 8 ... B) 8 Power cord connector 8 RJ 45 connector 8 RS232 connector 8 Touch Unit power 8 USB A connector 8 VGA In connector 8 VGA Out connector (monitor loop through) 8 Contact Dell 5, 38 D Dell contacting 45, 46 I Interactive Pen Battery 17 Pen tip 17 Power indicator 17 Power switch 17 Wrist strap holder 17 M Main Unit 7 Camera 7 Infrared (IR) receivers 7 Lamp...


