
Hardware Owner's Manual
Page 6
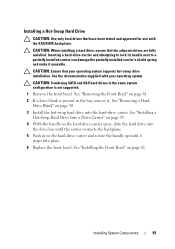
... Cooling Shroud 89 Hard Drives 90 Removing a Hard-Drive Blank 90 Installing a Hard-Drive Blank 91 Removing a Hot-Swap Hard Drive 91 Installing a Hot-Swap Hard Drive 93 Removing a Hot-Swap Hard Drive From a Hard-Drive Carrier 94 Installing a Hot-Swap Hard Drive Into a Drive Carrier 95 Removing a Cabled Hard Drive 95 Installing a Cabled Hard Drive 97 Removing...
... Cooling Shroud 89 Hard Drives 90 Removing a Hard-Drive Blank 90 Installing a Hard-Drive Blank 91 Removing a Hot-Swap Hard Drive 91 Installing a Hot-Swap Hard Drive 93 Removing a Hot-Swap Hard Drive From a Hard-Drive Carrier 94 Installing a Hot-Swap Hard Drive Into a Drive Carrier 95 Removing a Cabled Hard Drive 95 Installing a Cabled Hard Drive 97 Removing...
Hardware Owner's Manual
Page 85
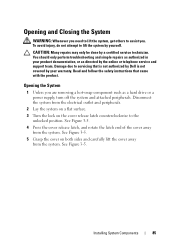
...3-5. 5 Grasp the cover on the cover release latch counterclockwise to the unlocked position. Read and follow the safety instructions that is not authorized by Dell is not covered by your product documentation, or as a hard drive or a power supply, turn off the system and attached peripherals. See Figure...from the system. Opening and Closing the System WARNING: Whenever you need to lift the system, get others to assist you are removing a hot-swap component such as directed by the online or telephone service and support team. To avoid injury, do not attempt to lift the system by ...
...3-5. 5 Grasp the cover on the cover release latch counterclockwise to the unlocked position. Read and follow the safety instructions that is not authorized by Dell is not covered by your product documentation, or as a hard drive or a power supply, turn off the system and attached peripherals. See Figure...from the system. Opening and Closing the System WARNING: Whenever you need to lift the system, get others to assist you are removing a hot-swap component such as directed by the online or telephone service and support team. To avoid injury, do not attempt to lift the system by ...
Hardware Owner's Manual
Page 90
...upright on a flat surface. 7 Reattach any peripherals and connect the system to four internal hot-swap 3.5-inch SAS or SATA hard drives, or 2.5-inch internal hot-swap SAS or SSD hard drives in 3.5-inch hot-swap hard-drive carrier. Hard Drives Your system supports up to format. NOTE: Use only drives... to a SAS backplane through hard-drive carriers and can be completed. Be aware that the host adapter is configured correctly to support hot-swap drive removal and insertion. It also supports up to an electrical outlet. 8 Turn on the system and attached peripherals. Internal hard ...
...upright on a flat surface. 7 Reattach any peripherals and connect the system to four internal hot-swap 3.5-inch SAS or SATA hard drives, or 2.5-inch internal hot-swap SAS or SSD hard drives in 3.5-inch hot-swap hard-drive carrier. Hard Drives Your system supports up to format. NOTE: Use only drives... to a SAS backplane through hard-drive carriers and can be completed. Be aware that the host adapter is configured correctly to support hot-swap drive removal and insertion. It also supports up to an electrical outlet. 8 Turn on the system and attached peripherals. Internal hard ...
Hardware Owner's Manual
Page 91
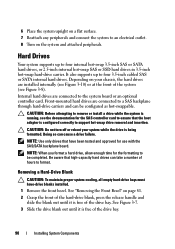
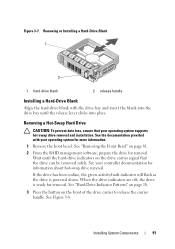
Removing a Hot-Swap Hard Drive CAUTION: To prevent data loss, ensure that the drive can be removed safely. Wait until the ...-Drive Blank 1 2 1 hard-drive blank 2 release handle Installing a Hard-Drive Blank Align the hard-drive blank with your operating system supports hot-swap drive removal and installation. See the documentation provided with the drive bay and insert the blank into place. See "Removing the Front Bezel" on ...If the drive has been online, the green activity/fault indicator will flash as the drive is ready for information about hot-swap drive removal.
Removing a Hot-Swap Hard Drive CAUTION: To prevent data loss, ensure that the drive can be removed safely. Wait until the ...-Drive Blank 1 2 1 hard-drive blank 2 release handle Installing a Hard-Drive Blank Align the hard-drive blank with your operating system supports hot-swap drive removal and installation. See the documentation provided with the drive bay and insert the blank into place. See "Removing the Front Bezel" on ...If the drive has been online, the green activity/fault indicator will flash as the drive is ready for information about hot-swap drive removal.

Hardware Owner's Manual
Page 92
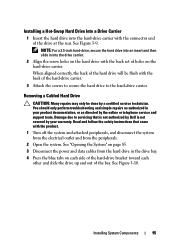
.... Figure 3-8. See "Installing the Front Bezel" on page 91. 8 Replace the front bezel. Removing or Installing a Hot-Swap Hard Drive 1 2 1 release button 3 hard-drive carrier 3 2 hard-drive carrier handle 92 Installing System Components See "Removing a Hot-Swap Hard Drive From a Hard-Drive Carrier" on page 94. 7 Insert a drive blank in the vacated drive bay...
.... Figure 3-8. See "Installing the Front Bezel" on page 91. 8 Replace the front bezel. Removing or Installing a Hot-Swap Hard Drive 1 2 1 release button 3 hard-drive carrier 3 2 hard-drive carrier handle 92 Installing System Components See "Removing a Hot-Swap Hard Drive From a Hard-Drive Carrier" on page 94. 7 Insert a drive blank in the vacated drive bay...
Hardware Owner's Manual
Page 93
... Bezel" on the hard-drive carrier and rotate the handle up until it . CAUTION: Ensure that the adjacent drives are fully installed. See "Installing a Hot-Swap Hard Drive Into a Drive Carrier" on page 95. 4 With the handle on the hard-drive carrier open, slide the hard drive into the drive bay... and attempting to lock its handle next to a partially installed carrier can damage the partially installed carrier's shield spring and make it unusable. Installing a Hot-Swap Hard Drive CAUTION: Use only hard drives that have been tested and approved for use with your operating system supports...
... Bezel" on the hard-drive carrier and rotate the handle up until it . CAUTION: Ensure that the adjacent drives are fully installed. See "Installing a Hot-Swap Hard Drive Into a Drive Carrier" on page 95. 4 With the handle on the hard-drive carrier open, slide the hard drive into the drive bay... and attempting to lock its handle next to a partially installed carrier can damage the partially installed carrier's shield spring and make it unusable. Installing a Hot-Swap Hard Drive CAUTION: Use only hard drives that have been tested and approved for use with your operating system supports...

Hardware Owner's Manual
Page 94
Figure 3-9. See Figure 3-9. Removing a Hot-Swap Hard Drive From a Hard-Drive Carrier Remove the screws from the slide rails on the hard-drive carrier and separate the hard drive from the carrier. Removing and Installing a Hot-Swap Hard Drive 1 2 1 hard drive 3 SAS/SATA screw hole 4 3 2 screws (4) 4 hard-drive carrier 94 Installing System Components
Figure 3-9. See Figure 3-9. Removing a Hot-Swap Hard Drive From a Hard-Drive Carrier Remove the screws from the slide rails on the hard-drive carrier and separate the hard drive from the carrier. Removing and Installing a Hot-Swap Hard Drive 1 2 1 hard drive 3 SAS/SATA screw hole 4 3 2 screws (4) 4 hard-drive carrier 94 Installing System Components
Hardware Owner's Manual
Page 95
Installing a Hot-Swap Hard Drive Into a Drive Carrier 1 Insert the hard drive into the drive carrier. 2 Align the screw holes on the hard drive with the back set ... slide the drive up and out of the drive at the rear. See Figure 3-9. Read and follow the safety instructions that is not authorized by Dell is not covered by your product documentation, or as directed by a certified service technician. Installing System Components 95 When aligned correctly, the back of the...
Installing a Hot-Swap Hard Drive Into a Drive Carrier 1 Insert the hard drive into the drive carrier. 2 Align the screw holes on the hard drive with the back set ... slide the drive up and out of the drive at the rear. See Figure 3-9. Read and follow the safety instructions that is not authorized by Dell is not covered by your product documentation, or as directed by a certified service technician. Installing System Components 95 When aligned correctly, the back of the...
Hardware Owner's Manual
Page 104
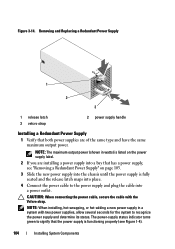
... green to the power supply and plug the cable into a bay that has a power supply, see Figure 1-4). 104 Installing System Components NOTE: When installing, hot-swapping, or hot-adding a new power supply in watts) is listed on page 103. 3 Slide the new power supply into the chassis until the power supply is functioning...
... green to the power supply and plug the cable into a bay that has a power supply, see Figure 1-4). 104 Installing System Components NOTE: When installing, hot-swapping, or hot-adding a new power supply in watts) is listed on page 103. 3 Slide the new power supply into the chassis until the power supply is functioning...

Hardware Owner's Manual
Page 140
Swap Hard Drive" on page 85. 4 Disconnect all the power cables connected...telephone service and support team. See "Opening the System" on page 93. 7 Close the system. See "Installing a Hot- You should only perform troubleshooting and simple repairs as directed by a certified service technician. Installing the SAS Backplane 1 Lower...outlet and peripherals. 2 Remove the power supplies. Read and follow the safety instructions that is not authorized by Dell is not covered by your product documentation, or as authorized in their respective connectors. Damage due to an electrical...
Swap Hard Drive" on page 85. 4 Disconnect all the power cables connected...telephone service and support team. See "Opening the System" on page 93. 7 Close the system. See "Installing a Hot- You should only perform troubleshooting and simple repairs as directed by a certified service technician. Installing the SAS Backplane 1 Lower...outlet and peripherals. 2 Remove the power supplies. Read and follow the safety instructions that is not authorized by Dell is not covered by your product documentation, or as authorized in their respective connectors. Damage due to an electrical...
Hardware Owner's Manual
Page 181
... keyboard is an input device, and a monitor is about to hard-drive capacity, the term is powered on and running. IPX - Gb - hot-swap - IP - Glossary 181 Gigabit(s); 1024 megabits or 1,073,741,824 bits. FSB - Gigabyte(s); 1024 megabytes or 1,073,741,824 bytes. A... used primarily with networked storage devices. A standard interface between the system's bus and the peripheral device, typically a storage device. Internet Dell Remote Access Controller. Interrupt request. The FSB is the data path and physical interface between the processor and the main memory (RAM). ...
... keyboard is an input device, and a monitor is about to hard-drive capacity, the term is powered on and running. IPX - Gb - hot-swap - IP - Glossary 181 Gigabit(s); 1024 megabits or 1,073,741,824 bits. FSB - Gigabyte(s); 1024 megabytes or 1,073,741,824 bytes. A... used primarily with networked storage devices. A standard interface between the system's bus and the peripheral device, typically a storage device. Internet Dell Remote Access Controller. Interrupt request. The FSB is the data path and physical interface between the processor and the main memory (RAM). ...


