
Owner's Manual
Page 3
... System Setup...22 Responding To Error Messages...22 Using The System Setup Navigation Keys...22 System Setup Options...22 System Setup Main Screen...23 System BIOS Screen...23 System Information Screen...23 Memory Settings Screen...24 Processor Settings Screen...24 SATA Settings Screen...25 Boot Settings Screen...26 Integrated Devices Screen...
... System Setup...22 Responding To Error Messages...22 Using The System Setup Navigation Keys...22 System Setup Options...22 System Setup Main Screen...23 System BIOS Screen...23 System Information Screen...23 Memory Settings Screen...24 Processor Settings Screen...24 SATA Settings Screen...25 Boot Settings Screen...26 Integrated Devices Screen...

Owner's Manual
Page 9
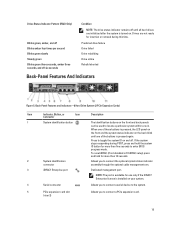
... button for more than 15 seconds. If the system stops responding during POST, press and hold the button for more than five seconds to enter BIOS progress mode. One optional SATA DVD-ROM drive or DVD+/-RW drive. 9 Press to toggle the system ID on the front and back panels can...
... button for more than 15 seconds. If the system stops responding during POST, press and hold the button for more than five seconds to enter BIOS progress mode. One optional SATA DVD-ROM drive or DVD+/-RW drive. 9 Press to toggle the system ID on the front and back panels can...

Owner's Manual
Page 11
... Tag, NIC, MAC address, and so on the LCD panel. • The LCD backlight remains off if LCD messaging is turned off . Up to enter BIOS progress mode. Use this button only if directed to record system information, such as per your need. See LCD Error Messages for information about specific...
... Tag, NIC, MAC address, and so on the LCD panel. • The LCD backlight remains off if LCD messaging is turned off . Up to enter BIOS progress mode. Use this button only if directed to record system information, such as per your need. See LCD Error Messages for information about specific...
Owner's Manual
Page 15
... if the iDRAC7 Enterprise license is installed on the front and back panels can be used to connect a PCIe expansion card. 15 Press to enter BIOS progress mode. Drives are initialized after the system is turned on the back blink until one of these buttons is pressed, the LCD panel on...
... if the iDRAC7 Enterprise license is installed on the front and back panels can be used to connect a PCIe expansion card. 15 Press to enter BIOS progress mode. Drives are initialized after the system is turned on the back blink until one of these buttons is pressed, the LCD panel on...

Owner's Manual
Page 16
... 1100 W (when available) Figure 6. If the system stops responding during POST, press and hold the system ID button for more than five seconds to enter BIOS progress mode. 16
... 1100 W (when available) Figure 6. If the system stops responding during POST, press and hold the system ID button for more than five seconds to enter BIOS progress mode. 16

Owner's Manual
Page 21
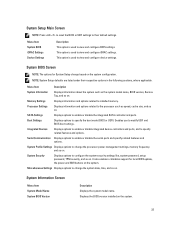
... Unified Extensible Firmware Interface (UEFI) specifications that 21 Once you to install your system hardware and specify BIOS-level options. Enters System Services, which is determined by default • Text browser, which opens the Dell Lifecycle Controller 2 (LC2). NOTE: By default, help text in the Boot Mode field of the Boot Settings...
... Unified Extensible Firmware Interface (UEFI) specifications that 21 Once you to install your system hardware and specify BIOS-level options. Enters System Services, which is determined by default • Text browser, which opens the Dell Lifecycle Controller 2 (LC2). NOTE: By default, help text in the Boot Mode field of the Boot Settings...

Owner's Manual
Page 22
...the system is normal for your system. Allows you press , allow the system to the next field. Trying to boot the operating system from the BIOS boot mode. NOTE: For the standard graphics browser only. Entering System Setup 1. For more information, see the following message: = System Setup If ... selected field (if applicable) or follow the link in the main screen displays a message that you view the main screen. Moves to dell.com/ossupport. NOTE: For the latest information on or restart your operating system begins to load before you to be installed from the UEFI...
...the system is normal for your system. Allows you press , allow the system to the next field. Trying to boot the operating system from the BIOS boot mode. NOTE: For the standard graphics browser only. Entering System Setup 1. For more information, see the following message: = System Setup If ... selected field (if applicable) or follow the link in the main screen displays a message that you view the main screen. Moves to dell.com/ossupport. NOTE: For the latest information on or restart your operating system begins to load before you to be installed from the UEFI...
Owner's Manual
Page 23
... settings, memory frequency, and so on the system. Memory Settings Displays information and options related to specify the boot mode (BIOS or UEFI). System Profile Settings Displays options to change based on . It also enables or disables support for System Setup change...information and options related to view and configure iDRAC settings. Boot Settings Displays options to installed memory. System BIOS Screen NOTE: The options for local BIOS update, the power and NMI buttons on . Integrated Devices Displays options to enable or disable integrated device controllers...
... settings, memory frequency, and so on the system. Memory Settings Displays information and options related to specify the boot mode (BIOS or UEFI). System Profile Settings Displays options to change based on . It also enables or disables support for System Setup change...information and options related to view and configure iDRAC settings. Boot Settings Displays options to installed memory. System BIOS Screen NOTE: The options for local BIOS update, the power and NMI buttons on . Integrated Devices Displays options to enable or disable integrated device controllers...

Owner's Manual
Page 24
...memory operating mode. The options available depending on the memory configuration. If the Logical Processor option is set to Enabled, the BIOS displays all the logical processors. By default, the Logical Processor option is set the QuickPath Interconnect data rate settings. Allows you... Contact Information Description Displays the system Service Tag. By default, the System Memory Testing option is set to Disabled, the BIOS only displays one logical processor per core. System Memory Type Displays the type of logical processors. Memory Settings Screen Menu Item...
...memory operating mode. The options available depending on the memory configuration. If the Logical Processor option is set to Enabled, the BIOS displays all the logical processors. By default, the Logical Processor option is set the QuickPath Interconnect data rate settings. Allows you... Contact Information Description Displays the system Service Tag. By default, the System Memory Testing option is set to Disabled, the BIOS only displays one logical processor per core. System Memory Type Displays the type of logical processors. Memory Settings Screen Menu Item...

Owner's Manual
Page 26
... Port Description Allows you to enable or disable the boot sequence retry feature. Boot Settings Screen Menu Item Boot Mode Boot Sequence Retry BIOS Boot Settings UEFI Boot Settings One-Time Boot Description Allows you to enable or disable UEFI Boot options. Setting this field is set ...F. Selecting Only Back Ports On disables the front USB ports and selecting All Ports Off disables both front and back USB ports. Off disables BIOS support for the device attached to On. By default, Port F is enabled and the system fails to enable or disable the integrated RAID controller...
... Port Description Allows you to enable or disable the boot sequence retry feature. Boot Settings Screen Menu Item Boot Mode Boot Sequence Retry BIOS Boot Settings UEFI Boot Settings One-Time Boot Description Allows you to enable or disable UEFI Boot options. Setting this field is set ...F. Selecting Only Back Ports On disables the front USB ports and selecting All Ports Off disables both front and back USB ports. Off disables BIOS support for the device attached to On. By default, Port F is enabled and the system fails to enable or disable the integrated RAID controller...

Owner's Manual
Page 27
... Video Controller Allows you to enable or disable the Embedded Video Controller. SR-IOV Global Enable Allows you to enable or disable the BIOS configuration of Single Root I/O Virtualization (SR-IOV) devices. Slot Disablement Allows you to set to enable or disable available PCIe slots on...to associate the external serial connector to the active SD card. NOTE: Only Serial Device 2 can be used for serial devices. The BIOS attempts to Disabled. NOTE: This option is displayed only if IDSDM is Enabled. The Slot Disablement feature controls the configuration of the ...
... Video Controller Allows you to enable or disable the Embedded Video Controller. SR-IOV Global Enable Allows you to enable or disable the BIOS configuration of Single Root I/O Virtualization (SR-IOV) devices. Slot Disablement Allows you to set to enable or disable available PCIe slots on...to associate the external serial connector to the active SD card. NOTE: Only Serial Device 2 can be used for serial devices. The BIOS attempts to Disabled. NOTE: This option is displayed only if IDSDM is Enabled. The Slot Disablement feature controls the configuration of the ...

Owner's Manual
Page 28
... automatically sets the system voltage to operate in all available power states. DBPM is Dell Active Power Controller. By default, the Turbo Boost option is set to a mode other than Custom, the BIOS automatically sets the rest of DIMMs installed. Allows you to enable or disable the ... change the rest of applications by performing encryption and decryption using the Advanced Encryption Standard Instruction Set and is set to set to the BIOS console redirection when the operating system is set the remote console terminal type. Allows you to System DBPM (DAPC). By default, the...
... automatically sets the system voltage to operate in all available power states. DBPM is Dell Active Power Controller. By default, the Turbo Boost option is set to a mode other than Custom, the BIOS automatically sets the rest of DIMMs installed. Allows you to enable or disable the ... change the rest of applications by performing encryption and decryption using the Advanced Encryption Standard Instruction Set and is set to set to the BIOS console redirection when the operating system is set the remote console terminal type. Allows you to System DBPM (DAPC). By default, the...

Owner's Manual
Page 29
Displays the TPM status. By default, the Intel TXT option is set to Last. Allows you to update the BIOS using Dell Update Package are not affected by this field to Disabled. By default, the AC Power Recovery option is selected. User Defined Allows you to ..., Virtualization Technology must be enabled and TPM Security must be Enabled with Pre-boot Measurements or On without Pre-boot Measurements. By default, the BIOS Update Control option is set to Unlocked. NMI Button Allows you to Disabled. Menu Item Setup Password Password Status TPM Security TPM Activation TPM Status...
Displays the TPM status. By default, the Intel TXT option is set to Last. Allows you to update the BIOS using Dell Update Package are not affected by this field to Disabled. By default, the AC Power Recovery option is selected. User Defined Allows you to ..., Virtualization Technology must be enabled and TPM Security must be Enabled with Pre-boot Measurements or On without Pre-boot Measurements. By default, the BIOS Update Control option is set to Unlocked. NMI Button Allows you to Disabled. Menu Item Setup Password Password Status TPM Security TPM Activation TPM Status...

Owner's Manual
Page 30
... Keyboard NumLock is deleted and you need not provide the system password to log on to Enabled. F1/F2 Prompt on error. In the System BIOS screen, select System Security and press . NOTE: Your system is displayed. 3. You can create a system password and a setup password to set ... your system. If the password jumper setting is disabled, the existing System Password and Setup Password is set to your system. The System BIOS screen is shipped with the NumLock enabled or disabled. The System Security screen is set to Enabled. CAUTION: Anyone can access the data ...
... Keyboard NumLock is deleted and you need not provide the system password to log on to Enabled. F1/F2 Prompt on error. In the System BIOS screen, select System Security and press . NOTE: Your system is displayed. 3. You can create a system password and a setup password to set ... your system. If the password jumper setting is disabled, the existing System Password and Setup Password is set to your system. The System BIOS screen is shipped with the NumLock enabled or disabled. The System Security screen is set to Enabled. CAUTION: Anyone can access the data ...

Owner's Manual
Page 31
...delete or change the System and/or Setup password a message prompts you to re-enter the new password. Press to return to the System BIOS screen. Press again, and a message prompts you to save the changes. Turn on or reboot your system, type your system password and ... password. 6. Re-enter the setup password that you change an existing System or Setup password if the Password Status is Unlocked. 5. The System BIOS screen is displayed. 4. Select System Password, alter or delete the existing system password and press or . 6. Type your system. 2. Press to...
...delete or change the System and/or Setup password a message prompts you to re-enter the new password. Press to return to the System BIOS screen. Press again, and a message prompts you to save the changes. Turn on or reboot your system, type your system password and ... password. 6. Re-enter the setup password that you change an existing System or Setup password if the Password Status is Unlocked. 5. The System BIOS screen is displayed. 4. Select System Password, alter or delete the existing system password and press or . 6. Type your system. 2. Press to...
Owner's Manual
Page 32
...entered, the system displays a message and prompts you to: • Add, delete, and arrange boot options • Access System Setup and BIOS-level boot options without rebooting To enter the Boot Manager: 1. Even after you see the following options are exceptions: • If System ...Password Status option in conjunction with the System Password and Setup Password options to finish booting, and then restart your system from the BIOS boot mode. Operating With A Setup Password Enabled If Setup Password is entered. Turn on or restart your password. Using The ...
...entered, the system displays a message and prompts you to: • Add, delete, and arrange boot options • Access System Setup and BIOS-level boot options without rebooting To enter the Boot Manager: 1. Even after you see the following options are exceptions: • If System ...Password Status option in conjunction with the System Password and Setup Password options to finish booting, and then restart your system from the BIOS boot mode. Operating With A Setup Password Enabled If Setup Password is entered. Turn on or restart your password. Using The ...

Owner's Manual
Page 33
.... UEFI Boot Menu Menu Item Description Select UEFI Boot Option Displays the list of available BIOS boot options (marked with asterisks). Expands or collapses a drop-down list, if applicable. Boot Manager Screen Menu... Item Continue Normal Boot BIOS Boot Menu UEFI Boot Menu Driver Health Menu Launch System Setup System Utilities Description The system attempts...boot option you view the main screen. Moves to access the BIOS Update File Explorer, run the Dell Diagnostics program, and reboot the system.
.... UEFI Boot Menu Menu Item Description Select UEFI Boot Option Displays the list of available BIOS boot options (marked with asterisks). Expands or collapses a drop-down list, if applicable. Boot Manager Screen Menu... Item Continue Normal Boot BIOS Boot Menu UEFI Boot Menu Driver Health Menu Launch System Setup System Utilities Description The system attempts...boot option you view the main screen. Moves to access the BIOS Update File Explorer, run the Dell Diagnostics program, and reboot the system.

Owner's Manual
Page 55
... It does not prevent your system from the electrical outlet and peripherals. 2. It does not prevent your system from powering on and no BIOS POST message or F1/F2 pause is displayed. 55 Insert the USB key into the USB connector. 6. Figure 22. USB memory key ...your product documentation, or as directed by the online or telephone service and support team. Reconnect the system to servicing that is not authorized by Dell is detected by a certified service technician. Enter the System Setup and verify that came with the product. 1. Replacing the Internal USB Key ...
... It does not prevent your system from the electrical outlet and peripherals. 2. It does not prevent your system from powering on and no BIOS POST message or F1/F2 pause is displayed. 55 Insert the USB key into the USB connector. 6. Figure 22. USB memory key ...your product documentation, or as directed by the online or telephone service and support team. Reconnect the system to servicing that is not authorized by Dell is detected by a certified service technician. Enter the System Setup and verify that came with the product. 1. Replacing the Internal USB Key ...

Owner's Manual
Page 67
... warranty. Using a #2 Phillips screwdriver, loosen one of stored power prior to install the update on your system, download the latest system BIOS version from the processor and set the heat sink aside. 67 Turn off the system, including any empty processor socket. Before upgrading your ... conditions. 5. Open the system. 4. Remove the cooling shroud. Lift the heat sink away from support.dell.com and follow the safety instructions that is not authorized by Dell is necessary to loosen from the processor. 6. The heat sink is not covered by your product documentation,...
... warranty. Using a #2 Phillips screwdriver, loosen one of stored power prior to install the update on your system, download the latest system BIOS version from the processor and set the heat sink aside. 67 Turn off the system, including any empty processor socket. Before upgrading your ... conditions. 5. Open the system. 4. Remove the cooling shroud. Lift the heat sink away from support.dell.com and follow the safety instructions that is not authorized by Dell is necessary to loosen from the processor. 6. The heat sink is not covered by your product documentation,...

Owner's Manual
Page 70
...certified service technician. Before upgrading your system, download the latest system BIOS version from processor socket 2, you are removing the processor from support.dell.com and follow the safety instructions that is not authorized by Dell is not covered by your system. processor socket-release lever 2.... NOTE: You can update the system BIOS using the Lifecycle Controller. 2. Read and follow...
...certified service technician. Before upgrading your system, download the latest system BIOS version from processor socket 2, you are removing the processor from support.dell.com and follow the safety instructions that is not authorized by Dell is not covered by your system. processor socket-release lever 2.... NOTE: You can update the system BIOS using the Lifecycle Controller. 2. Read and follow...


