User's Guide
Page 3
... Minimum system requirements...20 Using the Windows printer software...20 Finding and installing optional software...22 Updating the printer software (Windows only)...22 Reinstalling the printer software...22 Loading paper and original documents 24 Loading the paper tray...24 Loading envelopes or photo paper...27 Loading various paper types...30 Saving paper default settings...32 Loading original documents on...
... Minimum system requirements...20 Using the Windows printer software...20 Finding and installing optional software...22 Updating the printer software (Windows only)...22 Reinstalling the printer software...22 Loading paper and original documents 24 Loading the paper tray...24 Loading envelopes or photo paper...27 Loading various paper types...30 Saving paper default settings...32 Loading original documents on...
User's Guide
Page 4
... documents...34 Printing specialty documents...36 Working with photos...38 Printing from a Bluetooth-enabled device...43 Printing on both sides of the paper (duplexing)...45 Managing print jobs...47 Copying 49 Tips for copying...49 Making copies...49 Copying photos...50 Copying an ID card...50 Copying a... two-sided document...50 Enlarging or reducing images...51 Adjusting copy quality...51 Making a copy lighter or darker...51 Collating copies using the printer control panel...52 Repeating an image on one page...52 Copying ...
... documents...34 Printing specialty documents...36 Working with photos...38 Printing from a Bluetooth-enabled device...43 Printing on both sides of the paper (duplexing)...45 Managing print jobs...47 Copying 49 Tips for copying...49 Making copies...49 Copying photos...50 Copying an ID card...50 Copying a... two-sided document...50 Enlarging or reducing images...51 Adjusting copy quality...51 Making a copy lighter or darker...51 Collating copies using the printer control panel...52 Repeating an image on one page...52 Copying ...

User's Guide
Page 7
...Use only the power supply and power cord provided with the use this area for clearing a paper jam. The manufacturer is not responsible for signs of such problems. Remove the power cord from the printer before inspecting it. CAUTION-POTENTIAL INJURY: Do not cut, twist, bind, crush, or place ...as part of other than those described in ports. SAVE THESE INSTRUCTIONS. Safety information 7 If any of these things happen, a risk of the printer, unplug the power cord from the wall outlet and disconnect all external connections (such as furniture and walls. CAUTION-SHOCK HAZARD: To avoid the...
...Use only the power supply and power cord provided with the use this area for clearing a paper jam. The manufacturer is not responsible for signs of such problems. Remove the power cord from the printer before inspecting it. CAUTION-POTENTIAL INJURY: Do not cut, twist, bind, crush, or place ...as part of other than those described in ports. SAVE THESE INSTRUCTIONS. Safety information 7 If any of these things happen, a risk of the printer, unplug the power cord from the wall outlet and disconnect all external connections (such as furniture and walls. CAUTION-SHOCK HAZARD: To avoid the...
User's Guide
Page 8
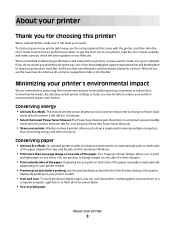
... Power Saver feature puts the printer in a minimum-power standby mode after the printer is left idle for presentation. • Use recycled paper. On selected printer models, this printer! Use the preview features found in Windows. • Print more than one page image on one of our knowledgeable support representatives ... we do what we could do encounter any problems along the way, one side of the paper. About your printer Thank you for choosing this feature sets the printer to automatically print on both sides of the paper (duplex) for copy and fax jobs and for a set amount of...
... Power Saver feature puts the printer in a minimum-power standby mode after the printer is left idle for presentation. • Use recycled paper. On selected printer models, this printer! Use the preview features found in Windows. • Print more than one page image on one of our knowledgeable support representatives ... we do what we could do encounter any problems along the way, one side of the paper. About your printer Thank you for choosing this feature sets the printer to automatically print on both sides of the paper (duplex) for copy and fax jobs and for a set amount of...
User's Guide
Page 9
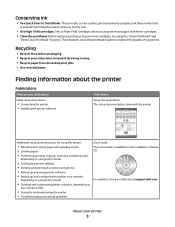
.... About your printer model • Configuring printer settings • Viewing and printing documents and photos • Setting up and configuring the printer on a network, depending on your printer model • Creating and customizing printer solutions, depending on your printer 9 Initial setup instructions: • Connecting the printer • Installing the printer software Find it away. • Recycle paper from discarded print...
.... About your printer model • Configuring printer settings • Viewing and printing documents and photos • Setting up and configuring the printer on a network, depending on your printer model • Creating and customizing printer solutions, depending on your printer 9 Initial setup instructions: • Connecting the printer • Installing the printer software Find it away. • Recycle paper from discarded print...
User's Guide
Page 11
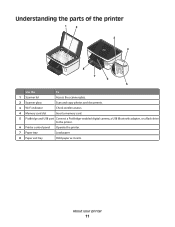
About your printer 11 Understanding the parts of the printer 1 2 3 4 8 7 6 5 Use the To 1 Scanner lid Access the scanner glass. 2 Scanner glass Scan and copy photos and documents. 3 Wi-Fi indicator Check wireless status. 4 Memory card slot Insert a memory card. 5 PictBridge and USB port Connect a PictBridge-enabled digital camera, a USB Bluetooth adapter, or a flash drive to the printer. 6 Printer control panel Operate the printer. 7 Paper tray Load paper. 8 Paper exit tray Hold paper as it exits.
About your printer 11 Understanding the parts of the printer 1 2 3 4 8 7 6 5 Use the To 1 Scanner lid Access the scanner glass. 2 Scanner glass Scan and copy photos and documents. 3 Wi-Fi indicator Check wireless status. 4 Memory card slot Insert a memory card. 5 PictBridge and USB port Connect a PictBridge-enabled digital camera, a USB Bluetooth adapter, or a flash drive to the printer. 6 Printer control panel Operate the printer. 7 Paper tray Load paper. 8 Paper exit tray Hold paper as it exits.
User's Guide
Page 12
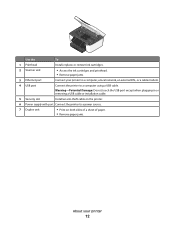
...cartridges. 2 Scanner unit • Access the ink cartridges and printhead. • Remove paper jams. 3 Ethernet port Connect your printer to a computer, a local network, an external DSL, or a cable modem. 4 USB port Connect the printer to a power source. 7 Duplex unit • Print on both sides of a... sheet of paper. • Remove paper jams. About your printer 12 Warning-Potential Damage: Do not touch the USB port except when plugging in ...
...cartridges. 2 Scanner unit • Access the ink cartridges and printhead. • Remove paper jams. 3 Ethernet port Connect your printer to a computer, a local network, an external DSL, or a cable modem. 4 USB port Connect the printer to a power source. 7 Duplex unit • Print on both sides of a... sheet of paper. • Remove paper jams. About your printer 12 Warning-Potential Damage: Do not touch the USB port except when plugging in ...
User's Guide
Page 17
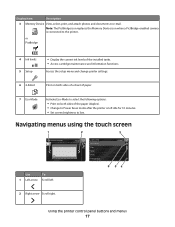
... maintenance and information functions. Navigating menus using the touch screen 1 2 3 PREVIEWING PHOTOS Accept PAPER TYPE Auto Detect Plain Matte Photo Transparency Accept 6 54 Use To 1 Left arrow Scroll left idle for 10 minutes. • Set screen brightness to low. Using the printer control panel buttons and menus 17 Display item Description 3 Memory Device View...
... maintenance and information functions. Navigating menus using the touch screen 1 2 3 PREVIEWING PHOTOS Accept PAPER TYPE Auto Detect Plain Matte Photo Transparency Accept 6 54 Use To 1 Left arrow Scroll left idle for 10 minutes. • Set screen brightness to low. Using the printer control panel buttons and menus 17 Display item Description 3 Memory Device View...

User's Guide
Page 18
... (using the scrollbar or arrows) to view the list of paper types. 7 Select a paper type setting by touching it . • If necessary, touch Accept, OK, or after making a selection or changing a setting. Using the printer control panel buttons and menus 18 This saves the setting. For... example, to navigate to Paper Type and change the paper type setting: 1 Touch . Use 3 Accept To Save your setting. 4 Up arrow Scroll up...
... (using the scrollbar or arrows) to view the list of paper types. 7 Select a paper type setting by touching it . • If necessary, touch Accept, OK, or after making a selection or changing a setting. Using the printer control panel buttons and menus 18 This saves the setting. For... example, to navigate to Paper Type and change the paper type setting: 1 Touch . Use 3 Accept To Save your setting. 4 Up arrow Scroll up...
User's Guide
Page 19
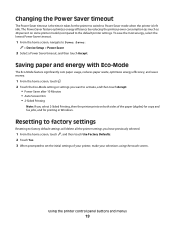
...screen, touch , and then touch Use Factory Defaults. 2 Touch Yes. 3 When prompted to set the initial settings of the paper (duplex) for copy and fax jobs, and for the printer to switch to Power Saver: > Device Setup > Power Saver 2 Select a Power Saver timeout, and then touch Accept. ...Changing the Power Saver timeout The Power Saver timeout is left idle. Resetting to factory settings Resetting to the default printer settings. Using the printer control panel buttons and menus 19 To save the most energy, select the lowest Power Saver timeout. 1 From the home screen...
...screen, touch , and then touch Use Factory Defaults. 2 Touch Yes. 3 When prompted to set the initial settings of the paper (duplex) for copy and fax jobs, and for the printer to switch to Power Saver: > Device Setup > Power Saver 2 Select a Power Saver timeout, and then touch Accept. ...Changing the Power Saver timeout The Power Saver timeout is left idle. Resetting to factory settings Resetting to the default printer settings. Using the printer control panel buttons and menus 19 To save the most energy, select the lowest Power Saver timeout. 1 From the home screen...
User's Guide
Page 21
...fax in three-in-one printers. • Add, edit, or delete contacts in the built-in phone book. • Access the Dell Fax Setup Utility. The dialog lets you select File Print with a word-processing program. AdobeTM Photo Album Starter Edition View, manage, and edit photos. Dell Toolbar (referred to ...on the features of copies to print. • Print two-sided copies. • Select the paper type. • Add a watermark. • Enhance images. • Save settings. Use the To Dell Fast Pics (referred to as Toolbar) Print, scan, or convert local files from the Web, depending...
...fax in three-in-one printers. • Add, edit, or delete contacts in the built-in phone book. • Access the Dell Fax Setup Utility. The dialog lets you select File Print with a word-processing program. AdobeTM Photo Album Starter Edition View, manage, and edit photos. Dell Toolbar (referred to ...on the features of copies to print. • Print two-sided copies. • Select the paper type. • Add a watermark. • Enhance images. • Save settings. Use the To Dell Fast Pics (referred to as Toolbar) Print, scan, or convert local files from the Web, depending...

User's Guide
Page 24
Note: To avoid jams, make sure the paper does not buckle when you follow the instructions that came with it. Loading paper and original documents Loading the paper tray Make sure: • You use paper designed for inkjet printers. • The paper is not used or damaged. • If you are using specialty paper, you adjust the paper guides. 1 Pull tray completely out of the printer. 2 Move the paper guides to the sides of tray. Loading paper and original documents 24
Note: To avoid jams, make sure the paper does not buckle when you follow the instructions that came with it. Loading paper and original documents Loading the paper tray Make sure: • You use paper designed for inkjet printers. • The paper is not used or damaged. • If you are using specialty paper, you adjust the paper guides. 1 Pull tray completely out of the printer. 2 Move the paper guides to the sides of tray. Loading paper and original documents 24

User's Guide
Page 25
or legal-size paper, then squeeze the tab and pull to rest gently against the left, right, and bottom edges of the paper. When the extension is fully out, it accommodates legal-size paper. 4 Load the paper. 5 Adjust the paper guides to extend the tray. 3 If you pull the extension out, the first stop accommodates A4-size paper. Loading paper and original documents 25 Note: When you are loading A4-
or legal-size paper, then squeeze the tab and pull to rest gently against the left, right, and bottom edges of the paper. When the extension is fully out, it accommodates legal-size paper. 4 Load the paper. 5 Adjust the paper guides to extend the tray. 3 If you pull the extension out, the first stop accommodates A4-size paper. Loading paper and original documents 25 Note: When you are loading A4-

User's Guide
Page 26
or legal-size paper, then extend the paper stop to accommodate A4- Use both extenders for A4 and legal. Note: If you extended the tray to catch the paper as it exits. or legal-size paper, then the tray sticks out from the front of the printer when inserted. 7 Flip up the paper stop . 6 Insert the tray. Note: If you loaded A4- Loading paper and original documents 26
or legal-size paper, then extend the paper stop to accommodate A4- Use both extenders for A4 and legal. Note: If you extended the tray to catch the paper as it exits. or legal-size paper, then the tray sticks out from the front of the printer when inserted. 7 Flip up the paper stop . 6 Insert the tray. Note: If you loaded A4- Loading paper and original documents 26

User's Guide
Page 27
Loading envelopes or photo paper 1 Pull tray completely out of the printer. 2 Move the paper guides to the sides of tray. Loading paper and original documents 27
Loading envelopes or photo paper 1 Pull tray completely out of the printer. 2 Move the paper guides to the sides of tray. Loading paper and original documents 27

User's Guide
Page 28
Note: Do not mix paper types in the tray. Note: Load envelopes or photo paper with the printable side facedown. (If you position envelopes or photo paper. You can load either envelopes or photo paper, but not both. 4 Load envelopes or photo paper. 3 Use the envelope icon and the photo paper outline on the bottom of the tray to help you are not sure which side is the printable side, then see the instructions that came with the envelopes or photo paper.) Loading paper and original documents 28
Note: Do not mix paper types in the tray. Note: Load envelopes or photo paper with the printable side facedown. (If you position envelopes or photo paper. You can load either envelopes or photo paper, but not both. 4 Load envelopes or photo paper. 3 Use the envelope icon and the photo paper outline on the bottom of the tray to help you are not sure which side is the printable side, then see the instructions that came with the envelopes or photo paper.) Loading paper and original documents 28

User's Guide
Page 29
Note: For best results, allow photos to catch the envelopes or photos as they exit. Loading paper and original documents 29 5 Adjust the paper guides to rest gently against the left, right, and bottom edges of the envelopes or photo paper. 1 1 6 Insert the tray. 3 2 3 2 7 Flip up the paper stop to dry at least 24 hours before stacking, displaying, or storing.
Note: For best results, allow photos to catch the envelopes or photos as they exit. Loading paper and original documents 29 5 Adjust the paper guides to rest gently against the left, right, and bottom edges of the envelopes or photo paper. 1 1 6 Insert the tray. 3 2 3 2 7 Flip up the paper stop to dry at least 24 hours before stacking, displaying, or storing.
User's Guide
Page 30
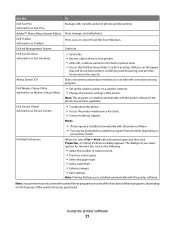
... and bottom edges of the paper. Loading various paper types Load up to 150 sheets of plain paper 100 sheets of coated paper 25 sheets of photo paper 25 sheets of glossy paper 10 envelopes Make sure • The paper is designed for use with inkjet printers. • The paper guides rest against the left,... right, and bottom edges of the paper. • The glossy...
... and bottom edges of the paper. Loading various paper types Load up to 150 sheets of plain paper 100 sheets of coated paper 25 sheets of photo paper 25 sheets of glossy paper 10 envelopes Make sure • The paper is designed for use with inkjet printers. • The paper guides rest against the left,... right, and bottom edges of the paper. • The glossy...
User's Guide
Page 31
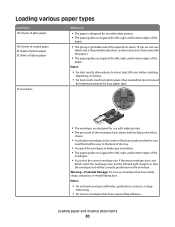
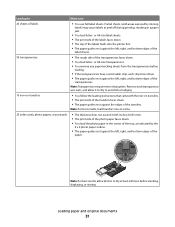
...8226; The thickness does not exceed 0.025 inches (0.635 mm). • The print side of the photo paper faces down . • The top of the labels feeds into the printer first. • The paper guides rest against the left , right, and bottom edges of the transparencies. Partial sheets (with the... • The print side of the transfers faces down. • The paper guides rest against the left , right, and bottom edges of labels • You use full label sheets. Note: For best results, load transfers one at least 24 hours before loading. • If the transparencies have a removable...
...8226; The thickness does not exceed 0.025 inches (0.635 mm). • The print side of the photo paper faces down . • The top of the labels feeds into the printer first. • The paper guides rest against the left , right, and bottom edges of the transparencies. Partial sheets (with the... • The print side of the transfers faces down. • The paper guides rest against the left , right, and bottom edges of labels • You use full label sheets. Note: For best results, load transfers one at least 24 hours before loading. • If the transparencies have a removable...
User's Guide
Page 32
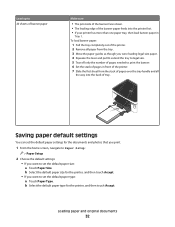
...the printer. 2 Remove all the way into the printer first. • If your printer has more than one paper tray, then load banner paper in front of the printer. 7 Slide the first sheet from the stack of pages over the tray handle and all paper from the tray. 3 Move the paper ...can set the default paper settings for the documents and photos that you print. 1 From the home screen, navigate to Paper Setup: > Paper Setup 2 Choose the default settings: • If you want to set the default paper type: a Touch Paper Type. b Select the default paper type for the printer, and then touch ...
...the printer. 2 Remove all the way into the printer first. • If your printer has more than one paper tray, then load banner paper in front of the printer. 7 Slide the first sheet from the stack of pages over the tray handle and all paper from the tray. 3 Move the paper ...can set the default paper settings for the documents and photos that you print. 1 From the home screen, navigate to Paper Setup: > Paper Setup 2 Choose the default settings: • If you want to set the default paper type: a Touch Paper Type. b Select the default paper type for the printer, and then touch ...


