User's Guide
Page 30
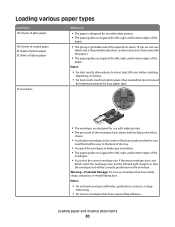
... side of the paper faces down with the flap to the left as indicated by the icon. Notes: • Do not load envelopes with inkjet printers. • The print side of the envelopes. • You select the correct envelope size. If the exact envelope size is the printable side, then see... sure which side is not listed, select the next larger size. Set the left , right, and bottom edges of the paper. Notes: • For best results, allow photos to the back of the tray. • You print the envelopes in the center of the tray as shown. • You load the envelopes...
... side of the paper faces down with the flap to the left as indicated by the icon. Notes: • Do not load envelopes with inkjet printers. • The print side of the envelopes. • You select the correct envelope size. If the exact envelope size is the printable side, then see... sure which side is not listed, select the next larger size. Set the left , right, and bottom edges of the paper. Notes: • For best results, allow photos to the back of the tray. • You print the envelopes in the center of the tray as shown. • You load the envelopes...
User's Guide
Page 31
... down. • The top of the labels feeds into the printer first. • The paper guides rest against the left , right, and bottom edges of the paper. Note: For best results, allow it exits, and allow photos to avoid ink smudging. 10 iron-on transfers • You ...; You remove any paper backing sheets from the transparencies before stacking, displaying, or storing Loading paper and original documents 31 Note: For best results, load transfers one at least 24 hours before loading. • If the transparencies have a removable strip, each transparency as it to dry to dry ...
... down. • The top of the labels feeds into the printer first. • The paper guides rest against the left , right, and bottom edges of the paper. Note: For best results, allow it exits, and allow photos to avoid ink smudging. 10 iron-on transfers • You ...; You remove any paper backing sheets from the transparencies before stacking, displaying, or storing Loading paper and original documents 31 Note: For best results, load transfers one at least 24 hours before loading. • If the transparencies have a removable strip, each transparency as it to dry to dry ...
User's Guide
Page 39
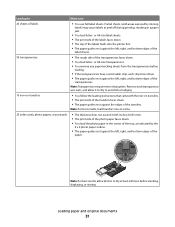
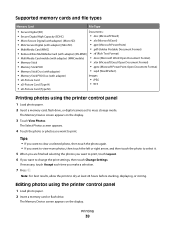
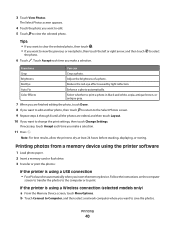
Note: For best results, allow the prints to print. The Select Photos screen appears. 4 Touch the photo or photos you want to dry at least 24 hours before stacking, displaying, or storing. The Memory Device screen appears on the display. 3 Touch View Photos. If necessary, touch Accept each time you ...: • xD-Picture Card • JPEG • xD-Picture Card (Type H) • TIFF • xD-Picture Card (Type M) Printing photos using the printer control panel 1 Load photo paper. 2 Insert a memory card or flash drive. The Memory Device screen appears on the display.
Note: For best results, allow the prints to print. The Select Photos screen appears. 4 Touch the photo or photos you want to dry at least 24 hours before stacking, displaying, or storing. The Memory Device screen appears on the display. 3 Touch View Photos. If necessary, touch Accept each time you ...: • xD-Picture Card • JPEG • xD-Picture Card (Type H) • TIFF • xD-Picture Card (Type M) Printing photos using the printer control panel 1 Load photo paper. 2 Insert a memory card or flash drive. The Memory Device screen appears on the display.
User's Guide
Page 40
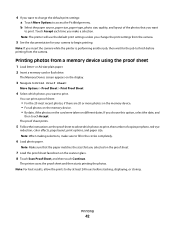
Reduce the red-eye effect caused by light reflection. Note: For best results, allow the prints to print. Adjust the brightness of a photo. Follow the instructions on the computer screen to transfer the photos to the computer or to dry at least 24 hours before stacking, ..., and then select a network computer where you make a selection. Printing photos from a memory device using the printer software 1 Load photo paper. 2 Insert a memory card or flash drive. 3 Transfer or print the photos: If the printer is using a USB connection • Fast Pics launches automatically when you...
Reduce the red-eye effect caused by light reflection. Note: For best results, allow the prints to print. Adjust the brightness of a photo. Follow the instructions on the computer screen to transfer the photos to the computer or to dry at least 24 hours before stacking, ..., and then select a network computer where you make a selection. Printing photos from a memory device using the printer software 1 Load photo paper. 2 Insert a memory card or flash drive. 3 Transfer or print the photos: If the printer is using a USB connection • Fast Pics launches automatically when you...
User's Guide
Page 42
... print. If you make sure to print. Note: For best results, allow the prints to finish before stacking, displaying, or storing. b Select the paper source, paper size, paper type, photo size, quality, and layout of copies per photo, red-eye reduction, color effects, page layout, print options... that you want to fill in the circles completely. 6 Load photo paper. The printer scans the proof sheet and then starts printing the photos. Printing 42 or A4-size plain paper. 2 Insert a memory card or flash drive. Printing photos from a memory device using the proof sheet 1 Load letter-...
... print. If you make sure to print. Note: For best results, allow the prints to finish before stacking, displaying, or storing. b Select the paper source, paper size, paper type, photo size, quality, and layout of copies per photo, red-eye reduction, color effects, page layout, print options... that you want to fill in the circles completely. 6 Load photo paper. The printer scans the proof sheet and then starts printing the photos. Printing 42 or A4-size plain paper. 2 Insert a memory card or flash drive. Printing photos from a memory device using the proof sheet 1 Load letter-...
User's Guide
Page 47
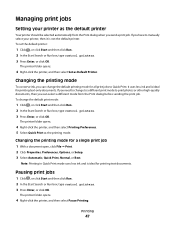
... then select Printing Preferences. 5 Select Quick Print as Default Printer. Note: Printing in Quick Print mode uses less ink and is ideal for all print jobs to print photos or other high-quality documents, then you need to change the default print mode: 1 Click , or... a document open, click File Print. 2 Click Properties, Preferences, Options, or Setup. 3 Select Automatic, Quick Print, Normal, or Best. Managing print jobs Setting your printer as the default printer Your printer should be selected automatically from the Print dialog before sending the print job. To set the default...
... then select Printing Preferences. 5 Select Quick Print as Default Printer. Note: Printing in Quick Print mode uses less ink and is ideal for all print jobs to print photos or other high-quality documents, then you need to change the default print mode: 1 Click , or... a document open, click File Print. 2 Click Properties, Preferences, Options, or Setup. 3 Select Automatic, Quick Print, Normal, or Best. Managing print jobs Setting your printer as the default printer Your printer should be selected automatically from the Print dialog before sending the print job. To set the default...
User's Guide
Page 51
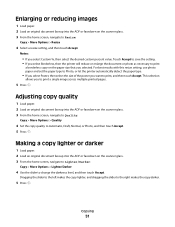
... then touch Accept. 5 Press . This selection allows you to print, and then touch Accept. For best results with this resize setting, use photo paper and set the paper type to Photo, or let the printer automatically detect the paper type. • If you select Poster, then select the size of the poster ...you select Borderless, then the printer will reduce or enlarge the document or photo as necessary to the right makes the copy darker. 5 Press . Dragging the slider to the left makes the copy lighter, and...
... then touch Accept. 5 Press . This selection allows you to print, and then touch Accept. For best results with this resize setting, use photo paper and set the paper type to Photo, or let the printer automatically detect the paper type. • If you select Poster, then select the size of the poster ...you select Borderless, then the printer will reduce or enlarge the document or photo as necessary to the right makes the copy darker. 5 Press . Dragging the slider to the left makes the copy lighter, and...


