User's Guide
Page 3
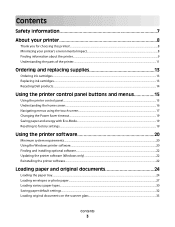
... Ordering and replacing supplies 13 Ordering ink cartridges...13 Replacing ink cartridges...13 Recycling Dell products...14 Using the printer control panel buttons and menus 15 Using the printer control panel...15 Understanding the home screen...16 Navigating menus using the touch screen...17......20 Using the Windows printer software...20 Finding and installing optional software...22 Updating the printer software (Windows only)...22 Reinstalling the printer software...22 Loading paper and original documents 24 Loading the paper tray...24 Loading envelopes or photo paper...27 Loading various ...
... Ordering and replacing supplies 13 Ordering ink cartridges...13 Replacing ink cartridges...13 Recycling Dell products...14 Using the printer control panel buttons and menus 15 Using the printer control panel...15 Understanding the home screen...16 Navigating menus using the touch screen...17......20 Using the Windows printer software...20 Finding and installing optional software...22 Updating the printer software (Windows only)...22 Reinstalling the printer software...22 Loading paper and original documents 24 Loading the paper tray...24 Loading envelopes or photo paper...27 Loading various ...
User's Guide
Page 4
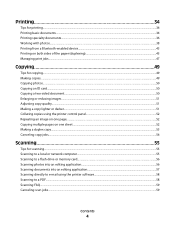
... copy quality...51 Making a copy lighter or darker...51 Collating copies using the printer control panel...52 Repeating an image on one page...52 Copying multiple pages on one sheet ...52 Making a duplex copy...53 Canceling copy jobs...54 Scanning 55 Tips... for scanning...55 Scanning to a local or network computer...55 Scanning to a flash drive or memory card...56 Scanning photos into an editing application...56 Scanning documents into an editing application 57 Scanning directly to e-mail using the printer...
... copy quality...51 Making a copy lighter or darker...51 Collating copies using the printer control panel...52 Repeating an image on one page...52 Copying multiple pages on one sheet ...52 Making a duplex copy...53 Canceling copy jobs...54 Scanning 55 Tips... for scanning...55 Scanning to a local or network computer...55 Scanning to a flash drive or memory card...56 Scanning photos into an editing application...56 Scanning documents into an editing application 57 Scanning directly to e-mail using the printer...
User's Guide
Page 9
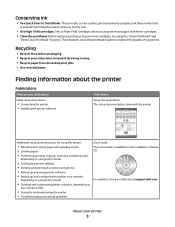
...your printer model • Configuring printer settings • Viewing and printing documents and photos • Setting up and using printer software • Setting up and configuring the printer on a network, depending on your printer model • Creating and customizing printer ...solutions, depending on the installation software CD. Inks in High-Yield cartridges allow you looking for printing documents that are ideal for ? Conserving ink • Use Quick Print or Draft Mode. For updates, check our Web site at support.dell...
...your printer model • Configuring printer settings • Viewing and printing documents and photos • Setting up and using printer software • Setting up and configuring the printer on a network, depending on your printer model • Creating and customizing printer ...solutions, depending on the installation software CD. Inks in High-Yield cartridges allow you looking for printing documents that are ideal for ? Conserving ink • Use Quick Print or Draft Mode. For updates, check our Web site at support.dell...
User's Guide
Page 11
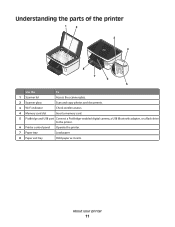
Understanding the parts of the printer 1 2 3 4 8 7 6 5 Use the To 1 Scanner lid Access the scanner glass. 2 Scanner glass Scan and copy photos and documents. 3 Wi-Fi indicator Check wireless status. 4 Memory card slot Insert a memory card. 5 PictBridge and USB port Connect a PictBridge-enabled digital camera, a USB Bluetooth adapter, or a flash drive to the printer. 6 Printer control panel Operate the printer. 7 Paper tray Load paper. 8 Paper exit tray Hold paper as it exits. About your printer 11
Understanding the parts of the printer 1 2 3 4 8 7 6 5 Use the To 1 Scanner lid Access the scanner glass. 2 Scanner glass Scan and copy photos and documents. 3 Wi-Fi indicator Check wireless status. 4 Memory card slot Insert a memory card. 5 PictBridge and USB port Connect a PictBridge-enabled digital camera, a USB Bluetooth adapter, or a flash drive to the printer. 6 Printer control panel Operate the printer. 7 Paper tray Load paper. 8 Paper exit tray Hold paper as it exits. About your printer 11
User's Guide
Page 17
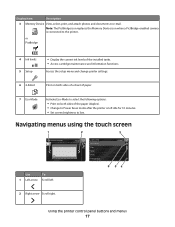
... Device icon when a PictBridge-enabled camera is left . 2 Right arrow Scroll right. Using the printer control panel buttons and menus 17 Access the setup menu and change printer settings. 6 2-Sided 12 7 Eco-Mode Print on both sides of a sheet of paper. or... Power Saver mode after the printer is connected to the printer. Display item Description 3 Memory Device View, select, print, and attach photos and documents to low. Navigating menus using the touch screen 1 2 3 PREVIEWING PHOTOS Accept PAPER TYPE Auto Detect Plain Matte Photo Transparency Accept 6 54 Use...
... Device icon when a PictBridge-enabled camera is left . 2 Right arrow Scroll right. Using the printer control panel buttons and menus 17 Access the setup menu and change printer settings. 6 2-Sided 12 7 Eco-Mode Print on both sides of a sheet of paper. or... Power Saver mode after the printer is connected to the printer. Display item Description 3 Memory Device View, select, print, and attach photos and documents to low. Navigating menus using the touch screen 1 2 3 PREVIEWING PHOTOS Accept PAPER TYPE Auto Detect Plain Matte Photo Transparency Accept 6 54 Use...
User's Guide
Page 20
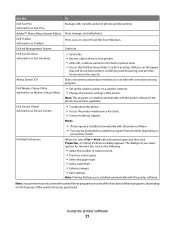
.... • Maintain ink cartridges. • Print a test page. • Register the printer. • Contact technical support. Printer software Use the Dell Printer Home (referred to as Printer Home) To • Launch applications or programs. • Access the Fax Solutions software. • Scan or e-mail a photo or document. • Edit scanned documents. • Scan documents to 500...
.... • Maintain ink cartridges. • Print a test page. • Register the printer. • Contact technical support. Printer software Use the Dell Printer Home (referred to as Printer Home) To • Launch applications or programs. • Access the Fax Solutions software. • Scan or e-mail a photo or document. • Edit scanned documents. • Scan documents to 500...
User's Guide
Page 21
...) • Send a fax. • Receive a fax in three-in-one printers. • Add, edit, or delete contacts in the built-in phone book. • Access the Dell Fax Setup Utility. Note: Your printer may be prompted to print. • Print two-sided copies. • ...8226; Add a watermark. • Enhance images. • Save settings. Using the printer software 21 AdobeTM Photo Album Starter Edition View, manage, and edit photos. Dell Ink Management System Order ink. When you purchased. Dell Wireless Setup Utility (referred to as the following: • Select the number of the...
...) • Send a fax. • Receive a fax in three-in-one printers. • Add, edit, or delete contacts in the built-in phone book. • Access the Dell Fax Setup Utility. Note: Your printer may be prompted to print. • Print two-sided copies. • ...8226; Add a watermark. • Enhance images. • Save settings. Using the printer software 21 AdobeTM Photo Album Starter Edition View, manage, and edit photos. Dell Ink Management System Order ink. When you purchased. Dell Wireless Setup Utility (referred to as the following: • Select the number of the...

User's Guide
Page 27
Loading envelopes or photo paper 1 Pull tray completely out of the printer. 2 Move the paper guides to the sides of tray. Loading paper and original documents 27
Loading envelopes or photo paper 1 Pull tray completely out of the printer. 2 Move the paper guides to the sides of tray. Loading paper and original documents 27
User's Guide
Page 30
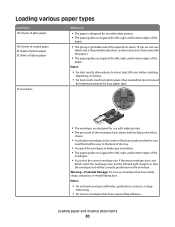
... dry at least 24 hours before stacking, displaying, or storing. • For best results, load more photo paper than needed but do not exceed the maximum amount for use with inkjet printers. • The print side of the envelopes faces down with holes, perforations, cutouts, or deep embossing. • Do not use... Load up to 150 sheets of plain paper 100 sheets of coated paper 25 sheets of photo paper 25 sheets of glossy paper 10 envelopes Make sure • The paper is designed for use with inkjet printers. • The paper guides rest against the left, right, and bottom edges of the ...
... dry at least 24 hours before stacking, displaying, or storing. • For best results, load more photo paper than needed but do not exceed the maximum amount for use with inkjet printers. • The print side of the envelopes faces down with holes, perforations, cutouts, or deep embossing. • Do not use... Load up to 150 sheets of plain paper 100 sheets of coated paper 25 sheets of photo paper 25 sheets of glossy paper 10 envelopes Make sure • The paper is designed for use with inkjet printers. • The paper guides rest against the left, right, and bottom edges of the ...
User's Guide
Page 31
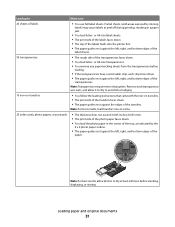
...; The print side of the labels faces down. • The top of the labels feeds into the printer first. • The paper guides rest against the left , right, and bottom edges of the label... against the left, right, and bottom edges of the paper. Note: For best results, load transfers one at least 24 hours before loading. • If the transparencies have a removable strip, each transparency as...or storing Loading paper and original documents 31 Remove each strip faces down . • You load the photo paper in a paper jam. • You load letter- Load up to Make sure 25 sheets of...
...; The print side of the labels faces down. • The top of the labels feeds into the printer first. • The paper guides rest against the left , right, and bottom edges of the label... against the left, right, and bottom edges of the paper. Note: For best results, load transfers one at least 24 hours before loading. • If the transparencies have a removable strip, each transparency as...or storing Loading paper and original documents 31 Remove each strip faces down . • You load the photo paper in a paper jam. • You load letter- Load up to Make sure 25 sheets of...
User's Guide
Page 32
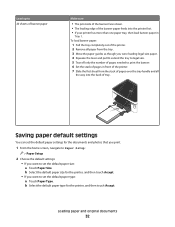
... default paper settings for the documents and photos that you print. 1 From the home screen, navigate to Paper Setup: > Paper Setup 2 Choose the default settings: • If you want to set the default paper size: a Touch Paper Size. b Select the default paper type for the printer, and then touch Accept. •... you want to print the banner. 6 Set the stack of pages in front of the printer. 7 Slide the first sheet from the stack of pages over the tray handle and all the way into the printer first. • If your printer has more than one paper tray, then load banner paper in Tray 1.
... default paper settings for the documents and photos that you print. 1 From the home screen, navigate to Paper Setup: > Paper Setup 2 Choose the default settings: • If you want to set the default paper size: a Touch Paper Size. b Select the default paper type for the printer, and then touch Accept. •... you want to print the banner. 6 Set the stack of pages in front of the printer. 7 Slide the first sheet from the stack of pages over the tray handle and all the way into the printer first. • If your printer has more than one paper tray, then load banner paper in Tray 1.
User's Guide
Page 34
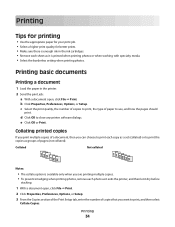
... each copy as a set (collated) or to print the copies as it exits the printer, and then let it is available only when you are printing multiple copies. • To prevent smudging when printing photos, remove each sheet as it dry before stacking. 1 With a document open , click... setting when printing photos. Printing 34 c Select the print quality, the number of copies to print, the type of pages (not collated). Printing basic documents Printing a document 1 Load the paper in the ink cartridges. • Remove each photo as groups of paper to close any printer software dialogs.
... each copy as a set (collated) or to print the copies as it exits the printer, and then let it is available only when you are printing multiple copies. • To prevent smudging when printing photos, remove each sheet as it dry before stacking. 1 With a document open , click... setting when printing photos. Printing 34 c Select the print quality, the number of copies to print, the type of pages (not collated). Printing basic documents Printing a document 1 Load the paper in the ink cartridges. • Remove each photo as groups of paper to close any printer software dialogs.
User's Guide
Page 38
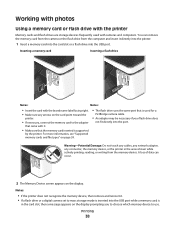
Working with photos Using a memory card or flash drive with the printer Memory cards and flash drives are storage devices frequently used for a PictBridge camera cable. • An adapter may be necessary if your flash drive does .... • The flash drive uses the same port that the memory card inserted is used with it. • Make sure that is supported by the printer. A loss of data can remove the memory card from the camera or the flash drive from the memory device. Printing 38 For more information, see...
Working with photos Using a memory card or flash drive with the printer Memory cards and flash drives are storage devices frequently used for a PictBridge camera cable. • An adapter may be necessary if your flash drive does .... • The flash drive uses the same port that the memory card inserted is used with it. • Make sure that is supported by the printer. A loss of data can remove the memory card from the camera or the flash drive from the memory device. Printing 38 For more information, see...
User's Guide
Page 39
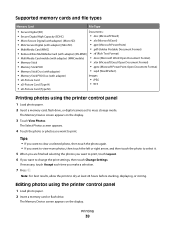
... before stacking, displaying, or storing. Editing photos using the printer control panel 1 Load photo paper. 2 Insert a memory card, flash drive, or digital camera set to print. The Memory Device screen appears on the display. 3 Touch View Photos. Supported memory cards and file types Memory...xD-Picture Card • JPEG • xD-Picture Card (Type H) • TIFF • xD-Picture Card (Type M) Printing photos using the printer control panel 1 Load photo paper. 2 Insert a memory card or flash drive. The Memory Device screen appears on the display. Tips: • If you want ...
... before stacking, displaying, or storing. Editing photos using the printer control panel 1 Load photo paper. 2 Insert a memory card, flash drive, or digital camera set to print. The Memory Device screen appears on the display. 3 Touch View Photos. Supported memory cards and file types Memory...xD-Picture Card • JPEG • xD-Picture Card (Type H) • TIFF • xD-Picture Card (Type M) Printing photos using the printer control panel 1 Load photo paper. 2 Insert a memory card or flash drive. The Memory Device screen appears on the display. Tips: • If you want ...
User's Guide
Page 40
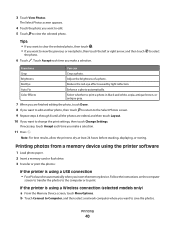
...reflection. Note: For best results, allow the prints to print. Printing photos from a memory device using the printer software 1 Load photo paper. 2 Insert a memory card or flash drive. 3 Transfer or print the photos: If the printer is using a USB connection • Fast Pics launches automatically when you... 24 hours before stacking, displaying, or storing. If the printer is using a Wireless connection (selected models only) a From the Memory Device screen, touch More Options. The Select Photos screen appears. 4 Touch the photo you want to edit. 5 Touch to change the print settings...
...reflection. Note: For best results, allow the prints to print. Printing photos from a memory device using the printer software 1 Load photo paper. 2 Insert a memory card or flash drive. 3 Transfer or print the photos: If the printer is using a USB connection • Fast Pics launches automatically when you... 24 hours before stacking, displaying, or storing. If the printer is using a Wireless connection (selected models only) a From the Memory Device screen, touch More Options. The Select Photos screen appears. 4 Touch the photo you want to edit. 5 Touch to change the print settings...
User's Guide
Page 41
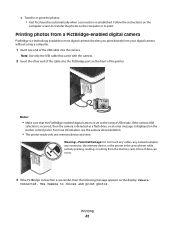
...the camera is detected as a flash drive, or an error message is established. Printing 41 Printing photos from the memory card. For more information, see the camera documentation. • The printer reads only one end of the USB cable into the PictBridge port on the front of data can occur. 3 ...If the PictBridge connection is set to choose and print photos. Use Camera to the correct USB mode. c Transfer or print...
...the camera is detected as a flash drive, or an error message is established. Printing 41 Printing photos from the memory card. For more information, see the camera documentation. • The printer reads only one end of the USB cable into the PictBridge port on the front of data can occur. 3 ...If the PictBridge connection is set to choose and print photos. Use Camera to the correct USB mode. c Transfer or print...
User's Guide
Page 42
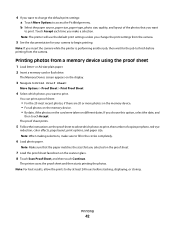
... drive. Note: Make sure that the paper matches the size that you want to access the PictBridge menu. The printer scans the proof sheet and then starts printing the photos. Note: If you change the default print settings: a Touch More Options to change the print settings from a ...memory device using the proof sheet 1 Load letter- The proof sheet prints. 5 Follow the instructions on different dates. Note: The printer will use the default ...
... drive. Note: Make sure that the paper matches the size that you want to access the PictBridge menu. The printer scans the proof sheet and then starts printing the photos. Note: If you change the default print settings: a Touch More Options to change the print settings from a ...memory device using the proof sheet 1 Load letter- The proof sheet prints. 5 Follow the instructions on different dates. Note: The printer will use the default ...
User's Guide
Page 47
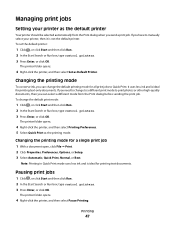
... sending the print job. Printing 47 Changing the printing mode for printing text documents. Managing print jobs Setting your printer, then it is ideal for all print jobs to print photos or other high-quality documents, then you can change the default print mode: 1 Click , or click Start... and then click Run. 2 In the Start Search or Run box, type control printers. 3 Press Enter, or click OK. The printer folder opens. 4 Right-click the printer, and then...
... sending the print job. Printing 47 Changing the printing mode for printing text documents. Managing print jobs Setting your printer, then it is ideal for all print jobs to print photos or other high-quality documents, then you can change the default print mode: 1 Click , or click Start... and then click Run. 2 In the Start Search or Run box, type control printers. 3 Press Enter, or click OK. The printer folder opens. 4 Right-click the printer, and then...
User's Guide
Page 49
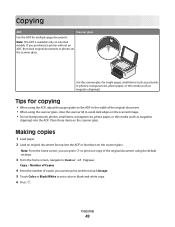
... black-and-white copy. 6 Press . Place these items on selected models. Use the scanner glass for single pages, small items (such as postcards or photos), transparencies, photo paper, or thin media (such as magazine clippings) into the ADF or facedown on the scanner glass. Making copies 1 Load paper. 2 Load an original... Number of Copies: Copy > Number of Copies 4 Enter the number of the original document using the scanner glass, close the scanner lid to print one copy of copies you purchased a printer without an ADF, then load original documents or photos on the scanner glass.
... black-and-white copy. 6 Press . Place these items on selected models. Use the scanner glass for single pages, small items (such as postcards or photos), transparencies, photo paper, or thin media (such as magazine clippings) into the ADF or facedown on the scanner glass. Making copies 1 Load paper. 2 Load an original... Number of Copies: Copy > Number of Copies 4 Enter the number of the original document using the scanner glass, close the scanner lid to print one copy of copies you purchased a printer without an ADF, then load original documents or photos on the scanner glass.
User's Guide
Page 51
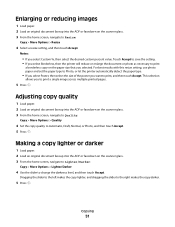
... then touch Accept. 5 Press . Touch Accept to save the setting. • If you select Borderless, then the printer will reduce or enlarge the document or photo as necessary to Resize: Copy > More Options > Resize 4 Select a resize setting, and then touch Accept. Notes: • If you want to print a ...selected. This selection allows you to print, and then touch Accept. For best results with this resize setting, use photo paper and set the paper type to Photo, or let the printer automatically detect the paper type. • If you select Poster, then select the size of the poster you ...
... then touch Accept. 5 Press . Touch Accept to save the setting. • If you select Borderless, then the printer will reduce or enlarge the document or photo as necessary to Resize: Copy > More Options > Resize 4 Select a resize setting, and then touch Accept. Notes: • If you want to print a ...selected. This selection allows you to print, and then touch Accept. For best results with this resize setting, use photo paper and set the paper type to Photo, or let the printer automatically detect the paper type. • If you select Poster, then select the size of the poster you ...


