Quick Reference Guide
Page 7
...Software. DSS is necessary for drives, and USB devices. Online discussion with support • Reference - support.dell.com NOTE: Select your region or business segment to support.dell.com, select your region or appropriate for components, such as the memory, hard drive, and operating system •... Customer Care - If you reinstall the operating system on your computer, you use support.dell.co m or contact support. &#...
...Software. DSS is necessary for drives, and USB devices. Online discussion with support • Reference - support.dell.com NOTE: Select your region or business segment to support.dell.com, select your region or appropriate for components, such as the memory, hard drive, and operating system •... Customer Care - If you reinstall the operating system on your computer, you use support.dell.co m or contact support. &#...
Quick Reference Guide
Page 9
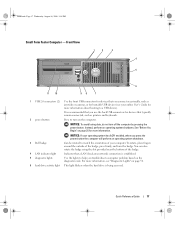
... The computer is in a normal operating state. • Blinking green - For more information. This light flickers when the hard drive is turned off the computer by pressing the power button. Quick Reference Guide 9 Use the front USB connectors for a description of...3:18 PM 1 5.25-inch drive bay 2 5.25-inch drive bay 3 3.5-inch drive bay 4 USB 2.0 connectors (2) 5 LAN indicator light 6 diagnostic lights 7 power button 8 power light 9 hard-drive activity light 10 headphone connector 11 microphone connector Can contain an optical drive. The power light illuminates and blinks...
... The computer is in a normal operating state. • Blinking green - For more information. This light flickers when the hard drive is turned off the computer by pressing the power button. Quick Reference Guide 9 Use the front USB connectors for a description of...3:18 PM 1 5.25-inch drive bay 2 5.25-inch drive bay 3 3.5-inch drive bay 4 USB 2.0 connectors (2) 5 LAN indicator light 6 diagnostic lights 7 power button 8 power light 9 hard-drive activity light 10 headphone connector 11 microphone connector Can contain an optical drive. The power light illuminates and blinks...
Quick Reference Guide
Page 14
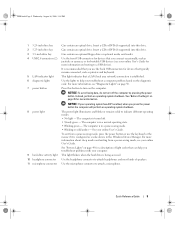
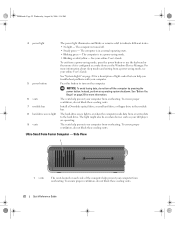
...to indicate different operating states: • No light - Can contain an optional floppy drive or optional Media Card Reader. Back View 1 2 3 4 5 6 14 Quick Reference Guide This light flickers when the hard drive is turned off. • Steady green - Desktop Computer - For more information, ...CD or DVD (if supported) into this drive. book.book Page 14 Wednesday, August 16, 2006 3:18 PM 5 power light 6 diagnostic lights 7 hard-drive activity light 8 headphone connector 9 microphone connector 10 3.5-inch drive bay 11 5.25-inch drive bay The power light illuminates and blinks or...
...to indicate different operating states: • No light - Can contain an optional floppy drive or optional Media Card Reader. Back View 1 2 3 4 5 6 14 Quick Reference Guide This light flickers when the hard drive is turned off. • Steady green - Desktop Computer - For more information, ...CD or DVD (if supported) into this drive. book.book Page 14 Wednesday, August 16, 2006 3:18 PM 5 power light 6 diagnostic lights 7 hard-drive activity light 8 headphone connector 9 microphone connector 10 3.5-inch drive bay 11 5.25-inch drive bay The power light illuminates and blinks or...
Quick Reference Guide
Page 17
...NOTICE: If your operating system has ACPI enabled, when you press the power button the computer will perform an operating system shutdown. 3 Dell badge Can be rotated to match the orientation of your online User's Guide for more information about booting to a USB device). For ...a LAN (local area network) connection is established. 5 diagnostic lights Use the lights to turn on page 50. 6 hard drive activity light This light flickers when the hard drive is recommended that you troubleshoot a computer problem based on page 25 for bootable USB devices (see "Diagnostic Lights" on the...
...NOTICE: If your operating system has ACPI enabled, when you press the power button the computer will perform an operating system shutdown. 3 Dell badge Can be rotated to match the orientation of your online User's Guide for more information about booting to a USB device). For ...a LAN (local area network) connection is established. 5 diagnostic lights Use the lights to turn on page 50. 6 hard drive activity light This light flickers when the hard drive is recommended that you troubleshoot a computer problem based on page 25 for bootable USB devices (see "Diagnostic Lights" on the...
Quick Reference Guide
Page 22
...book.book Page 22 Wednesday, August 16, 2006 3:18 PM 4 power light The power light illuminates and blinks or remains solid to the hard drive. To exit from overheating. See "System Lights" on when devices such as your CD player are operating. 9 vents The vents help ...computer reads data from overheating. NOTICE: To avoid losing data, do not block these cooling vents. 7 module bay Install a D-module optical drive, second hard drive, or floppy drive in the Windows Device Manager. See your computer. 5 power button Press this button to turn off . • Steady green - Ultra-...
...book.book Page 22 Wednesday, August 16, 2006 3:18 PM 4 power light The power light illuminates and blinks or remains solid to the hard drive. To exit from overheating. See "System Lights" on when devices such as your CD player are operating. 9 vents The vents help ...computer reads data from overheating. NOTICE: To avoid losing data, do not block these cooling vents. 7 module bay Install a D-module optical drive, second hard drive, or floppy drive in the Windows Device Manager. See your computer. 5 power button Press this button to turn off . • Steady green - Ultra-...

Quick Reference Guide
Page 32
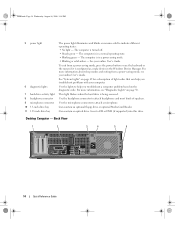
book.book Page 32 Wednesday, August 16, 2006 3:18 PM Inside Your Computer Mini Tower Computer 3 2 1 4 5 6 7 1 optical drive 4 optional chassis-intrusion switch 7 hard drive 2 floppy drive or media card reader 5 system board 3 power supply 6 heat-sink assembly 32 Quick Reference Guide
book.book Page 32 Wednesday, August 16, 2006 3:18 PM Inside Your Computer Mini Tower Computer 3 2 1 4 5 6 7 1 optical drive 4 optional chassis-intrusion switch 7 hard drive 2 floppy drive or media card reader 5 system board 3 power supply 6 heat-sink assembly 32 Quick Reference Guide
Quick Reference Guide
Page 35
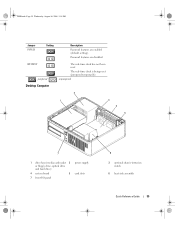
unjumpered 2 1 3 4 5 7 1 drive bays (media card reader 2 or floppy drive, optical drive and hard drive) 4 system board 5 7 front I/O panel power supply card slots 6 3 optional chassis-intrusion switch 6 heat sink assembly Quick Reference Guide 35 Password features are enabled (default setting). RTCRST jumpered Desktop Computer The real-time clock has not been reset. The real-time clock is being reset (jumpered temporarily). book.book Page 35 Wednesday, August 16, 2006 3:18 PM Jumper PSWD Setting Description Password features are disabled.
unjumpered 2 1 3 4 5 7 1 drive bays (media card reader 2 or floppy drive, optical drive and hard drive) 4 system board 5 7 front I/O panel power supply card slots 6 3 optional chassis-intrusion switch 6 heat sink assembly Quick Reference Guide 35 Password features are enabled (default setting). RTCRST jumpered Desktop Computer The real-time clock has not been reset. The real-time clock is being reset (jumpered temporarily). book.book Page 35 Wednesday, August 16, 2006 3:18 PM Jumper PSWD Setting Description Password features are disabled.

Quick Reference Guide
Page 38
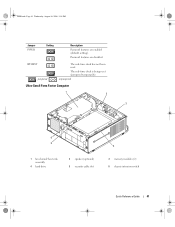
book.book Page 38 Wednesday, August 16, 2006 3:18 PM Small Form Factor Computer 3 2 1 4 5 1 drive-release latch 4 optional chassis-intrusion switch 7 heat sink and blower assembly 2 optical drive 5 hard drive 6 7 3 power supply and fan 6 system board 38 Quick Reference Guide
book.book Page 38 Wednesday, August 16, 2006 3:18 PM Small Form Factor Computer 3 2 1 4 5 1 drive-release latch 4 optional chassis-intrusion switch 7 heat sink and blower assembly 2 optical drive 5 hard drive 6 7 3 power supply and fan 6 system board 38 Quick Reference Guide
Quick Reference Guide
Page 41
book.book Page 41 Wednesday, August 16, 2006 3:18 PM Jumper PSWD Setting Description Password features are disabled. RTCRST jumpered The real-time clock has not been reset. The real-time clock is being reset (jumpered temporarily). Password features are enabled (default setting). unjumpered Ultra-Small Form Factor Computer 1 2 3 6 5 1 fan shroud/ heat sink assembly 4 hard drive 2 speaker (optional) 5 security cable slot 4 3 memory modules (2) 6 chassis intrusion switch Quick Reference Guide 41
book.book Page 41 Wednesday, August 16, 2006 3:18 PM Jumper PSWD Setting Description Password features are disabled. RTCRST jumpered The real-time clock has not been reset. The real-time clock is being reset (jumpered temporarily). Password features are enabled (default setting). unjumpered Ultra-Small Form Factor Computer 1 2 3 6 5 1 fan shroud/ heat sink assembly 4 hard drive 2 speaker (optional) 5 security cable slot 4 3 memory modules (2) 6 chassis intrusion switch Quick Reference Guide 41
Quick Reference Guide
Page 42
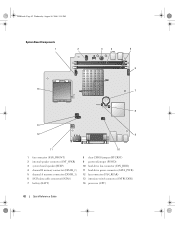
book.book Page 42 Wednesday, August 16, 2006 3:18 PM System Board Components 1 2 3 4 5 6 14 7 8 13 12 9 11 10 1 fan connector (FAN_FRONT) 2 internal speaker connector (INT_SPKR) 3 system board speaker (BEEP) 4 channel B memory connector (DIMM_2) 5 channel A memory connector (DIMM_1) 6 SATA data cable connector(SATA0) 7 battery (BATT) 8 clear CMOS jumper (RTCRST) 9 password jumper (PSWD) 10 hard-drive fan connector (FAN_HDD) 11 hard-drive power connector (SATA_PWR) 12 fan connector (FAN_REAR) 13 intrusion switch connector (INTRUDER) 14 processor (CPU) 42 Quick Reference Guide
book.book Page 42 Wednesday, August 16, 2006 3:18 PM System Board Components 1 2 3 4 5 6 14 7 8 13 12 9 11 10 1 fan connector (FAN_FRONT) 2 internal speaker connector (INT_SPKR) 3 system board speaker (BEEP) 4 channel B memory connector (DIMM_2) 5 channel A memory connector (DIMM_1) 6 SATA data cable connector(SATA0) 7 battery (BATT) 8 clear CMOS jumper (RTCRST) 9 password jumper (PSWD) 10 hard-drive fan connector (FAN_HDD) 11 hard-drive power connector (SATA_PWR) 12 fan connector (FAN_REAR) 13 intrusion switch connector (INTRUDER) 14 processor (CPU) 42 Quick Reference Guide
Quick Reference Guide
Page 47
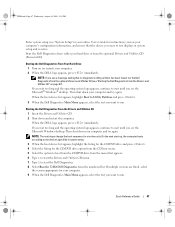
...found, run . NOTE: If you see the Microsoft® Windows® desktop. Starting the Dell Diagnostics From the Drivers and Utilities CD 1 Insert the Drivers and Utilities CD. 2 Shut down your hard drive or from the optional Drivers and Utilities CD (see a message stating that appears. 6 Type ... Main Menu appears, select the test you see the Microsoft Windows desktop. Start the Dell Diagnostics from either your computer and try again. Starting the Dell Diagnostics From Your Hard Drive 1 Turn on page 47). Then shut down and restart the computer. Quick Reference Guide 47 ...
...found, run . NOTE: If you see the Microsoft® Windows® desktop. Starting the Dell Diagnostics From the Drivers and Utilities CD 1 Insert the Drivers and Utilities CD. 2 Shut down your hard drive or from the optional Drivers and Utilities CD (see a message stating that appears. 6 Type ... Main Menu appears, select the test you see the Microsoft Windows desktop. Start the Dell Diagnostics from either your computer and try again. Starting the Dell Diagnostics From Your Hard Drive 1 Turn on page 47). Then shut down and restart the computer. Quick Reference Guide 47 ...

Quick Reference Guide
Page 51
...hard drive failure has Reseat all modules without error. • If available, install properly working memory of the same type into your online User's Guide. A possible USB failure has occurred. For information on contacting Dell, see your computer. • If the problem persists, contact Dell. For information on contacting Dell... that you know works and restart the computer. • If the problem persists or the computer has integrated graphics, contact Dell. restart the computer. A possible graphics card failure has occurred. • If the computer has a graphics card, remove ...
...hard drive failure has Reseat all modules without error. • If available, install properly working memory of the same type into your online User's Guide. A possible USB failure has occurred. For information on contacting Dell, see your computer. • If the problem persists, contact Dell. For information on contacting Dell... that you know works and restart the computer. • If the problem persists or the computer has integrated graphics, contact Dell. restart the computer. A possible graphics card failure has occurred. • If the computer has a graphics card, remove ...
Quick Reference Guide
Page 52
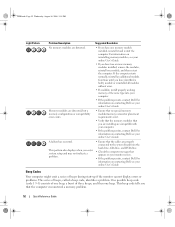
... to the system board from the hard drive, CD drive, and DVD drive. • Check the computer message that you are installing are compatible with your computer. • If the problem persists, contact Dell. A failure has occurred. For information on contacting Dell, see your online User's Guide.... modules are detected. • If you that the computer encountered a memory problem. 52 Quick Reference Guide For information on contacting Dell, see your online User's Guide. book.book Page 52 Wednesday, August 16, 2006 3:18 PM Light Pattern Problem Description Suggested Resolution...
... to the system board from the hard drive, CD drive, and DVD drive. • Check the computer message that you are installing are compatible with your computer. • If the problem persists, contact Dell. A failure has occurred. For information on contacting Dell, see your online User's Guide.... modules are detected. • If you that the computer encountered a memory problem. 52 Quick Reference Guide For information on contacting Dell, see your online User's Guide. book.book Page 52 Wednesday, August 16, 2006 3:18 PM Light Pattern Problem Description Suggested Resolution...
Quick Reference Guide
Page 56
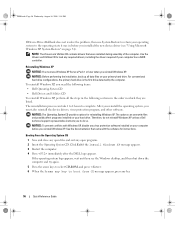
...Restore to return your operating system to the operating state it was in which they are listed. For conventional hard drive configurations, the primary hard drive is the first drive detected by the computer. To reinstall Windows XP, you need the following sections in the order in before... the Press any key to load any virus protection software installed on your hard drive. NOTICE: Before performing the installation, back up all the steps in the following items: • Dell Operating System CD • Dell Drivers and Utilities CD To reinstall Windows XP, perform all data files on...
...Restore to return your operating system to the operating state it was in which they are listed. For conventional hard drive configurations, the primary hard drive is the first drive detected by the computer. To reinstall Windows XP, you need the following sections in the order in before... the Press any key to load any virus protection software installed on your hard drive. NOTICE: Before performing the installation, back up all the steps in the following items: • Dell Operating System CD • Dell Drivers and Utilities CD To reinstall Windows XP, perform all data files on...

Quick Reference Guide
Page 57
... operating system components and configures the computer. message appears, click Skip. 15 When the Ready to complete the setup depends on the size of the hard drive and the speed of your computer. NOTICE: Do not press any key when the following message appears: Press any key to boot from the CD...
... operating system components and configures the computer. message appears, click Skip. 15 When the Ready to complete the setup depends on the size of the hard drive and the speed of your computer. NOTICE: Do not press any key when the following message appears: Press any key to boot from the CD...


