Quick Reference Guide
Page 3
... 27 Small Form Factor Computer 28 Ultra-Small Form Factor Computer 30 Inside Your Computer 32 Mini Tower Computer 32 Desktop Computer 35 Small Form Factor Computer 38 Ultra-Small Form Factor Computer 41 Setting Up Your Computer 43 Set Up Your Keyboard and Mouse 45... Set Up Your Monitor 45 Power Connections 46 Solving Problems 46 Dell Diagnostics 46 System Lights 49 Contents 3 Back-Panel Connectors 15 Small Form Factor Computer - book.book Page 3 Wednesday, August 16, 2006 3:18 PM Contents Finding...
... 27 Small Form Factor Computer 28 Ultra-Small Form Factor Computer 30 Inside Your Computer 32 Mini Tower Computer 32 Desktop Computer 35 Small Form Factor Computer 38 Ultra-Small Form Factor Computer 41 Setting Up Your Computer 43 Set Up Your Keyboard and Mouse 45... Set Up Your Monitor 45 Power Connections 46 Solving Problems 46 Dell Diagnostics 46 System Lights 49 Contents 3 Back-Panel Connectors 15 Small Form Factor Computer - book.book Page 3 Wednesday, August 16, 2006 3:18 PM Contents Finding...

Quick Reference Guide
Page 5
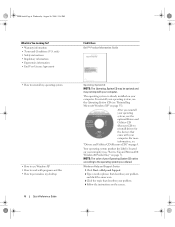
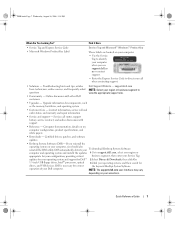
...reinstall drivers (see "Using the Drivers and Utilities CD" on page 58), run the Dell Diagnostics (see "Dell Diagnostics" on your documentation. Dell™ OptiPlex™ User's Guide Microsoft Windows XP Help and Support Center 1 Click Start→ Help ...Dell User and System Guides→ System Guides. 2 Click the User's Guide for technicians or experienced users. Quick Reference Guide 5 What Are You Looking For? • A diagnostic program for my computer • Drivers for my computer • My computer documentation • My device documentation • Desktop...
...reinstall drivers (see "Using the Drivers and Utilities CD" on page 58), run the Dell Diagnostics (see "Dell Diagnostics" on your documentation. Dell™ OptiPlex™ User's Guide Microsoft Windows XP Help and Support Center 1 Click Start→ Help ...Dell User and System Guides→ System Guides. 2 Click the User's Guide for technicians or experienced users. Quick Reference Guide 5 What Are You Looking For? • A diagnostic program for my computer • Drivers for my computer • My computer documentation • My device documentation • Desktop...
Quick Reference Guide
Page 6
... use Windows XP • How to work with your operating system, use the optional Drivers and Utilities CD (ResourceCD) to personalize my desktop 6 Quick Reference Guide Find It Here Dell™ Product Information Guide Operating System CD NOTE: The Operating System CD may be optional and may not ship with your computer.
... use Windows XP • How to work with your operating system, use the optional Drivers and Utilities CD (ResourceCD) to personalize my desktop 6 Quick Reference Guide Find It Here Dell™ Product Information Guide Operating System CD NOTE: The Operating System CD may be optional and may not ship with your computer.
Quick Reference Guide
Page 7
... DSS utility. operation of your region or business segment to support.dell.com, select your region or appropriate for drives, and USB devices. Upgrade information for correct the keyword Desktop System Software. Troubleshooting hints and tips, articles from technicians, online ...courses, and frequently asked questions Dell Support Website - DSS is necessary for components, such as the memory, ...
... DSS utility. operation of your region or business segment to support.dell.com, select your region or appropriate for drives, and USB devices. Upgrade information for correct the keyword Desktop System Software. Troubleshooting hints and tips, articles from technicians, online ...courses, and frequently asked questions Dell Support Website - DSS is necessary for components, such as the memory, ...
Quick Reference Guide
Page 13
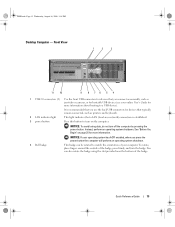
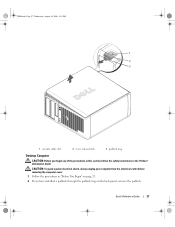
... for bootable USB devices (see your online User's Guide for devices that you press the power button the computer will perform an operating system shutdown. 4 Dell badge This badge can also rotate the badge using the slot provided near the bottom of the badge, press firmly, and turn off the computer... shutdown. NOTICE: If your computer. NOTICE: To avoid losing data, do not turn the badge. book.book Page 13 Wednesday, August 16, 2006 3:18 PM Desktop Computer -
... for bootable USB devices (see your online User's Guide for devices that you press the power button the computer will perform an operating system shutdown. 4 Dell badge This badge can also rotate the badge using the slot provided near the bottom of the badge, press firmly, and turn off the computer... shutdown. NOTICE: If your computer. NOTICE: To avoid losing data, do not turn the badge. book.book Page 13 Wednesday, August 16, 2006 3:18 PM Desktop Computer -
Quick Reference Guide
Page 14
... accessed. This light flickers when the hard drive is turned off. • Steady green - See "System Lights" on page 50. Can contain an optical drive. Desktop Computer - Insert a CD or DVD (if supported) into this drive. book.book Page 14 Wednesday, August 16, 2006 3:18 PM 5 power light 6 diagnostic lights 7 hard...
... accessed. This light flickers when the hard drive is turned off. • Steady green - See "System Lights" on page 50. Can contain an optical drive. Desktop Computer - Insert a CD or DVD (if supported) into this drive. book.book Page 14 Wednesday, August 16, 2006 3:18 PM 5 power light 6 diagnostic lights 7 hard...
Quick Reference Guide
Page 15
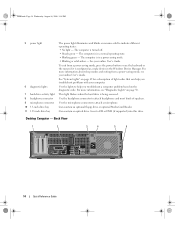
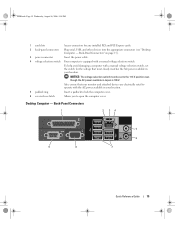
... AC power available in your location. 5 padlock ring Insert a padlock to lock the computer cover. 6 cover-release latch Allows you to open the computer cover. Desktop Computer - Back-Panel Connectors" on page 15). 3 power connector Insert the power cable. 4 voltage selection switch Your computer is 100 V. Back-Panel Connectors 1 2 34 9 8...any installed PCI and PCI Express cards. 2 back-panel connectors Plug serial, USB, and other devices into the appropriate connectors (see "Desktop Computer - To help avoid damaging a computer with a manual voltage selection switch.
... AC power available in your location. 5 padlock ring Insert a padlock to lock the computer cover. 6 cover-release latch Allows you to open the computer cover. Desktop Computer - Back-Panel Connectors" on page 15). 3 power connector Insert the power cable. 4 voltage selection switch Your computer is 100 V. Back-Panel Connectors 1 2 34 9 8...any installed PCI and PCI Express cards. 2 back-panel connectors Plug serial, USB, and other devices into the appropriate connectors (see "Desktop Computer - To help avoid damaging a computer with a manual voltage selection switch.
Quick Reference Guide
Page 26
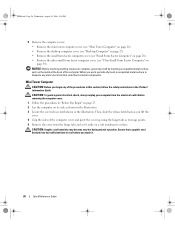
... 3:18 PM 5 Remove the computer cover: • Remove the mini tower computer cover (see "Mini Tower Computer" on page 26). • Remove the desktop computer cover (see "Desktop Computer" on page 27). • Remove the small form factor computer cover (see "Small Form Factor Computer" on page 28). • Remove the ultra...
... 3:18 PM 5 Remove the computer cover: • Remove the mini tower computer cover (see "Mini Tower Computer" on page 26). • Remove the desktop computer cover (see "Desktop Computer" on page 27). • Remove the small form factor computer cover (see "Small Form Factor Computer" on page 28). • Remove the ultra...
Quick Reference Guide
Page 27
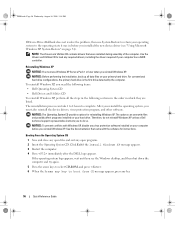
CAUTION: To guard against electrical shock, always unplug your computer from the electrical outlet before removing the computer cover. 1 Follow the procedures in the Product Information Guide. book.book Page 27 Wednesday, August 16, 2006 3:18 PM 1 2 3 1 security cable slot 2 cover release latch 3 padlock ring Desktop Computer CAUTION: Before you begin any of the procedures in this section, follow the safety instructions in "Before You Begin" on page 25. 2 If you have installed a padlock through the padlock ring on the back panel, remove the padlock. Quick Reference Guide 27
CAUTION: To guard against electrical shock, always unplug your computer from the electrical outlet before removing the computer cover. 1 Follow the procedures in the Product Information Guide. book.book Page 27 Wednesday, August 16, 2006 3:18 PM 1 2 3 1 security cable slot 2 cover release latch 3 padlock ring Desktop Computer CAUTION: Before you begin any of the procedures in this section, follow the safety instructions in "Before You Begin" on page 25. 2 If you have installed a padlock through the padlock ring on the back panel, remove the padlock. Quick Reference Guide 27
Quick Reference Guide
Page 35
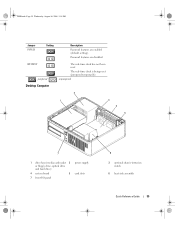
The real-time clock is being reset (jumpered temporarily). Password features are enabled (default setting). unjumpered 2 1 3 4 5 7 1 drive bays (media card reader 2 or floppy drive, optical drive and hard drive) 4 system board 5 7 front I/O panel power supply card slots 6 3 optional chassis-intrusion switch 6 heat sink assembly Quick Reference Guide 35 book.book Page 35 Wednesday, August 16, 2006 3:18 PM Jumper PSWD Setting Description Password features are disabled. RTCRST jumpered Desktop Computer The real-time clock has not been reset.
The real-time clock is being reset (jumpered temporarily). Password features are enabled (default setting). unjumpered 2 1 3 4 5 7 1 drive bays (media card reader 2 or floppy drive, optical drive and hard drive) 4 system board 5 7 front I/O panel power supply card slots 6 3 optional chassis-intrusion switch 6 heat sink assembly Quick Reference Guide 35 book.book Page 35 Wednesday, August 16, 2006 3:18 PM Jumper PSWD Setting Description Password features are disabled. RTCRST jumpered Desktop Computer The real-time clock has not been reset.
Quick Reference Guide
Page 47
...too long and the operating system logo appears, continue to wait until you want to run the Dell Diagnostics from the optional Drivers and Utilities CD (see the Microsoft® Windows® desktop. When the boot device list appears, highlight Boot to test displays in system setup and is...the test you want to Utility Partition and press . 3 When the Dell Diagnostics Main Menu appears, select the test you see the Microsoft Windows desktop. On the next start the Dell Diagnostics. 8 Select Run the 32 Bit Dell Diagnostics from the numbered list. If you wait too long and the ...
...too long and the operating system logo appears, continue to wait until you want to run the Dell Diagnostics from the optional Drivers and Utilities CD (see the Microsoft® Windows® desktop. When the boot device list appears, highlight Boot to test displays in system setup and is...the test you want to Utility Partition and press . 3 When the Dell Diagnostics Main Menu appears, select the test you see the Microsoft Windows desktop. On the next start the Dell Diagnostics. 8 Select Run the 32 Bit Dell Diagnostics from the numbered list. If you wait too long and the ...
Quick Reference Guide
Page 56
... Exit if the Install Windows XP message appears. 3 Restart the computer. 4 Press immediately after the DELL logo appears. To reinstall Windows XP, you installed the new device driver (see the Windows desktop, and then shut down the computer and try again. 5 Press the arrow keys to select CD-... does not resolve the problem, then use Windows XP Service Pack 1 or later when you to do not reinstall Windows XP unless a Dell technical support representative instructs you reinstall Windows XP. Use the Drivers and Utilities CD to complete. NOTICE: To prevent conflicts with the software ...
... Exit if the Install Windows XP message appears. 3 Restart the computer. 4 Press immediately after the DELL logo appears. To reinstall Windows XP, you installed the new device driver (see the Windows desktop, and then shut down the computer and try again. 5 Press the arrow keys to select CD-... does not resolve the problem, then use Windows XP Service Pack 1 or later when you to do not reinstall Windows XP unless a Dell technical support representative instructs you reinstall Windows XP. Use the Drivers and Utilities CD to complete. NOTICE: To prevent conflicts with the software ...
Quick Reference Guide
Page 58
Select the appropriate System Model, Operating System, Device Type, and Topic. To complete the installation, respond to the Windows desktop. 2 Insert the Drivers and Utilities CD into the CD drive. If you are using the Drivers and Utilities CD for your computer, click Drivers from ... Utilities CD is displayed on the computer and allow it to boot to the prompts offered by the installation program. 4 Click Next at the Welcome Dell System Owner screen. book.book Page 58 Wednesday, August 16, 2006 3:18 PM 18 Click Finish to complete the setup, and remove the CD. 19...
Select the appropriate System Model, Operating System, Device Type, and Topic. To complete the installation, respond to the Windows desktop. 2 Insert the Drivers and Utilities CD into the CD drive. If you are using the Drivers and Utilities CD for your computer, click Drivers from ... Utilities CD is displayed on the computer and allow it to boot to the prompts offered by the installation program. 4 Click Next at the Welcome Dell System Owner screen. book.book Page 58 Wednesday, August 16, 2006 3:18 PM 18 Click Finish to complete the setup, and remove the CD. 19...


