
Quick Reference Guide
Page 9
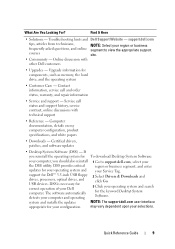
... computer and operating 2 Select Drivers & Downloads and click Go. 3 Click your Dell computer. Upgrade information for Dell™ 3.5-inch USB floppy drives, processors, optical drives, and USB devices. Contact information, service call status and support history, service contract...dell.com, select your configuration. Computer documentation, details on my computer configuration, product specifications, and white papers • Downloads - Certified drivers, patches, and software updates • Desktop System Software (DSS) - support for components, such as memory, the hard drive...
... computer and operating 2 Select Drivers & Downloads and click Go. 3 Click your Dell computer. Upgrade information for Dell™ 3.5-inch USB floppy drives, processors, optical drives, and USB devices. Contact information, service call status and support history, service contract...dell.com, select your configuration. Computer documentation, details on my computer configuration, product specifications, and white papers • Downloads - Certified drivers, patches, and software updates • Desktop System Software (DSS) - support for components, such as memory, the hard drive...
Quick Reference Guide
Page 16
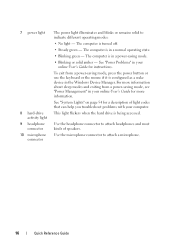
...is configured as a wake device in a power-saving mode. • Blinking or solid amber - This light flickers when the hard drive is in your computer. Use the headphone connector to attach a microphone. 16 Quick Reference Guide The computer is being accessed. 7 power light... 8 hard-drive activity light 9 headphone connector 10 microphone connector The power light illuminates and blinks or remains solid to indicate different operating modes: •...
...is configured as a wake device in a power-saving mode. • Blinking or solid amber - This light flickers when the hard drive is in your computer. Use the headphone connector to attach a microphone. 16 Quick Reference Guide The computer is being accessed. 7 power light... 8 hard-drive activity light 9 headphone connector 10 microphone connector The power light illuminates and blinks or remains solid to indicate different operating modes: •...
Quick Reference Guide
Page 23
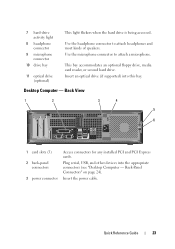
... - Back-Panel Connectors" on page 24). This bay accommodates an optional floppy drive, media card reader, or second hard drive. Quick Reference Guide 23 7 hard-drive activity light 8 headphone connector 9 microphone connector 10 drive bay 11 optical drive (optional) This light flickers when the hard drive is being accessed. Use the microphone connector to attach headphones and most kinds...
... - Back-Panel Connectors" on page 24). This bay accommodates an optional floppy drive, media card reader, or second hard drive. Quick Reference Guide 23 7 hard-drive activity light 8 headphone connector 9 microphone connector 10 drive bay 11 optical drive (optional) This light flickers when the hard drive is being accessed. Use the microphone connector to attach headphones and most kinds...
Quick Reference Guide
Page 27
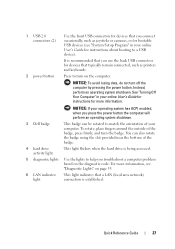
Instead, perform an operating system shutdown. To rotate, place fingers around the outside of the badge. 4 hard drive activity light This light flickers when the hard drive is being accessed. 5 diagnostic lights Use the lights to turn on the diagnostic code. You can be rotated to a USB device). Quick ... computer problem based on the computer. It is recommended that you press the power button the computer will perform an operating system shutdown. 3 Dell badge This badge can also rotate the badge using the slot provided near the bottom of the badge, press firmly, and turn off the...
Instead, perform an operating system shutdown. To rotate, place fingers around the outside of the badge. 4 hard drive activity light This light flickers when the hard drive is being accessed. 5 diagnostic lights Use the lights to turn on the diagnostic code. You can be rotated to a USB device). Quick ... computer problem based on the computer. It is recommended that you press the power button the computer will perform an operating system shutdown. 3 Dell badge This badge can also rotate the badge using the slot provided near the bottom of the badge, press firmly, and turn off the...
Quick Reference Guide
Page 40
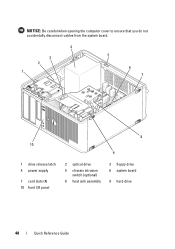
NOTICE: Be careful when opening the computer cover to ensure that you do not accidentally disconnect cables from the system board. 4 3 2 1 5 6 7 8 10 9 1 drive release latch 4 power supply 7 card slots (4) 10 front I/O panel 2 optical drive 5 chassis intrusion switch (optional) 8 heat sink assembly 3 floppy drive 6 system board 9 hard drive 40 Quick Reference Guide
NOTICE: Be careful when opening the computer cover to ensure that you do not accidentally disconnect cables from the system board. 4 3 2 1 5 6 7 8 10 9 1 drive release latch 4 power supply 7 card slots (4) 10 front I/O panel 2 optical drive 5 chassis intrusion switch (optional) 8 heat sink assembly 3 floppy drive 6 system board 9 hard drive 40 Quick Reference Guide
Quick Reference Guide
Page 48
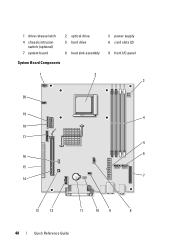
1 drive release latch 4 chassis intrusion switch (optional) 7 system board 2 optical drive 5 hard drive 8 heat sink assembly System Board Components 3 power supply 6 card slots (2) 9 front I/O panel 1 2 3 20 19 4 18 17 5 6 16 15 7 14 13 12 11 10 9 8 48 Quick Reference Guide
1 drive release latch 4 chassis intrusion switch (optional) 7 system board 2 optical drive 5 hard drive 8 heat sink assembly System Board Components 3 power supply 6 card slots (2) 9 front I/O panel 1 2 3 20 19 4 18 17 5 6 16 15 7 14 13 12 11 10 9 8 48 Quick Reference Guide
Quick Reference Guide
Page 51
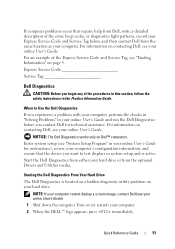
... User's Guide). 1 Shut down the computer. Start the Dell Diagnostics from either your hard drive. Starting the Dell Diagnostics From Your Hard Drive The Dell Diagnostics is active. Turn on (or restart) your computer. For information on your hard drive or from the same location as your computer. 2 When the DELL™ logo appears, press immediately. Quick Reference Guide 51...
... User's Guide). 1 Shut down the computer. Start the Dell Diagnostics from either your hard drive. Starting the Dell Diagnostics From Your Hard Drive The Dell Diagnostics is active. Turn on (or restart) your computer. For information on your hard drive or from the same location as your computer. 2 When the DELL™ logo appears, press immediately. Quick Reference Guide 51...
Quick Reference Guide
Page 58
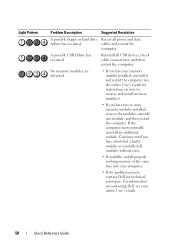
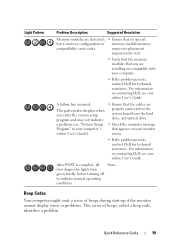
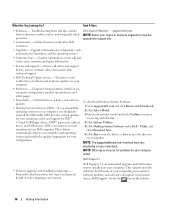
..., install properly working memory of the same type into your computer. • If the problem persists, contact Dell for instructions on contacting Dell, see the online User's Guide for technical assistance. Light Pattern Problem Description Suggested Resolution A possible floppy or hard drive Reseat all USB devices, check cable connections, and then restart the computer.
..., install properly working memory of the same type into your computer. • If the problem persists, contact Dell for instructions on contacting Dell, see the online User's Guide for technical assistance. Light Pattern Problem Description Suggested Resolution A possible floppy or hard drive Reseat all USB devices, check cable connections, and then restart the computer.
Quick Reference Guide
Page 59
... on your monitor screen. • If the problem persists, contact Dell for technical assistance. For information on contacting Dell, see your online User's Guide. four diagnostic lights turn green briefly before turning off to the system board from the hard drive, and optical drive. • Check the computer message that the cables are compatible with...
... on your monitor screen. • If the problem persists, contact Dell for technical assistance. For information on contacting Dell, see your online User's Guide. four diagnostic lights turn green briefly before turning off to the system board from the hard drive, and optical drive. • Check the computer message that the cables are compatible with...
Quick Reference Guide
Page 64
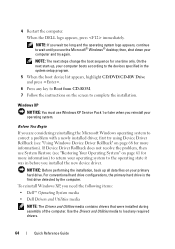
When the DELL logo appears, press immediately. then, shut down your primary hard drive. Before You Begin If you are considering reinstalling the Microsoft Windows operating system to wait until you see the Microsoft® Windows® ...when you need the following items: • Dell™ Operating System media • Dell Drivers and Utilities media NOTE: The Drivers and Utilities media contains drivers that were installed during assembly of the computer. For conventional hard drive configurations, the primary hard drive is the first drive detected by the computer. NOTE: The next steps...
When the DELL logo appears, press immediately. then, shut down your primary hard drive. Before You Begin If you are considering reinstalling the Microsoft Windows operating system to wait until you see the Microsoft® Windows® ...when you need the following items: • Dell™ Operating System media • Dell Drivers and Utilities media NOTE: The Drivers and Utilities media contains drivers that were installed during assembly of the computer. For conventional hard drive configurations, the primary hard drive is the first drive detected by the computer. NOTE: The next steps...
Quick Reference Guide
Page 65
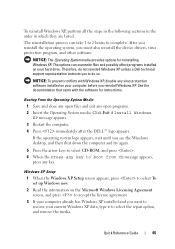
... open files and exit any key. Click Exit if Install Windows XP message appears. 3 Restart the computer. 4 Press immediately after the DELL™ logo appears. NOTICE: The Operating System media provides options for instructions. NOTICE: To prevent conflicts with the software for reinstalling Windows ...do so. After you reinstall the operating system, you to select To set up Windows now. 2 Read the information on your hard drive. See the documentation that came with Windows XP, disable any virus protection software installed on the Microsoft Windows Licensing Agreement screen, and ...
... open files and exit any key. Click Exit if Install Windows XP message appears. 3 Restart the computer. 4 Press immediately after the DELL™ logo appears. NOTICE: The Operating System media provides options for instructions. NOTICE: To prevent conflicts with the software for reinstalling Windows ...do so. After you reinstall the operating system, you to select To set up Windows now. 2 Read the information on your hard drive. See the documentation that came with Windows XP, disable any virus protection software installed on the Microsoft Windows Licensing Agreement screen, and ...
Quick Reference Guide
Page 66
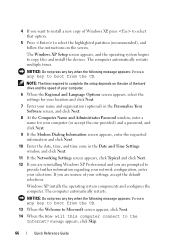
... copy of Windows XP, press to select that option. 5 Press to select the highlighted partition (recommended), and follow the instructions on the size of the hard drive and the speed of your selections. The computer automatically restarts multiple times. NOTE: The time required to copy files and install the devices.
... copy of Windows XP, press to select that option. 5 Press to select the highlighted partition (recommended), and follow the instructions on the size of the hard drive and the speed of your selections. The computer automatically restarts multiple times. NOTE: The time required to copy files and install the devices.
Quick Reference Guide
Page 69
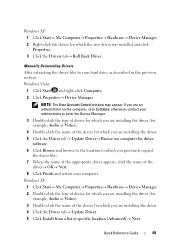
... are installing the driver (for example, Audio or Video). 3 Double-click the name of the driver→ OK→ Next. 8 Click Finish and restart your hard drive as described in the previous section: Windows Vista: 1 Click Start and right-click Computer. 2 Click Properties→ Device Manager. Quick Reference Guide 69 NOTE: The...
... are installing the driver (for example, Audio or Video). 3 Double-click the name of the driver→ OK→ Next. 8 Click Finish and restart your hard drive as described in the previous section: Windows Vista: 1 Click Start and right-click Computer. 2 Click Properties→ Device Manager. Quick Reference Guide 69 NOTE: The...
User's Guide
Page 3
... Computer Cover 39 PCI, PCI Express Cards, and PS/2 Serial Port Adapters 41 PCI Cards 41 PCI Express Cards 46 PS/2 Serial Port Adapters 56 Drives 61 General Installation Guidelines 61 Hard Drive 63 Drive-Panel Inserts 70 Floppy Drive 73 Media Card Reader 76 Contents 3
... Computer Cover 39 PCI, PCI Express Cards, and PS/2 Serial Port Adapters 41 PCI Cards 41 PCI Express Cards 46 PS/2 Serial Port Adapters 56 Drives 61 General Installation Guidelines 61 Hard Drive 63 Drive-Panel Inserts 70 Floppy Drive 73 Media Card Reader 76 Contents 3

User's Guide
Page 4
Optical Drive 78 Processor 83 Removing the Processor 83 Installing the Processor 85 Power Supply 89 Replacing the Power Supply 89 DC Power Connectors 91 4 Desktop Computer ... Components 102 Desktop Computer (Model # DCNE) Specifications 105 I/O Panel 111 Removing the I/O Panel 111 Replacing the I/O Panel 112 Drives 113 General Installation Guidelines 113 Optical Drive 115 Floppy Drive 118 Media Card Reader 121 Hard Drive 125 PCI, PCI Express Cards, and PS/2 Serial Port Adapters 135 PCI Cards 135 PCI Express and DVI Cards...
Optical Drive 78 Processor 83 Removing the Processor 83 Installing the Processor 85 Power Supply 89 Replacing the Power Supply 89 DC Power Connectors 91 4 Desktop Computer ... Components 102 Desktop Computer (Model # DCNE) Specifications 105 I/O Panel 111 Removing the I/O Panel 111 Replacing the I/O Panel 112 Drives 113 General Installation Guidelines 113 Optical Drive 115 Floppy Drive 118 Media Card Reader 121 Hard Drive 125 PCI, PCI Express Cards, and PS/2 Serial Port Adapters 135 PCI Cards 135 PCI Express and DVI Cards...

User's Guide
Page 5
... Computer (Model # DCCY) Specifications 193 I/O Panel 199 Removing the I/O Panel 199 Replacing the I/O Panel 201 Removing the Computer Cover 203 Drives 205 General Installation Guidelines 205 Hard Drive 208 Optical Drive 215 Floppy Drive and Media Card Reader 217 PCI, PCI Express Cards, and PS/2 Serial Port Adapters 223 PCI Cards 223 PCI Express and...
... Computer (Model # DCCY) Specifications 193 I/O Panel 199 Removing the I/O Panel 199 Replacing the I/O Panel 201 Removing the Computer Cover 203 Drives 205 General Installation Guidelines 205 Hard Drive 208 Optical Drive 215 Floppy Drive and Media Card Reader 217 PCI, PCI Express Cards, and PS/2 Serial Port Adapters 223 PCI Cards 223 PCI Express and...
User's Guide
Page 7
Configuring Your Hard Drives for RAID 270 Using the NVIDIA MediaShield ROM Utility 271 Using NVIDIA MediaShield 272 Enabling Cool 'n' Quiet™ Technology 275 7 Chassis Intrusion Switch 277 Removing ...
Configuring Your Hard Drives for RAID 270 Using the NVIDIA MediaShield ROM Utility 271 Using NVIDIA MediaShield 272 Enabling Cool 'n' Quiet™ Technology 275 7 Chassis Intrusion Switch 277 Removing ...

User's Guide
Page 8
... Cover 297 12 Cleaning Your Computer 299 Computer, Keyboard, and Monitor 299 Mouse 299 Cleaning a Non-Optical Mouse 299 Cleaning an Optical Mouse 300 Floppy Drive 300 CDs and DVDs 300 13 Reinstalling Drivers and the Operating System 301 Drivers 301 What Is a Driver 301 Identifying Drivers 301 Reinstalling Drivers and...; Windows Vista® and Windows® XP 307 Before You Begin 307 14 Solving Problems 311 Troubleshooting Tips 311 Battery Problems 311 Card Problems 311 Drive Problems 313 CD and DVD drive problems 313 Hard drive problems 314 8 Contents
... Cover 297 12 Cleaning Your Computer 299 Computer, Keyboard, and Monitor 299 Mouse 299 Cleaning a Non-Optical Mouse 299 Cleaning an Optical Mouse 300 Floppy Drive 300 CDs and DVDs 300 13 Reinstalling Drivers and the Operating System 301 Drivers 301 What Is a Driver 301 Identifying Drivers 301 Reinstalling Drivers and...; Windows Vista® and Windows® XP 307 Before You Begin 307 14 Solving Problems 311 Troubleshooting Tips 311 Battery Problems 311 Card Problems 311 Drive Problems 313 CD and DVD drive problems 313 Hard drive problems 314 8 Contents
User's Guide
Page 16
...computing environment, software updates, and relevant self-support information. Proactive e-mail notification of your computing environment Dell Support 3 Dell Support 3 is necessary for components, such as memory, the hard drive, and the operating system • Customer Care - Utility, and click Download Now. 6 Click ...Run to run the driver, or Save to save the driver to support.dell.com and click Drivers and Downloads. 2 Click Select...
...computing environment, software updates, and relevant self-support information. Proactive e-mail notification of your computing environment Dell Support 3 Dell Support 3 is necessary for components, such as memory, the hard drive, and the operating system • Customer Care - Utility, and click Download Now. 6 Click ...Run to run the driver, or Save to save the driver to support.dell.com and click Drivers and Downloads. 2 Click Select...

User's Guide
Page 22
...Computer" on page 321. This light flickers when the hard drive is in a power-saving mode. • Blinking or solid amber - 1 optical drive (optional) 2 Flexbay drive 3 USB 2.0 connectors (2) 4 LAN indicator light 5 diagnostic lights 6 power button 7 power light 8 hard-drive activity light 9 headphone connector 10 microphone connector Insert ...press the power button or use the back USB connectors for a description of speakers. Press this drive. NOTICE: If your computer. Can contain an optional floppy drive or an optional media card reader. The computer is being accessed.
...Computer" on page 321. This light flickers when the hard drive is in a power-saving mode. • Blinking or solid amber - 1 optical drive (optional) 2 Flexbay drive 3 USB 2.0 connectors (2) 4 LAN indicator light 5 diagnostic lights 6 power button 7 power light 8 hard-drive activity light 9 headphone connector 10 microphone connector Insert ...press the power button or use the back USB connectors for a description of speakers. Press this drive. NOTICE: If your computer. Can contain an optional floppy drive or an optional media card reader. The computer is being accessed.


