

Quick Reference Guide
Page 20
.... Connect your monitor to ensure reliable operation. 4 network activity light Flashes a yellow light when the computer is recommended that you must use the y-cable that the network cable has been securely attached. NOTE: If you are using a graphics card that supports dual monitors, use Category 3 wiring, force the network speed to 10 Mbps to the connector on the back panel of a network cable to either a network jack or your network or broadband device. NOTE: If you purchased an optional graphics card...
.... Connect your monitor to ensure reliable operation. 4 network activity light Flashes a yellow light when the computer is recommended that you must use the y-cable that the network cable has been securely attached. NOTE: If you are using a graphics card that supports dual monitors, use Category 3 wiring, force the network speed to 10 Mbps to the connector on the back panel of a network cable to either a network jack or your network or broadband device. NOTE: If you purchased an optional graphics card...
Quick Reference Guide
Page 22
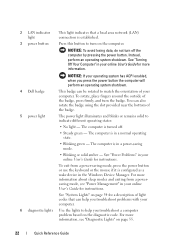
... an operating system shutdown. 4 Dell badge 5 power light This badge can also rotate the badge using the slot provided near the bottom of light codes that a local area network (LAN) connection is in a power-saving mode. • Blinking or solid amber - For more information about sleep modes and exiting from a power-saving mode, press the power button or use the keyboard or the mouse if it is configured as a wake device in your computer. 6 diagnostic lights Use the lights to...
... an operating system shutdown. 4 Dell badge 5 power light This badge can also rotate the badge using the slot provided near the bottom of light codes that a local area network (LAN) connection is in a power-saving mode. • Blinking or solid amber - For more information about sleep modes and exiting from a power-saving mode, press the power button or use the keyboard or the mouse if it is configured as a wake device in your computer. 6 diagnostic lights Use the lights to...
Quick Reference Guide
Page 43
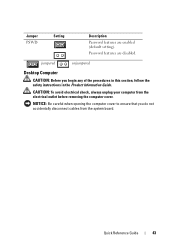
Jumper PSWD Setting Description Password features are disabled. Password features are enabled (default setting). CAUTION: To avoid electrical shock, always unplug your computer from the system board. Quick Reference Guide 43 jumpered unjumpered Desktop Computer CAUTION: Before you do not accidentally disconnect cables from the electrical outlet before removing the computer cover. NOTICE: Be careful when opening the computer cover to ensure that you begin any of the procedures in this section, follow the safety instructions in the Product Information Guide.
Jumper PSWD Setting Description Password features are disabled. Password features are enabled (default setting). CAUTION: To avoid electrical shock, always unplug your computer from the system board. Quick Reference Guide 43 jumpered unjumpered Desktop Computer CAUTION: Before you do not accidentally disconnect cables from the electrical outlet before removing the computer cover. NOTICE: Be careful when opening the computer cover to ensure that you begin any of the procedures in this section, follow the safety instructions in the Product Information Guide.
Quick Reference Guide
Page 47
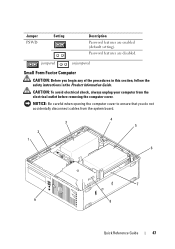
... in this section, follow the safety instructions in the Product Information Guide. Password features are enabled (default setting). jumpered unjumpered Small Form Factor Computer CAUTION: Before you do not accidentally disconnect cables from the electrical outlet before removing the computer cover. CAUTION: To avoid electrical shock, always unplug your computer from the system board. 3 2 1 4 5 6 7 9 8 Quick Reference Guide 47 Jumper PSWD Setting Description Password features are disabled.
... in this section, follow the safety instructions in the Product Information Guide. Password features are enabled (default setting). jumpered unjumpered Small Form Factor Computer CAUTION: Before you do not accidentally disconnect cables from the electrical outlet before removing the computer cover. CAUTION: To avoid electrical shock, always unplug your computer from the system board. 3 2 1 4 5 6 7 9 8 Quick Reference Guide 47 Jumper PSWD Setting Description Password features are disabled.
Quick Reference Guide
Page 50
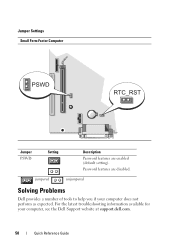
For the latest troubleshooting information available for your computer does not perform as expected. Password features are enabled (default setting). Jumper Settings Small Form Factor Computer Jumper PSWD Setting Description Password features are disabled. jumpered unjumpered Solving Problems Dell provides a number of tools to help you if your computer, see the Dell Support website at support.dell.com. 50 Quick Reference Guide
For the latest troubleshooting information available for your computer does not perform as expected. Password features are enabled (default setting). Jumper Settings Small Form Factor Computer Jumper PSWD Setting Description Password features are disabled. jumpered unjumpered Solving Problems Dell provides a number of tools to help you if your computer, see the Dell Support website at support.dell.com. 50 Quick Reference Guide

Quick Reference Guide
Page 68
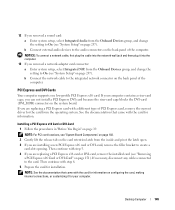
... Guide Windows Vista: 1 Click Start and right-click Computer. 2 Click Properties→ Device Manager. Windows® XP 1 Click Start→ Control Panel. 2 Under Pick a Category, click Performance and Maintenance, and click System. 3 In the System Properties window, click the Hardware tab, and click Device Manager. If you install or update a driver, use System Restore (see "Restoring Your Operating System" on page 68). otherwise, contact your computer might not work correctly. Scroll down the list...
... Guide Windows Vista: 1 Click Start and right-click Computer. 2 Click Properties→ Device Manager. Windows® XP 1 Click Start→ Control Panel. 2 Under Pick a Category, click Performance and Maintenance, and click System. 3 In the System Properties window, click the Hardware tab, and click Device Manager. If you install or update a driver, use System Restore (see "Restoring Your Operating System" on page 68). otherwise, contact your computer might not work correctly. Scroll down the list...
User's Guide
Page 16
... operating system for your computer model. This support provides real-time health scans of your product model and click Confirm, or enter a service tag and click Go. 4 Click System Utilities. 5 Click Desktop System Software under Dell - Contact information, service call status and support history, service contract, online discussions with other Dell customers • Upgrades - Certified drivers, patches, and software updates • Desktop System Software (DSS)- Utility, and click Download Now. 6 Click Run to run...
... operating system for your computer model. This support provides real-time health scans of your product model and click Confirm, or enter a service tag and click Go. 4 Click System Utilities. 5 Click Desktop System Software under Dell - Contact information, service call status and support history, service contract, online discussions with other Dell customers • Upgrades - Certified drivers, patches, and software updates • Desktop System Software (DSS)- Utility, and click Download Now. 6 Click Run to run...
User's Guide
Page 56
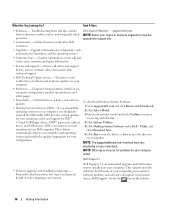
.../2 Serial Port Adapters CAUTION: Before you removed a network-adapter card connector: a Enter system setup, select Integrated NIC from the Onboard Devices group, and change the setting to On (see "System Setup" on page 257). Installing a PS/2 Serial Port Adapter 1 Follow the procedures in the Product Information Guide. NOTICE: To prevent static damage to components inside to pivot the latch open position. 56 Mini Tower Computer NOTICE: To connect a network cable, first plug the cable into the network...
.../2 Serial Port Adapters CAUTION: Before you removed a network-adapter card connector: a Enter system setup, select Integrated NIC from the Onboard Devices group, and change the setting to On (see "System Setup" on page 257). Installing a PS/2 Serial Port Adapter 1 Follow the procedures in the Product Information Guide. NOTICE: To prevent static damage to components inside to pivot the latch open position. 56 Mini Tower Computer NOTICE: To connect a network cable, first plug the cable into the network...

User's Guide
Page 99
... Japan is 100 V. Back-Panel Connectors 1 2 3 4 5 9 1 parallel connector 2 link integrity light 6 8 7 Connect a parallel device, such as a printer, to operate with a manual voltage-selection switch. For more information, see "System Setup Options" on page 258. • Green - A good connection exists between a 10-Mbps network and the computer. • Orange - 4 voltage selection switch Your computer is equipped with the AC power available in your location. 5 padlock ring Insert...
... Japan is 100 V. Back-Panel Connectors 1 2 3 4 5 9 1 parallel connector 2 link integrity light 6 8 7 Connect a parallel device, such as a printer, to operate with a manual voltage-selection switch. For more information, see "System Setup Options" on page 258. • Green - A good connection exists between a 10-Mbps network and the computer. • Orange - 4 voltage selection switch Your computer is equipped with the AC power available in your location. 5 padlock ring Insert...
User's Guide
Page 146
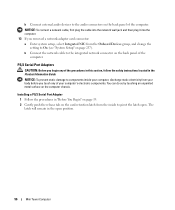
... connect a network cable, first plug the cable into the network wall jack and then plug it for information on configuring the card, making internal connections, or customizing it into the computer. 13 If you are installing a new PCI Express x16 card or DVI-card, remove the filler bracket to the integrated network connector on the back panel of the computer. If you removed a sound card: a Enter system setup, select Integrated Audio from the Onboard Devices group, and change the setting...
... connect a network cable, first plug the cable into the network wall jack and then plug it for information on configuring the card, making internal connections, or customizing it into the computer. 13 If you are installing a new PCI Express x16 card or DVI-card, remove the filler bracket to the integrated network connector on the back panel of the computer. If you removed a sound card: a Enter system setup, select Integrated Audio from the Onboard Devices group, and change the setting...

User's Guide
Page 187
... AC power available in your location. 5 padlock ring Insert a padlock to open the computer cover. Back-Panel Connectors 1 2 3 4 5 9 1 parallel connector 2 link integrity light 6 8 7 Connect a parallel device, such as a printer, to the 115-V position even though the AC power available in your location. If you to lock the computer cover. 6 cover release latch Allows you have a USB printer, plug it into a USB connector. For more information, see "System Setup Options" on...
... AC power available in your location. 5 padlock ring Insert a padlock to open the computer cover. Back-Panel Connectors 1 2 3 4 5 9 1 parallel connector 2 link integrity light 6 8 7 Connect a parallel device, such as a printer, to the 115-V position even though the AC power available in your location. If you to lock the computer cover. 6 cover release latch Allows you have a USB printer, plug it into a USB connector. For more information, see "System Setup Options" on...

User's Guide
Page 265
... this section, follow the safety instructions located in "Before You Begin" on page 19. 2 If clearing the password on a small form factor computer, remove the hard drive (see "Drives" on page 205). Jumper PSWD Setting Description Password features are disabled. Advanced Features 265 Jumper Settings Mini Tower, Desktop, and Small Form Factor Computers NOTE: The mini tower system board is displayed, but the jumper location is in the same...
... this section, follow the safety instructions located in "Before You Begin" on page 19. 2 If clearing the password on a small form factor computer, remove the hard drive (see "Drives" on page 205). Jumper PSWD Setting Description Password features are disabled. Advanced Features 265 Jumper Settings Mini Tower, Desktop, and Small Form Factor Computers NOTE: The mini tower system board is displayed, but the jumper location is in the same...

User's Guide
Page 267
... the cooling fans. b Remove the password jumper plug from the software manufacturer. Waking up from factor computer, install the hard drive (see "Installing a Hard Drive" on page 297). Password (PSWD) and CMOS (RTC_RST) jumpers are restored. d Remove the jumper plug from the RTC_RST pins and place it back on the password pins. 4 If clearing the CMOS setting on your computer and devices to enter either of reduced power are not working. To determine if your computer is using HyperTransport or dual-core...
... the cooling fans. b Remove the password jumper plug from the software manufacturer. Waking up from factor computer, install the hard drive (see "Installing a Hard Drive" on page 297). Password (PSWD) and CMOS (RTC_RST) jumpers are restored. d Remove the jumper plug from the RTC_RST pins and place it back on the password pins. 4 If clearing the CMOS setting on your computer and devices to enter either of reduced power are not working. To determine if your computer is using HyperTransport or dual-core...

User's Guide
Page 302
... not work correctly. Reinstalling Drivers and Utilities NOTICE: The Dell Support website at support.dell.com and your computer to continue. NOTE: The User Account Control window may appear. If Device Driver Rollback does not resolve the problem, then use Windows Device Driver Rollback to reinstall the driver or install a new driver. NOTE: The User Account Control window may appear. If an exclamation point is optional, and as such, may need to replace the driver with certain computers. Using Windows Vista Device Driver...
... not work correctly. Reinstalling Drivers and Utilities NOTICE: The Dell Support website at support.dell.com and your computer to continue. NOTE: The User Account Control window may appear. If Device Driver Rollback does not resolve the problem, then use Windows Device Driver Rollback to reinstall the driver or install a new driver. NOTE: The User Account Control window may appear. If an exclamation point is optional, and as such, may need to replace the driver with certain computers. Using Windows Vista Device Driver...

User's Guide
Page 303
... to install. In most cases, the CD/DVD starts running Windows. Reinstalling Drivers and the Operating System 303 Using Windows XP Device Driver Rollback If a problem occurs on your computer after you install or update a driver, use Windows XP Device Driver Rollback to replace the driver with all computers. Windows Vista 1 Save and close any open files, and exit any open programs. 2 Insert the Drivers and Utilities media. If Device Driver Rollback does not resolve the problem, then use System Restore (see "Enabling System Restore" on...
... to install. In most cases, the CD/DVD starts running Windows. Reinstalling Drivers and the Operating System 303 Using Windows XP Device Driver Rollback If a problem occurs on your computer after you install or update a driver, use Windows XP Device Driver Rollback to replace the driver with all computers. Windows Vista 1 Save and close any open files, and exit any open programs. 2 Insert the Drivers and Utilities media. If Device Driver Rollback does not resolve the problem, then use System Restore (see "Enabling System Restore" on...
User's Guide
Page 304
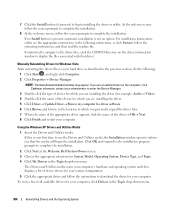
... use the Drivers and Utilities media, the Installation window opens to inform you that driver. Manually Reinstalling Drivers for Windows Vista After extracting the driver files to download the driver for System Model, Operating System, Device Type, and Topic. 4 Click My Drivers in the Topic drop-down menu. NOTE: The User Account Control window may appear. otherwise, contact your administrator to enter the Device Manager. 3 Double-click the type of device for which you are installing the driver (for example, Audio or Video...
... use the Drivers and Utilities media, the Installation window opens to inform you that driver. Manually Reinstalling Drivers for Windows Vista After extracting the driver files to download the driver for System Model, Operating System, Device Type, and Topic. 4 Click My Drivers in the Topic drop-down menu. NOTE: The User Account Control window may appear. otherwise, contact your administrator to enter the Device Manager. 3 Double-click the type of device for which you are installing the driver (for example, Audio or Video...

User's Guide
Page 307
... "Restoring Your Operating System" on the screen to correct a problem with a newly installed driver, first try again. When the DELL logo appears, press immediately. NOTE: If you need the following items: • Dell™ Operating System media • Dell Drivers and Utilities media NOTE: The Drivers and Utilities media contains drivers that Turn off System Restore is the first drive detected by the computer. then, shut down your computer and try using Windows XP Device Driver...
... "Restoring Your Operating System" on the screen to correct a problem with a newly installed driver, first try again. When the DELL logo appears, press immediately. NOTE: If you need the following items: • Dell™ Operating System media • Dell Drivers and Utilities media NOTE: The Drivers and Utilities media contains drivers that Turn off System Restore is the first drive detected by the computer. then, shut down your computer and try using Windows XP Device Driver...
User's Guide
Page 324
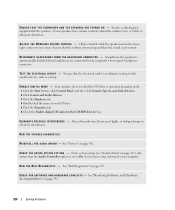
... Audio Controller option is set to the computer's front-panel headphone connector. Enter system setup (see "System Setup" on page 327. R U N T H E D E L L D I A G N O S T I N D O W S V O L U M E C O N T R O L - See "Resolving Software and Hardware Incompatibilities" on page 301. See the setup diagram supplied with another device, such as a lamp. Ensure that the volume is turned up and that the sound is automatically disabled when headphones are connected to On. Sound from the speakers is not muted. E N A B L E D I G I V E R - Your speakers do not work...
... Audio Controller option is set to the computer's front-panel headphone connector. Enter system setup (see "System Setup" on page 327. R U N T H E D E L L D I A G N O S T I N D O W S V O L U M E C O N T R O L - See "Resolving Software and Hardware Incompatibilities" on page 301. See the setup diagram supplied with another device, such as a lamp. Ensure that the volume is turned up and that the sound is automatically disabled when headphones are connected to On. Sound from the speakers is not muted. E N A B L E D I G I V E R - Your speakers do not work...
User's Guide
Page 329
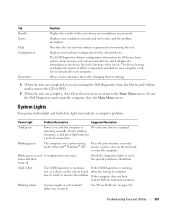
... problem. Blinking yellow A power supply or system board failure has occurred. See "Power Problems" on , and the computer is No corrective action is running the Dell Diagnostics from system setup, memory, and various internal tests, and it displays the information in the device list in a power-saving mode (Microsoft® Windows® XP). Blinking green The computer is identified. Press the power button, move the mouse, or press a key on the system board allow the testing to complete. operating...
... problem. Blinking yellow A power supply or system board failure has occurred. See "Power Problems" on , and the computer is No corrective action is running the Dell Diagnostics from system setup, memory, and various internal tests, and it displays the information in the device list in a power-saving mode (Microsoft® Windows® XP). Blinking green The computer is identified. Press the power button, move the mouse, or press a key on the system board allow the testing to complete. operating...
User's Guide
Page 366
... password. A video standard for video cards and controllers that supports resolutions up to operate with a processor and a memory chip. S-video TV-out - super-extended graphics array - SXGA+ - system setup - telephony application programming interface - Enables Windows programs to 1400 x 1050. standby mode - Reinforced area of the computer. 366 Glossary Always disconnect the network cable from entering the computer through the electrical outlet. A video standard for video cards and controllers. A video standard for example, Windows Notepad uses...
... password. A video standard for video cards and controllers that supports resolutions up to operate with a processor and a memory chip. S-video TV-out - super-extended graphics array - SXGA+ - system setup - telephony application programming interface - Enables Windows programs to 1400 x 1050. standby mode - Reinforced area of the computer. 366 Glossary Always disconnect the network cable from entering the computer through the electrical outlet. A video standard for video cards and controllers. A video standard for example, Windows Notepad uses...


