
Service Manual
Page 3
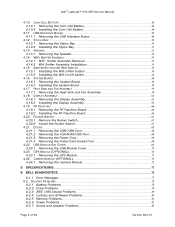
Dell™ Latitude™ XT2 XFR Service Manual Table of 94 Version A00-01 Windows Vista 14 1.4.3 N-trig Applet ...14 1.5 XT2 XFR PEN ...20 1.5.1 Calibrating the Pen...20 1.5.2 Troubleshooting...21 1.6 APPLICATION MATRIX ...22 2 WORKING ON YOUR XT2 XFR ...22 2.1 BEFORE WORKING INSIDE YOUR XT2 XFR 23 2.2 RECOMMENDED TOOLS ...24 2.3 TURNING OFF YOUR XT2 XFR ...24 2.4 AFTER WORKING INSIDE YOUR XT2 XFR 24 3 SCREW CHART...25...
Dell™ Latitude™ XT2 XFR Service Manual Table of 94 Version A00-01 Windows Vista 14 1.4.3 N-trig Applet ...14 1.5 XT2 XFR PEN ...20 1.5.1 Calibrating the Pen...20 1.5.2 Troubleshooting...21 1.6 APPLICATION MATRIX ...22 2 WORKING ON YOUR XT2 XFR ...22 2.1 BEFORE WORKING INSIDE YOUR XT2 XFR 23 2.2 RECOMMENDED TOOLS ...24 2.3 TURNING OFF YOUR XT2 XFR ...24 2.4 AFTER WORKING INSIDE YOUR XT2 XFR 24 3 SCREW CHART...25...
Service Manual
Page 4
Dell™ Latitude™ XT2 XFR Service Manual 4.10 COIN-CELL BATTERY ...48 4.10.1 Removing the Coin-Cell Battery 48 4.10.2 Installing the Coin-Cell Battery 49 4.11 USB INTERFACE BOARD ...49 4.11.1 Removing the USB Interface Board 49 4.12 ...the GPS Module ...71 4.24 CAMERA MODULE (OPTIONAL) ...72 4.24.1 Removing the Camera Module 72 5 SPECIFICATIONS ...73 6 DELL DIAGNOSTICS...74 6.1.1 Error Messages ...77 6.2 SOLVING PROBLEMS...78 6.2.1 Battery Problems ...78 6.2.2 Drive Problems ...78 6.2.3 IEEE 1394 Device Problems ...80 6.2.4 Lockups and Software Problems 80 6.2.5 Memory Problems...
Dell™ Latitude™ XT2 XFR Service Manual 4.10 COIN-CELL BATTERY ...48 4.10.1 Removing the Coin-Cell Battery 48 4.10.2 Installing the Coin-Cell Battery 49 4.11 USB INTERFACE BOARD ...49 4.11.1 Removing the USB Interface Board 49 4.12 ...the GPS Module ...71 4.24 CAMERA MODULE (OPTIONAL) ...72 4.24.1 Removing the Camera Module 72 5 SPECIFICATIONS ...73 6 DELL DIAGNOSTICS...74 6.1.1 Error Messages ...77 6.2 SOLVING PROBLEMS...78 6.2.1 Battery Problems ...78 6.2.2 Drive Problems ...78 6.2.3 IEEE 1394 Device Problems ...80 6.2.4 Lockups and Software Problems 80 6.2.5 Memory Problems...
Service Manual
Page 20
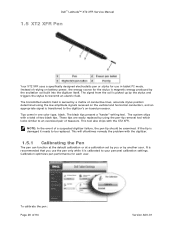
...'s on-board processor. NOTE: In the event of two black tips. Dell™ Latitude™ XT2 XFR Service Manual 1.5 XT2 XFR Pen Your XT2 XFR uses a specifically designed electrostatic pen or stylus for each user. The system ships with the XT2 XFR. This tool also ships with a total of a suspected digitizer failure, ...energy produced by a matrix of 94 Version A00-01 The black tips present a "harder" writing feel. Instead of relying on battery power, the energy source for the stylus is sensed by the excitation coil built into the digitizer itself. The signal from the ...
...'s on-board processor. NOTE: In the event of two black tips. Dell™ Latitude™ XT2 XFR Service Manual 1.5 XT2 XFR Pen Your XT2 XFR uses a specifically designed electrostatic pen or stylus for each user. The system ships with the XT2 XFR. This tool also ships with a total of a suspected digitizer failure, ...energy produced by a matrix of 94 Version A00-01 The black tips present a "harder" writing feel. Instead of relying on battery power, the energy source for the stylus is sensed by the excitation coil built into the digitizer itself. The signal from the ...

Service Manual
Page 23
... components may appear differently than shown in this type of your XT2 XFR and all network cables from the XT2 XFR. 5. Remove the main battery (see Removing the Main Battery). 8. Dell™ Latitude™ XT2 XFR Service Manual 2.1 Before Working Inside Your XT2 XFR Use the following safety guidelines to help protect your XT2 XFR from potential damage and to help to ensure your...
... components may appear differently than shown in this type of your XT2 XFR and all network cables from the XT2 XFR. 5. Remove the main battery (see Removing the Main Battery). 8. Dell™ Latitude™ XT2 XFR Service Manual 2.1 Before Working Inside Your XT2 XFR Use the following safety guidelines to help protect your XT2 XFR from potential damage and to help to ensure your...
Service Manual
Page 25
...-01 1 21106-02 1 Page 25 of 94 Version A00-01 Connect any external devices, such as a port replicator, battery slice, or media base, and replace any cards, such as an ExpressCard. 2. Dell™ Latitude™ XT2 XFR Service Manual After you complete any replacement procedure, ensure you connect any external devices, cards, and cables before...
...-01 1 21106-02 1 Page 25 of 94 Version A00-01 Connect any external devices, such as a port replicator, battery slice, or media base, and replace any cards, such as an ExpressCard. 2. Dell™ Latitude™ XT2 XFR Service Manual After you complete any replacement procedure, ensure you connect any external devices, cards, and cables before...
Service Manual
Page 27
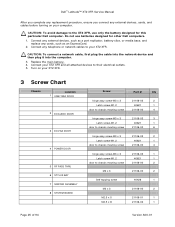
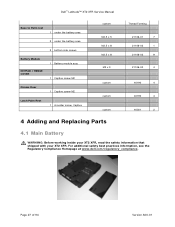
..., see the Regulatory Compliance Homepage at www.dell.com/regulatory_compliance. Dell™ Latitude™ XT2 XFR Service Manual Base to Palm rest 1 under the battery area 2 under the battery area 3 bottom side screws Battery Module KEYPAD / HINGE COVER 1 Battery module assy 1 Captive screw-M2 Dimms Door... Thread Forming 21106-01 7 21106-02 1 21106-02 9 21106-00 4 40190 4 40190 4 40301 2 4 Adding and Replacing Parts 4.1 Main Battery WARNING: Before working inside your XT2 XFR, read the safety information that shipped with your XT2 XFR. Page 27 of 94 Version A00-01
..., see the Regulatory Compliance Homepage at www.dell.com/regulatory_compliance. Dell™ Latitude™ XT2 XFR Service Manual Base to Palm rest 1 under the battery area 2 under the battery area 3 bottom side screws Battery Module KEYPAD / HINGE COVER 1 Battery module assy 1 Captive screw-M2 Dimms Door... Thread Forming 21106-01 7 21106-02 1 21106-02 9 21106-00 4 40190 4 40190 4 40301 2 4 Adding and Replacing Parts 4.1 Main Battery WARNING: Before working inside your XT2 XFR, read the safety information that shipped with your XT2 XFR. Page 27 of 94 Version A00-01

Service Manual
Page 28
... Before Working Inside Your XT2 XFR. 2. Remove the battery from the Battery Door 1. Dell™ Latitude™ XT2 XFR Service Manual 4.1.1 Removing the Main Battery 1. Remove the battery from the XT2 XFR. 4.1.2 Removing the Battery from the XT2 XFR before continuing. 3. Follow the procedures in Before Working Inside Your XT2 XFR. 2. Slide the two battery-bay latch releases on the front edge of the XT2 XFR outward to release the...
... Before Working Inside Your XT2 XFR. 2. Remove the battery from the Battery Door 1. Dell™ Latitude™ XT2 XFR Service Manual 4.1.1 Removing the Main Battery 1. Remove the battery from the XT2 XFR. 4.1.2 Removing the Battery from the XT2 XFR before continuing. 3. Follow the procedures in Before Working Inside Your XT2 XFR. 2. Slide the two battery-bay latch releases on the front edge of the XT2 XFR outward to release the...

Service Manual
Page 29
Place the bracket onto the battery. 2. Dell™ Latitude™ XT2 XFR Service Manual 4. Remove the battery. 4.1.3 Installing the Battery into the Battery Door 1. Page 29 of 94 Version A00-01 Slide the battery onto the battery door and align the tabs on the battery with the door tabs. Rotate the door up to remove the battery. 5.
Place the bracket onto the battery. 2. Dell™ Latitude™ XT2 XFR Service Manual 4. Remove the battery. 4.1.3 Installing the Battery into the Battery Door 1. Page 29 of 94 Version A00-01 Slide the battery onto the battery door and align the tabs on the battery with the door tabs. Rotate the door up to remove the battery. 5.

Service Manual
Page 30
Dell™ Latitude™ XT2 XFR Service Manual 3. For additional safety best practices information, see the Regulatory Compliance Homepage at www.dell.com/regulatory_compliance. 4.2.1 Removing the Hinge Cover 1. Use your XT2 XFR. Remove the battery from the XT2 XFR. Loosen the four captive screws securing the hinge cover in Before Working Inside Your XT2 XFR. 2. Follow the procedures in place. 4. Page 30 of...
Dell™ Latitude™ XT2 XFR Service Manual 3. For additional safety best practices information, see the Regulatory Compliance Homepage at www.dell.com/regulatory_compliance. 4.2.1 Removing the Hinge Cover 1. Use your XT2 XFR. Remove the battery from the XT2 XFR. Loosen the four captive screws securing the hinge cover in Before Working Inside Your XT2 XFR. 2. Follow the procedures in place. 4. Page 30 of...

Service Manual
Page 31
... step, follow the instructions in Before Working Inside Your XT2 XFR. 2. Remove the two screws securing the keyboard to the XT2 XFR. Page 31 of 94 Version A00-01 Follow the procedures in removing the battery section. 3. Dell™ Latitude™ XT2 XFR Service Manual 4.3 Keyboard WARNING: Before working inside your XT2 XFR, read the safety information that shipped with your...
... step, follow the instructions in Before Working Inside Your XT2 XFR. 2. Remove the two screws securing the keyboard to the XT2 XFR. Page 31 of 94 Version A00-01 Follow the procedures in removing the battery section. 3. Dell™ Latitude™ XT2 XFR Service Manual 4.3 Keyboard WARNING: Before working inside your XT2 XFR, read the safety information that shipped with your...

Service Manual
Page 34
... XT2 XFR. 2. Remove the battery from the system board. 10. Lift using the blue pull tab on the memory and mini-card cover. Page 34 of 94 Version A00-01 For additional safety best practices information, see the Regulatory Compliance Homepage at www.dell.com/regulatory_compliance. 4.4.1 Removing the Memory and Mini-Card Cover 1. Dell™ Latitude...
... XT2 XFR. 2. Remove the battery from the system board. 10. Lift using the blue pull tab on the memory and mini-card cover. Page 34 of 94 Version A00-01 For additional safety best practices information, see the Regulatory Compliance Homepage at www.dell.com/regulatory_compliance. 4.4.1 Removing the Memory and Mini-Card Cover 1. Dell™ Latitude...

Service Manual
Page 36
... before continuing. 3. Follow the procedures in Before Working Inside Your XT2 XFR. 2. Remove the memory module from the memory module. 5. Remove the battery before continuing. 4. Page 36 of 94 Version A00-01 Dell™ Latitude™ XT2 XFR Service Manual 4.5 Memory WARNING: Before working inside your XT2 XFR, read the safety information that shipped with your fingers to gently...
... before continuing. 3. Follow the procedures in Before Working Inside Your XT2 XFR. 2. Remove the memory module from the memory module. 5. Remove the battery before continuing. 4. Page 36 of 94 Version A00-01 Dell™ Latitude™ XT2 XFR Service Manual 4.5 Memory WARNING: Before working inside your XT2 XFR, read the safety information that shipped with your fingers to gently...
Service Manual
Page 37
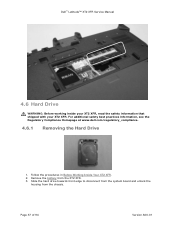
Follow the procedures in Before Working Inside Your XT2 XFR. 2. Slide the hard drive towards front edge to disconnect from the system board and unlock the housing from the XT2 XFR. 3. Remove the battery from the chassis. Page 37 of 94 Version A00-01 Dell™ Latitude™ XT2 XFR Service Manual 4.6 Hard Drive WARNING: Before working inside your XT2 XFR, read the safety information that shipped with your XT2 XFR. For additional safety best practices information, see the Regulatory Compliance Homepage at www.dell.com/regulatory_compliance. 4.6.1 Removing the Hard Drive 1.
Follow the procedures in Before Working Inside Your XT2 XFR. 2. Slide the hard drive towards front edge to disconnect from the system board and unlock the housing from the XT2 XFR. 3. Remove the battery from the chassis. Page 37 of 94 Version A00-01 Dell™ Latitude™ XT2 XFR Service Manual 4.6 Hard Drive WARNING: Before working inside your XT2 XFR, read the safety information that shipped with your XT2 XFR. For additional safety best practices information, see the Regulatory Compliance Homepage at www.dell.com/regulatory_compliance. 4.6.1 Removing the Hard Drive 1.

Service Manual
Page 39
Remove the battery from the mini-card. NOTE: There are five cables located under the memory door. Connects to for the wire to white terminal on WLAN adapters 4 ... and WPAN mini-cards all have icons on their label that tells you which antenna port. 1 BLACK (left side, three enter from the left side) - 4.7.1 Dell™ Latitude™ XT2 XFR Service Manual Removing the Mini-Card 1. Remove the memory and mini-card cover before continuing. 4.
Remove the battery from the mini-card. NOTE: There are five cables located under the memory door. Connects to for the wire to white terminal on WLAN adapters 4 ... and WPAN mini-cards all have icons on their label that tells you which antenna port. 1 BLACK (left side, three enter from the left side) - 4.7.1 Dell™ Latitude™ XT2 XFR Service Manual Removing the Mini-Card 1. Remove the memory and mini-card cover before continuing. 4.

Service Manual
Page 41
... assembly out of 94 Version A00-01 Dell™ Latitude™ XT2 XFR Service Manual 4.8 Internal Card With Bluetooth® Wireless Technology WARNING: Before working inside your XT2 XFR, read the safety information that shipped with your XT2 XFR. Disconnect the Bluetooth cable from the Bluetooth... adapter. 4. Loosen the screw on the Bluetooth assembly. 5. Page 41 of the XT2 XFR. Follow the procedures in Before Working Inside Your XT2 XFR. 2. Remove the battery ...
... assembly out of 94 Version A00-01 Dell™ Latitude™ XT2 XFR Service Manual 4.8 Internal Card With Bluetooth® Wireless Technology WARNING: Before working inside your XT2 XFR, read the safety information that shipped with your XT2 XFR. Disconnect the Bluetooth cable from the Bluetooth... adapter. 4. Loosen the screw on the Bluetooth assembly. 5. Page 41 of the XT2 XFR. Follow the procedures in Before Working Inside Your XT2 XFR. 2. Remove the battery ...

Service Manual
Page 43
..., then remove the 2 screws in Before Working Inside Your XT2 XFR. 2. Page 43 of the XT2 XFR. Dell™ Latitude™ XT2 XFR Service Manual 4.9 Palm Rest WARNING: Before working inside your XT2 XFR, read the safety information that shipped with your XT2 XFR. Flip the unit over and remove the hinge cover from the... chassis. 8. Rotate the LCD 90 degrees to allow access to base screws and lift the clamp out of 94 Version A00-01 Remove the battery ...
..., then remove the 2 screws in Before Working Inside Your XT2 XFR. 2. Page 43 of the XT2 XFR. Dell™ Latitude™ XT2 XFR Service Manual 4.9 Palm Rest WARNING: Before working inside your XT2 XFR, read the safety information that shipped with your XT2 XFR. Flip the unit over and remove the hinge cover from the... chassis. 8. Rotate the LCD 90 degrees to allow access to base screws and lift the clamp out of 94 Version A00-01 Remove the battery ...

Service Manual
Page 48
... best practices information, see the Regulatory Compliance Homepage at www.dell.com/regulatory_compliance. 4.10.1 Removing the Coin-Cell Battery 1. Install the WLAN/WWAN mini-cards. (See mini-card chapter for reference) 17. Follow the procedures in Before Working Inside Your XT2 XFR. 2. Dell™ Latitude™ XT2 XFR Service Manual 13. Follow the procedures in removing the palm...
... best practices information, see the Regulatory Compliance Homepage at www.dell.com/regulatory_compliance. 4.10.1 Removing the Coin-Cell Battery 1. Install the WLAN/WWAN mini-cards. (See mini-card chapter for reference) 17. Follow the procedures in Before Working Inside Your XT2 XFR. 2. Dell™ Latitude™ XT2 XFR Service Manual 13. Follow the procedures in removing the palm...

Service Manual
Page 49
DO NOT place battery on chassis pad. 3. Dell™ Latitude™ XT2 XFR Service Manual 4.10.2 Installing the Coin-Cell Battery 1. Follow the procedures for Installing the palm rest. 4.11 USB Interface Board 4.11.1 Removing the USB Interface Board WARNING: Before working inside your XT2 XFR, read the safety information that shipped with your XT2 XFR. For additional safety best practices...
DO NOT place battery on chassis pad. 3. Dell™ Latitude™ XT2 XFR Service Manual 4.10.2 Installing the Coin-Cell Battery 1. Follow the procedures for Installing the palm rest. 4.11 USB Interface Board 4.11.1 Removing the USB Interface Board WARNING: Before working inside your XT2 XFR, read the safety information that shipped with your XT2 XFR. For additional safety best practices...

Service Manual
Page 56
... connector from the XT2 XFR. 5. Remove the coin-cell battery from the system board. 8. Disconnect the Stylus bay connector from the system board. 4. From the inside your XT2 XFR, read the safety information that shipped with your XT2 XFR. Page 56 of the XT2 XFR, disconnect the display...board. 6. For additional safety best practices information, see the Regulatory Compliance Homepage at www.dell.com/regulatory_compliance. 4.16.1 Removing the System Board 1. Dell™ Latitude™ XT2 XFR Service Manual 4.16 System Board WARNING: Before working inside of 94 Version A00-01 ...
... connector from the XT2 XFR. 5. Remove the coin-cell battery from the system board. 8. Disconnect the Stylus bay connector from the system board. 4. From the inside your XT2 XFR, read the safety information that shipped with your XT2 XFR. Page 56 of the XT2 XFR, disconnect the display...board. 6. For additional safety best practices information, see the Regulatory Compliance Homepage at www.dell.com/regulatory_compliance. 4.16.1 Removing the System Board 1. Dell™ Latitude™ XT2 XFR Service Manual 4.16 System Board WARNING: Before working inside of 94 Version A00-01 ...

Service Manual
Page 57
Lift the system board up and remove from over the video/antenna cable socket. 11. Dell™ Latitude™ XT2 XFR Service Manual 2 3 5 4 1 6 1 Speaker connection 2 Stylus connection 3 Coin-cell battery connection 4 WiFi sniffer connection 5 System board screw (2.5 x 5-mm) 6 System board screw at bracket (2.5 x 8-mm) 10. Page 57 of 94 Version A00-01 Carefully lift the gasket surround from the fan housing area and lift the gasket from the XT2 XFR.
Lift the system board up and remove from over the video/antenna cable socket. 11. Dell™ Latitude™ XT2 XFR Service Manual 2 3 5 4 1 6 1 Speaker connection 2 Stylus connection 3 Coin-cell battery connection 4 WiFi sniffer connection 5 System board screw (2.5 x 5-mm) 6 System board screw at bracket (2.5 x 8-mm) 10. Page 57 of 94 Version A00-01 Carefully lift the gasket surround from the fan housing area and lift the gasket from the XT2 XFR.

