Latitude E7240 Owners Manual
Page 3
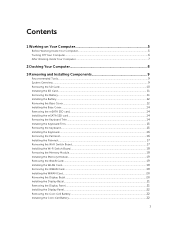
... 7 2 Docking Your Computer 8 3 Removing and Installing Components 9 Recommended Tools...9 System Overview...9 Removing the SD Card...10 Installing the SD Card...11 Removing the Battery...11 Installing the Battery...12 Removing the Base Cover...12 Installing the Base Cover...14 Removing the mSATA SSD card...14 Installing the mSATA SSD card...14 Removing......20 Removing the Display Bezel...20 Installing the Display Bezel...21 Removing the Display Panel...21 Installing the Display Panel...22 Removing the Coin-Cell Battery...22 Installing the Coin-Cell...
... 7 2 Docking Your Computer 8 3 Removing and Installing Components 9 Recommended Tools...9 System Overview...9 Removing the SD Card...10 Installing the SD Card...11 Removing the Battery...11 Installing the Battery...12 Removing the Base Cover...12 Installing the Base Cover...14 Removing the mSATA SSD card...14 Installing the mSATA SSD card...14 Removing......20 Removing the Display Bezel...20 Installing the Display Bezel...21 Removing the Display Panel...21 Installing the Display Panel...22 Removing the Coin-Cell Battery...22 Installing the Coin-Cell...
Latitude E7240 Owners Manual
Page 4
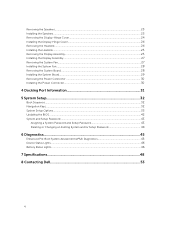
... Deleting or Changing an Existing System and/or Setup Password 44 6 Diagnostics...45 Enhanced Pre-Boot System Assessment (ePSA) Diagnostics 45 Device Status Lights...46 Battery Status Lights...46 7 Specifications...48 8 Contacting Dell 53 4
... Deleting or Changing an Existing System and/or Setup Password 44 6 Diagnostics...45 Enhanced Pre-Boot System Assessment (ePSA) Diagnostics 45 Device Status Lights...46 Battery Status Lights...46 7 Specifications...48 8 Contacting Dell 53 4

Latitude E7240 Owners Manual
Page 6
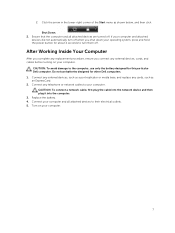
... devices from the network device. 4. Shut down a. Click Start . 6 Disconnect your computer from the right edge of the computer. Remove the main battery. 8. While you must remove the main battery before opening the Charms menu and select Settings. Turning Off Your Computer CAUTION: To avoid losing data, save and close all open...
... devices from the network device. 4. Shut down a. Click Start . 6 Disconnect your computer from the right edge of the computer. Remove the main battery. 8. While you must remove the main battery before opening the Charms menu and select Settings. Turning Off Your Computer CAUTION: To avoid losing data, save and close all open...
Latitude E7240 Owners Manual
Page 7
.... 1. Connect your computer. Ensure that the computer and all attached devices to the computer, use batteries designed for this particular Dell computer. CAUTION: To avoid damage to their electrical outlets. 5. 2. If your computer and attached devices did not automatically turn them off when you connect any ...
.... 1. Connect your computer. Ensure that the computer and all attached devices to the computer, use batteries designed for this particular Dell computer. CAUTION: To avoid damage to their electrical outlets. 5. 2. If your computer and attached devices did not automatically turn them off when you connect any ...
Latitude E7240 Owners Manual
Page 9
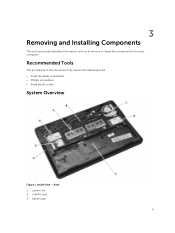
3 Removing and Installing Components This section provides detailed information on how to remove or install the components from your computer. system fan 2. Back 1. mSATA card 3. battery bay 9 Inside View - Recommended Tools The procedures in this document may require the following tools: • Small flat-blade screwdriver • Phillips screwdriver • Small plastic scribe System Overview Figure 1.
3 Removing and Installing Components This section provides detailed information on how to remove or install the components from your computer. system fan 2. Back 1. mSATA card 3. battery bay 9 Inside View - Recommended Tools The procedures in this document may require the following tools: • Small flat-blade screwdriver • Phillips screwdriver • Small plastic scribe System Overview Figure 1.
Latitude E7240 Owners Manual
Page 10
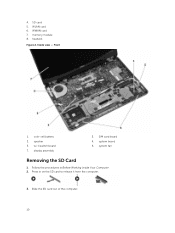
4. WWAN card 7. speaker 5. Slide the SD card out of the computer. 10 heatsink Figure 2. Front 1. coin-cell battery 3. system fan Removing the SD Card 1. Inside view - wi-fi switch board 7. SIM card board 4. system board 6. Follow the procedures in on the SD card to release it from the computer. 3. SD card 5. Press in Before Working Inside Your Computer. 2. display assembly 2. WLAN card 6. memory module 8.
4. WWAN card 7. speaker 5. Slide the SD card out of the computer. 10 heatsink Figure 2. Front 1. coin-cell battery 3. system fan Removing the SD Card 1. Inside view - wi-fi switch board 7. SIM card board 4. system board 6. Follow the procedures in on the SD card to release it from the computer. 3. SD card 5. Press in Before Working Inside Your Computer. 2. display assembly 2. WLAN card 6. memory module 8.
Latitude E7240 Owners Manual
Page 11
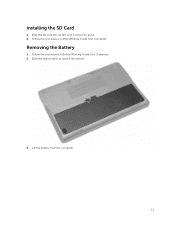
Removing the Battery 1. Follow the procedures in Before Working Inside Your Computer. 2. Follow the procedures in After Working Inside Your Computer. Slide the release latch to unlock the battery. 3. Slide the SD card into its slot until it clicks into place. 2. Installing the SD Card 1. Lift the battery from the computer. 11
Removing the Battery 1. Follow the procedures in Before Working Inside Your Computer. 2. Follow the procedures in After Working Inside Your Computer. Slide the release latch to unlock the battery. 3. Slide the SD card into its slot until it clicks into place. 2. Installing the SD Card 1. Lift the battery from the computer. 11
Latitude E7240 Owners Manual
Page 12
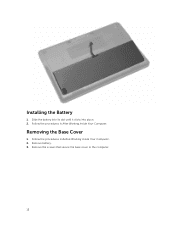
Installing the Battery 1. Remove battery. 3. Follow the procedures in Before Working Inside Your Computer. 2. Removing the Base Cover 1. Follow the procedures in After Working Inside Your Computer. Slide the battery into its slot until it clicks into place. 2. Remove the screws that secure the base cover to the computer. 12
Installing the Battery 1. Remove battery. 3. Follow the procedures in Before Working Inside Your Computer. 2. Removing the Base Cover 1. Follow the procedures in After Working Inside Your Computer. Slide the battery into its slot until it clicks into place. 2. Remove the screws that secure the base cover to the computer. 12
Latitude E7240 Owners Manual
Page 14
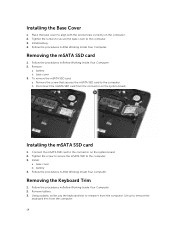
... cover to align with the screw holes correctly on the system board. 2. Install battery. 4. Follow the procedures in After Working Inside Your Computer. battery b. To remove the mSATA SSD card: a. Installing the mSATA SSD card 1. battery 4. Follow the procedures in Before Working Inside Your Computer. 2. Remove: a. Removing... the Keyboard Trim 1. Remove battery. 3. Connect the mSATA SSD card to remove the keyboard trim from the computer. Lift up to the connector on the ...
... cover to align with the screw holes correctly on the system board. 2. Install battery. 4. Follow the procedures in After Working Inside Your Computer. battery b. To remove the mSATA SSD card: a. Installing the mSATA SSD card 1. battery 4. Follow the procedures in Before Working Inside Your Computer. 2. Remove: a. Removing... the Keyboard Trim 1. Remove battery. 3. Connect the mSATA SSD card to remove the keyboard trim from the computer. Lift up to the connector on the ...
Latitude E7240 Owners Manual
Page 15
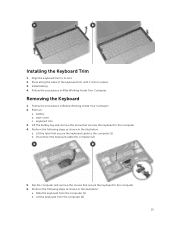
...Inside Your Computer. base cover c. Flip the computer and remove the screws that secure the keyboard cable to the computer. 6. battery b. Perform the following steps as shown in place. 3. b. Press along the sides of the keyboard trim until it clicks in the illustration: a.... Install battery. 4. Disconnect the keyboard cable the computer [2]. 5. Remove: a. Perform the following steps as shown in the illustration: a. Slide the keyboard from...
...Inside Your Computer. base cover c. Flip the computer and remove the screws that secure the keyboard cable to the computer. 6. battery b. Perform the following steps as shown in place. 3. b. Press along the sides of the keyboard trim until it clicks in the illustration: a.... Install battery. 4. Disconnect the keyboard cable the computer [2]. 5. Remove: a. Perform the following steps as shown in the illustration: a. Slide the keyboard from...
Latitude E7240 Owners Manual
Page 16
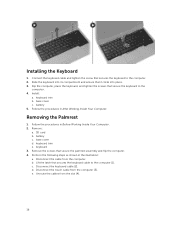
... that it clicks into its compartment and ensure that secure the keyboard to the computer. 4. Follow the procedures in the illustration: a. battery c. base cover d. keyboard 3. b. e. Slide the keyboard into place. 3. battery 5. SD card b. Remove the screws that secures the keyboard cable to the computer. 2. Lift the latch that secure the palmrest assembly...
... that it clicks into its compartment and ensure that secure the keyboard to the computer. 4. Follow the procedures in the illustration: a. battery c. base cover d. keyboard 3. b. e. Slide the keyboard into place. 3. battery 5. SD card b. Remove the screws that secures the keyboard cable to the computer. 2. Lift the latch that secure the palmrest assembly...
Latitude E7240 Owners Manual
Page 17
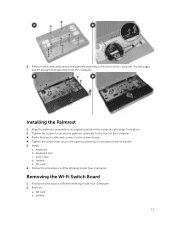
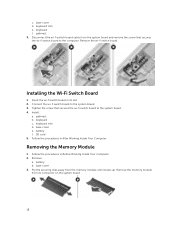
... Working Inside Your Computer. SD card b. Remove the screws that secure the palmrest assembly to the front of the computer. Installing the Palmrest 1. base cover d. battery 17 Removing the Wi‐Fi Switch Board 1. Align the palm rest assembly to the system board. 4. Route the touch cable and connect to its...
... Working Inside Your Computer. SD card b. Remove the screws that secure the palmrest assembly to the front of the computer. Installing the Palmrest 1. base cover d. battery 17 Removing the Wi‐Fi Switch Board 1. Align the palm rest assembly to the system board. 4. Route the touch cable and connect to its...
Latitude E7240 Owners Manual
Page 18
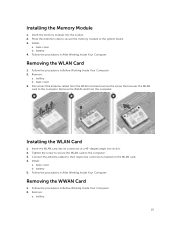
...base cover 3. base cover d. palmrest 3. Connect the wi-fi switch board to the system board. 4. Removing the Memory Module 1. battery b. Disconnect the wi-fi switch board cable from the memory module until it pops up. Insert the wi-fi switch board in its ... system board. 18 Install: a. keyboard c. base cover e. Installing the Wi‐Fi Switch Board 1. keyboard f. keyboard trim d. Remove: a. battery f. Follow the procedures in Before Working Inside Your Computer. 2. Follow the procedures in After Working Inside Your Computer. Pry the securing clips away from...
...base cover 3. base cover d. palmrest 3. Connect the wi-fi switch board to the system board. 4. Removing the Memory Module 1. battery b. Disconnect the wi-fi switch board cable from the memory module until it pops up. Insert the wi-fi switch board in its ... system board. 18 Install: a. keyboard c. base cover e. Installing the Wi‐Fi Switch Board 1. keyboard f. keyboard trim d. Remove: a. battery f. Follow the procedures in Before Working Inside Your Computer. 2. Follow the procedures in After Working Inside Your Computer. Pry the securing clips away from...
Latitude E7240 Owners Manual
Page 19
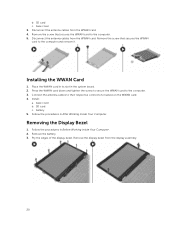
... 3. Remove: a. Connect the antenna cables to the system board. 3. Follow the procedures in Before Working Inside Your Computer. 2. battery 4. Follow the procedures in Before Working Inside Your Computer. 2. base cover 3. Tighten the screw to secure the WLAN card to the... computer. Installing the Memory Module 1. Remove: a. battery b. Follow the procedures in After Working Inside Your Computer. battery 19 Follow the procedures in After Working Inside Your Computer. Install: a. base cover b. Installing the WLAN...
... 3. Remove: a. Connect the antenna cables to the system board. 3. Follow the procedures in Before Working Inside Your Computer. 2. battery 4. Follow the procedures in Before Working Inside Your Computer. 2. base cover 3. Tighten the screw to secure the WLAN card to the... computer. Installing the Memory Module 1. Remove: a. battery b. Follow the procedures in After Working Inside Your Computer. battery 19 Follow the procedures in After Working Inside Your Computer. Install: a. base cover b. Installing the WLAN...
Latitude E7240 Owners Manual
Page 20
... Computer. Remove the display bezel from the display assembly. 20 Remove the screw that secures the WWAN card to the computer. 3. b. SD card c. base cover 3. battery 5. Remove the battery. 3. Pry the edges of the display bezel.
... Computer. Remove the display bezel from the display assembly. 20 Remove the screw that secures the WWAN card to the computer. 3. b. SD card c. base cover 3. battery 5. Remove the battery. 3. Pry the edges of the display bezel.
Latitude E7240 Owners Manual
Page 21
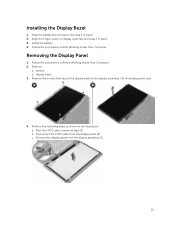
Install the battery 4. Disconnect the LVDS cable from the display assembly [3]. 21 display bezel 3. Peel the LVDS cable connector tape [1]. Follow the procedures in the illustration: a. Perform the ... the procedures in place. 2. Removing the Display Panel 1. Remove the screws that secure the display panel to the display assembly. Lift the display panel over. 4. battery b. c. Remove the display panel from the display panel [2]. Installing the Display Bezel 1. Align the hinge covers on display assembly and snap it in After Working...
Install the battery 4. Disconnect the LVDS cable from the display assembly [3]. 21 display bezel 3. Peel the LVDS cable connector tape [1]. Follow the procedures in the illustration: a. Perform the ... the procedures in place. 2. Removing the Display Panel 1. Remove the screws that secure the display panel to the display assembly. Lift the display panel over. 4. battery b. c. Remove the display panel from the display panel [2]. Installing the Display Bezel 1. Align the hinge covers on display assembly and snap it in After Working...

Latitude E7240 Owners Manual
Page 22
... secure the display panel to the system board. 3. battery 5. Follow the procedures in Before Working Inside Your Computer. 2. battery c. Disconnect the coin-cell battery cable from the system board [2]. 5. Route the cables and connect the coin-cell battery cable to the display assembly. 4. display bezel b....board. Unroute the cables from the slot and remove the coin-cell battery from the computer. Tighten the screw that secures the coin-cell battery to the system board. 4. Install: a. Removing the Coin-Cell Battery 1. Perform the following steps as shown in its connector on the...
... secure the display panel to the system board. 3. battery 5. Follow the procedures in Before Working Inside Your Computer. 2. battery c. Disconnect the coin-cell battery cable from the system board [2]. 5. Route the cables and connect the coin-cell battery cable to the display assembly. 4. display bezel b....board. Unroute the cables from the slot and remove the coin-cell battery from the computer. Tighten the screw that secures the coin-cell battery to the system board. 4. Install: a. Removing the Coin-Cell Battery 1. Perform the following steps as shown in its connector on the...
Latitude E7240 Owners Manual
Page 23
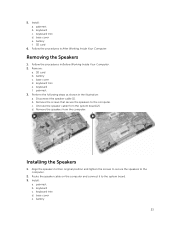
... Speakers 1. SD card b. base cover d. b. keyboard c. base cover e. 5. keyboard trim d. battery c. palmrest 3. Remove the screws that secure the speakers to the computer. 2. Unroute the speaker cable from the computer. Align the speakers to their original position ... the speakers from the system board [2]. Installing the Speakers 1. Route the speaker cable on the computer and connect it to the system board. 3. keyboard trim d. battery 23
... Speakers 1. SD card b. base cover d. b. keyboard c. base cover e. 5. keyboard trim d. battery c. palmrest 3. Remove the screws that secure the speakers to the computer. 2. Unroute the speaker cable from the computer. Align the speakers to their original position ... the speakers from the system board [2]. Installing the Speakers 1. Route the speaker cable on the computer and connect it to the system board. 3. keyboard trim d. battery 23
Latitude E7240 Owners Manual
Page 24
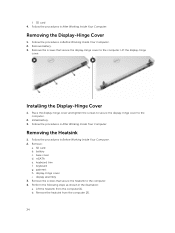
Install battery. 3. keyboard trim f. palmrest h. b. SD card b. Remove the screws that secure the display-hinge cover to the computer. Lift the heatsink from the computer [2]. 24 Remove... in After Working Inside Your Computer. Place the display-hinge cover and tighten the screws to secure the display-hinge cover to the computer. 4. battery c. SD card 4. Remove battery. 3. Removing the Heatsink 1. display assembly 3. Removing the Display-Hinge Cover 1. Follow the procedures in After Working Inside Your Computer. base cover d. keyboard g. f. ...
Install battery. 3. keyboard trim f. palmrest h. b. SD card b. Remove the screws that secure the display-hinge cover to the computer. Lift the heatsink from the computer [2]. 24 Remove... in After Working Inside Your Computer. Place the display-hinge cover and tighten the screws to secure the display-hinge cover to the computer. 4. battery c. SD card 4. Remove battery. 3. Removing the Heatsink 1. display assembly 3. Removing the Display-Hinge Cover 1. Follow the procedures in After Working Inside Your Computer. base cover d. keyboard g. f. ...
Latitude E7240 Owners Manual
Page 25
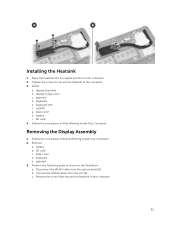
Install: a. keyboard e. battery i. base cover d. Perform the following steps as shown in After Working Inside Your Computer. c. display-hinge cover c. base cover h. Follow the procedures in the illustration: a. ... to the computer. 3. display assembly b. SD card 4. Disconnect the WLAN cable from the slot [2]. Tighten the screws to secure the heatsink to the computer. 25 battery b. keyboard trim f. Follow the procedures in Before Working Inside Your Computer. 2. Removing the Display Assembly 1. SD card c. Unroute the WLAN cables from the system board...
Install: a. keyboard e. battery i. base cover d. Perform the following steps as shown in After Working Inside Your Computer. c. display-hinge cover c. base cover h. Follow the procedures in the illustration: a. ... to the computer. 3. display assembly b. SD card 4. Disconnect the WLAN cable from the slot [2]. Tighten the screws to secure the heatsink to the computer. 25 battery b. keyboard trim f. Follow the procedures in Before Working Inside Your Computer. 2. Removing the Display Assembly 1. SD card c. Unroute the WLAN cables from the system board...

