User Manual
Page 6
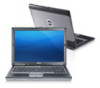
... cards or connect the computer to turn on and shut down your computer. Figure 9. Power Button NOTE: It is recommended that you turn on system board • discrete integrated video • PCI-E x16 Gen1 • PCI-E x16 Gen2 Intel Graphics NVIDIA N12P with your computer. System Information Chipset Processor Intel Mobile...
... cards or connect the computer to turn on and shut down your computer. Figure 9. Power Button NOTE: It is recommended that you turn on system board • discrete integrated video • PCI-E x16 Gen1 • PCI-E x16 Gen2 Intel Graphics NVIDIA N12P with your computer. System Information Chipset Processor Intel Mobile...

Owners Manual
Page 5
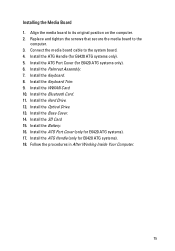
... Assembly 65 Installing the Palm Rest Assembly 68 22 Smart Card Reader 69 Removing the Smart Card 69 Installing the Smart Card 71 23 Media Board 73 Removing The Media Board 73 Installing the Media Board 75 24 ExpressCard Cage 77 Removing the ExpressCard Cage 77
... Assembly 65 Installing the Palm Rest Assembly 68 22 Smart Card Reader 69 Removing the Smart Card 69 Installing the Smart Card 71 23 Media Board 73 Removing The Media Board 73 Installing the Media Board 75 24 ExpressCard Cage 77 Removing the ExpressCard Cage 77

Owners Manual
Page 6
Installing the ExpressCard Cage 78 25 System Board Components 79 Removing the System Board 79 Installing the System Board 84 26 Speaker...85 Removing the Speakers 85 Installing the Speakers...87 27 Modem Connector 89 Removing the Modem Connector 89 Installing the Modem ...Connector 93 28 Input/Output Panel 95 Removing the Input/Output (I/O) Board 95 Installing the Input/Output (I/O) Board 97 29 DC-In Port 99 Removing DC-in Port...99 Installing DC-In Port...102 30 Display Assembly 103 Removing the Display...
Installing the ExpressCard Cage 78 25 System Board Components 79 Removing the System Board 79 Installing the System Board 84 26 Speaker...85 Removing the Speakers 85 Installing the Speakers...87 27 Modem Connector 89 Removing the Modem Connector 89 Installing the Modem ...Connector 93 28 Input/Output Panel 95 Removing the Input/Output (I/O) Board 95 Installing the Input/Output (I/O) Board 97 29 DC-In Port 99 Removing DC-in Port...99 Installing DC-In Port...102 30 Display Assembly 103 Removing the Display...

Owners Manual
Page 10
.... 7. Close the display and turn the computer upside-down on a flat work , periodically touch an unpainted metal surface to ground the system board. NOTE: To avoid damaging the system board, you must remove the main battery before you work surface. Disconnect your computer, perform the following tools: • Small flat-blade screwdriver...
.... 7. Close the display and turn the computer upside-down on a flat work , periodically touch an unpainted metal surface to ground the system board. NOTE: To avoid damaging the system board, you must remove the main battery before you work surface. Disconnect your computer, perform the following tools: • Small flat-blade screwdriver...
Owners Manual
Page 35
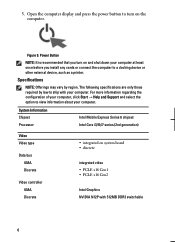
Remove the Secure Digital (SD) card. 6. Remove the ATG Handle (only for E6420 ATG systems). 4. Remove the ATG Port Cover (only for E6420 ATG systems). 3. Follow the procedures in Before Working On Your Computer 2. Use your fingertips to spread apart the securing clips on the system board by drawing the module from the system board at a 45-degree angle. 35 Memory Card 12 Removing the Memory Card 1. Remove the base cover. 7. Remove the battery. 5. Remove the memory module from its connector on each end of the memory module connector until the memory module pops up. 8.
Remove the Secure Digital (SD) card. 6. Remove the ATG Handle (only for E6420 ATG systems). 4. Remove the ATG Port Cover (only for E6420 ATG systems). 3. Follow the procedures in Before Working On Your Computer 2. Use your fingertips to spread apart the securing clips on the system board by drawing the module from the system board at a 45-degree angle. 35 Memory Card 12 Removing the Memory Card 1. Remove the base cover. 7. Remove the battery. 5. Remove the memory module from its connector on each end of the memory module connector until the memory module pops up. 8.

Owners Manual
Page 36
Follow the procedures in After Working Inside Your Computer. 36 Installing the Memory Card 1. Install the Secure Digital (SD) card. 5. Install the ATG Port Cover (only for E6420 ATG systems). 8. Install the Base Cover. 4. Install the ATG Handle (only for E6420 ATG systems). 7. Install the Battery. 6. Push the memory module into the memory slot. 2. Press the clips to secure the memory module to the system board. 3.
Follow the procedures in After Working Inside Your Computer. 36 Installing the Memory Card 1. Install the Secure Digital (SD) card. 5. Install the ATG Port Cover (only for E6420 ATG systems). 8. Install the Base Cover. 4. Install the ATG Handle (only for E6420 ATG systems). 7. Install the Battery. 6. Push the memory module into the memory slot. 2. Press the clips to secure the memory module to the system board. 3.
Owners Manual
Page 38
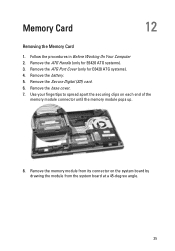
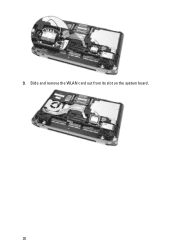
9. Slide and remove the WLAN card out from its slot on the system board. 38
9. Slide and remove the WLAN card out from its slot on the system board. 38

Owners Manual
Page 45
Remove the Battery. 5. Disconnect any antennas routed over the coin cell battery. 8. Remove the ATG Handle (only for E6420 ATG systems). 4. Remove the SD Card. 6. Remove the ATG Port Cover (only for E6420 ATG systems). 3. Coin-Cell Battery 15 Removing the Coin-Cell Battery 1. Disconnect the coin-cell battery cable from the system board. 45 Follow the procedures in Before Working on Your Computer. 2. Remove the Base Cover. 7.
Remove the Battery. 5. Disconnect any antennas routed over the coin cell battery. 8. Remove the ATG Handle (only for E6420 ATG systems). 4. Remove the SD Card. 6. Remove the ATG Port Cover (only for E6420 ATG systems). 3. Coin-Cell Battery 15 Removing the Coin-Cell Battery 1. Disconnect the coin-cell battery cable from the system board. 45 Follow the procedures in Before Working on Your Computer. 2. Remove the Base Cover. 7.
Owners Manual
Page 46
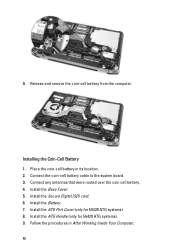
Release and remove the coin-cell battery from the computer. Install the Secure Digital (SD) card. 6. Install the ATG Port Cover (only for E6420 ATG systems). 9. Install the Base Cover. 5. Follow the procedures in its location. 2. Install the ATG Handle (only for E6420 ATG systems). 8. Connect any antennas that were routed over the coin cell battery. 4. Install the Battery. 7. Installing the Coin-Cell Battery 1. Connect the coin-cell battery cable to the system board. 3. 9. Place the coin-cell battery in After Working Inside Your Computer. 46
Release and remove the coin-cell battery from the computer. Install the Secure Digital (SD) card. 6. Install the ATG Port Cover (only for E6420 ATG systems). 9. Install the Base Cover. 5. Follow the procedures in its location. 2. Install the ATG Handle (only for E6420 ATG systems). 8. Connect any antennas that were routed over the coin cell battery. 4. Install the Battery. 7. Installing the Coin-Cell Battery 1. Connect the coin-cell battery cable to the system board. 3. 9. Place the coin-cell battery in After Working Inside Your Computer. 46
Owners Manual
Page 58
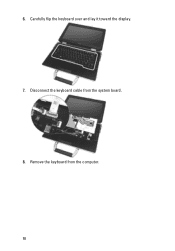
Carefully flip the keyboard over and lay it toward the display. 7. Remove the keyboard from the system board. 8. Disconnect the keyboard cable from the computer. 58 6.
Carefully flip the keyboard over and lay it toward the display. 7. Remove the keyboard from the system board. 8. Disconnect the keyboard cable from the computer. 58 6.
Owners Manual
Page 60
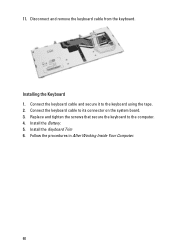
Connect the keyboard cable to the keyboard using the tape. 2. Install the Battery. 5. Connect the keyboard cable and secure it to its connector on the system board. 3. Follow the procedures in After Working Inside Your Computer. 60 11. Install the Keyboard Trim 6. Installing the Keyboard 1. Disconnect and remove the keyboard cable from the keyboard. Replace and tighten the screws that secure the keyboard to the computer. 4.
Connect the keyboard cable to the keyboard using the tape. 2. Install the Battery. 5. Connect the keyboard cable and secure it to its connector on the system board. 3. Follow the procedures in After Working Inside Your Computer. 60 11. Install the Keyboard Trim 6. Installing the Keyboard 1. Disconnect and remove the keyboard cable from the keyboard. Replace and tighten the screws that secure the keyboard to the computer. 4.
Owners Manual
Page 63
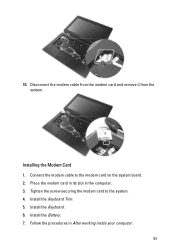
Install the Keyboard Trim. 5. Installing the Modem Card 1. Tighten the screw securing the modem card to the modem card on the system board. 2. Follow the procedures in the computer. 3. Install the Keyboard. 6. Install the Battery. 7. Place the modem card in its slot in After working inside your computer. 63 10. Disconnect the modem cable from the modem card and remove it from the system. Connect the modem cable to the system. 4.
Install the Keyboard Trim. 5. Installing the Modem Card 1. Tighten the screw securing the modem card to the modem card on the system board. 2. Follow the procedures in the computer. 3. Install the Keyboard. 6. Install the Battery. 7. Place the modem card in its slot in After working inside your computer. 63 10. Disconnect the modem cable from the modem card and remove it from the system. Connect the modem cable to the system. 4.

Owners Manual
Page 66
15. Using a plastic scribe, gently pry out the top right corner of the palm rest and run along the scribe to the right side of the palm rest to release the snaps. 66 Release and disconnect the LED, smart card, touchpad, RFID, and ExpressCard cable from the system board. 16.
15. Using a plastic scribe, gently pry out the top right corner of the palm rest and run along the scribe to the right side of the palm rest to release the snaps. 66 Release and disconnect the LED, smart card, touchpad, RFID, and ExpressCard cable from the system board. 16.
Owners Manual
Page 68
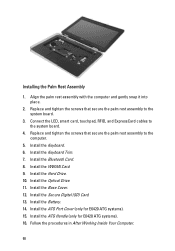
... screws that secure the palm rest assembly to the system board. 3. Install the Optical Drive. 11. Install the Base Cover. 12. Install the Battery. 14. Install the Keyboard. 6. Install the WWAN Card. 9. Install the ATG Handle (only for E6420 ATG systems). 15. Align the palm rest assembly with... snap it into place. 2. Install the Secure Digital (SD) Card. 13. Install the Keyboard Trim. 7. Install the ATG Port Cover (only for E6420 ATG systems). 16. Follow the procedures in After Working Inside Your Computer. 68 Install the Hard Drive. 10. Connect the LED, smart card, touchpad,...
... screws that secure the palm rest assembly to the system board. 3. Install the Optical Drive. 11. Install the Base Cover. 12. Install the Battery. 14. Install the Keyboard. 6. Install the WWAN Card. 9. Install the ATG Handle (only for E6420 ATG systems). 15. Align the palm rest assembly with... snap it into place. 2. Install the Secure Digital (SD) Card. 13. Install the Keyboard Trim. 7. Install the ATG Port Cover (only for E6420 ATG systems). 16. Follow the procedures in After Working Inside Your Computer. 68 Install the Hard Drive. 10. Connect the LED, smart card, touchpad,...
Owners Manual
Page 69
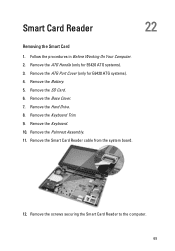
Remove the Battery. 5. Remove the Keyboard. 10. Remove the Keyboard Trim. 9. Remove the Palmrest Assembly. 11. Remove the Smart Card Reader cable from the system board. 12. Follow the procedures in Before Working On Your Computer. 2. Remove the SD Card. 6. Remove the ATG Port Cover (only for E6420 ATG systems). 3. Remove the Hard Drive. 8. Remove the Base Cover. 7. Remove the ATG Handle (only for E6420 ATG systems). 4. Remove the screws securing the Smart Card Reader to the computer. 69 Smart Card Reader 22 Removing the Smart Card 1.
Remove the Battery. 5. Remove the Keyboard. 10. Remove the Keyboard Trim. 9. Remove the Palmrest Assembly. 11. Remove the Smart Card Reader cable from the system board. 12. Follow the procedures in Before Working On Your Computer. 2. Remove the SD Card. 6. Remove the ATG Port Cover (only for E6420 ATG systems). 3. Remove the Hard Drive. 8. Remove the Base Cover. 7. Remove the ATG Handle (only for E6420 ATG systems). 4. Remove the screws securing the Smart Card Reader to the computer. 69 Smart Card Reader 22 Removing the Smart Card 1.
Owners Manual
Page 71
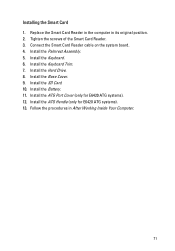
...Install the SD Card. 10. Install the Keyboard Trim. 7. Installing the Smart Card 1. Install the Battery. 11. Install the ATG Port Cover (only for E6420 ATG systems). 13. Install the Palmrest Assembly. 5. Install the Keyboard. 6. Install the Base Cover. 9. Install the ATG Handle (only for... E6420 ATG systems). 12. Follow the procedures in its original position. 2. Replace the Smart Card Reader in the computer in After Working Inside Your...
...Install the SD Card. 10. Install the Keyboard Trim. 7. Installing the Smart Card 1. Install the Battery. 11. Install the ATG Port Cover (only for E6420 ATG systems). 13. Install the Palmrest Assembly. 5. Install the Keyboard. 6. Install the Base Cover. 9. Install the ATG Handle (only for... E6420 ATG systems). 12. Follow the procedures in its original position. 2. Replace the Smart Card Reader in the computer in After Working Inside Your...

Owners Manual
Page 73
.... 9. Remove the Keyboard. 13. Remove the screws that secure the media board to the computer. 73 Remove the SD Card. 6. Remove the Optical Drive. 7. Remove the Bluetooth Card. 11. Remove the Palmrest Assembly. 14. Remove the ATG Port Cover (only for E6420 ATG systems). 3. Remove the Base Cover. 8. Remove the Keyboard Trim...
.... 9. Remove the Keyboard. 13. Remove the screws that secure the media board to the computer. 73 Remove the SD Card. 6. Remove the Optical Drive. 7. Remove the Bluetooth Card. 11. Remove the Palmrest Assembly. 14. Remove the ATG Port Cover (only for E6420 ATG systems). 3. Remove the Base Cover. 8. Remove the Keyboard Trim...
Owners Manual
Page 74
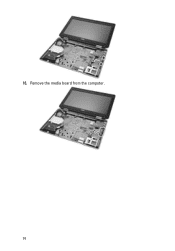
16. Remove the media board from the computer. 74
16. Remove the media board from the computer. 74
Owners Manual
Page 75
... Cover. 14. Install the Battery. 16. Install the ATG Port Cover (for E6420 ATG systems). 18. Install the Optical Drive. 13. Install the SD Card. 15. Replace and tighten the screws that secure the media board to its original position on the computer. 2. Install the WWAN Card. 10.... Install the ATG Handle (only for E6420 ATG systems only). 6. Install the ATG Handle (for E6420 ATG systems). 17. Follow the procedures in After Working Inside ...
... Cover. 14. Install the Battery. 16. Install the ATG Port Cover (for E6420 ATG systems). 18. Install the Optical Drive. 13. Install the SD Card. 15. Replace and tighten the screws that secure the media board to its original position on the computer. 2. Install the WWAN Card. 10.... Install the ATG Handle (only for E6420 ATG systems only). 6. Install the ATG Handle (for E6420 ATG systems). 17. Follow the procedures in After Working Inside ...
Owners Manual
Page 79
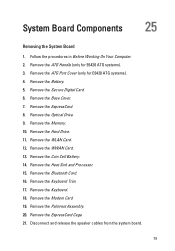
... the Keyboard. 18. Remove the ExpressCard Cage. 21. Remove the Battery. 5. Remove the Keyboard Trim. 17. System Board Components 25 Removing the System Board 1. Remove the ATG Handle (only for E6420 ATG systems). 4. Remove the WLAN Card. 12. Disconnect and release the speaker cables from the system... board. 79 Remove the ExpressCard. 8. Remove the Hard Drive. 11. Remove the Modem Card 19. Remove the Base Cover...
... the Keyboard. 18. Remove the ExpressCard Cage. 21. Remove the Battery. 5. Remove the Keyboard Trim. 17. System Board Components 25 Removing the System Board 1. Remove the ATG Handle (only for E6420 ATG systems). 4. Remove the WLAN Card. 12. Disconnect and release the speaker cables from the system... board. 79 Remove the ExpressCard. 8. Remove the Hard Drive. 11. Remove the Modem Card 19. Remove the Base Cover...


