User Manual
Page 6
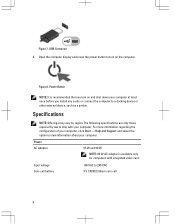
... down your computer at least once before you turn on the computer. The following specifications are only those required by region. Input voltage Coin-cell battery 100 VAC to view information about your computer. For more information regarding the configuration of your computer, click Start → Help and Support and select...
... down your computer at least once before you turn on the computer. The following specifications are only those required by region. Input voltage Coin-cell battery 100 VAC to view information about your computer. For more information regarding the configuration of your computer, click Start → Help and Support and select...
Owner's Manual
Page 3
... Removing the Secure Digital (SD) Card...11 Installing the Secure Digital (SD) Card...11 Removing The ExpressCard...12 Installing the ExpressCard...12 Removing The Battery...12 Installing the Battery...13 Removing the Subscriber Identity Module (SIM) Card 13 Installing the Subscriber Identity Module (SIM) Card 13 Removing the Base Cover...13 Installing...
... Removing the Secure Digital (SD) Card...11 Installing the Secure Digital (SD) Card...11 Removing The ExpressCard...12 Installing the ExpressCard...12 Removing The Battery...12 Installing the Battery...13 Removing the Subscriber Identity Module (SIM) Card 13 Installing the Subscriber Identity Module (SIM) Card 13 Removing the Base Cover...13 Installing...
Owner's Manual
Page 4
... Chassis Base...28 Installing the Chassis Base...29 Removing the Hall Sensor...30 Installing the Hall Sensor...31 Removing the Coin-Cell Battery...31 Installing the Coin-Cell Battery...32 Removing the System Board...32 Installing the System Board...34 Removing the Power-Connector Port...35 Installing the Power-Connector Port...36...
... Chassis Base...28 Installing the Chassis Base...29 Removing the Hall Sensor...30 Installing the Hall Sensor...31 Removing the Coin-Cell Battery...31 Installing the Coin-Cell Battery...32 Removing the System Board...32 Installing the System Board...34 Removing the Power-Connector Port...35 Installing the Power-Connector Port...36...

Owner's Manual
Page 5
6 Troubleshooting Your Computer 65 Device Status Lights...65 Battery Status Lights...66 7 Technical Specifications...67 8 Contacting Dell...73
6 Troubleshooting Your Computer 65 Device Status Lights...65 Battery Status Lights...66 7 Technical Specifications...67 8 Contacting Dell...73
Owner's Manual
Page 7
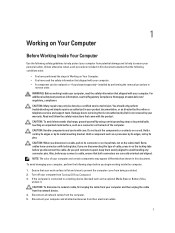
...in reverse order. Read and follow the safety instructions that is not authorized by Dell is not covered by your computer. Disconnect your computer (see the Regulatory Compliance Homepage at www.dell.com/ regulatory_compliance CAUTION: Many repairs may appear differently than shown in this document. .... 7 Hold a card by its edges or by periodically touching an unpainted metal surface, such as the optional Media Base or Battery Slice, undock it. Some cables have read the safety information that shipped with your computer and certain components may only be replaced ...
...in reverse order. Read and follow the safety instructions that is not authorized by Dell is not covered by your computer. Disconnect your computer (see the Regulatory Compliance Homepage at www.dell.com/ regulatory_compliance CAUTION: Many repairs may appear differently than shown in this document. .... 7 Hold a card by its edges or by periodically touching an unpainted metal surface, such as the optional Media Base or Battery Slice, undock it. Some cables have read the safety information that shipped with your computer and certain components may only be replaced ...
Owner's Manual
Page 8
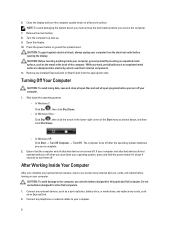
...yourself by touching an unpainted metal surface, such as shown below, and then click Shut Down. - Do not use only the battery designed for other Dell computers. 1. Connect any external devices, such as an ExpressCard. 2. Shut down on your operating system, press and hold the ... . NOTE: To avoid damaging the system board, you shut down your computer. Press the power button to the computer, use batteries designed for this particular Dell computer. CAUTION: To guard against electrical shock, always unplug your computer. 8 While you turn the computer upside-down the operating ...
...yourself by touching an unpainted metal surface, such as shown below, and then click Shut Down. - Do not use only the battery designed for other Dell computers. 1. Connect any external devices, such as an ExpressCard. 2. Shut down on your operating system, press and hold the ... . NOTE: To avoid damaging the system board, you shut down your computer. Press the power button to the computer, use batteries designed for this particular Dell computer. CAUTION: To guard against electrical shock, always unplug your computer. 8 While you turn the computer upside-down the operating ...
Owner's Manual
Page 9
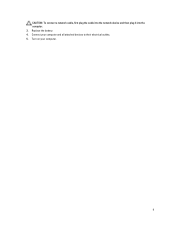
Replace the battery. 4. Connect your computer. 9 CAUTION: To connect a network cable, first plug the cable into the network device and then plug it into the computer. 3. Turn on your computer and all attached devices to their electrical outlets. 5.
Replace the battery. 4. Connect your computer. 9 CAUTION: To connect a network cable, first plug the cable into the network device and then plug it into the computer. 3. Turn on your computer and all attached devices to their electrical outlets. 5.
Owner's Manual
Page 12
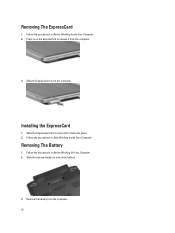
Removing The ExpressCard 1. Slide the ExpressCard out of the computer. Slide the ExpressCard into place. 2. Follow the procedures in Before Working On Your Computer. 2. Follow the procedures in After Working Inside Your Computer. Remove the battery from the computer. 3. Follow the procedures in on the ExpressCard to unlock the battery. 3. Slide the release latches to release it clicks into its slot until it from the computer. 12 Removing The Battery 1. Installing the ExpressCard 1. Press in Before Working Inside Your Computer. 2.
Removing The ExpressCard 1. Slide the ExpressCard out of the computer. Slide the ExpressCard into place. 2. Follow the procedures in Before Working On Your Computer. 2. Follow the procedures in After Working Inside Your Computer. Remove the battery from the computer. 3. Follow the procedures in on the ExpressCard to unlock the battery. 3. Slide the release latches to release it clicks into its slot until it from the computer. 12 Removing The Battery 1. Installing the ExpressCard 1. Press in Before Working Inside Your Computer. 2.
Owner's Manual
Page 13
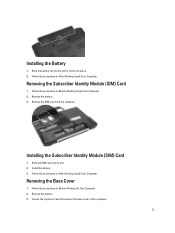
... Your Computer. 2. Follow the procedures in After Working Inside Your Computer. Remove the battery. 3. Loosen the captive screw that secures the base cover to the computer. 13 Installing the Battery 1. Follow the procedures in Before Working Inside Your Computer. 2. Remove the SIM card... from the computer. Slide the battery into place. 2. Slide the SIM card into its slot until it clicks into its slot. 2. Install the battery. 3. Removing the Subscriber Identity Module (SIM) Card 1. Installing the Subscriber Identity Module...
... Your Computer. 2. Follow the procedures in After Working Inside Your Computer. Remove the battery. 3. Loosen the captive screw that secures the base cover to the computer. 13 Installing the Battery 1. Follow the procedures in Before Working Inside Your Computer. 2. Remove the SIM card... from the computer. Slide the battery into place. 2. Slide the SIM card into its slot until it clicks into its slot. 2. Install the battery. 3. Removing the Subscriber Identity Module (SIM) Card 1. Installing the Subscriber Identity Module...
Owner's Manual
Page 14
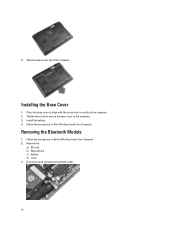
Removing the Bluetooth Module 1. Follow the procedures in After Working Inside Your Computer. Installing the Base Cover 1. Place the base cover to the computer. 3. Follow the procedures in Before Working Inside Your Computer. 2. Slide the base cover out of the computer. Install the battery. 4. Remove the: a) SD card b) ExpressCard c) battery d) cover 3. Disconnect and unroute the bluetooth cable. 14 4. Tighten the screw to secure the base cover to align with the screw hole correctly on the computer. 2.
Removing the Bluetooth Module 1. Follow the procedures in After Working Inside Your Computer. Installing the Base Cover 1. Place the base cover to the computer. 3. Follow the procedures in Before Working Inside Your Computer. 2. Slide the base cover out of the computer. Install the battery. 4. Remove the: a) SD card b) ExpressCard c) battery d) cover 3. Disconnect and unroute the bluetooth cable. 14 4. Tighten the screw to secure the base cover to align with the screw hole correctly on the computer. 2.

Owner's Manual
Page 15
... screw that secure the hard drive to the computer. 5. Connect the bluetooth cable to the computer. 3. Install the: a) base cover b) battery c) ExpressCard d) SD card 4. Tighten the screw to secure the bluetooth module to its connector. 2. Remove the: a) battery b) base cover 3. Remove the screws that secures the bluetooth module to the computer. 15 4.
... screw that secure the hard drive to the computer. 5. Connect the bluetooth cable to the computer. 3. Install the: a) base cover b) battery c) ExpressCard d) SD card 4. Tighten the screw to secure the bluetooth module to its connector. 2. Remove the: a) battery b) base cover 3. Remove the screws that secures the bluetooth module to the computer. 15 4.
Owner's Manual
Page 17
... hard-drive connector. 3. Tighten the screws to secure the hard drive to secure the hard drive. 5. Follow the procedures in its slot. 4. Install the: a) cover b) battery 7. Follow the procedures in After Working Inside Your Computer. Attach the hard-drive caddy to the hard drive. 2. Pry the retention clips away from the...
... hard-drive connector. 3. Tighten the screws to secure the hard drive to secure the hard drive. 5. Follow the procedures in its slot. 4. Install the: a) cover b) battery 7. Follow the procedures in After Working Inside Your Computer. Attach the hard-drive caddy to the hard drive. 2. Pry the retention clips away from the...

Owner's Manual
Page 18
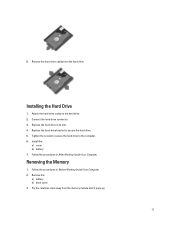
Insert the memory module into the socket. 2. Press the retention clips to secure the memory module to remove the second memory module. Removing The Palmrest 1. 4. Install the: a) base cover b) battery 4. Repeat steps 2 and 3 to the system board. 3. Disconnect the SD memory card reader cable. 18 Installing the Memory 1. Lift and remove the memory module from its connector. 5. Remove the: a) battery b) base cover 3. Follow the procedures in After Working Inside Your Computer. Follow the procedures in Before Working Inside Your Computer. 2.
Insert the memory module into the socket. 2. Press the retention clips to secure the memory module to remove the second memory module. Removing The Palmrest 1. 4. Install the: a) base cover b) battery 4. Repeat steps 2 and 3 to the system board. 3. Disconnect the SD memory card reader cable. 18 Installing the Memory 1. Lift and remove the memory module from its connector. 5. Remove the: a) battery b) base cover 3. Follow the procedures in After Working Inside Your Computer. Follow the procedures in Before Working Inside Your Computer. 2.
Owner's Manual
Page 20
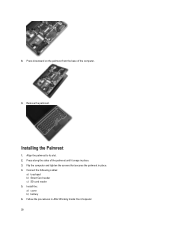
Remove the palmrest. Install the: a) cover b) battery 6. Flip the computer and tighten the screws that secures the palmrest in After Working Inside Your Computer. 20 Follow the procedures in place. 4. Press downward on the palmrest from the base of the palmrest until it snaps in place. 3. Align the palmrest to its slot. 2. Connect the following cables: a) touchpad b) Smart Card reader c) SD card reader 5. 8. Installing the Palmrest 1. Press along the sides of the computer. 9.
Remove the palmrest. Install the: a) cover b) battery 6. Flip the computer and tighten the screws that secures the palmrest in After Working Inside Your Computer. 20 Follow the procedures in place. 4. Press downward on the palmrest from the base of the palmrest until it snaps in place. 3. Align the palmrest to its slot. 2. Connect the following cables: a) touchpad b) Smart Card reader c) SD card reader 5. 8. Installing the Palmrest 1. Press along the sides of the computer. 9.
Owner's Manual
Page 21
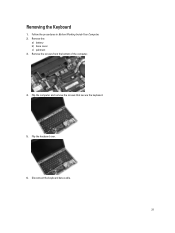
Remove the: a) battery b) base cover c) palmrest 3. Disconnect the keyboard data cable. 21 Remove the screws from the bottom of the computer. 4. Flip the keyboard over. 6. Flip the computer and remove the screws that secure the keyboard. 5. Follow the procedures in Before Working Inside Your Computer. 2. Removing the Keyboard 1.
Remove the: a) battery b) base cover c) palmrest 3. Disconnect the keyboard data cable. 21 Remove the screws from the bottom of the computer. 4. Flip the keyboard over. 6. Flip the computer and remove the screws that secure the keyboard. 5. Follow the procedures in Before Working Inside Your Computer. 2. Removing the Keyboard 1.
Owner's Manual
Page 23
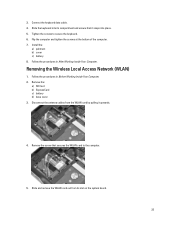
...Remove the screw that it upwards. 4. Slide the keyboard into place. 5. Tighten the screws to the computer. 5. Install the: a) palmrest b) cover c) battery 8. Slide and remove the WLAN card out from the WLAN card by pulling it snaps into its slot on the system board. 23 Remove the...: a) SD Card b) ExpressCard c) battery d) base cover 3. Connect the keyboard data cable. 4. Removing the Wireless Local Access Network (WLAN) 1. Disconnect the antenna cables from its compartment and...
...Remove the screw that it upwards. 4. Slide the keyboard into place. 5. Tighten the screws to the computer. 5. Install the: a) palmrest b) cover c) battery 8. Slide and remove the WLAN card out from the WLAN card by pulling it snaps into its slot on the system board. 23 Remove the...: a) SD Card b) ExpressCard c) battery d) base cover 3. Connect the keyboard data cable. 4. Removing the Wireless Local Access Network (WLAN) 1. Disconnect the antenna cables from its compartment and...
Owner's Manual
Page 24
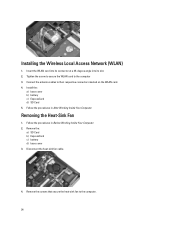
Follow the procedures in After Working Inside Your Computer. Disconnect the heat-sink fan cable. 4. Install the: a) base cover b) battery c) ExpressCard d) SD Card 5. Remove the screws that secure the heat-sink fan to the computer 3. Tighten the screw to secure ...the WLAN card to the computer. 24 Removing the Heat-Sink Fan 1. Remove the: a) SD Card b) ExpressCard c) battery d) base cover 3. Installing the Wireless Local Access Network (WLAN) 1. Follow the procedures in Before Working Inside Your Computer. 2. Insert the WLAN card into...
Follow the procedures in After Working Inside Your Computer. Disconnect the heat-sink fan cable. 4. Install the: a) base cover b) battery c) ExpressCard d) SD Card 5. Remove the screws that secure the heat-sink fan to the computer 3. Tighten the screw to secure ...the WLAN card to the computer. 24 Removing the Heat-Sink Fan 1. Remove the: a) SD Card b) ExpressCard c) battery d) base cover 3. Installing the Wireless Local Access Network (WLAN) 1. Follow the procedures in Before Working Inside Your Computer. 2. Insert the WLAN card into...
Owner's Manual
Page 25
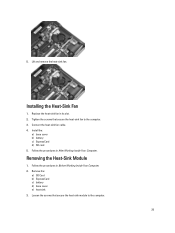
... procedures in Before Working Inside Your Computer. 2. Loosen the screws that secure the heat-sink fan to the computer. 25 Remove the: a) SD Card b) ExpressCard c) battery d) base cover e) heat sink 3. Lift and remove the heat-sink fan. Tighten the screws that secure the heat-sink module to the computer. 3. Install the...
... procedures in Before Working Inside Your Computer. 2. Loosen the screws that secure the heat-sink fan to the computer. 25 Remove the: a) SD Card b) ExpressCard c) battery d) base cover e) heat sink 3. Lift and remove the heat-sink fan. Tighten the screws that secure the heat-sink module to the computer. 3. Install the...

Owner's Manual
Page 26
Replace the heat-sink module in Before Working Inside Your Computer. 2. Tighten the screws to secure the heat-sink module. 3. Follow the procedures in its slot. 2. Install the: a) heat-sink fan b) base cover c) battery d) ExpressCard e) SD Card 4. Follow the procedures in After Working Inside Your Computer. Removing the Speakers 1. Remove the: a) SD Card b) ExpressCard c) battery d) base cover 3. Installing the Heat-Sink module 1. Disconnect the speaker cable. 26 4. Remove the heat-sink module.
Replace the heat-sink module in Before Working Inside Your Computer. 2. Tighten the screws to secure the heat-sink module. 3. Follow the procedures in its slot. 2. Install the: a) heat-sink fan b) base cover c) battery d) ExpressCard e) SD Card 4. Follow the procedures in After Working Inside Your Computer. Removing the Speakers 1. Remove the: a) SD Card b) ExpressCard c) battery d) base cover 3. Installing the Heat-Sink module 1. Disconnect the speaker cable. 26 4. Remove the heat-sink module.

Owner's Manual
Page 28
... d) SD card 4. Disconnect the touchpad cable. 4. Installing the Speakers 1. Remove the: a) SD card b) ExpressCard c) battery d) base cover e) palmrest f) keyboard g) bluetooth module h) heat-sink fan i) speakers 3. Follow the procedures in Before Working Inside Your Computer. 2. Follow the procedures in After Working ...
... d) SD card 4. Disconnect the touchpad cable. 4. Installing the Speakers 1. Remove the: a) SD card b) ExpressCard c) battery d) base cover e) palmrest f) keyboard g) bluetooth module h) heat-sink fan i) speakers 3. Follow the procedures in Before Working Inside Your Computer. 2. Follow the procedures in After Working ...


