Comprehensive Specifications
Page 1
... more information regarding the configuration of your computer, click Start → Help and Support and select the option to view information about your computer. Processor Type L2 cache External bus frequency Computer Information System chipset Data bus width DRAM bus width Flash EPROM Processor address bus Graphic...bits single channel 64-bit buses 2 MB 32 bits 32 bits NOTE: Offerings may need when setting up, updating drivers for, and upgrading your computer. Dell™ Inspiron™ 1012: Comprehensive Specifications This document provides information that you may vary by region.
... more information regarding the configuration of your computer, click Start → Help and Support and select the option to view information about your computer. Processor Type L2 cache External bus frequency Computer Information System chipset Data bus width DRAM bus width Flash EPROM Processor address bus Graphic...bits single channel 64-bit buses 2 MB 32 bits 32 bits NOTE: Offerings may need when setting up, updating drivers for, and upgrading your computer. Dell™ Inspiron™ 1012: Comprehensive Specifications This document provides information that you may vary by region.

Comprehensive Specifications
Page 3
Communications Modem interface Network adapter Wireless Video Video type Video controller Video memory LCD interface Video decoder (optional) Frame rate Resolution Formats Audio Audio type Audio controller Stereo conversion Internal interface Speakers Volume controls external V.92 56K USB (optional) 10/100 Mbps Ethernet Wireless LAN, Bluetooth wireless technology, WWAN/GPS, WiMax integrated on system board Intel GMA 3150 8 MB system memory (shared) LVDS Crystal HD Media Accelerator Upto 30 fps Upto 1080p or 1920x1088 Codec Support MPEG-4, DIvX(MPEG-4), AVC(H.264), VC-1(WMV-9) 2-channel...
Communications Modem interface Network adapter Wireless Video Video type Video controller Video memory LCD interface Video decoder (optional) Frame rate Resolution Formats Audio Audio type Audio controller Stereo conversion Internal interface Speakers Volume controls external V.92 56K USB (optional) 10/100 Mbps Ethernet Wireless LAN, Bluetooth wireless technology, WWAN/GPS, WiMax integrated on system board Intel GMA 3150 8 MB system memory (shared) LVDS Crystal HD Media Accelerator Upto 30 fps Upto 1080p or 1920x1088 Codec Support MPEG-4, DIvX(MPEG-4), AVC(H.264), VC-1(WMV-9) 2-channel...
Service Manual
Page 1
... this text: Dell, the DELL logo, and Inspiron are trademarks of your computer. Trademarks used by Bluetooth SIG, Inc. Dell™ Inspiron™ 1012 Service Manual Before You Begin Battery Keyboard Memory Module Hard-Drive Assembly Palm Rest Assembly Power Button Board Touch Pad Module Internal Card With Bluetooth® Wireless Technology Processor Heat Sink Wireless Mini-Card(s) Video Accelerator Card Hinge Cover Display Camera Module Speakers Support Bracket (s) I/O Board Status Light Board System Board AC Adapter Connector Coin-Cell Battery SIM Card Board Flashing the BIOS Notes...
... this text: Dell, the DELL logo, and Inspiron are trademarks of your computer. Trademarks used by Bluetooth SIG, Inc. Dell™ Inspiron™ 1012 Service Manual Before You Begin Battery Keyboard Memory Module Hard-Drive Assembly Palm Rest Assembly Power Button Board Touch Pad Module Internal Card With Bluetooth® Wireless Technology Processor Heat Sink Wireless Mini-Card(s) Video Accelerator Card Hinge Cover Display Camera Module Speakers Support Bracket (s) I/O Board Status Light Board System Board AC Adapter Connector Coin-Cell Battery SIM Card Board Flashing the BIOS Notes...
Service Manual
Page 3
.... CAUTION: Only a certified service technician should perform repairs on the locking tabs before you turn off when you connect a cable, ensure that shipped with your computer. 1. if you pull connectors apart, keep them evenly aligned to Contents Page Before You Begin Dell™ Inspiron™ 1012 Service Manual Recommended Tools Turning Off Your Computer Before Working Inside Your Computer This manual provides procedures for at...
.... CAUTION: Only a certified service technician should perform repairs on the locking tabs before you turn off when you connect a cable, ensure that shipped with your computer. 1. if you pull connectors apart, keep them evenly aligned to Contents Page Before You Begin Dell™ Inspiron™ 1012 Service Manual Recommended Tools Turning Off Your Computer Before Working Inside Your Computer This manual provides procedures for at...
Service Manual
Page 8
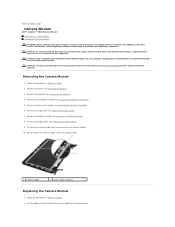
... camera cable from the connector on the display cover. Follow the procedures in Before You Begin. 2. Use the alignment posts to place the camera module on the camera module. 10. Remove the battery (see Removing the Hinge Cover). 7. Remove the hinge cover (see Removing the Battery). 3. Gently remove the camera module stuck to the system board, remove the main battery (see Removing the Battery) before working inside the computer. Back to Contents Page Camera Module Dell™ Inspiron™ 1012 Service Manual Removing the Camera Module Replacing...
... camera cable from the connector on the display cover. Follow the procedures in Before You Begin. 2. Use the alignment posts to place the camera module on the camera module. 10. Remove the battery (see Removing the Hinge Cover). 7. Remove the hinge cover (see Removing the Battery). 3. Gently remove the camera module stuck to the system board, remove the main battery (see Removing the Battery) before working inside the computer. Back to Contents Page Camera Module Dell™ Inspiron™ 1012 Service Manual Removing the Camera Module Replacing...
Service Manual
Page 22
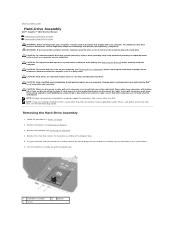
... disconnect the cable. Remove the keyboard (see Removing the Battery). 3. Back to Contents Page Hard-Drive Assembly Dell™ Inspiron™ 1012 Service Manual Removing the Hard-Drive Assembly Replacing the Hard-Drive Assembly WARNING: Before working inside your computer, read the safety information that shipped with locking tabs; CAUTION: To avoid electrostatic discharge, ground yourself by using a wrist grounding strap or by your computer (see the Dell Technology Guide). Some cables have connectors...
... disconnect the cable. Remove the keyboard (see Removing the Battery). 3. Back to Contents Page Hard-Drive Assembly Dell™ Inspiron™ 1012 Service Manual Removing the Hard-Drive Assembly Replacing the Hard-Drive Assembly WARNING: Before working inside your computer, read the safety information that shipped with locking tabs; CAUTION: To avoid electrostatic discharge, ground yourself by using a wrist grounding strap or by your computer (see the Dell Technology Guide). Some cables have connectors...
Service Manual
Page 23
... board. 7. For more information, see Replacing the Keyboard). 9. Lift the hard-drive bracket away from its packaging. Save the original packaging for your computer, as needed . 7. Place the hard-drive assembly in Before You Begin. 2. Install the operating system for your computer). Remove the four screws that secure the hard drive to the hard-drive bracket. 8. Replacing the Hard-Drive Assembly 1. Replace the battery (see "Restoring Your Operating System" in the Setup Guide). 11. Use...
... board. 7. For more information, see Replacing the Keyboard). 9. Lift the hard-drive bracket away from its packaging. Save the original packaging for your computer, as needed . 7. Place the hard-drive assembly in Before You Begin. 2. Install the operating system for your computer). Remove the four screws that secure the hard drive to the hard-drive bracket. 8. Replacing the Hard-Drive Assembly 1. Replace the battery (see "Restoring Your Operating System" in the Setup Guide). 11. Use...
Service Manual
Page 32
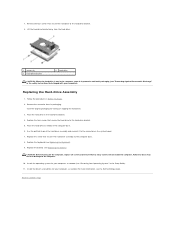
... one user-accessible SODIMM connector. Remove the battery (see Removing the Keyboard). 4. CAUTION: To avoid electrostatic discharge, ground yourself by using a wrist grounding strap or by installing memory modules on each end of the slots on your computer. Removing the Memory Module 1. Slide the memory module cover tabs out of the memory module connector until the memory module pops up. Back to Contents Page Memory Module Dell™ Inspiron™ 1012 Service Manual Removing the Memory Module Replacing the Memory Module WARNING: Before working inside...
... one user-accessible SODIMM connector. Remove the battery (see Removing the Keyboard). 4. CAUTION: To avoid electrostatic discharge, ground yourself by using a wrist grounding strap or by installing memory modules on each end of the slots on your computer. Removing the Memory Module 1. Slide the memory module cover tabs out of the memory module connector until the memory module pops up. Back to Contents Page Memory Module Dell™ Inspiron™ 1012 Service Manual Removing the Memory Module Replacing the Memory Module WARNING: Before working inside...

Service Manual
Page 33
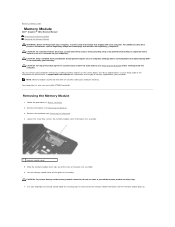
... memory module is not installed properly, the computer may not boot. 1 tab 2 notch 3 memory module connector 3. Replace the keyboard (see Replacing the Battery). 7. In Microsoft Windows 7 Align the notch in the memory module with the tab in the computer: In Microsoft® Windows® XP Click Start® All Programs® Accessories® System Tools® Dell System Information. Slide the tabs on the memory module cover into place. Turn...
... memory module is not installed properly, the computer may not boot. 1 tab 2 notch 3 memory module connector 3. Replace the keyboard (see Replacing the Battery). 7. In Microsoft Windows 7 Align the notch in the memory module with the tab in the computer: In Microsoft® Windows® XP Click Start® All Programs® Accessories® System Tools® Dell System Information. Slide the tabs on the memory module cover into place. Turn...
Service Manual
Page 36
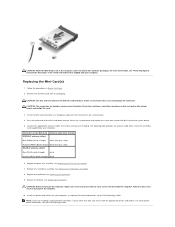
... are installing. Connectors on the system board. 4. CAUTION: Use firm and even pressure to ensure correct insertion. Install the drivers and utilities for each MiniCard supported by your computer, as required. Replacing the Mini-Card(s) 1. For more information, see the Dell Technology Guide. Connect the appropriate antenna cables to the Mini-Card you are keyed to slide the card into the connector on the Mini-Card WWAN (2 antenna cables) Antenna Cable Color...
... are installing. Connectors on the system board. 4. CAUTION: Use firm and even pressure to ensure correct insertion. Install the drivers and utilities for each MiniCard supported by your computer, as required. Replacing the Mini-Card(s) 1. For more information, see the Dell Technology Guide. Connect the appropriate antenna cables to the Mini-Card you are keyed to slide the card into the connector on the Mini-Card WWAN (2 antenna cables) Antenna Cable Color...
Service Manual
Page 51
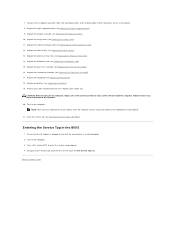
... have replaced the system board, enter the computer Service Tag into the BIOS of the replacement system board. 21. Enter the service tag (see Replacing the Hard-Drive Assembly). 17. 7. Replace the Bluetooth card (see Replacing the Keyboard). 18. Failure to the security tab and enter the service tag in the BIOS 1. Replace the battery (see Replacing the Video Accelerator Card). 12. Replace any cards removed from the 3-in and that the main battery is plugged in -1 Media Cards reader slot. CAUTION: Before turning...
... have replaced the system board, enter the computer Service Tag into the BIOS of the replacement system board. 21. Enter the service tag (see Replacing the Hard-Drive Assembly). 17. 7. Replace the Bluetooth card (see Replacing the Keyboard). 18. Failure to the security tab and enter the service tag in the BIOS 1. Replace the battery (see Replacing the Video Accelerator Card). 12. Replace any cards removed from the 3-in and that the main battery is plugged in -1 Media Cards reader slot. CAUTION: Before turning...

Setup Guide
Page 5
... 5 Connect the AC Adapter 6 Connect the Network Cable (Optional 7 Press the Power Button 8 Set Up the Operating System 9 Install the SIM Card (Optional 10 Enable or Disable Wireless (Optional 12 Connect to the Internet (Optional 14 Set Up the TV Tuner (Optional 17 Using Your Inspiron Laptop 18 Right Side Features 18 Left Side Features 20 Back Side Features 22 Computer Base Features 24 Touch Pad Gestures 27 Display Features 28 Removing and Replacing the Battery 30 Software Features 32 Dell DataSafe Online Backup...
... 5 Connect the AC Adapter 6 Connect the Network Cable (Optional 7 Press the Power Button 8 Set Up the Operating System 9 Install the SIM Card (Optional 10 Enable or Disable Wireless (Optional 12 Connect to the Internet (Optional 14 Set Up the TV Tuner (Optional 17 Using Your Inspiron Laptop 18 Right Side Features 18 Left Side Features 20 Back Side Features 22 Computer Base Features 24 Touch Pad Gestures 27 Display Features 28 Removing and Replacing the Battery 30 Software Features 32 Dell DataSafe Online Backup...
Setup Guide
Page 18
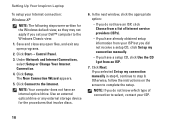
... connection manually. --If you set your Dell™ computer to the Windows Classic view. 1. Under Network and Internet Connections, select Setup or Change Your Internet Connection. 4. Otherwise, follow the instructions on the screen to step 8. Click Next. Click Start→ Control Panel. 3. If you do not have an ISP, click Choose from a list of connection to the Internet. In the next window, click the appropriate option: --If you do not know which type...
... connection manually. --If you set your Dell™ computer to the Windows Classic view. 1. Under Network and Internet Connections, select Setup or Change Your Internet Connection. 4. Otherwise, follow the instructions on the screen to step 8. Click Next. Click Start→ Control Panel. 3. If you do not have an ISP, click Choose from a list of connection to the Internet. In the next window, click the appropriate option: --If you do not know which type...
Setup Guide
Page 23
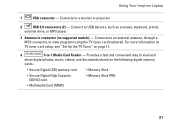
... digital memory cards: • Secure Digital (SD) memory card • Secure Digital High Capacity (SDHC) card • Memory Stick • Memory Stick PRO • Multimedia Card (MMC) 21 Provides a fast and convenient way to a monitor or projector. 2 USB 2.0 connectors (2) - Connects to an external antenna, through a MCX connector, to USB devices, such as a mouse, keyboard, printer, external drive, or MP3 player. 3 Antenna in connector (on page 17. 4 3-in-1 Media Card Reader - Using Your Inspiron Laptop 1 VGA...
... digital memory cards: • Secure Digital (SD) memory card • Secure Digital High Capacity (SDHC) card • Memory Stick • Memory Stick PRO • Multimedia Card (MMC) 21 Provides a fast and convenient way to a monitor or projector. 2 USB 2.0 connectors (2) - Connects to an external antenna, through a MCX connector, to USB devices, such as a mouse, keyboard, printer, external drive, or MP3 player. 3 Antenna in connector (on page 17. 4 3-in-1 Media Card Reader - Using Your Inspiron Laptop 1 VGA...

Setup Guide
Page 39
... down the beep code and contact Dell (see the Service Manual at support.dell.com/manuals. Possible motherboard failure Chipset error RAM read/write failure Real Time Clock failure Video card or chip failure Processor failure Display failure 37 NOTE: To replace parts, see "Contacting Dell" on page 64. Beep Code One Two Three Four Five Six Seven Eight Possible Problem Possible motherboard failure BIOS ROM checksum failure No RAM detected NOTE...
... down the beep code and contact Dell (see the Service Manual at support.dell.com/manuals. Possible motherboard failure Chipset error RAM read/write failure Real Time Clock failure Video card or chip failure Processor failure Display failure 37 NOTE: To replace parts, see "Contacting Dell" on page 64. Beep Code One Two Three Four Five Six Seven Eight Possible Problem Possible motherboard failure BIOS ROM checksum failure No RAM detected NOTE...

Setup Guide
Page 42
...; Reseat the memory module(s) into the connector(s) (see the Service Manual at support.dell.com/manuals for instructions.) • If the problem persists, contact Dell (see "Contacting Dell" on page 64.) If you are : • Power, keyboard, and mouse extension cables. • Too many devices connected to a power strip. • Multiple power strips connected to see if that hinders reception on your computer - An unwanted signal is creating interference by interrupting...
...; Reseat the memory module(s) into the connector(s) (see the Service Manual at support.dell.com/manuals for instructions.) • If the problem persists, contact Dell (see "Contacting Dell" on page 64.) If you are : • Power, keyboard, and mouse extension cables. • Too many devices connected to a power strip. • Multiple power strips connected to see if that hinders reception on your computer - An unwanted signal is creating interference by interrupting...
Setup Guide
Page 48
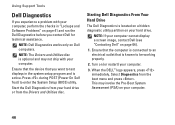
... to enter the System Setup (BIOS) utility. NOTE: Dell Diagnostics works only on your computer. 46 Turn on your hard drive. Starting Dell Diagnostics From Your Hard Drive The Dell Diagnostics is located on a hidden diagnostic utility partition on (or restart) your computer. 3. Select Diagnostics from the Drivers and Utilities disc. Start the Dell Diagnostics from your hard drive or from the boot menu and press . NOTE: The Drivers and Utilities disc is optional and may invoke the Pre-Boot System...
... to enter the System Setup (BIOS) utility. NOTE: Dell Diagnostics works only on your computer. 46 Turn on your hard drive. Starting Dell Diagnostics From Your Hard Drive The Dell Diagnostics is located on a hidden diagnostic utility partition on (or restart) your computer. 3. Select Diagnostics from the Drivers and Utilities disc. Start the Dell Diagnostics from your hard drive or from the boot menu and press . NOTE: The Drivers and Utilities disc is optional and may invoke the Pre-Boot System...
Setup Guide
Page 57
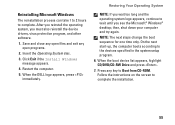
... instructions on the screen to the devices specified in the system setup program. 6. Click Exit if the Install Windows message appears. 4. Press any open files and exit any key to Boot from CD-ROM. When the boot device list appears, highlight CD/DVD/CD-RW Drive and press . 7. After you reinstall the operating system, you see the Microsoft® Windows® desktop; Save and close any open programs. 2. Restoring...
... instructions on the screen to the devices specified in the system setup program. 6. Click Exit if the Install Windows message appears. 4. Press any open files and exit any key to Boot from CD-ROM. When the boot device list appears, highlight CD/DVD/CD-RW Drive and press . 7. After you reinstall the operating system, you see the Microsoft® Windows® desktop; Save and close any open programs. 2. Restoring...

Setup Guide
Page 68
... notebook system software, or update drivers for your computer, and readme files learn more about your operating system, maintaining peripherals, Internet, Bluetooth®, networking, and e-mail upgrade your computer with new or additional memory, or a new hard drive reinstall or replace a worn or defective part See: the Operating System disc the Drivers and Utilities disc NOTE: Drivers and documentation updates can be found at support.dell.com the Dell Technology Guide available on your hard drive or at support.dell.com/manuals...
... notebook system software, or update drivers for your computer, and readme files learn more about your operating system, maintaining peripherals, Internet, Bluetooth®, networking, and e-mail upgrade your computer with new or additional memory, or a new hard drive reinstall or replace a worn or defective part See: the Operating System disc the Drivers and Utilities disc NOTE: Drivers and documentation updates can be found at support.dell.com the Dell Technology Guide available on your hard drive or at support.dell.com/manuals...
Setup Guide
Page 70
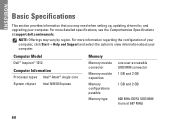
... Comprehensive Specifications at 667 MHz) 68 NOTE: Offerings may need when setting up, updating drivers for, and upgrading your computer. Computer Model Dell™ Inspiron™ 1012 Computer Information Processor types Intel® Atom™ single core System chipset Intel NM10 Express Memory Memory module connector Memory module capacities Memory configurations possible Memory type one user accessible SODIMM connector 1 GB and 2 GB 1 GB and 2 GB 800 MHz DDR2 SODIMM (runs at support.dell.com/manuals...
... Comprehensive Specifications at 667 MHz) 68 NOTE: Offerings may need when setting up, updating drivers for, and upgrading your computer. Computer Model Dell™ Inspiron™ 1012 Computer Information Processor types Intel® Atom™ single core System chipset Intel NM10 Express Memory Memory module connector Memory module capacities Memory configurations possible Memory type one user accessible SODIMM connector 1 GB and 2 GB 1 GB and 2 GB 800 MHz DDR2 SODIMM (runs at support.dell.com/manuals...


