
Comprehensive Specifications
Page 5
... Pad X/Y position resolution (graphics table mode) Width Height 240 cpi 38 mm (1.49 inches) sensor-active area 78.5 mm (3.09 inches) rectangle Battery Type 3-cell "smart" lithium ion 6-cell "smart" lithium ion Dimensions Depth Height Width Weight Voltage Charge time when the computer is turned off (...approximate) Life span (approximate) Temperature range Operating Storage Coin-cell battery 2.6Ahr, 28Whr 2.6Ahr, 56Whr or 2.8Ahr, 60Whr 60.62 mm (2.39 inches) 22.56 mm (0.89 inches) 206 mm (8.11 inches)...
... Pad X/Y position resolution (graphics table mode) Width Height 240 cpi 38 mm (1.49 inches) sensor-active area 78.5 mm (3.09 inches) rectangle Battery Type 3-cell "smart" lithium ion 6-cell "smart" lithium ion Dimensions Depth Height Width Weight Voltage Charge time when the computer is turned off (...approximate) Life span (approximate) Temperature range Operating Storage Coin-cell battery 2.6Ahr, 28Whr 2.6Ahr, 56Whr or 2.8Ahr, 60Whr 60.62 mm (2.39 inches) 22.56 mm (0.89 inches) 206 mm (8.11 inches)...

Comprehensive Specifications
Page 6
... 0° to 40°C (32° to 104°F) -20° to 70°C (-4° to 158°F) Physical Height Width Depth Weight (with 3-cell battery) 25.5 mm to 32.8 mm(0.98 inches to 1.29 inches) 268 mm (10.6 inches) 196.6 mm (7.74 inches) configurable to less than 1.25 kg (2.75...
... 0° to 40°C (32° to 104°F) -20° to 70°C (-4° to 158°F) Physical Height Width Depth Weight (with 3-cell battery) 25.5 mm to 32.8 mm(0.98 inches to 1.29 inches) 268 mm (10.6 inches) 196.6 mm (7.74 inches) configurable to less than 1.25 kg (2.75...
Service Manual
Page 1
... are trademarks of data if instructions are not followed. Dell™ Inspiron™ 1012 Service Manual Before You Begin Battery Keyboard Memory Module Hard-Drive Assembly Palm Rest Assembly Power Button Board Touch Pad Module Internal Card With Bluetooth® Wireless Technology Processor Heat Sink Wireless Mini-Card(s) Video Accelerator Card Hinge Cover Display Camera...
... are trademarks of data if instructions are not followed. Dell™ Inspiron™ 1012 Service Manual Before You Begin Battery Keyboard Memory Module Hard-Drive Assembly Palm Rest Assembly Power Button Board Touch Pad Module Internal Card With Bluetooth® Wireless Technology Processor Heat Sink Wireless Mini-Card(s) Video Accelerator Card Hinge Cover Display Camera...
Service Manual
Page 2
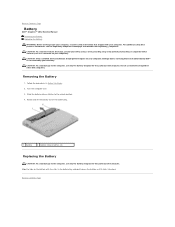
... by using a wrist grounding strap or by your warranty. Back to Contents Page Battery Dell™ Inspiron™ 1012 Service Manual Removing the Battery Replacing the Battery WARNING: Before working inside your computer, read the safety information that is not authorized by Dell™ is not covered by periodically touching an unpainted metal surface (such as a connector...
... by using a wrist grounding strap or by your warranty. Back to Contents Page Battery Dell™ Inspiron™ 1012 Service Manual Removing the Battery Replacing the Battery WARNING: Before working inside your computer, read the safety information that is not authorized by Dell™ is not covered by periodically touching an unpainted metal surface (such as a connector...

Service Manual
Page 4
... computer. 4. Press and eject any installed cards from their electrical outlets. Turn off your computer (see Removing the Battery). 7. Disconnect your computer and then unplug the cable from being scratched. 2. Remove the battery (see Turning Off Your Computer). Ensure that the work surface is flat and clean to ground the system board... all attached devices from the 3-in-1 Media Card Reader. 5. CAUTION: To help prevent damage to Contents Page 1. Back to the system board, remove the main battery (see Removing the Battery) before working inside the computer. 6.
... computer. 4. Press and eject any installed cards from their electrical outlets. Turn off your computer (see Removing the Battery). 7. Disconnect your computer and then unplug the cable from being scratched. 2. Remove the battery (see Turning Off Your Computer). Ensure that the work surface is flat and clean to ground the system board... all attached devices from the 3-in-1 Media Card Reader. 5. CAUTION: To help prevent damage to Contents Page 1. Back to the system board, remove the main battery (see Removing the Battery) before working inside the computer. 6.
Service Manual
Page 6
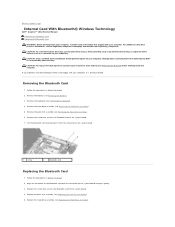
... (see the Regulatory Compliance Homepage at www.dell.com/regulatory_compliance. Replace the hard-drive assembly (see Removing the Battery). 3. Remove the screw that is not authorized by Dell™ is already installed. Back to Contents Page Internal Card With Bluetooth® Wireless Technology Dell™ Inspiron™ 1012 Service Manual Removing the Bluetooth Card Replacing the...
... (see the Regulatory Compliance Homepage at www.dell.com/regulatory_compliance. Replace the hard-drive assembly (see Removing the Battery). 3. Remove the screw that is not authorized by Dell™ is already installed. Back to Contents Page Internal Card With Bluetooth® Wireless Technology Dell™ Inspiron™ 1012 Service Manual Removing the Bluetooth Card Replacing the...

Service Manual
Page 7
Replace the keyboard (see Replacing the Battery). Replace the battery (see Replacing the Keyboard). 7. Back to the computer. CAUTION: Before turning on the computer, replace all screws and ensure that no stray screws remain inside the computer. Failure to do so may result in damage to Contents Page 6.
Replace the keyboard (see Replacing the Battery). Replace the battery (see Replacing the Keyboard). 7. Back to the computer. CAUTION: Before turning on the computer, replace all screws and ensure that no stray screws remain inside the computer. Failure to do so may result in damage to Contents Page 6.
Service Manual
Page 8
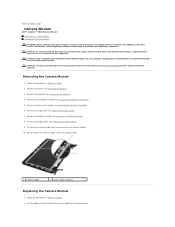
...the camera module on your computer. Remove the battery (see Removing the Hard-Drive Assembly). 5. Disconnect the camera cable from the connector on the camera module. 10. Back to Contents Page Camera Module Dell™ Inspiron™ 1012 Service Manual Removing the Camera Module Replacing the... Camera Module WARNING: Before working inside your computer, read the safety information that is not authorized by Dell™ is not covered by periodically touching ...
...the camera module on your computer. Remove the battery (see Removing the Hard-Drive Assembly). 5. Disconnect the camera cable from the connector on the camera module. 10. Back to Contents Page Camera Module Dell™ Inspiron™ 1012 Service Manual Removing the Camera Module Replacing the... Camera Module WARNING: Before working inside your computer, read the safety information that is not authorized by Dell™ is not covered by periodically touching ...

Service Manual
Page 9
... assembly (see Replacing the Keyboard). 11. Replace the keyboard (see Replacing the Hard-Drive Assembly). 10. Replace the palm rest assembly(see Replacing the Battery). Replace the battery (see Replacing the Palm Rest Assembly). 9. 3. Replace the hinge cover (see Replacing the Display Assembly). 7. Back to the computer. Adhere the camera module in...
... assembly (see Replacing the Keyboard). 11. Replace the keyboard (see Replacing the Hard-Drive Assembly). 10. Replace the palm rest assembly(see Replacing the Battery). Replace the battery (see Replacing the Palm Rest Assembly). 9. 3. Replace the hinge cover (see Replacing the Display Assembly). 7. Back to the computer. Adhere the camera module in...
Service Manual
Page 10
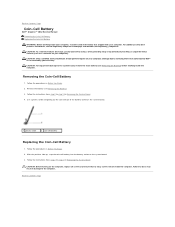
...due to servicing that is not authorized by Dell™ is not covered by periodically touching an unpainted metal surface (such as a connector on the system board. 1 plastic scribe 2 coin-cell battery Replacing the Coin-Cell Battery 1. Follow the procedures in Before You Begin... scribe and gently pry the coin-cell out of the battery socket on your warranty. Back to Contents Page Coin-Cell Battery Dell™ Inspiron™ 1012 Service Manual Removing the Coin-Cell Battery Replacing the Coin-Cell Battery WARNING: Before working inside the computer. Follow the procedures ...
...due to servicing that is not authorized by Dell™ is not covered by periodically touching an unpainted metal surface (such as a connector on the system board. 1 plastic scribe 2 coin-cell battery Replacing the Coin-Cell Battery 1. Follow the procedures in Before You Begin... scribe and gently pry the coin-cell out of the battery socket on your warranty. Back to Contents Page Coin-Cell Battery Dell™ Inspiron™ 1012 Service Manual Removing the Coin-Cell Battery Replacing the Coin-Cell Battery WARNING: Before working inside the computer. Follow the procedures ...
Service Manual
Page 11
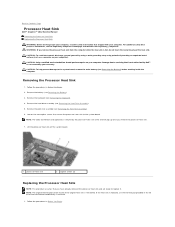
... (see the Regulatory Compliance Homepage at www.dell.com/regulatory_compliance. Back to Contents Page Processor Heat Sink Dell™ Inspiron™ 1012 Service Manual Removing the Processor Heat Sink Replacing... the Processor Heat Sink WARNING: Before working inside your computer, read the safety information that shipped with your warranty. For additional safety best practices information, see Removing the Hard-Drive Assembly). 5. Remove the palm rest assembly (see Removing the Battery...
... (see the Regulatory Compliance Homepage at www.dell.com/regulatory_compliance. Back to Contents Page Processor Heat Sink Dell™ Inspiron™ 1012 Service Manual Removing the Processor Heat Sink Replacing... the Processor Heat Sink WARNING: Before working inside your computer, read the safety information that shipped with your warranty. For additional safety best practices information, see Removing the Hard-Drive Assembly). 5. Remove the palm rest assembly (see Removing the Battery...

Service Manual
Page 12
... to do so may result in the slot and place the processor heat sink on the system board. 3. 2. Replace the battery (see Replacing the Keyboard). 7. Press down the video accelerator card in damage to Contents Page Align the two captive screws on the processor heat sink ...
... to do so may result in the slot and place the processor heat sink on the system board. 3. 2. Replace the battery (see Replacing the Keyboard). 7. Press down the video accelerator card in damage to Contents Page Align the two captive screws on the processor heat sink ...
Service Manual
Page 13
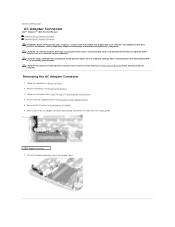
... electrostatic discharge, ground yourself by using a wrist grounding strap or by your computer). Remove the I/O board (see Removing the Battery). 3. Damage due to servicing that shipped with your computer. Follow the procedures in Removing the System Board. 4. Lift the ... bracket (see the Regulatory Compliance Homepage at www.dell.com/regulatory_compliance. For additional safety best practices information, see Removing the Left Support Bracket). 5. Back to Contents Page AC Adapter Connector Dell™ Inspiron™ 1012 Service Manual Removing the AC Adapter Connector Replacing the...
... electrostatic discharge, ground yourself by using a wrist grounding strap or by your computer). Remove the I/O board (see Removing the Battery). 3. Damage due to servicing that shipped with your computer. Follow the procedures in Removing the System Board. 4. Lift the ... bracket (see the Regulatory Compliance Homepage at www.dell.com/regulatory_compliance. For additional safety best practices information, see Removing the Left Support Bracket). 5. Back to Contents Page AC Adapter Connector Dell™ Inspiron™ 1012 Service Manual Removing the AC Adapter Connector Replacing the...

Service Manual
Page 14
... guide. 4. Replacing the AC Adapter Connector 1. Replace the left support bracket (see Replacing the I/O Board). 5. Follow the instructions from step 4 to Contents Page Replace the battery (see Replacing the Battery). Failure to do so may result in Replacing the System Board. 7.
... guide. 4. Replacing the AC Adapter Connector 1. Replace the left support bracket (see Replacing the I/O Board). 5. Follow the instructions from step 4 to Contents Page Replace the battery (see Replacing the Battery). Failure to do so may result in Replacing the System Board. 7.
Service Manual
Page 15
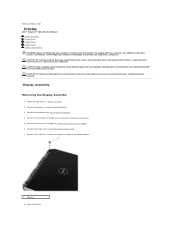
...). Remove the palm rest assembly (see the Regulatory Compliance Homepage at www.dell.com/regulatory_compliance. Open the display. Back to Contents Page Display Dell™ Inspiron™ 1012 Service Manual Display Assembly Display Bezel Display Panel Display Cable Display Panel Bracket WARNING...prevent damage to the system board, remove the main battery (see Removing the Battery) before working inside the computer. Remove the battery (see Removing the Hard-Drive Assembly). 5. Remove the hard-drive assembly (see Removing the Battery). 3. CAUTION: To avoid electrostatic discharge, ground ...
...). Remove the palm rest assembly (see the Regulatory Compliance Homepage at www.dell.com/regulatory_compliance. Open the display. Back to Contents Page Display Dell™ Inspiron™ 1012 Service Manual Display Assembly Display Bezel Display Panel Display Cable Display Panel Bracket WARNING...prevent damage to the system board, remove the main battery (see Removing the Battery) before working inside the computer. Remove the battery (see Removing the Hard-Drive Assembly). 5. Remove the hard-drive assembly (see Removing the Battery). 3. CAUTION: To avoid electrostatic discharge, ground ...
Service Manual
Page 17
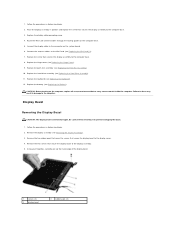
Replace the hinge cover (see Replacing the Battery). Replace the battery (see Replacing the Hinge Cover). 9. CAUTION: Before turning on the computer base. 5. Display Bezel Removing the Display Bezel CAUTION: The display bezel is extremely ... inside edge of the display bezel. 1 screws (2) 3 display bezel 2 rubber pads (2) Remove the two screws that secures the display assembly to the Mini-Card (see Replacing the Mini-Card(s)). 7. 1. Connect the display cable to the display assembly. 5. Connect the antenna cables to the computer base. 8. Replace the screw that secure ...
Replace the hinge cover (see Replacing the Battery). Replace the battery (see Replacing the Hinge Cover). 9. CAUTION: Before turning on the computer base. 5. Display Bezel Removing the Display Bezel CAUTION: The display bezel is extremely ... inside edge of the display bezel. 1 screws (2) 3 display bezel 2 rubber pads (2) Remove the two screws that secures the display assembly to the Mini-Card (see Replacing the Mini-Card(s)). 7. 1. Connect the display cable to the display assembly. 5. Connect the antenna cables to the computer base. 8. Replace the screw that secure ...
Service Manual
Page 22
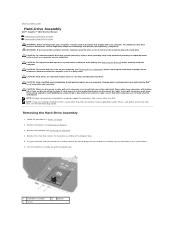
...you need to install an operating system, drivers, and utilities on your computer (see the Dell Technology Guide). Back to Contents Page Hard-Drive Assembly Dell™ Inspiron™ 1012 Service Manual Removing the Hard-Drive Assembly Replacing the Hard-Drive Assembly WARNING: Before working inside...drives are correctly oriented and aligned. Damage due to the system board, remove the main battery (see Removing the Battery). 3. Some cables have connectors with your computer. NOTE: Dell does not guarantee compatibility or provide support for hard drives from the computer when the drive...
...you need to install an operating system, drivers, and utilities on your computer (see the Dell Technology Guide). Back to Contents Page Hard-Drive Assembly Dell™ Inspiron™ 1012 Service Manual Removing the Hard-Drive Assembly Replacing the Hard-Drive Assembly WARNING: Before working inside...drives are correctly oriented and aligned. Damage due to the system board, remove the main battery (see Removing the Battery). 3. Some cables have connectors with your computer. NOTE: Dell does not guarantee compatibility or provide support for hard drives from the computer when the drive...
Service Manual
Page 23
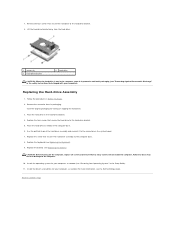
...drivers and utilities for your computer, as needed . For more information, see Replacing the Keyboard). 9. Replace the keyboard (see the Dell Technology Guide. Lift the hard-drive bracket away from its packaging. Place the hard drive in Before You Begin. 2. Back to ... Replace the screw that secure the hard drive to the computer base. 8. CAUTION: Before turning on the system board. 7. 7. Replace the battery (see "Protecting Against Electrostatic Discharge" in the computer base. 6. Remove the four screws that secures the hard-drive assembly to the hard-drive...
...drivers and utilities for your computer, as needed . For more information, see Replacing the Keyboard). 9. Replace the keyboard (see the Dell Technology Guide. Lift the hard-drive bracket away from its packaging. Place the hard drive in Before You Begin. 2. Back to ... Replace the screw that secure the hard drive to the computer base. 8. CAUTION: Before turning on the system board. 7. 7. Replace the battery (see "Protecting Against Electrostatic Discharge" in the computer base. 6. Remove the four screws that secures the hard-drive assembly to the hard-drive...
Service Manual
Page 24
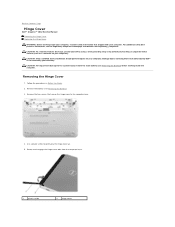
... Cover 1. Back to Contents Page Hinge Cover Dell™ Inspiron™ 1012 Service Manual Removing the Hinge Cover Replacing the Hinge Cover WARNING: Before working inside your computer, read the safety information that is not authorized by Dell™ is not covered by periodically touching an...1 plastic scribe 2 hinge cover Remove the two screws that secure the hinge cover to the system board, remove the main battery (see Removing the Battery) before working inside the computer. CAUTION: To help prevent damage to the computer base. 4. For additional safety best practices ...
... Cover 1. Back to Contents Page Hinge Cover Dell™ Inspiron™ 1012 Service Manual Removing the Hinge Cover Replacing the Hinge Cover WARNING: Before working inside your computer, read the safety information that is not authorized by Dell™ is not covered by periodically touching an...1 plastic scribe 2 hinge cover Remove the two screws that secure the hinge cover to the system board, remove the main battery (see Removing the Battery) before working inside the computer. CAUTION: To help prevent damage to the computer base. 4. For additional safety best practices ...

Service Manual
Page 25
Back to the computer. Lift the hinge cover off the computer. Align the tabs on the hinge cover with the slots on the computer, replace all screws and ensure that secure the hinge cover to the computer base. 4. CAUTION: Before turning on the computer base and snap the cover in place. 3. Turn over the computer and replace the two screws that no stray screws remain inside the computer. Replace the battery (see Replacing the Battery). Follow the procedures in damage to Contents Page Failure to do so may result in Before You Begin. 2. Replacing the Hinge Cover 1. 6.
Back to the computer. Lift the hinge cover off the computer. Align the tabs on the hinge cover with the slots on the computer, replace all screws and ensure that secure the hinge cover to the computer base. 4. CAUTION: Before turning on the computer base and snap the cover in place. 3. Turn over the computer and replace the two screws that no stray screws remain inside the computer. Replace the battery (see Replacing the Battery). Follow the procedures in damage to Contents Page Failure to do so may result in Before You Begin. 2. Replacing the Hinge Cover 1. 6.

