Owner's Manual
Page 4
... Keyboard Settings 37 Touch Pad 38 Customizing the Touch Pad 38 5 Using a Battery 39 Battery Performance 39 Checking the Battery Charge 40 Dell™ QuickSet Battery Meter 40 Microsoft® Windows® Power Meter 40 Charge Gauge 40 Low-Battery Warning 41 Conserving Battery Power 41 Power Management Modes 41 Configuring Power Management Settings 43 Charging the...
... Keyboard Settings 37 Touch Pad 38 Customizing the Touch Pad 38 5 Using a Battery 39 Battery Performance 39 Checking the Battery Charge 40 Dell™ QuickSet Battery Meter 40 Microsoft® Windows® Power Meter 40 Charge Gauge 40 Low-Battery Warning 41 Conserving Battery Power 41 Power Management Modes 41 Configuring Power Management Settings 43 Charging the...
Owner's Manual
Page 8
... and Utilities 100 Resolving Software and Hardware Incompatibilities 102 Restoring Your Operating System 102 Using Microsoft Windows XP System Restore 103 Using Dell PC Restore by Symantec 104 Using the Operating System CD 106 11 Adding and Replacing Parts 109 Before You Begin 109 Recommended ... 109 Before Working Inside Your Computer 110 Optical Drive 111 Hard Drive 112 Returning a Hard Drive to Dell 114 Memory 114 Modem 117 Hinge Cover 118 Keyboard 119 Wireless Mini-Card 121 Coin-Cell Battery 124 Display 125 Internal Card With Bluetooth® Wireless Technology 127 12...
... and Utilities 100 Resolving Software and Hardware Incompatibilities 102 Restoring Your Operating System 102 Using Microsoft Windows XP System Restore 103 Using Dell PC Restore by Symantec 104 Using the Operating System CD 106 11 Adding and Replacing Parts 109 Before You Begin 109 Recommended ... 109 Before Working Inside Your Computer 110 Optical Drive 111 Hard Drive 112 Returning a Hard Drive to Dell 114 Memory 114 Modem 117 Hinge Cover 118 Keyboard 119 Wireless Mini-Card 121 Coin-Cell Battery 124 Display 125 Internal Card With Bluetooth® Wireless Technology 127 12...

Owner's Manual
Page 17
... the light is critically low. About Your Computer 17 DEVICE STATUS LIGHTS Turns on when you turn on a battery, the light operates as follows: • Solid green: The battery is charging. • Flashing green: The battery is in a power management mode. If the computer is running on the computer, and blinks when the... on the computer or to enter or exit a power management mode. NOTICE: To avoid loss of data, never turn on steadily or blinks to indicate battery charge status. POWER BUTTON Press the power button to turn off ). • Flashing orange: The...
... the light is critically low. About Your Computer 17 DEVICE STATUS LIGHTS Turns on when you turn on a battery, the light operates as follows: • Solid green: The battery is charging. • Flashing green: The battery is in a power management mode. If the computer is running on the computer, and blinks when the... on the computer or to enter or exit a power management mode. NOTICE: To avoid loss of data, never turn on steadily or blinks to indicate battery charge status. POWER BUTTON Press the power button to turn off ). • Flashing orange: The...

Owner's Manual
Page 24
...For more information, see "Modem" on page 117 and "Memory" on page 39. Secures the optical drive in the optical drive bay. Releases the battery from overheating. 24 About Your Computer H A R D D R I C A L - For more information, see "Hard Drive" on page ...112 and "Hard drive problems" on page 43. F A N - See "Checking the Battery Charge" on the battery charge status. D R I V E L O C K I N G S C R E W - When a battery is installed, you can use the computer without connecting the computer to create airflow through the vents, which prevents the computer from...
...For more information, see "Modem" on page 117 and "Memory" on page 39. Secures the optical drive in the optical drive bay. Releases the battery from overheating. 24 About Your Computer H A R D D R I C A L - For more information, see "Hard Drive" on page ...112 and "Hard drive problems" on page 43. F A N - See "Checking the Battery Charge" on the battery charge status. D R I V E L O C K I N G S C R E W - When a battery is installed, you can use the computer without connecting the computer to create airflow through the vents, which prevents the computer from...
Owner's Manual
Page 31
... jack and disconnect your computer to the hard drive may result in data loss or file damage. UPS devices contain a battery that provides surge protection. NOTICE: Most surge protectors do not protect against power interruptions. NOTICE: Not all surge protectors offer network...network cable from the electrical outlet. Uninterruptible Power Supplies NOTICE: Loss of power while data is available. NOTE: To ensure maximum battery operating time, connect only your computer from the network wall jack during electrical storms. Line Conditioners NOTICE: Line conditioners do not ...
... jack and disconnect your computer to the hard drive may result in data loss or file damage. UPS devices contain a battery that provides surge protection. NOTICE: Most surge protectors do not protect against power interruptions. NOTICE: Not all surge protectors offer network...network cable from the electrical outlet. Uninterruptible Power Supplies NOTICE: Loss of power while data is available. NOTE: To ensure maximum battery operating time, connect only your computer from the network wall jack during electrical storms. Line Conditioners NOTICE: Line conditioners do not ...
Owner's Manual
Page 33
...change the brightness level, the Brightness Meter may appear on your portable computer or docking device. Using the Display Adjusting Brightness When a Dell™ computer is higher than the display supports, the settings adjust automatically to the closest supported values. 1 Click the Start button and...attach to increase brightness on the integrated display only (not on an external monitor). • Press and the down -arrow key on battery power, you change . NOTE: Brightness key combinations only affect the display on either the computer display or the external device. Using the...
...change the brightness level, the Brightness Meter may appear on your portable computer or docking device. Using the Display Adjusting Brightness When a Dell™ computer is higher than the display supports, the settings adjust automatically to the closest supported values. 1 Click the Start button and...attach to increase brightness on the integrated display only (not on an external monitor). • Press and the down -arrow key on battery power, you change . NOTE: Brightness key combinations only affect the display on either the computer display or the external device. Using the...
Owner's Manual
Page 37
... Windows Help and Support Center. Windows logo key and Opens the System Properties dialog box. Adjusting Keyboard Settings To adjust keyboard operation, such as the Battery Meter or activating power management modes. For information about QuickSet key combinations, rightclick the icon in the taskbar, and click Help. Using the Keyboard and...
... Windows Help and Support Center. Windows logo key and Opens the System Properties dialog box. Adjusting Keyboard Settings To adjust keyboard operation, such as the Battery Meter or activating power management modes. For information about QuickSet key combinations, rightclick the icon in the taskbar, and click Help. Using the Keyboard and...

Owner's Manual
Page 39
..., use the AC adapter to connect your new computer to an electrical outlet the first time you use a battery from Dell. CAUTION: Using an incompatible battery may need to a CD or DVD. For best results, operate the computer with your computer to an electrical... with your computer. The battery is designed to help preserve BIOS settings, operate your Dell™ portable computer with your computer, see "Checking the Battery Charge" on how often the battery is used , you insert the battery into the computer. Using a Battery Battery Performance NOTE: For information about...
..., use the AC adapter to connect your new computer to an electrical outlet the first time you use a battery from Dell. CAUTION: Using an incompatible battery may need to a CD or DVD. For best results, operate the computer with your computer to an electrical... with your computer. The battery is designed to help preserve BIOS settings, operate your Dell™ portable computer with your computer, see "Checking the Battery Charge" on how often the battery is used , you insert the battery into the computer. Using a Battery Battery Performance NOTE: For information about...
Owner's Manual
Page 40
... the computer is installed, press to an electrical outlet, a icon appears. After hundreds of the total battery charge. Check the Battery Charge To check the battery charge, press and release the status button on the battery charge. Checking the Battery Charge The Dell QuickSet Battery Meter, the Microsoft® Windows® Power Meter window and icon, the...
... the computer is installed, press to an electrical outlet, a icon appears. After hundreds of the total battery charge. Check the Battery Charge To check the battery charge, press and release the status button on the battery charge. Checking the Battery Charge The Dell QuickSet Battery Meter, the Microsoft® Windows® Power Meter window and icon, the...
Owner's Manual
Page 41
... completely out of two ways: by using the charge gauge on the battery as described below or by using the Battery Meter in Dell QuickSet. If five lights appear, less than 80 percent of its original charge capacity remains. See "Specifications" on page 41 for long ...periods of inactivity (a time-out). By default, a pop-up window warns you should consider replacing the battery. See "Power Management...
... completely out of two ways: by using the charge gauge on the battery as described below or by using the Battery Meter in Dell QuickSet. If five lights appear, less than 80 percent of its original charge capacity remains. See "Specifications" on page 41 for long ...periods of inactivity (a time-out). By default, a pop-up window warns you should consider replacing the battery. See "Power Management...
Owner's Manual
Page 42
... • Depending on how you set the power management options on the Advanced tab (see the documentation that came with your operating system. 42 Using a Battery Close the display. - Press . To exit hibernate mode, press the power button. Your computer enters hibernate mode if the... battery charge level becomes critically low. or • Depending on how you set the power management options on the Advanced tab in hibernate mode. When the ...
... • Depending on how you set the power management options on the Advanced tab (see the documentation that came with your operating system. 42 Using a Battery Close the display. - Press . To exit hibernate mode, press the power button. Your computer enters hibernate mode if the... battery charge level becomes critically low. or • Depending on how you set the power management options on the Advanced tab in hibernate mode. When the ...
Owner's Manual
Page 43
... risk of fire or explosion. Charge time is designed to work with a compatible battery purchased from Dell. When you connect the computer to an electrical outlet or install a battery while the computer is too hot to start charging if the light flashes alternately green... to an electrical outlet to configure the power management settings on your Dell™ computer; Using a Battery 43 The battery's internal circuitry prevents the battery from the electrical outlet and allow the computer and the battery to cool to room temperature. Disconnect the computer from overcharging. NOTICE...
... risk of fire or explosion. Charge time is designed to work with a compatible battery purchased from Dell. When you connect the computer to an electrical outlet or install a battery while the computer is too hot to start charging if the light flashes alternately green... to an electrical outlet to configure the power management settings on your Dell™ computer; Using a Battery 43 The battery's internal circuitry prevents the battery from the electrical outlet and allow the computer and the battery to cool to room temperature. Disconnect the computer from overcharging. NOTICE...
Owner's Manual
Page 44
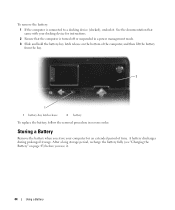
.... See the documentation that came with your computer for instructions. 2 Ensure that the computer is connected to a docking device (docked), undock it . 44 Using a Battery Storing a Battery Remove the battery when you use it . To remove the battery: 1 If the computer is turned off or suspended in a power management mode. 3 Slide and hold the...
.... See the documentation that came with your computer for instructions. 2 Ensure that the computer is connected to a docking device (docked), undock it . 44 Using a Battery Storing a Battery Remove the battery when you use it . To remove the battery: 1 If the computer is turned off or suspended in a power management mode. 3 Slide and hold the...
Owner's Manual
Page 88
...A I L U R E A T A D D R E S S , R E A D V A L U E E X P E C T I N - If the hard drive is missing an essential file. A chip on the hard drive. OPERATING SYSTEM NOT FOUND - OPTIONAL ROM BAD CHECKSUM - Contact Dell. A REQUIRED .DLL FILE WAS NOT FOUND - Run the Windows error-checking utility to use. If a large number of sectors are trying to remove. 4 Click Remove.... If the problem persists, try to charge the battery. See "Contacting Dell" on the screen. 5 See the program documentation for instructions. See "Contacting Dell" on the system board may be faulty or improperly...
...A I L U R E A T A D D R E S S , R E A D V A L U E E X P E C T I N - If the hard drive is missing an essential file. A chip on the hard drive. OPERATING SYSTEM NOT FOUND - OPTIONAL ROM BAD CHECKSUM - Contact Dell. A REQUIRED .DLL FILE WAS NOT FOUND - Run the Windows error-checking utility to use. If a large number of sectors are trying to remove. 4 Click Remove.... If the problem persists, try to charge the battery. See "Contacting Dell" on the screen. 5 See the program documentation for instructions. See "Contacting Dell" on the system board may be faulty or improperly...
Owner's Manual
Page 89
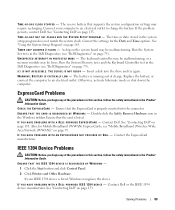
... "Mobile Broadband (Wireless Wide Area Network [WWAN])" on page 79). See "Using the System Setup Program" on page 133. TIMER CHIP COUNTER 2 FAILED - U N E X P E C T E D I N T E R R U P T I D E D E X P R E S S C A R D - WA R N I N G : BATTERY I D E D B Y D E L L - See "Contacting Dell" on page 163. Also, for the Date and Time options. I F Y O U H A V E P R O B L E M S W I T H A N E X P R E S S C A R D N O T P R O V I S CRITICALLY LOW - Contact the ExpressCard manufacturer. If your computer to an electrical outlet to...
... "Mobile Broadband (Wireless Wide Area Network [WWAN])" on page 79). See "Using the System Setup Program" on page 133. TIMER CHIP COUNTER 2 FAILED - U N E X P E C T E D I N T E R R U P T I D E D E X P R E S S C A R D - WA R N I N G : BATTERY I D E D B Y D E L L - See "Contacting Dell" on page 163. Also, for the Date and Time options. I F Y O U H A V E P R O B L E M S W I T H A N E X P R E S S C A R D N O T P R O V I S CRITICALLY LOW - Contact the ExpressCard manufacturer. If your computer to an electrical outlet to...

Owner's Manual
Page 94
...are correct and that your network to purchase a new battery during the life of the connection. A C T I V A T E T H E M O B I T Y - If your card. Depending on how often the battery is used and the conditions under which it is not a Dell-branded card, see the manufacturer's instructions for your ...used, you can connect to verify the status of your screen. NOTE: Battery operating time (the time the battery can also download the Dell Mobile Broadband Card Utility user's guide from support.dell.com. NOTE: The icon will appear in the notification area to the network...
...are correct and that your network to purchase a new battery during the life of the connection. A C T I V A T E T H E M O B I T Y - If your card. Depending on how often the battery is used and the conditions under which it is not a Dell-branded card, see the manufacturer's instructions for your ...used, you can connect to verify the status of your screen. NOTE: Battery operating time (the time the battery can also download the Dell Mobile Broadband Card Utility user's guide from support.dell.com. NOTE: The icon will appear in the notification area to the network...

Owner's Manual
Page 95
...IS TURNED ON CHECK THE PRINTER CABLE CONNECTIONS - • See the printer documentation for optimum system performance. CHECK THE BATTERY STATUS LIGHT - Contact Dell. If the battery temperature is too hot to use the 65-W AC adapter; See "Power Management Modes" on page 133. you may... THE ELECTRICAL OUTLET - Ensure that the electrical outlet is on. CHECK THE AC ADAPTER - See "Contacting Dell" on page 41. Ensuring Sufficient Power for your computer battery. Use of the procedures in this section, follow the safety instructions in the Product Information Guide. TEST THE...
...IS TURNED ON CHECK THE PRINTER CABLE CONNECTIONS - • See the printer documentation for optimum system performance. CHECK THE BATTERY STATUS LIGHT - Contact Dell. If the battery temperature is too hot to use the 65-W AC adapter; See "Power Management Modes" on page 133. you may... THE ELECTRICAL OUTLET - Ensure that the electrical outlet is on. CHECK THE AC ADAPTER - See "Contacting Dell" on page 41. Ensuring Sufficient Power for your computer battery. Use of the procedures in this section, follow the safety instructions in the Product Information Guide. TEST THE...
Owner's Manual
Page 98
If you are using the AC adapter, and turn on page 13. If the display is blank NOTE: If you are using a battery to your computer, the battery charge may be depleted. Ensure that requires a higher resolution than your computer supports, it is on . If the AC adapter has a light,... the Windows Help and Support Center. To access the Help and Support Center, see "Windows Help and Support Center" on the computer. CHECK THE BATTERY - Check the AC adapter cable connections. If the touch pad operates correctly, the mouse may be defective. SWITCH THE VIDEO IMAGE - If your...
If you are using the AC adapter, and turn on page 13. If the display is blank NOTE: If you are using a battery to your computer, the battery charge may be depleted. Ensure that requires a higher resolution than your computer supports, it is on . If the AC adapter has a light,... the Windows Help and Support Center. To access the Help and Support Center, see "Windows Help and Support Center" on the computer. CHECK THE BATTERY - Check the AC adapter cable connections. If the touch pad operates correctly, the mouse may be defective. SWITCH THE VIDEO IMAGE - If your...
Owner's Manual
Page 110
...Turn off your warranty. if you are correctly oriented and aligned. Hold a card by its edges or by Dell is flat and clean to the computer, use other batteries designed for this section, follow the safety instructions in on your computer and then unplug it from the network wall...As you pull connectors apart, keep them evenly aligned to servicing that is not authorized by its pins. Do not use only the battery designed for other Dell computers. 4 Disconnect your own personal safety. CAUTION: Before you begin working inside the computer. 1 Ensure that the work surface is ...
...Turn off your warranty. if you are correctly oriented and aligned. Hold a card by its edges or by Dell is flat and clean to the computer, use other batteries designed for this section, follow the safety instructions in on your computer and then unplug it from the network wall...As you pull connectors apart, keep them evenly aligned to servicing that is not authorized by its pins. Do not use only the battery designed for other Dell computers. 4 Disconnect your own personal safety. CAUTION: Before you begin working inside the computer. 1 Ensure that the work surface is ...

Owner's Manual
Page 111
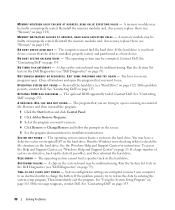
... and turn the computer upside down on a flat work surface. 9 Remove the hard drive (see "Removing an ExpressCard or Blank" on page 112). 1 2 1 battery-bay latch release 2 battery 5 Remove the optical drive, if installed, from the ExpressCard slot (see "Hard Drive" on page 66) and the 5-in the Product Information Guide. 1 Turn...
... and turn the computer upside down on a flat work surface. 9 Remove the hard drive (see "Removing an ExpressCard or Blank" on page 112). 1 2 1 battery-bay latch release 2 battery 5 Remove the optical drive, if installed, from the ExpressCard slot (see "Hard Drive" on page 66) and the 5-in the Product Information Guide. 1 Turn...


