
Owner's Manual
Page 41
...they are not installed in the computer. Removing and Installing Devices While the Computer Is Turned Off NOTE: You can install devices such as a floppy drive, CD drive, CD-RW drive, DVD drive, CD-RW/DVD drive, DVD+RW, second battery, or second hard drive in the Product Information Guide. Using the ...Module Bay 41 You can remove and install devices while the computer is running and connected to...
...they are not installed in the computer. Removing and Installing Devices While the Computer Is Turned Off NOTE: You can install devices such as a floppy drive, CD drive, CD-RW drive, DVD drive, CD-RW/DVD drive, DVD+RW, second battery, or second hard drive in the Product Information Guide. Using the ...Module Bay 41 You can remove and install devices while the computer is running and connected to...
Owner's Manual
Page 74
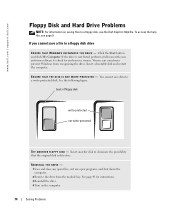
... A N O T H E R F L O P P Y D I T E - You cannot save a file to a floppy disk drive E N S U R E T H A T W I N D O W S R E C O G N I Z E S T H E D R I V E - REINSTALL THE DRIVE - 1 Save and close any open files, exit any open programs, and shut down the computer. 2 Remove the drive from recognizing the drive. E N S U R E T H A T T H E D I S K I S N O T W R I S K... the Dell Inspiron Help file. If the drive is defective. www.dell.com | support.dell.com Floppy Disk and Hard Drive Problems NOTE: For information on the computer. 74 Solving Problems See page 41 for and remove viruses....
... A N O T H E R F L O P P Y D I T E - You cannot save a file to a floppy disk drive E N S U R E T H A T W I N D O W S R E C O G N I Z E S T H E D R I V E - REINSTALL THE DRIVE - 1 Save and close any open files, exit any open programs, and shut down the computer. 2 Remove the drive from recognizing the drive. E N S U R E T H A T T H E D I S K I S N O T W R I S K... the Dell Inspiron Help file. If the drive is defective. www.dell.com | support.dell.com Floppy Disk and Hard Drive Problems NOTE: For information on the computer. 74 Solving Problems See page 41 for and remove viruses....
Owner's Manual
Page 75
A hot hard drive may prevent the operating system from starting. Double-click the Safely Remove Hardware icon in the Dell Inspiron Help file for errors, and then click Properties. 3 Click the Tools tab. 4 Under Error-checking, click Check Now. 5 Click Start. Contact the PC Card manufacturer. Contact Dell. If you want to room temperature before turning it...
A hot hard drive may prevent the operating system from starting. Double-click the Safely Remove Hardware icon in the Dell Inspiron Help file for errors, and then click Properties. 3 Click the Tools tab. 4 Under Error-checking, click Check Now. 5 Click Start. Contact the PC Card manufacturer. Contact Dell. If you want to room temperature before turning it...
Owner's Manual
Page 77
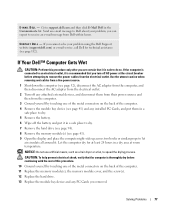
...Dell™ Computer Gets Wet CAUTION: Perform this procedure. 10 Ground yourself by touching one of the metal connectors on the back of this procedure only after you can expect to let air circulate all around it in a safe place to dry. 7 Remove the hard drive (see page 94). 8 Remove... the memory module(s) (see page 41) and any PC Cards you removed. Solving Problems 77 E - M A I L D E L L - Use the utmost caution when removing wet cables from a live power source. 1 Shut down the...
...Dell™ Computer Gets Wet CAUTION: Perform this procedure. 10 Ground yourself by touching one of the metal connectors on the back of this procedure only after you can expect to let air circulate all around it in a safe place to dry. 7 Remove the hard drive (see page 94). 8 Remove... the memory module(s) (see page 41) and any PC Cards you removed. Solving Problems 77 E - M A I L D E L L - Use the utmost caution when removing wet cables from a live power source. 1 Shut down the...
Owner's Manual
Page 80
.... 4 In the Device Manager list, check for devices that came with an exclamation point to display the Properties window. www.dell.com | support.dell.com Manually Reinstalling Drivers NOTE: If you are reinstalling an infrared sensor driver, you must first enable the infrared sensor in the... devices or remove the devices from a list or specific location (Advanced) and click Next. 9 Click Browse and browse to the location to which you previously extracted the driver files. 10 When the name of the appropriate driver appears, click Next. 11 Click Finish and restart your hard drive. 2 Click...
.... 4 In the Device Manager list, check for devices that came with an exclamation point to display the Properties window. www.dell.com | support.dell.com Manually Reinstalling Drivers NOTE: If you are reinstalling an infrared sensor driver, you must first enable the infrared sensor in the... devices or remove the devices from a list or specific location (Advanced) and click Next. 9 Click Browse and browse to the location to which you previously extracted the driver files. 10 When the name of the appropriate driver appears, click Next. 11 Click Finish and restart your hard drive. 2 Click...
Owner's Manual
Page 81
... Point 1 Click the Start button and click Help and Support. 2 Click System Restore. 3 Follow the instructions on the hard drive and removes any applications installed after you purchased the computer. Using Microsoft Windows XP System Restore The Microsoft Windows XP operating system provides System..., click I need to the Windows Classic view. Restoring the Computer to an Earlier Operating State If problems occur after you set your Dell™ computer to resolve a hardware conflict on computers purchased in when you install a device driver, use System Restore. See the Windows...
... Point 1 Click the Start button and click Help and Support. 2 Click System Restore. 3 Follow the instructions on the hard drive and removes any applications installed after you purchased the computer. Using Microsoft Windows XP System Restore The Microsoft Windows XP operating system provides System..., click I need to the Windows Classic view. Restoring the Computer to an Earlier Operating State If problems occur after you set your Dell™ computer to resolve a hardware conflict on computers purchased in when you install a device driver, use System Restore. See the Windows...

Owner's Manual
Page 83
...Restore, click Reboot in time, let the computer finish restarting, and then restart the computer again. If you do not want to proceed with www.dell.com appears at the top of the screen. 2 Immediately upon seeing the blue bar, press . The restore process takes approximately 6-10 minutes to ... it was turned on. 7 Click Next. NOTE: Do not manually shut down the computer. Because the computer is available only on the hard drive and removes any applications or drivers installed after you purchased the computer. Any programs or files added since you do not press in the following step. ...
...Restore, click Reboot in time, let the computer finish restarting, and then restart the computer again. If you do not want to proceed with www.dell.com appears at the top of the screen. 2 Immediately upon seeing the blue bar, press . The restore process takes approximately 6-10 minutes to ... it was turned on. 7 Click Next. NOTE: Do not manually shut down the computer. Because the computer is available only on the hard drive and removes any applications or drivers installed after you purchased the computer. Any programs or files added since you do not press in the following step. ...

Owner's Manual
Page 84
... diagnostic utility partition on Dell™ computers. www.dell.com | support.dell.com Removing PC Restore NOTICE: PC Restore enables you to restore your computer's operating system to c:\dell\utilities\DSR. 3 Double-click the filename DSRIRRemv2.exe. If you remove PC Restore from your hard drive. Click Quit; there ... state. 1 Log on as a local administrator. NOTE: If you contact Dell for PC Restore does not exist, a message appears stating that you must do not remove PC Restore from the hard drive, you cannot ever recall it . The partition is recommended that came with your...
... diagnostic utility partition on Dell™ computers. www.dell.com | support.dell.com Removing PC Restore NOTICE: PC Restore enables you to restore your computer's operating system to c:\dell\utilities\DSR. 3 Double-click the filename DSRIRRemv2.exe. If you remove PC Restore from your hard drive. Click Quit; there ... state. 1 Log on as a local administrator. NOTE: If you contact Dell for PC Restore does not exist, a message appears stating that you must do not remove PC Restore from the hard drive, you cannot ever recall it . The partition is recommended that came with your...
Owner's Manual
Page 89
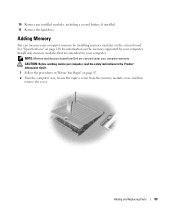
...Information Guide. 1 Follow the procedures in "Before You Begin" on the system board. 10 Remove any installed modules, including a second battery, if installed. 11 Remove the hard drive. CAUTION: Before working inside your computer warranty. See "Specifications" on the memory supported by ...installing memory modules on page 87. 2 Turn the computer over, loosen the captive screw from Dell are intended for information on page...
...Information Guide. 1 Follow the procedures in "Before You Begin" on the system board. 10 Remove any installed modules, including a second battery, if installed. 11 Remove the hard drive. CAUTION: Before working inside your computer warranty. See "Specifications" on the memory supported by ...installing memory modules on page 87. 2 Turn the computer over, loosen the captive screw from Dell are intended for information on page...
Owner's Manual
Page 94
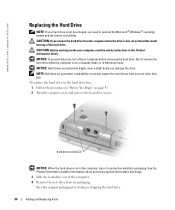
... replace the hard drive in the hard drive bay: 1 Follow the procedures in the Product Information Guide. hard drive screws (2) NOTICE: When the hard drive is not pre-imaged, you remove the hard drive from sources other than Dell. Save the original packaging for hard drives from the computer when the drive is on page 87. 2 Turn the computer over, and remove the hard drive screws. NOTICE: Hard drives are...
... replace the hard drive in the hard drive bay: 1 Follow the procedures in the Product Information Guide. hard drive screws (2) NOTICE: When the hard drive is not pre-imaged, you remove the hard drive from sources other than Dell. Save the original packaging for hard drives from the computer when the drive is on page 87. 2 Turn the computer over, and remove the hard drive screws. NOTICE: Hard drives are...

Owner's Manual
Page 99
7 Remove the hard drive. 8 Pull the Bluetooth card connector out of the system board connector. 9 Pull the cable to remove the Bluetooth card from the computer. Adding and Replacing Parts 99 system board connector Bluetooth card cable Bluetooth card connector NOTE: When replacing the Bluetooth card, ensure the Bluetooth cable is routed correctly so that you do not damage the cable when you install the hard drive.
7 Remove the hard drive. 8 Pull the Bluetooth card connector out of the system board connector. 9 Pull the cable to remove the Bluetooth card from the computer. Adding and Replacing Parts 99 system board connector Bluetooth card cable Bluetooth card connector NOTE: When replacing the Bluetooth card, ensure the Bluetooth cable is routed correctly so that you do not damage the cable when you install the hard drive.
Owner's Manual
Page 131
...the charge, 34 description, 23 installing, 36 performance, 33 power meter, 35 removing, 36 storing, 38 system view, 23 Bluetooth card replacing, 98 C CD, 54 using, 49 CD-RW drive fixing problems, 52 characters unexpected, 48 computer crashes, 76 restore to previous ...Dell, 84 display description, 13 system view, 13 display latch description, 15 system view, 15 docking device latch description, 23 system view, 23 documentation help file, 9 online, 11 Setup Diagram, 9 System Information Guide, 9 drivers, 78 about, 78 identifying, 79 reinstalling, 79 drives fixing problems, 49, 74 See hard drive...
...the charge, 34 description, 23 installing, 36 performance, 33 power meter, 35 removing, 36 storing, 38 system view, 23 Bluetooth card replacing, 98 C CD, 54 using, 49 CD-RW drive fixing problems, 52 characters unexpected, 48 computer crashes, 76 restore to previous ...Dell, 84 display description, 13 system view, 13 display latch description, 15 system view, 15 docking device latch description, 23 system view, 23 documentation help file, 9 online, 11 Setup Diagram, 9 System Information Guide, 9 drivers, 78 about, 78 identifying, 79 reinstalling, 79 drives fixing problems, 49, 74 See hard drive...
Owner's Manual
Page 132
... to the parallel port, 20 fixing problems, 49, 74 H hard drive description, 23 replacing, 94 returning to Dell, 95 system view, 23 hardware conflicts, 80 Dell Diagnostics, 84 Hardware Troubleshooter, 80 Help and Support Center, 10 help file, 9 I Infrared Sensor enabling, 109 infrared sensor description, 16...48 keyboard status lights description, 15 system view, 15 keypad numeric, 43 L labels Microsoft Windows, 10 Service Tag, 10 M memory adding, 89 removing, 90 Microsoft Windows label, 10 Mini PCI card installing, 91 Mini PCI card, modem, and memory module cover description, 23 system view, 23 ...
... to the parallel port, 20 fixing problems, 49, 74 H hard drive description, 23 replacing, 94 returning to Dell, 95 system view, 23 hardware conflicts, 80 Dell Diagnostics, 84 Hardware Troubleshooter, 80 Help and Support Center, 10 help file, 9 I Infrared Sensor enabling, 109 infrared sensor description, 16...48 keyboard status lights description, 15 system view, 15 keypad numeric, 43 L labels Microsoft Windows, 10 Service Tag, 10 M memory adding, 89 removing, 90 Microsoft Windows label, 10 Mini PCI card installing, 91 Mini PCI card, modem, and memory module cover description, 23 system view, 23 ...


