Dell Users Guide
Page 9
...Extension 226 Printing, Copying, Scanning, and Faxing 227 18 Printing 229 Tips for Successful Printing 229 Tips on Storing Print Media 229 Avoiding Paper Jams 229 Sending a Job to Print 229 Canceling a Print Job 230 Canceling From the Operator Panel 230 Canceling a Job From the Computer ...Storage Device 231 Supported File Formats 231 Printing a File in a USB Memory 231 Printing a Report Page 231 19 Copying 233 Loading Paper for Copying 233 Preparing a Document 233 Making Copies From the Document Glass 233 Making Copies From the ADF 235 Setting Copy Options 235...
...Extension 226 Printing, Copying, Scanning, and Faxing 227 18 Printing 229 Tips for Successful Printing 229 Tips on Storing Print Media 229 Avoiding Paper Jams 229 Sending a Job to Print 229 Canceling a Print Job 230 Canceling From the Operator Panel 230 Canceling a Job From the Computer ...Storage Device 231 Supported File Formats 231 Printing a File in a USB Memory 231 Printing a Report Page 231 19 Copying 233 Loading Paper for Copying 233 Preparing a Document 233 Making Copies From the Document Glass 233 Making Copies From the ADF 235 Setting Copy Options 235...
Dell Users Guide
Page 13
... Scanner 320 Cleaning the ADF Feed Roller 322 26 Clearing Jams 323 Avoiding Jams 323 Identifying the Location of Paper Jams 324 Clearing Paper Jams From the ADF 325 Clearing Paper Jams From the Front of the Printer 329 Clearing Paper Jams From the Back of the Printer 330 Clearing Paper Jams From the Output Tray 332 Troubleshooting 337 27 Troubleshooting 339...
... Scanner 320 Cleaning the ADF Feed Roller 322 26 Clearing Jams 323 Avoiding Jams 323 Identifying the Location of Paper Jams 324 Clearing Paper Jams From the ADF 325 Clearing Paper Jams From the Front of the Printer 329 Clearing Paper Jams From the Back of the Printer 330 Clearing Paper Jams From the Output Tray 332 Troubleshooting 337 27 Troubleshooting 339...
Dell Users Guide
Page 59
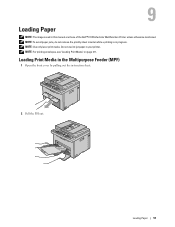
NOTE: For printing envelopes, see "Loading Print Media" on page 211. Loading Paper 57 Do not use ink jet paper in this manual are those of the Dell™ C1765nfw Color Multifunction Printer unless otherwise mentioned. 9 Loading Paper NOTE: The images used in your printer. NOTE: Use only laser print media. NOTE: To avoid paper jams, do not remove the priority sheet inserter while a printing is in the Multipurpose Feeder (MPF) 1 Open the front cover by pulling out the instruction sheet. 2 Pull the PSI out. Loading Print Media in progress.
NOTE: For printing envelopes, see "Loading Print Media" on page 211. Loading Paper 57 Do not use ink jet paper in this manual are those of the Dell™ C1765nfw Color Multifunction Printer unless otherwise mentioned. 9 Loading Paper NOTE: The images used in your printer. NOTE: Use only laser print media. NOTE: To avoid paper jams, do not remove the priority sheet inserter while a printing is in the Multipurpose Feeder (MPF) 1 Open the front cover by pulling out the instruction sheet. 2 Pull the PSI out. Loading Print Media in progress.

Dell Users Guide
Page 177
...List Using the Tool Box 1 Click Start → All Programs → Dell Printers → Dell C1765 Color Multifunction Printer → Tool Box. In this case, click Dell C1765nf Color Multifunction Printer or Dell C1765nfw Color Multifunction Printer listed in this step, when multiple printer drivers are installed ... selected report or list is displayed. 4 Click the button for testing colors. Fax Activity Purpose: To print the report of paper jams and fatal errors. Understanding the Printer Menus 175 The Reports page is printed. Error History Purpose: To print a detailed list ...
...List Using the Tool Box 1 Click Start → All Programs → Dell Printers → Dell C1765 Color Multifunction Printer → Tool Box. In this case, click Dell C1765nf Color Multifunction Printer or Dell C1765nfw Color Multifunction Printer listed in this step, when multiple printer drivers are installed ... selected report or list is displayed. 4 Click the button for testing colors. Fax Activity Purpose: To print the report of paper jams and fatal errors. Understanding the Printer Menus 175 The Reports page is printed. Error History Purpose: To print a detailed list ...
Dell Users Guide
Page 205
... feed properly, and could cause paper jams. For best performance, use it into the MPF or PSI. For the best print quality in this manual are those of print media. When loading paper, identify the recommended print side on a variety of the Dell™ C1765nfw Color Multifunction Printer unless otherwise mentioned. Paper lighter than 135 g/m2...
... feed properly, and could cause paper jams. For best performance, use it into the MPF or PSI. For the best print quality in this manual are those of print media. When loading paper, identify the recommended print side on a variety of the Dell™ C1765nfw Color Multifunction Printer unless otherwise mentioned. Paper lighter than 135 g/m2...
Dell Users Guide
Page 206
... information is usually indicated on talc or acid paper. • Moist paper that may result in a paper jam. • Do not remove the PSI while a job is properly loaded in degraded paper handling. Business paper designed for general business use dry 75 g/m2 (20 lb) xerographic paper. To help avoid jams or poor print quality: • Always use...
... information is usually indicated on talc or acid paper. • Moist paper that may result in a paper jam. • Do not remove the PSI while a job is properly loaded in degraded paper handling. Business paper designed for general business use dry 75 g/m2 (20 lb) xerographic paper. To help avoid jams or poor print quality: • Always use...
Dell Users Guide
Page 208
... For best performance, use envelopes made from several manufacturers before ordering and using large quantities of pre-punched paper. • Paper should be possible to print on the paper to depending on the placement of holes on loading an envelope. • Use one envelope size during ... in manufacturing techniques. Have postage stamps attached - When printing on page 216 or "Loading an Envelope in a paper jam. • Pre-punched paper can cause jams when multiple sheets feed through the printer. Have an interlocking design - Your printer may require more frequent cleaning and...
... For best performance, use envelopes made from several manufacturers before ordering and using large quantities of pre-punched paper. • Paper should be possible to print on the paper to depending on the placement of holes on loading an envelope. • Use one envelope size during ... in manufacturing techniques. Have postage stamps attached - When printing on page 216 or "Loading an Envelope in a paper jam. • Pre-punched paper can cause jams when multiple sheets feed through the printer. Have an interlocking design - Your printer may require more frequent cleaning and...
Dell Users Guide
Page 219
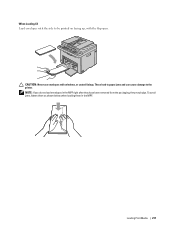
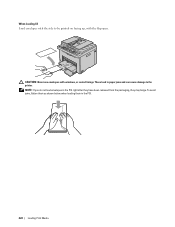
NOTE: If you do not load envelopes in the MPF. Loading Print Media 217 These lead to paper jams and can cause damage to be printed on facing up, with windows, or coated linings. To avoid jams, flatten them as shown below when loading them in the MPF right after they have been removed from the packaging, they may bulge. CAUTION: Never use envelopes with the flap open. When Loading C5 Load envelopes with the side to the printer.
NOTE: If you do not load envelopes in the MPF. Loading Print Media 217 These lead to paper jams and can cause damage to be printed on facing up, with windows, or coated linings. To avoid jams, flatten them as shown below when loading them in the MPF right after they have been removed from the packaging, they may bulge. CAUTION: Never use envelopes with the flap open. When Loading C5 Load envelopes with the side to the printer.
Dell Users Guide
Page 221
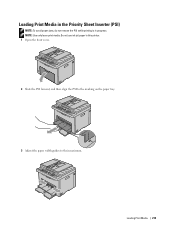
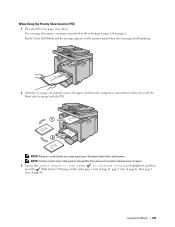
Loading Print Media in the Priority Sheet Inserter (PSI) NOTE: To avoid paper jams, do not remove the PSI while printing is in this printer. 1 Open the front cover. 2 Slide the PSI forward, and then align the PSI to the marking on the paper tray. 3 Adjust the paper width guides to their maximum. Loading Print Media 219 Do not use ink jet paper in progress. NOTE: Use only laser print media.
Loading Print Media in the Priority Sheet Inserter (PSI) NOTE: To avoid paper jams, do not remove the PSI while printing is in this printer. 1 Open the front cover. 2 Slide the PSI forward, and then align the PSI to the marking on the paper tray. 3 Adjust the paper width guides to their maximum. Loading Print Media 219 Do not use ink jet paper in progress. NOTE: Use only laser print media.
Dell Users Guide
Page 224
CAUTION: Never use envelopes with the flap open. These lead to paper jams and can cause damage to be printed on facing up, with windows, or coated linings. NOTE: If you do not load envelopes in the PSI. 222 Loading Print Media To avoid jams, flatten them as shown below when loading them in the PSI right after they have been removed from the packaging, they may bulge. When Loading C5 Load envelopes with the side to the printer.
CAUTION: Never use envelopes with the flap open. These lead to paper jams and can cause damage to be printed on facing up, with windows, or coated linings. NOTE: If you do not load envelopes in the PSI. 222 Loading Print Media To avoid jams, flatten them as shown below when loading them in the PSI right after they have been removed from the packaging, they may bulge. When Loading C5 Load envelopes with the side to the printer.
Dell Users Guide
Page 226
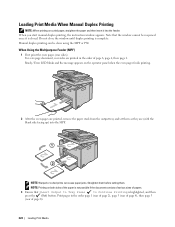
NOTE: Warped or curled prints can be reopened once it into the MPF. NOTE: Printing on both sides of the paper is not possible if the document consists of various sizes of papers. 3 Ensure that the window cannot be done using the MPF or PSI. For a six page document, rear sides ... it is closed. Do not close the window until duplex printing is highlighted, and then press the (Set) button. Manual duplex printing can cause paper jams. Straighten them before setting them as they are (with the blank side facing up) into the feeder. Note that Insert Output to Tray Press to...
NOTE: Warped or curled prints can be reopened once it into the MPF. NOTE: Printing on both sides of the paper is not possible if the document consists of various sizes of papers. 3 Ensure that the window cannot be done using the MPF or PSI. For a six page document, rear sides ... it is closed. Do not close the window until duplex printing is highlighted, and then press the (Set) button. Manual duplex printing can cause paper jams. Straighten them before setting them as they are (with the blank side facing up) into the feeder. Note that Insert Output to Tray Press to...
Dell Users Guide
Page 227
... and set them . Print pages in the order page 6, page 4, then page 2. Ready / Error LED blinks and the message appears on both sides of the paper is not possible if the document consists of various sizes of page 6). Loading Print Media 225 For a six page document, even pages are (with the... blank side facing up) into the PSI. NOTE: Warped or curled prints can cause paper jams. Straighten them before setting them as they are printed in the order page 1 (rear of page 2), page 3 (rear of page 4), then page 5 (rear of...
... and set them . Print pages in the order page 6, page 4, then page 2. Ready / Error LED blinks and the message appears on both sides of the paper is not possible if the document consists of various sizes of page 6). Loading Print Media 225 For a six page document, even pages are (with the... blank side facing up) into the PSI. NOTE: Warped or curled prints can cause paper jams. Straighten them before setting them as they are printed in the order page 1 (rear of page 2), page 3 (rear of page 4), then page 5 (rear of...

Dell Users Guide
Page 231
...a feature in the Priority Sheet Inserter (PSI)" on page 219 • "Avoiding Jams" on page 207. Modify the system settings as needed (such as Quality, Paper Size, or Image Orientation, click Preferences. Avoiding Paper Jams NOTE: It is selected in the dialog box. Sending a Job to Print Install ...the printer driver to use all the available system settings you can avoid paper jams. See the following instructions on loading print media: • "Loading Print Media in the Multipurpose Feeder (MPF)" on page 350 for instructions...
...a feature in the Priority Sheet Inserter (PSI)" on page 219 • "Avoiding Jams" on page 207. Modify the system settings as needed (such as Quality, Paper Size, or Image Orientation, click Preferences. Avoiding Paper Jams NOTE: It is selected in the dialog box. Sending a Job to Print Install ...the printer driver to use all the available system settings you can avoid paper jams. See the following instructions on loading print media: • "Loading Print Media in the Multipurpose Feeder (MPF)" on page 350 for instructions...

Dell Users Guide
Page 293
... the number that shipped with your printer to manage multiple instances of the Status Window for example, when a paper jam occurs or toner is a warning or when an error occurs, for a particular printer. Dell C1765nf/C1765nfw Color MFP - Printer Status Window The Printer Status window alerts you order by phone or from the Select...
... the number that shipped with your printer to manage multiple instances of the Status Window for example, when a paper jam occurs or toner is a warning or when an error occurs, for a particular printer. Dell C1765nf/C1765nfw Color MFP - Printer Status Window The Printer Status window alerts you order by phone or from the Select...
Dell Users Guide
Page 297
... panel displays messages describing the current state of the printer are not secured. If this does not solve the problem, contact Dell. See "Clearing Paper Jams From the ADF" on page 312. Check if user name and password for SMTP server are set correctly. (Set) button.... Re-install the specified toner cartridge. See "Installing a Toner Cartridge" on page 325. See "Contacting Dell" on . This chapter describes messages, their meanings,...
... panel displays messages describing the current state of the printer are not secured. If this does not solve the problem, contact Dell. See "Clearing Paper Jams From the ADF" on page 312. Check if user name and password for SMTP server are set correctly. (Set) button.... Re-install the specified toner cartridge. See "Installing a Toner Cartridge" on page 325. See "Contacting Dell" on . This chapter describes messages, their meanings,...
Dell Users Guide
Page 301
... the specified paper, and then press the Paper Jams From the Front of the Printer" on page 323. Check and clear the paper path. Check and clear the paper path. Turn off the printer, and then on. Re-install or replace the specified toner cartridge. Order a new consumable from www.dell.com/supplies.... (odd) pages, and press the When Manual Duplex Printing" on page 332. See "Clearing Paper Jams From the Output Tray" on page 224. (Set) button. Clean the CTD sensor. Order a new consumable from www.dell.com/supplies. See "Cleaning the Color Toner Density (CTD) Sensor" on page 323. Check ...
... the specified paper, and then press the Paper Jams From the Front of the Printer" on page 323. Check and clear the paper path. Check and clear the paper path. Turn off the printer, and then on. Re-install or replace the specified toner cartridge. Order a new consumable from www.dell.com/supplies.... (odd) pages, and press the When Manual Duplex Printing" on page 332. See "Clearing Paper Jams From the Output Tray" on page 224. (Set) button. Clean the CTD sensor. Order a new consumable from www.dell.com/supplies. See "Cleaning the Color Toner Density (CTD) Sensor" on page 323. Check ...
Dell Users Guide
Page 326
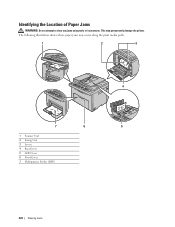
The following illustration shows where paper jams may permanently damage the printer. This may occur along the print media path. 1 2 3 4 7 6 5 1 Scanner Unit 2 Fusing Unit 3 Levers 4 Rear Cover 5 ADF Cover 6 Front Cover 7 Multipurpose Feeder (MPF) 324 Clearing Jams Identifying the Location of Paper Jams WARNING: Do not attempt to clear any jams using tools or instruments.
The following illustration shows where paper jams may permanently damage the printer. This may occur along the print media path. 1 2 3 4 7 6 5 1 Scanner Unit 2 Fusing Unit 3 Levers 4 Rear Cover 5 ADF Cover 6 Front Cover 7 Multipurpose Feeder (MPF) 324 Clearing Jams Identifying the Location of Paper Jams WARNING: Do not attempt to clear any jams using tools or instruments.

Dell Users Guide
Page 327
Clearing Paper Jams From the ADF When a document jams while it in the following illustration. The fusing unit becomes extremely hot during use. Clearing Jams 325 NOTE: To resolve the error displayed on the operator panel, you must clear all print media from the ...path. 1 Open the ADF cover. 2 Remove the jammed document by carefully pulling it passes through the Automatic Document Feeder (ADF), remove jams in the following procedures, read and follow the safety instructions in the Important Information. WARNING: To avoid burns, do not clear paper jams immediately after printing.
Clearing Paper Jams From the ADF When a document jams while it in the following illustration. The fusing unit becomes extremely hot during use. Clearing Jams 325 NOTE: To resolve the error displayed on the operator panel, you must clear all print media from the ...path. 1 Open the ADF cover. 2 Remove the jammed document by carefully pulling it passes through the Automatic Document Feeder (ADF), remove jams in the following procedures, read and follow the safety instructions in the Important Information. WARNING: To avoid burns, do not clear paper jams immediately after printing.
Dell Users Guide
Page 331
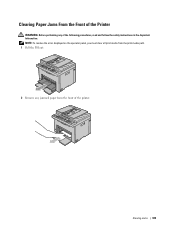
NOTE: To resolve the error displayed on the operator panel, you must clear all print media from the front of the following procedures, read and follow the safety instructions in the Important Information. Clearing Jams 329 Clearing Paper Jams From the Front of the Printer WARNING: Before performing any jammed paper from the print media path. 1 Pull the PSI out. 2 Remove any of the printer.
NOTE: To resolve the error displayed on the operator panel, you must clear all print media from the front of the following procedures, read and follow the safety instructions in the Important Information. Clearing Jams 329 Clearing Paper Jams From the Front of the Printer WARNING: Before performing any jammed paper from the print media path. 1 Pull the PSI out. 2 Remove any of the printer.
Dell Users Guide
Page 332
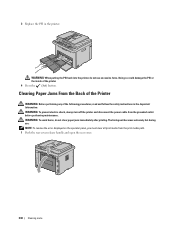
...the printer, do not clear paper jams immediately after printing. WARNING: To prevent electric shock, always turn off the printer and disconnect the power cable from the print media path. 1 Push the rear cover release handle and open the rear cover. 330 Clearing Jams NOTE: To resolve the ... avoid burns, do not use . The fusing unit becomes extremely hot during use excessive force. 3 Replace the PSI in the Important Information. Clearing Paper Jams From the Back of the Printer WARNING: Before performing any of the printer. 4 Press the (Set) button. Doing so could damage the PSI ...
...the printer, do not clear paper jams immediately after printing. WARNING: To prevent electric shock, always turn off the printer and disconnect the power cable from the print media path. 1 Push the rear cover release handle and open the rear cover. 330 Clearing Jams NOTE: To resolve the ... avoid burns, do not use . The fusing unit becomes extremely hot during use excessive force. 3 Replace the PSI in the Important Information. Clearing Paper Jams From the Back of the Printer WARNING: Before performing any of the printer. 4 Press the (Set) button. Doing so could damage the PSI ...


