
Dell Users Guide
Page 23
...; Safety information • Warranty information Important Information WARNING: Read and follow all safety instructions in this manual are you looking for? • Drivers for experienced users or technicians. Finding Information 21 What are those of the Dell™ C1765nfw Color Multifunction Printer unless otherwise mentioned. You can use my printer The Software and...
...; Safety information • Warranty information Important Information WARNING: Read and follow all safety instructions in this manual are you looking for? • Drivers for experienced users or technicians. Finding Information 21 What are those of the Dell™ C1765nfw Color Multifunction Printer unless otherwise mentioned. You can use my printer The Software and...
Dell Users Guide
Page 31
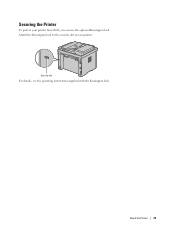
About the Printer 29 Security slot For details, see the operating instructions supplied with the Kensington lock. Securing the Printer To protect your printer. Attach the Kensington lock to the security slot on your printer from theft, you can use the optional Kensington lock.
About the Printer 29 Security slot For details, see the operating instructions supplied with the Kensington lock. Securing the Printer To protect your printer. Attach the Kensington lock to the security slot on your printer from theft, you can use the optional Kensington lock.

Dell Users Guide
Page 47
3 Turn on the printer. 4 Follow the on-screen instructions in the operator panel to configure the initial settings of your printer. Connecting Your Printer 45
3 Turn on the printer. 4 Follow the on-screen instructions in the operator panel to configure the initial settings of your printer. Connecting Your Printer 45
Dell Users Guide
Page 53
... +13:00) Tongatapu (UTC +14:00) Kiritimati 5 Ensure that Please Enter Name appears. Enter your computer to start Dell Printer Setup. 2 Double-click the Dell C1765 Installer icon, and follow the on-screen instructions to skip the Fax Setup, press the (Start) button and then restart the printer. 8 Ensure that Please Enter Time...
... +13:00) Tongatapu (UTC +14:00) Kiritimati 5 Ensure that Please Enter Name appears. Enter your computer to start Dell Printer Setup. 2 Double-click the Dell C1765 Installer icon, and follow the on-screen instructions to skip the Fax Setup, press the (Start) button and then restart the printer. 8 Ensure that Please Enter Time...
Dell Users Guide
Page 59
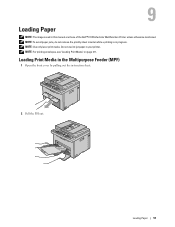
Do not use ink jet paper in progress. NOTE: For printing envelopes, see "Loading Print Media" on page 211. Loading Paper 57 NOTE: To avoid paper jams, do not remove the priority sheet inserter while a printing is in your printer. 9 Loading Paper NOTE: The images used in the Multipurpose Feeder (MPF) 1 Open the front cover by pulling out the instruction sheet. 2 Pull the PSI out. Loading Print Media in this manual are those of the Dell™ C1765nfw Color Multifunction Printer unless otherwise mentioned. NOTE: Use only laser print media.
Do not use ink jet paper in progress. NOTE: For printing envelopes, see "Loading Print Media" on page 211. Loading Paper 57 NOTE: To avoid paper jams, do not remove the priority sheet inserter while a printing is in your printer. 9 Loading Paper NOTE: The images used in the Multipurpose Feeder (MPF) 1 Open the front cover by pulling out the instruction sheet. 2 Pull the PSI out. Loading Print Media in this manual are those of the Dell™ C1765nfw Color Multifunction Printer unless otherwise mentioned. NOTE: Use only laser print media.
Dell Users Guide
Page 60
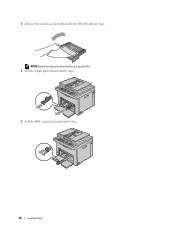
NOTE: Read the instruction sheet before you use the PSI. 4 Pull the length guide forward until it stops. 5 Pull the MPF extension forward until it stops. 58 Loading Paper 3 Remove the instruction sheet attached to the PSI with adhesive tape.
NOTE: Read the instruction sheet before you use the PSI. 4 Pull the length guide forward until it stops. 5 Pull the MPF extension forward until it stops. 58 Loading Paper 3 Remove the instruction sheet attached to the PSI with adhesive tape.
Dell Users Guide
Page 67
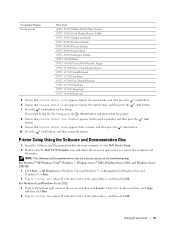
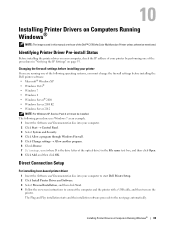
...program. 6 Check Browse. 7 D:\setup.exe (where D is the drive letter of the Dell™ C1765nfw Color Multifunction Printer unless otherwise mentioned. Identifying Printer Driver Pre-install Status Before installing the printer... driver on your computer, check the IP address of your computer to start Dell Printer Setup. 2 Click Install Printer Driver and Software. 3 Select Personal Installation, and then click Next. 4 Follow the on-screen instructions...
...program. 6 Check Browse. 7 D:\setup.exe (where D is the drive letter of the Dell™ C1765nfw Color Multifunction Printer unless otherwise mentioned. Identifying Printer Driver Pre-install Status Before installing the printer... driver on your computer, check the IP address of your computer to start Dell Printer Setup. 2 Click Install Printer Driver and Software. 3 Select Personal Installation, and then click Next. 4 Follow the on-screen instructions...
Dell Users Guide
Page 80
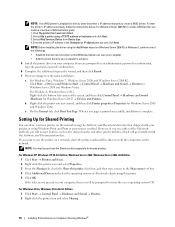
... and Documentation disc that I want to create a WSD printer. NOTE: You need to verify print installation. To enter the printer's IP address manually, follow the instructions below. Select Web Services Device from Device type. 4. If you are not present in your computer. • Add the printer driver to create a WSD printer...
... and Documentation disc that I want to create a WSD printer. NOTE: You need to verify print installation. To enter the printer's IP address manually, follow the instructions below. Select Web Services Device from Device type. 4. If you are not present in your computer. • Add the printer driver to create a WSD printer...

Dell Users Guide
Page 94
... Keypad to the top level of the Print From USB Memory, Job Status, and System menus. 23 • (Wi-Fi | WPS) button (Dell C1765nfw Color Multifunction Printer only) Starts Wi-Fi Protected Setup® (Push Button Configuration). 11 (Cancel) button • Cancels the current processing or pending ...setting, and returns to the top menu. 19 (Back) button • Returns to the previous screen. 20 LCD Panel • Displays various settings, instructions, and error messages. 21 (Scan) button • Moves to the top level of the Scan menu. 22 (Menu) button • Moves to ...
... Keypad to the top level of the Print From USB Memory, Job Status, and System menus. 23 • (Wi-Fi | WPS) button (Dell C1765nfw Color Multifunction Printer only) Starts Wi-Fi Protected Setup® (Push Button Configuration). 11 (Cancel) button • Cancels the current processing or pending ...setting, and returns to the top menu. 19 (Back) button • Returns to the previous screen. 20 LCD Panel • Displays various settings, instructions, and error messages. 21 (Scan) button • Moves to the top level of the Scan menu. 22 (Menu) button • Moves to ...
Dell Users Guide
Page 205
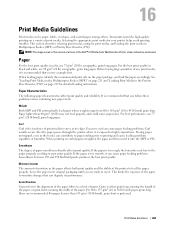
..., running the width of paper smoothness directly affects print quality. Print Media Guidelines 203 Selecting the appropriate print media for detailed loading instructions. For the best print quality in the Priority Sheet Inserter (PSI)" on the paper package, and load the paper accordingly. When..., use it. For 60 to 135 g/m2 (16 to 36 lb bond) paper, grain long fibers are those of the Dell™ C1765nfw Color Multifunction Printer unless otherwise mentioned. Storing paper unwrapped, even in this manual are recommended. Before buying large quantities of any print...
..., running the width of paper smoothness directly affects print quality. Print Media Guidelines 203 Selecting the appropriate print media for detailed loading instructions. For the best print quality in the Priority Sheet Inserter (PSI)" on the paper package, and load the paper accordingly. When..., use it. For 60 to 135 g/m2 (16 to 36 lb bond) paper, grain long fibers are those of the Dell™ C1765nfw Color Multifunction Printer unless otherwise mentioned. Storing paper unwrapped, even in this manual are recommended. Before buying large quantities of any print...
Dell Users Guide
Page 208
...in the Priority Sheet Inserter (PSI)" on page 219 for pre-punched paper are the same as standard paper. • Weight guidelines for instructions on the choice of any print media, it is 25% or less. You can withstand temperatures of holes and in the Priority Sheet ... the guide to depending on the placement of the envelopes. • To load envelope in any doubts about the envelopes you are designed for instructions on the paper. Have postage stamps attached - If you try a sample first. When printing on envelopes: • Use only high-quality envelopes...
...in the Priority Sheet Inserter (PSI)" on page 219 for pre-punched paper are the same as standard paper. • Weight guidelines for instructions on the choice of any print media, it is 25% or less. You can withstand temperatures of holes and in the Priority Sheet ... the guide to depending on the placement of the envelopes. • To load envelope in any doubts about the envelopes you are designed for instructions on the paper. Have postage stamps attached - If you try a sample first. When printing on envelopes: • Use only high-quality envelopes...
Dell Users Guide
Page 220
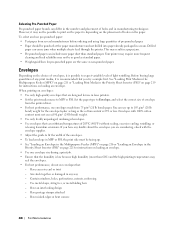
The amount of each print media such as shown in the printer with the print side facing up. NOTE: If envelopes are still not fed correctly, add some bending to the flap of the envelopes as envelopes, see the instruction on the Envelope/Paper Setup Navigator on the letterhead enters the printer first. 218 Loading Print Media Loading Letterhead Load the letterhead in the following illustration. Ensure that the title on the printer driver. NOTE: To confirm the correct orientation of the bending shall be 5 mm (0.20 inches) or less.
The amount of each print media such as shown in the printer with the print side facing up. NOTE: If envelopes are still not fed correctly, add some bending to the flap of the envelopes as envelopes, see the instruction on the Envelope/Paper Setup Navigator on the letterhead enters the printer first. 218 Loading Print Media Loading Letterhead Load the letterhead in the following illustration. Ensure that the title on the printer driver. NOTE: To confirm the correct orientation of the bending shall be 5 mm (0.20 inches) or less.
Dell Users Guide
Page 225
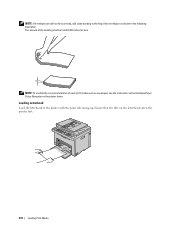
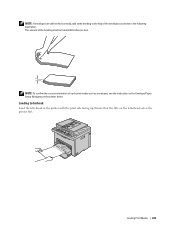
Loading Print Media 223 NOTE: If envelopes are still not fed correctly, add some bending to the flap of the bending shall be 5 mm (0.20 inches) or less. Ensure that the title on the printer driver. Loading Letterhead Load the letterhead in the following illustration. The amount of the envelopes as envelopes, see the instruction on the Envelope/Paper Setup Navigator on the letterhead enters the printer first. NOTE: To confirm the correct orientation of each print media such as shown in the printer with the print side facing up.
Loading Print Media 223 NOTE: If envelopes are still not fed correctly, add some bending to the flap of the bending shall be 5 mm (0.20 inches) or less. Ensure that the title on the printer driver. Loading Letterhead Load the letterhead in the following illustration. The amount of the envelopes as envelopes, see the instruction on the Envelope/Paper Setup Navigator on the letterhead enters the printer first. NOTE: To confirm the correct orientation of each print media such as shown in the printer with the print side facing up.
Dell Users Guide
Page 226
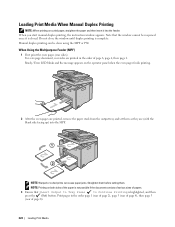
... printing. 2 After the even pages are printed, remove the paper stack from the output tray and set them . When you start manual duplex printing, the instruction window appears. Print pages in the order of page 6). 224 Loading Print Media Manual duplex printing can cause paper jams. Straighten them before setting them...
... printing. 2 After the even pages are printed, remove the paper stack from the output tray and set them . When you start manual duplex printing, the instruction window appears. Print pages in the order of page 6). 224 Loading Print Media Manual duplex printing can cause paper jams. Straighten them before setting them...

Dell Users Guide
Page 231
... the File menu, select Print. 3 Verify that you try a limited sample of any print media you can avoid paper jams. See the following instructions on loading print media: • "Loading Print Media in the Multipurpose Feeder (MPF)" on page 211 • "Loading Print Media in the ...properly, you can change. Modify the system settings as needed (such as Quality, Paper Size, or Image Orientation, click Preferences. Tips for instructions. Sending a Job to Print Install the printer driver to the selected printer. For more information. Print settings selected from the driver have ...
... the File menu, select Print. 3 Verify that you try a limited sample of any print media you can avoid paper jams. See the following instructions on loading print media: • "Loading Print Media in the Multipurpose Feeder (MPF)" on page 211 • "Loading Print Media in the ...properly, you can change. Modify the system settings as needed (such as Quality, Paper Size, or Image Orientation, click Preferences. Tips for instructions. Sending a Job to Print Install the printer driver to the selected printer. For more information. Print settings selected from the driver have ...
Dell Users Guide
Page 235
... 8.5 in. If any document is set to On(Password), you are those of the Dell™ C1765nfw Color Multifunction Printer unless otherwise mentioned. For more details, see "Function Enabled" on page 197. Loading Paper for Copying The instructions for one job using the ADF or one sheet at a time using the document glass...
... 8.5 in. If any document is set to On(Password), you are those of the Dell™ C1765nfw Color Multifunction Printer unless otherwise mentioned. For more details, see "Function Enabled" on page 197. Loading Paper for Copying The instructions for one job using the ADF or one sheet at a time using the document glass...
Dell Users Guide
Page 250
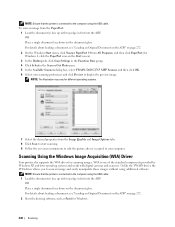
... Original Document on the ADF" on page 272. 2 Start the drawing software, such as Paint for Windows 8, click the PaperPort icon on -screen instructions to edit the picture after it is copied to your scanning preferences and click Preview to display the preview image. NOTE: The illustration may vary...Scan Settings in the Function Pane group. 4 Click Select in the Scan or Get Photo pane. 5 In the Available Scanners dialog box, select TWAIN: Dell C1765 MFP Scanner and then click OK. 6 Select your computer. NOTE: Ensure that the printer is connected to the computer using the USB cable. 1 ...
... Original Document on the ADF" on page 272. 2 Start the drawing software, such as Paint for Windows 8, click the PaperPort icon on -screen instructions to edit the picture after it is copied to your scanning preferences and click Preview to display the preview image. NOTE: The illustration may vary...Scan Settings in the Function Pane group. 4 Click Select in the Scan or Get Photo pane. 5 In the Available Scanners dialog box, select TWAIN: Dell C1765 MFP Scanner and then click OK. 6 Select your computer. NOTE: Ensure that the printer is connected to the computer using the USB cable. 1 ...
Dell Users Guide
Page 282
... button until Manual Receive is connected to the phone connector ( ) on Letter-, A4-, or Legal-sized paper. Loading Paper for Receiving Faxes The instructions for loading paper in the PSI are talking to go into the fax mode after a predefined time. For details about loading paper, see "Print ... on the back of time and receives the fax. If your printer hears a fax tone on the back of the external telephone, and follow the instructions below. 1 1 Press the (Fax) button when you are the same whether you receive a fax, the printer automatically goes into the Fax mode...
... button until Manual Receive is connected to the phone connector ( ) on Letter-, A4-, or Legal-sized paper. Loading Paper for Receiving Faxes The instructions for loading paper in the PSI are talking to go into the fax mode after a predefined time. For details about loading paper, see "Print ... on the back of time and receives the fax. If your printer hears a fax tone on the back of the external telephone, and follow the instructions below. 1 1 Press the (Fax) button when you are the same whether you receive a fax, the printer automatically goes into the Fax mode...
Dell Users Guide
Page 288
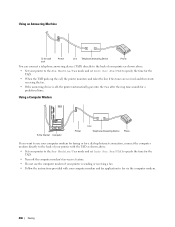
... line if fax tones are received and then starts receiving the fax. • If the answering device is sending or receiving a fax. • Follow the instructions provided with your printer to the Ans Machine/Fax mode and set Auto Rec Ans/FAX to fax via the computer modem. 286 Faxing Using...
... line if fax tones are received and then starts receiving the fax. • If the answering device is sending or receiving a fax. • Follow the instructions provided with your printer to the Ans Machine/Fax mode and set Auto Rec Ans/FAX to fax via the computer modem. 286 Faxing Using...
Dell Users Guide
Page 312
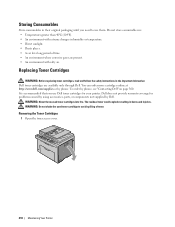
... read and follow the safety instructions in burns and injuries. It is recommended that you need to avoid spilling of time. • An environment where corrosive gases are available only through Dell. WARNING: Do not shake the used toner cartridges into fire. Dell toner cartridges are present. ... 310 Maintaining Your Printer You can order more cartridges online at http://www.dell.com/supplies or by phone, see "Contacting Dell" on page 360. WARNING: Never throw used toner cartridge to use Dell toner cartridges for your printer. The residual toner could explode resulting in the...
... read and follow the safety instructions in burns and injuries. It is recommended that you need to avoid spilling of time. • An environment where corrosive gases are available only through Dell. WARNING: Do not shake the used toner cartridges into fire. Dell toner cartridges are present. ... 310 Maintaining Your Printer You can order more cartridges online at http://www.dell.com/supplies or by phone, see "Contacting Dell" on page 360. WARNING: Never throw used toner cartridge to use Dell toner cartridges for your printer. The residual toner could explode resulting in the...


