User Guide
Page 3
... specialty media 56 Setting the paper size and type...56 Configuring Universal paper settings...56 Loading trays...56 Loading the multipurpose feeder...61 Using the standard bin and paper stop 66 Linking and unlinking trays...67 Linking and unlinking trays ...67 Creating a custom name for a paper type ...67 Assigning a custom paper type...
... specialty media 56 Setting the paper size and type...56 Configuring Universal paper settings...56 Loading trays...56 Loading the multipurpose feeder...61 Using the standard bin and paper stop 66 Linking and unlinking trays...67 Linking and unlinking trays ...67 Creating a custom name for a paper type ...67 Assigning a custom paper type...
User Guide
Page 6
...xx 246 Troubleshooting 249 Understanding the printer messages...249 Solving printer problems...264 Solving print problems...270 Solving copy problems...295 Leave paper in bin. [45y.xx 241 [x]-page jam, remove all pages from the finisher's accumulator. Contents 6 Ordering an ADF separator roller ...218 ...Avoiding jams...230 Understanding jam messages and locations 231 [x]‑page jam, open automatic feeder top cover. [28y.xx 232 [x]‑page jam, clear standard bin. [20y.xx 233 [x]‑page jam, open rear door. [20y.xx 233 [x]‑page jam, open front door. [20y.xx 235 ...
...xx 246 Troubleshooting 249 Understanding the printer messages...249 Solving printer problems...264 Solving print problems...270 Solving copy problems...295 Leave paper in bin. [45y.xx 241 [x]-page jam, remove all pages from the finisher's accumulator. Contents 6 Ordering an ADF separator roller ...218 ...Avoiding jams...230 Understanding jam messages and locations 231 [x]‑page jam, open automatic feeder top cover. [28y.xx 232 [x]‑page jam, clear standard bin. [20y.xx 233 [x]‑page jam, open rear door. [20y.xx 233 [x]‑page jam, open front door. [20y.xx 235 ...
User Guide
Page 13
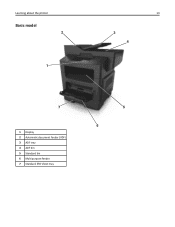
Learning about the printer Basic model 2 1 13 3 4 7 1 Display 2 Automatic document feeder (ADF) 3 ADF tray 4 ADF bin 5 Standard bin 6 Multipurpose feeder 7 Standard 550‑sheet tray 5 6
Learning about the printer Basic model 2 1 13 3 4 7 1 Display 2 Automatic document feeder (ADF) 3 ADF tray 4 ADF bin 5 Standard bin 6 Multipurpose feeder 7 Standard 550‑sheet tray 5 6
User Guide
Page 66
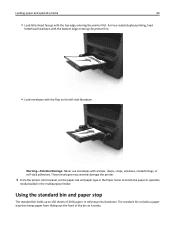
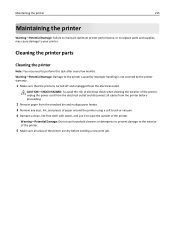
... use envelopes with the flap on the left side facedown. The standard bin includes a paper stop The standard bin holds up to match the paper or specialty media loaded in the Paper menu to 150 sheets of the bin as it stacks. Using the standard bin and paper stop that keeps paper from sliding out the front...
... use envelopes with the flap on the left side facedown. The standard bin includes a paper stop The standard bin holds up to match the paper or specialty media loaded in the Paper menu to 150 sheets of the bin as it stacks. Using the standard bin and paper stop that keeps paper from sliding out the front...
User Guide
Page 164
... Forms and Favorites menus. • "Do not display" is Off or set to only one page at a time. Specify the brightness of light from the standard output bin. is the factory default setting. Note: On is the U.S. For each icon, select from the scanner glass to Paper. Notes: • MM‑DD...
... Forms and Favorites menus. • "Do not display" is Off or set to only one page at a time. Specify the brightness of light from the standard output bin. is the factory default setting. Note: On is the U.S. For each icon, select from the scanner glass to Paper. Notes: • MM‑DD...
User Guide
Page 178
... incoming fax jobs. Note: Standard Bin is the factory default setting. Print the transmission information at which faxes are received. Enable forwarding of the time or according to set schedule. Enable ... ID or fax ID specified. Understanding the printer menus 178 Use Separator Sheets Off Before Job After Job Separator Sheet Source Tray [x] Manual Feeder Output Bin Standard Bin Bin [x] Fax Footer On Off Max Speed 2400 4800 9600 14400 33600 Fax Forwarding Print Print and Forward Forward Forward to Fax E‑mail FTP LDSS...
... incoming fax jobs. Note: Standard Bin is the factory default setting. Print the transmission information at which faxes are received. Enable forwarding of the time or according to set schedule. Enable ... ID or fax ID specified. Understanding the printer menus 178 Use Separator Sheets Off Before Job After Job Separator Sheet Source Tray [x] Manual Feeder Output Bin Standard Bin Bin [x] Fax Footer On Off Max Speed 2400 4800 9600 14400 33600 Fax Forwarding Print Print and Forward Forward Forward to Fax E‑mail FTP LDSS...
User Guide
Page 179
... Tray [x] Manual Feeder Logs Display Remote Station Name Dialed Number Enable Job Log On Off Enable Call Log On Off Log Output Bin Standard Bin Bin [x] To Specify whether prints are printed. Note: Print log is the factory default setting. Specify whether printed logs display the dialed... Call log. Note: Print Never is the factory default setting. Note: On is the factory default setting. Specify the bin where fax logs are stapled. Note: Standard Bin is the factory default setting. Notes: • On is the factory default setting. Understanding the printer menus 179 Use...
... Tray [x] Manual Feeder Logs Display Remote Station Name Dialed Number Enable Job Log On Off Enable Call Log On Off Log Output Bin Standard Bin Bin [x] To Specify whether prints are printed. Note: Print log is the factory default setting. Specify whether printed logs display the dialed... Call log. Note: Print Never is the factory default setting. Note: On is the factory default setting. Specify the bin where fax logs are stapled. Note: Standard Bin is the factory default setting. Notes: • On is the factory default setting. Understanding the printer menus 179 Use...
User Guide
Page 215
... printer is turned off and unplugged from the electrical outlet and disconnect all areas of the printer are dry before proceeding. 2 Remove paper from the standard bin and multipurpose feeder. 3 Remove any dust, lint, and pieces of paper around the printer using a soft brush or vacuum. 4 Dampen a clean, lint-free cloth with...
... printer is turned off and unplugged from the electrical outlet and disconnect all areas of the printer are dry before proceeding. 2 Remove paper from the standard bin and multipurpose feeder. 3 Remove any dust, lint, and pieces of paper around the printer using a soft brush or vacuum. 4 Dampen a clean, lint-free cloth with...
User Guide
Page 231
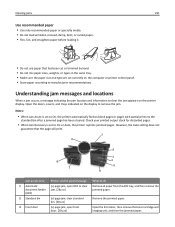
...clear Remove all paper from the ADF tray, and then remove the document feeder jam. [28y.xx] jammed paper. (ADF) 2 Standard bin [x]‑page jam, clear standard bin. [20y.xx] Remove the jammed paper. 3 Front door [x]‑page jam, open front door. [20y.xx] Open the front ... 1 9 8 7 2 3 4 5 6 Jam access area Printer control panel message What to do 1 Automatic [x]‑page jam, open ADF to the standard bin after a jammed page has been cleared. Understanding jam messages and locations When a jam occurs, a message indicating the jam location and information to remove the jam...
...clear Remove all paper from the ADF tray, and then remove the document feeder jam. [28y.xx] jammed paper. (ADF) 2 Standard bin [x]‑page jam, clear standard bin. [20y.xx] Remove the jammed paper. 3 Front door [x]‑page jam, open front door. [20y.xx] Open the front ... 1 9 8 7 2 3 4 5 6 Jam access area Printer control panel message What to do 1 Automatic [x]‑page jam, open ADF to the standard bin after a jammed page has been cleared. Understanding jam messages and locations When a jam occurs, a message indicating the jam location and information to remove the jam...
User Guide
Page 233
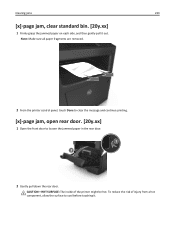
... rear door. 1 2 2 Gently pull down the rear door. To reduce the risk of the printer might be hot. Clearing jams 233 [x]‑page jam, clear standard bin. [20y.xx] 1 Firmly grasp the jammed paper on each side, and then gently pull it . Note: Make sure all paper fragments are removed. 2 From the...
... rear door. 1 2 2 Gently pull down the rear door. To reduce the risk of the printer might be hot. Clearing jams 233 [x]‑page jam, clear standard bin. [20y.xx] 1 Firmly grasp the jammed paper on each side, and then gently pull it . Note: Make sure all paper fragments are removed. 2 From the...
User Guide
Page 241
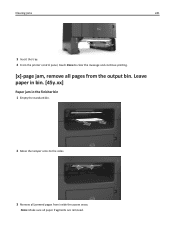
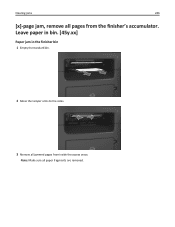
Clearing jams 241 3 Insert the tray. 4 From the printer control panel, touch Done to the sides. 3 Remove all paper fragments are removed. Leave paper in bin. [45y.xx] Paper jam in the finisher bin 1 Empty the standard bin. 2 Move the tamper arms to clear the message and continue printing. [x]-page jam, remove all pages from inside the access areas. Note: Make sure all jammed pages from the output bin.
Clearing jams 241 3 Insert the tray. 4 From the printer control panel, touch Done to the sides. 3 Remove all paper fragments are removed. Leave paper in bin. [45y.xx] Paper jam in the finisher bin 1 Empty the standard bin. 2 Move the tamper arms to clear the message and continue printing. [x]-page jam, remove all pages from inside the access areas. Note: Make sure all jammed pages from the output bin.
User Guide
Page 246
Clearing jams 246 [x]-page jam, remove all paper fragments are removed. Note: Make sure all pages from inside the access areas. Leave paper in bin. [45y.xx] Paper jam in the finisher bin 1 Empty the standard bin. 2 Move the tamper arms to the sides. 3 Remove all jammed pages from the finisher's accumulator.
Clearing jams 246 [x]-page jam, remove all paper fragments are removed. Note: Make sure all pages from inside the access areas. Leave paper in bin. [45y.xx] Paper jam in the finisher bin 1 Empty the standard bin. 2 Move the tamper arms to the sides. 3 Remove all jammed pages from the finisher's accumulator.
User Guide
Page 259
... suitable toner cartridge. Remove defective disk [61] Remove and replace the defective printer hard disk. Remove paper from standard output bin Remove the paper stack from the standard bin. If missing, install the toner cartridge. Replace cartridge, 0 estimated pages remain [88.xy] Replace the toner... cartridge to clear the message and continue printing. Reinstall missing or unresponsive cartridge [31.xy] Try one or more information, visit http://support.dell....
... suitable toner cartridge. Remove defective disk [61] Remove and replace the defective printer hard disk. Remove paper from standard output bin Remove the paper stack from the standard bin. If missing, install the toner cartridge. Replace cartridge, 0 estimated pages remain [88.xy] Replace the toner... cartridge to clear the message and continue printing. Reinstall missing or unresponsive cartridge [31.xy] Try one or more information, visit http://support.dell....
User Guide
Page 314
....xx] 246 [x]‑page jam, clear manual feeder. [25y.xx] 239 [x]‑page jam, clear standard bin. [20y.xx] 233 [x]‑page jam, open automatic feeder top cover. [28y.xx] 232 [x]‑page jam, open front door. [20y.xx] 235 [x]‑page ...
....xx] 246 [x]‑page jam, clear manual feeder. [25y.xx] 239 [x]‑page jam, clear standard bin. [20y.xx] 233 [x]‑page jam, open automatic feeder top cover. [28y.xx] 232 [x]‑page jam, open front door. [20y.xx] 235 [x]‑page ...
User Guide
Page 318
... duplex area 238 in front door 235 in manual feeder 239 in rear door 233 in standard bin 233 in staple access door 241 in stapler door 246 in tray [x] 240 Job Accounting ... 196 Reports 145 Security Audit Log 158 Set Date/Time 158 Settings 193 SMTP Setup menu 154 Standard Network 146 Standard USB 152 Substitute Size 139 TCP/IP 149 Universal Setup 144 Utilities 198 Wireless 150 XPS 199 ...148 network setup page printing 55 No analog phone line connected to modem, fax is disabled. 257 Non‑Dell [supply type], see User's Guide [33.xy] 258 non‑volatile memory 211 erasing 212 Not enough free...
... duplex area 238 in front door 235 in manual feeder 239 in rear door 233 in standard bin 233 in staple access door 241 in stapler door 246 in tray [x] 240 Job Accounting ... 196 Reports 145 Security Audit Log 158 Set Date/Time 158 Settings 193 SMTP Setup menu 154 Standard Network 146 Standard USB 152 Substitute Size 139 TCP/IP 149 Universal Setup 144 Utilities 198 Wireless 150 XPS 199 ...148 network setup page printing 55 No analog phone line connected to modem, fax is disabled. 257 Non‑Dell [supply type], see User's Guide [33.xy] 258 non‑volatile memory 211 erasing 212 Not enough free...
User Guide
Page 319
... cover 232 in duplex area 238 in finisher rear door 241, 246 in front door 235 in manual feeder 239 in rear door 233 in standard bin 233 in staple access door 241 in stapler door 246 in tray [x] 240 Paper Loading menu 142 paper size setting 56 Paper Size/Type menu...
... cover 232 in duplex area 238 in finisher rear door 241, 246 in front door 235 in manual feeder 239 in rear door 233 in standard bin 233 in staple access door 241 in stapler door 246 in tray [x] 240 Paper Loading menu 142 paper size setting 56 Paper Size/Type menu...
User Guide
Page 320
...disk encryption 213 printer hard disk memory erasing 212 printer information where to restart. Leave paper in bin. [45y.xx] 241 [x]‑page jam, clear manual feeder. [25y.xx] 239 [x]‑page jam, clear standard bin. [20y.xx] 233 [x]‑page jam, open automatic feeder top cover. [28y.xx] ...[paper source] [34] 254 Insufficient memory for use in this device 252 Disk near full. Leave paper in bin. [45y.xx] 246 [x]-page jam, remove all pages from the output bin. Contact system administrator. 253 Fax Station Name not set up . Contact system administrator. 252 Fax server 'To ...
...disk encryption 213 printer hard disk memory erasing 212 printer information where to restart. Leave paper in bin. [45y.xx] 241 [x]‑page jam, clear manual feeder. [25y.xx] 239 [x]‑page jam, clear standard bin. [20y.xx] 233 [x]‑page jam, open automatic feeder top cover. [28y.xx] ...[paper source] [34] 254 Insufficient memory for use in this device 252 Disk near full. Leave paper in bin. [45y.xx] 246 [x]-page jam, remove all pages from the output bin. Contact system administrator. 253 Fax Station Name not set up . Contact system administrator. 252 Fax server 'To ...
User Guide
Page 321
...unresponsive cartridge [31.xy] 259 Reinstall missing or unresponsive imaging unit [31.xy] 260 Remove defective disk [61] 259 Remove paper from standard output bin 259 Replace all originals if restarting job. 260 Replace cartridge, 0 estimated pages remain [88.xy] 259 Replace cartridge, printer region mismatch... options troubleshooting internal option is disabled. 257 Non‑Dell [supply type], see User's Guide [33.xy] 258 Not enough free space in bin. [45y.xx] 241 Remove defective disk [61] 259 Remove paper from standard output bin 259 removing printer hard disk 42 repeat print jobs 82...
...unresponsive cartridge [31.xy] 259 Reinstall missing or unresponsive imaging unit [31.xy] 260 Remove defective disk [61] 259 Remove paper from standard output bin 259 Replace all originals if restarting job. 260 Replace cartridge, 0 estimated pages remain [88.xy] 259 Replace cartridge, printer region mismatch... options troubleshooting internal option is disabled. 257 Non‑Dell [supply type], see User's Guide [33.xy] 258 Not enough free space in bin. [45y.xx] 241 Remove defective disk [61] 259 Remove paper from standard output bin 259 removing printer hard disk 42 repeat print jobs 82...
User Guide
Page 323
Index 323 DSL connection 110 standard telephone line connection 106 VoIP connection 111 setting up fax and e‑mail functions 299 setting up serial printing 54 setting up the printer on ... Messenger 227 Status Monitor Center 227 Supplies Ordering Utility 217 Some held jobs were not restored 262 standard bin, using 66 Standard Network menu 146 Standard network software error 54] 262 standard tray loading 56 Standard USB menu 152 Standard USB port disabled [56] 262 staple cartridge replacing 223 statement of volatility 211 Status Monitor Center accessing...
Index 323 DSL connection 110 standard telephone line connection 106 VoIP connection 111 setting up fax and e‑mail functions 299 setting up serial printing 54 setting up the printer on ... Messenger 227 Status Monitor Center 227 Supplies Ordering Utility 217 Some held jobs were not restored 262 standard bin, using 66 Standard Network menu 146 Standard network software error 54] 262 standard tray loading 56 Standard USB menu 152 Standard USB port disabled [56] 262 staple cartridge replacing 223 statement of volatility 211 Status Monitor Center accessing...


