User Guide
Page 26
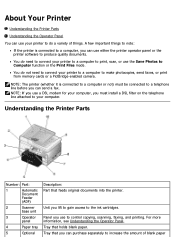
NOTE: If you use the Save Photos to Computer function or the Print Files mode. Understanding the Printer Parts Number: Part: 1 Automatic Document Feeder (ADF) 2 Scanner base unit 3 Operator panel 4 Paper tray 5 Optional Description: Part that holds blank ...paper. Unit you must be connected to produce quality documents. Tray that feeds original documents into the printer. About Your Printer Understanding the Printer Parts Understanding the Operator Panel You can purchase separately to increase the amount of things. You do not need to connect ...
NOTE: If you use the Save Photos to Computer function or the Print Files mode. Understanding the Printer Parts Number: Part: 1 Automatic Document Feeder (ADF) 2 Scanner base unit 3 Operator panel 4 Paper tray 5 Optional Description: Part that holds blank ...paper. Unit you must be connected to produce quality documents. Tray that feeds original documents into the printer. About Your Printer Understanding the Printer Parts Understanding the Operator Panel You can purchase separately to increase the amount of things. You do not need to connect ...
User Guide
Page 27
... set of printer that holds your document or photo flat while you use to connect your PictBridge-enabled digital camera or a connector USB key to scan, copy, or fax multiple-page tray documents. 11 Express Service Code Identify your printer when you scan it exits the printer. ADF exit...stop straight out to direct your call when contacting technical support. paper tray that your printer can also pick up your original document here after it . 7 PictBridge The connector you use support.dell.com or contact technical support. To view other image types stored on the memory card...
... set of printer that holds your document or photo flat while you use to connect your PictBridge-enabled digital camera or a connector USB key to scan, copy, or fax multiple-page tray documents. 11 Express Service Code Identify your printer when you scan it exits the printer. ADF exit...stop straight out to direct your call when contacting technical support. paper tray that your printer can also pick up your original document here after it . 7 PictBridge The connector you use support.dell.com or contact technical support. To view other image types stored on the memory card...

User Guide
Page 29
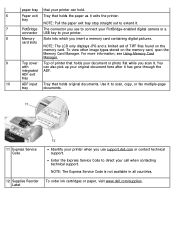
... return to the previous menu or screen. Select an image to be printed (in progress. Cancel a scan, print, or copy job in Photo mode). Navigate menus and menu items. Decrease/increase the number of copies. Select a menu item. Return to the default settings. Change the ...selected modes. Initiate a paper feed by holding the button for three seconds. Cancel a copy job (using only the printer), and eject the page. door (beneath the optional duplex unit) Understanding the Operator Panel Number Use the: 1 LCD display 2 Menu button 3 ...
... return to the previous menu or screen. Select an image to be printed (in progress. Cancel a scan, print, or copy job in Photo mode). Navigate menus and menu items. Decrease/increase the number of copies. Select a menu item. Return to the default settings. Change the ...selected modes. Initiate a paper feed by holding the button for three seconds. Cancel a copy job (using only the printer), and eject the page. door (beneath the optional duplex unit) Understanding the Operator Panel Number Use the: 1 LCD display 2 Menu button 3 ...
User Guide
Page 31
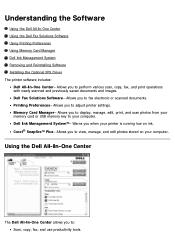
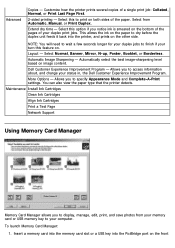
...™- Printing Preferences- Allows you to display, manage, edit, print, and scan photos from your computer. Allows you to view, manage, and edit photos stored on ink. Using the Dell All-In-One Center The Dell All-In-One Center allows you when your printer is running low on your memory card or USB memory key to...
...™- Printing Preferences- Allows you to display, manage, edit, print, and scan photos from your computer. Allows you to view, manage, and edit photos stored on ink. Using the Dell All-In-One Center The Dell All-In-One Center allows you when your printer is running low on your memory card or USB memory key to...
User Guide
Page 32
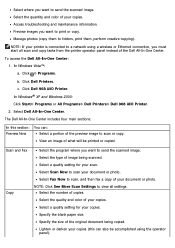
... settings. Specify the size of the Dell All-In-One Center. Manage photos (copy them , perform creative copying). Click Dell Printers. Select Dell All-In-One Center. Lighten or darken your copies. Select the quantity and color of copies. Click Dell 968 AIO Printer. Access troubleshooting and maintenance information. To access the Dell All-In-One Center: 1. c. Select the number of your...
... settings. Specify the size of the Dell All-In-One Center. Manage photos (copy them , perform creative copying). Click Dell Printers. Select Dell All-In-One Center. Lighten or darken your copies. Select the quantity and color of copies. Click Dell 968 AIO Printer. Access troubleshooting and maintenance information. To access the Dell All-In-One Center: 1. c. Select the number of your...
User Guide
Page 35
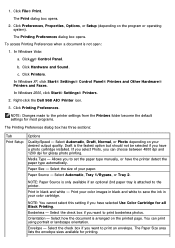
... arranged on the printed page. Click Hardware and Sound. In Windows 2000, click Start® Settings® Printers. 2. Right-click the Dell 968 AIO Printer icon. 3. NOTE: Changes made to print borderless photos. Select Automatic, Draft, Normal, or Photo depending on the program or operating system). Select Automatic, Tray 1/Bypass, or Tray 2. Print in black and...
... arranged on the printed page. Click Hardware and Sound. In Windows 2000, click Start® Settings® Printers. 2. Right-click the Dell 968 AIO Printer icon. 3. NOTE: Changes made to print borderless photos. Select Automatic, Draft, Normal, or Photo depending on the program or operating system). Select Automatic, Tray 1/Bypass, or Tray 2. Print in black and...
User Guide
Page 36
...to access information about, and change your duplex print jobs. Insert a memory card into the memory card slot or a USB key into the printer, and prints on the front Select from your memory card or USB memory key to finish if your computer. Layout - NOTE: You will need...: 1. This allows the ink on the paper to display, manage, edit, print, and save photos from Automatic, Manual, or Print Duplex. You can also view the paper type that the printer detects. Dell Customer Experience Improvement Program - Select this option if you to print on image content. Extend dry ...
...to access information about, and change your duplex print jobs. Insert a memory card into the memory card slot or a USB key into the printer, and prints on the front Select from your memory card or USB memory key to finish if your computer. Layout - NOTE: You will need...: 1. This allows the ink on the paper to display, manage, edit, print, and save photos from Automatic, Manual, or Print Duplex. You can also view the paper type that the printer detects. Dell Customer Experience Improvement Program - Select this option if you to print on image content. Extend dry ...

User Guide
Page 41
Copy menu item Color Settings Specify the color of copies. Understanding the Operator Panel Menus Copy Mode Photo Mode Print Files Mode Fax Mode Scan Mode Setup Mode Maintenance Mode PictBridge Mode Bluetooth Mode Copy Mode Main Menu Copy Mode Main Menu Color ...Copies Reduce/Enlarge Quality Lighter/Darker Paper Handling Collate 2-Sided Copies N-up or down Arrow button to scroll to the printer. From the main menu, press the up Layout Original Size Content Type Change Default Settings Mode Submenu Paper Handling NOTE: The 2-Sided Copies menu only...
Copy menu item Color Settings Specify the color of copies. Understanding the Operator Panel Menus Copy Mode Photo Mode Print Files Mode Fax Mode Scan Mode Setup Mode Maintenance Mode PictBridge Mode Bluetooth Mode Copy Mode Main Menu Copy Mode Main Menu Color ...Copies Reduce/Enlarge Quality Lighter/Darker Paper Handling Collate 2-Sided Copies N-up or down Arrow button to scroll to the printer. From the main menu, press the up Layout Original Size Content Type Change Default Settings Mode Submenu Paper Handling NOTE: The 2-Sided Copies menu only...
User Guide
Page 42
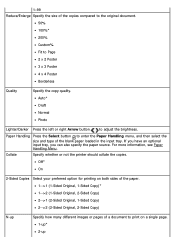
For more information, see Paper Handling Menu. Collate Specify whether or not the printer should collate the copies. 1-99 Reduce/Enlarge Specify the size of the blank paper loaded in the input tray. Paper Handling Press the Select button ... or pages of a document to adjust the brightness. If you have an optional input tray, you can also specify the paper source. Auto* Draft Normal Photo Lighter/Darker Press the left or right Arrow button to print on a single page. 1-up* 2-up
For more information, see Paper Handling Menu. Collate Specify whether or not the printer should collate the copies. 1-99 Reduce/Enlarge Specify the size of the blank paper loaded in the input tray. Paper Handling Press the Select button ... or pages of a document to adjust the brightness. If you have an optional input tray, you can also specify the paper source. Auto* Draft Normal Photo Lighter/Darker Press the left or right Arrow button to print on a single page. 1-up* 2-up
User Guide
Page 44
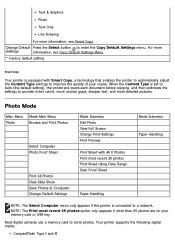
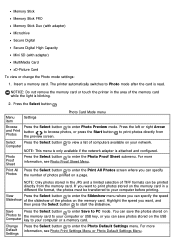
... detailed pictures. Your printer supports the following digital media: CompactFlash Type I and II Change Default Press the Select button to store photos. For more than 25 photos are on your copies. Photo Mode Main Menu Mode Main Menu Photo Browse and Print Photos Select Computer Photo Proof Sheet Print All Photos View Slide Show Save Photos to Computer Change...
... detailed pictures. Your printer supports the following digital media: CompactFlash Type I and II Change Default Press the Select button to store photos. For more than 25 photos are on your copies. Photo Mode Main Menu Mode Main Menu Photo Browse and Print Photos Select Computer Photo Proof Sheet Print All Photos View Slide Show Save Photos to Computer Change...
User Guide
Page 45
... slideshow. NOTICE: Do not remove the memory card or touch the printer in a different file format, the photos must be printed directly from Photos the preview screen. If you want , and then press the Select button to Photo mode after the card is blinking. 2. Highlight the speed you can... Mini SD (with adapter) MultiMedia Card xD-Picture Card To view or change the Photo mode settings: 1. Photo Proof Sheet Press the Select button to enter the Photo Default Settings menu. NOTE: Only photos stored in the JPG and a limited selection of TIFF formats can specify the speed ...
... slideshow. NOTICE: Do not remove the memory card or touch the printer in a different file format, the photos must be printed directly from Photos the preview screen. If you want , and then press the Select button to Photo mode after the card is blinking. 2. Highlight the speed you can... Mini SD (with adapter) MultiMedia Card xD-Picture Card To view or change the Photo mode settings: 1. Photo Proof Sheet Press the Select button to enter the Photo Default Settings menu. NOTE: Only photos stored in the JPG and a limited selection of TIFF formats can specify the speed ...
User Guide
Page 46
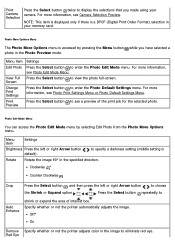
...the image 90° in the image to eliminate red eye. Off* On Remove Specify whether or not the printer adjusts color in the specified direction. Photo More Options Menu The Photo More Options menu is a DPOF (Digital Print Order Format) selection in your camera. Press the Select button ...repeatedly to Auto Enhance shrink or expand the area of the print job for the selected photo. Specify whether or not the printer automatically adjusts the image. Red Eye NOTE: This item is displayed only if there is accessed by selecting Edit...
...the image 90° in the image to eliminate red eye. Off* On Remove Specify whether or not the printer adjusts color in the specified direction. Photo More Options Menu The Photo More Options menu is a DPOF (Digital Print Order Format) selection in your camera. Press the Select button ...repeatedly to Auto Enhance shrink or expand the area of the print job for the selected photo. Specify whether or not the printer automatically adjusts the image. Red Eye NOTE: This item is displayed only if there is accessed by selecting Edit...
User Guide
Page 49
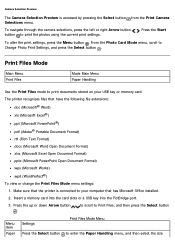
... the camera selections, press the left or right Arrow button button to enter the Paper Handling menu, and then select the size The printer recognizes files that the printer is accessed by pressing the Select button from the Print Camera Selections menu. Make sure that have the following file extensions: .doc (Microsoft... scroll to Print Files, and then press the Select button Menu item Paper Settings Print Files Mode Menu Press the Select button to print the photos using the current print settings. . Press the up or down Arrow button . From the...
... the camera selections, press the left or right Arrow button button to enter the Paper Handling menu, and then select the size The printer recognizes files that the printer is accessed by pressing the Select button from the Print Camera Selections menu. Make sure that have the following file extensions: .doc (Microsoft... scroll to Print Files, and then press the Select button Menu item Paper Settings Print Files Mode Menu Press the Select button to print the photos using the current print settings. . Press the up or down Arrow button . From the...
User Guide
Page 65
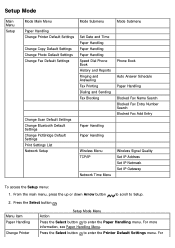
Menu item Paper Handling Change Printer Action Setup Mode Menu Press the Select button to enter the Printer Default Settings menu. For more information, see Paper Handling Menu. Press the Select button to enter the Paper Handling menu. Setup... Mode Main Menu Setup Mode Main Menu Mode Submenu Mode Submenu Paper Handling Change Printer Default Settings Change Copy Default Settings Change Photo Default Settings Change Fax Default Settings Change Scan Default Settings Change Bluetooth Default Settings Change PictBridge Default Settings Print Settings...
Menu item Paper Handling Change Printer Action Setup Mode Menu Press the Select button to enter the Printer Default Settings menu. For more information, see Paper Handling Menu. Press the Select button to enter the Paper Handling menu. Setup... Mode Main Menu Setup Mode Main Menu Mode Submenu Mode Submenu Paper Handling Change Printer Default Settings Change Copy Default Settings Change Photo Default Settings Change Fax Default Settings Change Scan Default Settings Change Bluetooth Default Settings Change PictBridge Default Settings Print Settings...

User Guide
Page 66
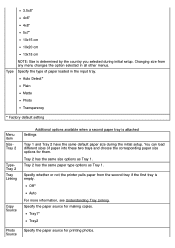
...List Press the Select button to enter the PictBridge Default Settings menu. For more information, see Photo Default Settings Menu. Change Bluetooth Press the Select button to enter the Photo Default Settings menu. For more information, Settings see Fax Setup Menu. Default Settings For more ... paper source. Network Setup Press the Select button to enter the Copy Default Settings menu. Menu Settings item Paper Handling menu for printer with one input tray Size Specify the size of the blank paper loaded in the input tray. 8.5x11"* 8.5x14" A4* B5 A5 ...
...List Press the Select button to enter the PictBridge Default Settings menu. For more information, see Photo Default Settings Menu. Change Bluetooth Press the Select button to enter the Photo Default Settings menu. For more information, Settings see Fax Setup Menu. Default Settings For more ... paper source. Network Setup Press the Select button to enter the Copy Default Settings menu. Menu Settings item Paper Handling menu for printer with one input tray Size Specify the size of the blank paper loaded in the input tray. 8.5x11"* 8.5x14" A4* B5 A5 ...
User Guide
Page 67
...same size options as Tray 1. Tray 2 has the same paper type options as Tray 1. Specify the paper source for printing photos. Specify whether or not the printer pulls paper from any menu changes the option selected in the input tray. 3.5x5" 4x6" 4x8" 5x7" 10x15 cm ...Auto For more information, see Understanding Tray Linking. You can load different sizes of paper loaded in all other menus. Auto Detect* Plain Matte Photo Transparency * Factory default setting Menu item SizeTray 2 TypeTray 2 Tray Linking Copy Source Additional options available when a second paper tray is attached ...
...same size options as Tray 1. Tray 2 has the same paper type options as Tray 1. Specify the paper source for printing photos. Specify whether or not the printer pulls paper from any menu changes the option selected in the input tray. 3.5x5" 4x6" 4x8" 5x7" 10x15 cm ...Auto For more information, see Understanding Tray Linking. You can load different sizes of paper loaded in all other menus. Auto Detect* Plain Matte Photo Transparency * Factory default setting Menu item SizeTray 2 TypeTray 2 Tray Linking Copy Source Additional options available when a second paper tray is attached ...
User Guide
Page 68
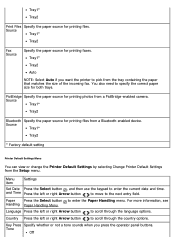
...Off PictBridge Specify the paper source for printing files. Source Tray1* Tray2 * Factory default setting Printer Default Settings Menu You can view or change the Printer Default Settings by selecting Change Printer Default Settings from the Setup menu. Paper Press the Select button to specify the correct paper...buttons. You also need to enter the Paper Handling menu. Key Press Specify whether or not a tone sounds when you want the printer to pick from the tray containing the paper that matches the size of the incoming fax. Tray1* Tray2 Print Files Specify the paper...
...Off PictBridge Specify the paper source for printing files. Source Tray1* Tray2 * Factory default setting Printer Default Settings Menu You can view or change the Printer Default Settings by selecting Change Printer Default Settings from the Setup menu. Paper Press the Select button to specify the correct paper...buttons. You also need to enter the Paper Handling menu. Key Press Specify whether or not a tone sounds when you want the printer to pick from the tray containing the paper that matches the size of the incoming fax. Tray1* Tray2 Print Files Specify the paper...
User Guide
Page 69
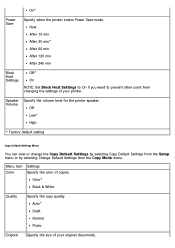
.... Menu item Settings Color Specify the color of your original documents. Speaker Volume Specify the volume level for the printer speaker. Off Low* High * Factory default setting Copy Default Settings Menu You can view or change the Copy ... or by selecting Change Default Settings from changing the settings of copies. On* Power Save Specify when the printer enters Power Save mode. Now After 10 min After 30 min* After 60 min After 120 min After 240... want to prevent other users from the Copy Mode menu. Auto* Draft Normal Photo Original Specify the size of your printer.
.... Menu item Settings Color Specify the color of your original documents. Speaker Volume Specify the volume level for the printer speaker. Off Low* High * Factory default setting Copy Default Settings Menu You can view or change the Copy ... or by selecting Change Default Settings from changing the settings of copies. On* Power Save Specify when the printer enters Power Save mode. Now After 10 min After 30 min* After 60 min After 120 min After 240... want to prevent other users from the Copy Mode menu. Auto* Draft Normal Photo Original Specify the size of your printer.
User Guide
Page 76
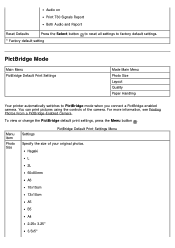
PictBridge Mode Main Menu PictBridge Default Print Settings Mode Main Menu Photo Size Layout Quality Paper Handling Your printer automatically switches to factory default settings. For more information, see Printing Photos From a PictBridge-Enabled Camera. To view or change the PictBridge default print settings, press the ... Factory default setting to reset all settings to PictBridge mode when you connect a PictBridge-enabled camera. Menu item Photo Size Settings PictBridge Default Print Settings Menu Specify the size of the camera. You can print pictures using the controls of ...
PictBridge Mode Main Menu PictBridge Default Print Settings Mode Main Menu Photo Size Layout Quality Paper Handling Your printer automatically switches to factory default settings. For more information, see Printing Photos From a PictBridge-Enabled Camera. To view or change the PictBridge default print settings, press the ... Factory default setting to reset all settings to PictBridge mode when you connect a PictBridge-enabled camera. Menu item Photo Size Settings PictBridge Default Print Settings Menu Specify the size of the camera. You can print pictures using the controls of ...
User Guide
Page 92
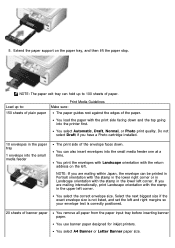
NOTE: The paper exit tray can hold up to 100 sheets of the paper. You use banner paper designed for inkjet printers. You select Automatic, Draft, Normal, or Photo print quality. NOTE: If you are mailing internationally, print Landscape orientation with the print side facing down . Select the next biggest ... margins so your envelope text is correctly positioned. 20 sheets of the envelope faces down and the top going into the small media feeder one at a time. You select the correct envelope size. You can be printed in Portrait orientation with the stamp in the lower right corner...
NOTE: The paper exit tray can hold up to 100 sheets of the paper. You use banner paper designed for inkjet printers. You select Automatic, Draft, Normal, or Photo print quality. NOTE: If you are mailing internationally, print Landscape orientation with the print side facing down . Select the next biggest ... margins so your envelope text is correctly positioned. 20 sheets of the envelope faces down and the top going into the small media feeder one at a time. You select the correct envelope size. You can be printed in Portrait orientation with the stamp in the lower right corner...


