User Guide
Page 26
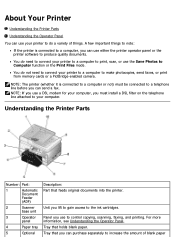
... do a variety of blank paper For more information, see Understanding the Operator Panel. Tray that feeds original documents into the printer. Tray that you use the Save Photos to do not need to connect your computer, you can purchase separately to your computer. NOTE: If you use a DSL... modem for your printer to a computer to print, scan, or use to make photocopies, send faxes, or print from memory cards or a PictBridge...
... do a variety of blank paper For more information, see Understanding the Operator Panel. Tray that feeds original documents into the printer. Tray that you use the Save Photos to do not need to connect your computer, you can purchase separately to your computer. NOTE: If you use a DSL... modem for your printer to a computer to print, scan, or use to make photocopies, send faxes, or print from memory cards or a PictBridge...
User Guide
Page 27
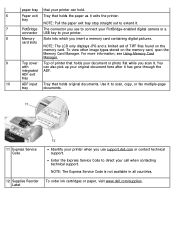
... to connect your PictBridge-enabled digital camera or a connector USB key to your printer. 8 Memory Slots into which you use support.dell.com or contact technical support. Use it to direct your document or photo flat while you scan it. For more information, see Using Memory Card Manager..... 11 Express Service Code Identify your printer when you insert a memory card containing digital pictures. NOTE: The Express Service Code is not available in all countries. 12 Supplies Reorder Label To order ink cartridges or paper, visit www.dell.com/supplies. To view other image ...
... to connect your PictBridge-enabled digital camera or a connector USB key to your printer. 8 Memory Slots into which you use support.dell.com or contact technical support. Use it to direct your document or photo flat while you scan it. For more information, see Using Memory Card Manager..... 11 Express Service Code Identify your printer when you insert a memory card containing digital pictures. NOTE: The Express Service Code is not available in all countries. 12 Supplies Reorder Label To order ink cartridges or paper, visit www.dell.com/supplies. To view other image ...

User Guide
Page 29
... image to be printed (in progress. Exit a menu, and return to the previous menu or screen. Cancel a scan, print, or copy job in Photo mode). Save the changes made on a memory card or digital camera. Navigate menus and menu items. Decrease/increase the number of copies. Initiate a copy,... scan, or fax. Cancel a copy job (using only the printer), and eject the page. Select a menu item. Increase or decrease the values when setting the date and time. Initiate a paper feed by holding the...
... image to be printed (in progress. Exit a menu, and return to the previous menu or screen. Cancel a scan, print, or copy job in Photo mode). Save the changes made on a memory card or digital camera. Navigate menus and menu items. Decrease/increase the number of copies. Initiate a copy,... scan, or fax. Cancel a copy job (using only the printer), and eject the page. Select a menu item. Increase or decrease the values when setting the date and time. Initiate a paper feed by holding the...
User Guide
Page 31
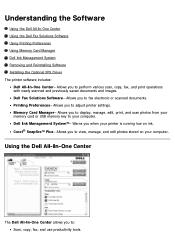
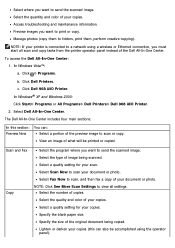
... display, manage, edit, print, and scan photos from your computer. Allows you to perform various scan, copy, fax, and print operations with newly scanned and previously saved documents and images. Allows you to adjust printer settings. Understanding the Software Using the Dell All-In-One Center Using the Dell Fax Solutions Software Using Printing Preferences...
... display, manage, edit, print, and scan photos from your computer. Allows you to perform various scan, copy, fax, and print operations with newly scanned and previously saved documents and images. Allows you to adjust printer settings. Understanding the Software Using the Dell All-In-One Center Using the Dell Fax Solutions Software Using Printing Preferences...
User Guide
Page 32
... the scanned image. Manage photos (copy them to view all scan and copy tasks from the printer operator panel instead of the preview image to a network using the operator panel). Click ® Programs. b. View an image of your scan. In Windows Vista™: a. Click Dell 968 AIO Printer. Select Dell All-In-One Center. Select a quality setting...
... the scanned image. Manage photos (copy them to view all scan and copy tasks from the printer operator panel instead of the preview image to a network using the operator panel). Click ® Programs. b. View an image of your scan. In Windows Vista™: a. Click Dell 968 AIO Printer. Select Dell All-In-One Center. Select a quality setting...
User Guide
Page 35
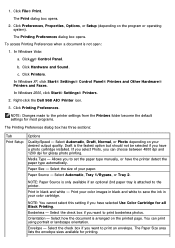
... settings for all Black Printing. NOTE: Changes made to print borderless photos. Right-click the Dell 968 AIO Printer icon. 3. In Windows 2000, click Start® Settings® Printers. 2. Select the check box if you want to set the paper type manually, or have a photo cartridge installed. Click Hardware and Sound. Select how the document is...
... settings for all Black Printing. NOTE: Changes made to print borderless photos. Right-click the Dell 968 AIO Printer icon. 3. In Windows 2000, click Start® Settings® Printers. 2. Select the check box if you want to set the paper type manually, or have a photo cartridge installed. Click Hardware and Sound. Select how the document is...
User Guide
Page 36
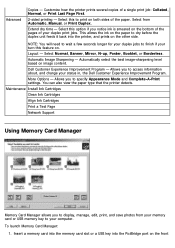
...- Select Normal, Banner, Mirror, N-up, Poster, Booklet, or Borderless. Allows you to display, manage, edit, print, and save photos from Automatic, Manual, or Print Duplex. Select this option if you to your computer. This allows the ink on the paper to finish...NOTE: You will need to wait a few seconds longer for your status in, the Dell Customer Experience Improvement Program. To launch Memory Card Manager: 1. Layout - Dell Customer Experience Improvement Program - Customize how the printer prints several copies of a single print job: Collated, Normal, or Print Last Page...
...- Select Normal, Banner, Mirror, N-up, Poster, Booklet, or Borderless. Allows you to display, manage, edit, print, and save photos from Automatic, Manual, or Print Duplex. Select this option if you to your computer. This allows the ink on the paper to finish...NOTE: You will need to wait a few seconds longer for your status in, the Dell Customer Experience Improvement Program. To launch Memory Card Manager: 1. Layout - Dell Customer Experience Improvement Program - Customize how the printer prints several copies of a single print job: Collated, Normal, or Print Last Page...

User Guide
Page 41
... Menus Copy Mode Photo Mode Print Files Mode Fax Mode Scan Mode Setup Mode Maintenance Mode PictBridge Mode Bluetooth Mode Copy Mode Main Menu Copy Mode Main Menu Color Copies Reduce/Enlarge Quality Lighter/Darker Paper Handling Collate 2-Sided Copies N-up or down Arrow button to scroll to the printer. Copy menu...
... Menus Copy Mode Photo Mode Print Files Mode Fax Mode Scan Mode Setup Mode Maintenance Mode PictBridge Mode Bluetooth Mode Copy Mode Main Menu Copy Mode Main Menu Color Copies Reduce/Enlarge Quality Lighter/Darker Paper Handling Collate 2-Sided Copies N-up or down Arrow button to scroll to the printer. Copy menu...
User Guide
Page 42
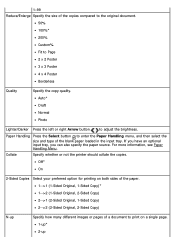
... not the printer should collate the copies. For more information, see Paper Handling Menu. Off* On 2-Sided Copies Select your preferred option for printing on both sides of the paper. 1-->1 (1-Sided Original, 1-Sided Copy)* 1-->2 (1-Sided Original, 2-Sided Copy) 2-->1 (2-Sided Original, 1-Sided Copy) 2-->2 (2-Sided Original, 2-Sided Copy) N-up Auto* Draft Normal Photo Lighter...
... not the printer should collate the copies. For more information, see Paper Handling Menu. Off* On 2-Sided Copies Select your preferred option for printing on both sides of the paper. 1-->1 (1-Sided Original, 1-Sided Copy)* 1-->2 (1-Sided Original, 2-Sided Copy) 2-->1 (2-Sided Original, 1-Sided Copy) 2-->2 (2-Sided Original, 2-Sided Copy) N-up Auto* Draft Normal Photo Lighter...
User Guide
Page 44
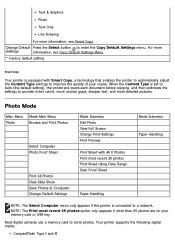
... colors, more neutral grays, sharper text, and more Settings information, see Copy Default Settings Menu. * Factory default setting Smart Copy Your printer is equipped with All X Photos Print most recent 25 photos option only appears if more information, see Smart Copy. When the Content Type is set to Auto (the default setting), the...
... colors, more neutral grays, sharper text, and more Settings information, see Copy Default Settings Menu. * Factory default setting Smart Copy Your printer is equipped with All X Photos Print most recent 25 photos option only appears if more information, see Smart Copy. When the Content Type is set to Auto (the default setting), the...
User Guide
Page 45
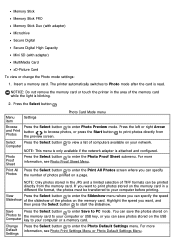
...or right Arrow and Print button to browse photos, or press the Start button to start the slideshow. For more information, see Photo Print Settings Menu or Photo Default Settings Menu. NOTICE: Do not remove the memory card or touch the printer in the area of the memory card while... Secure Digital Secure Digital High Capacity Mini SD (with adapter) MultiMedia Card xD-Picture Card To view or change the Photo mode settings: 1. The printer automatically switches to your network. NOTE: Only photos stored in a different file format, the photos must be printed directly from...
...or right Arrow and Print button to browse photos, or press the Start button to start the slideshow. For more information, see Photo Print Settings Menu or Photo Default Settings Menu. NOTICE: Do not remove the memory card or touch the printer in the area of the memory card while... Secure Digital Secure Digital High Capacity Mini SD (with adapter) MultiMedia Card xD-Picture Card To view or change the Photo mode settings: 1. The printer automatically switches to your network. NOTE: Only photos stored in a different file format, the photos must be printed directly from...
User Guide
Page 46
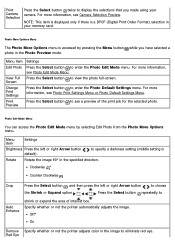
... option . Press the Select button repeatedly to Auto Enhance shrink or expand the area of the print job for the selected photo. Specify whether or not the printer automatically adjusts the image. For more information, see a preview of interest box. For more information, see... Photo Print Settings Menu or Photo Default Settings Menu. Press the Select button to view the photo full-screen. Photo Edit Mode Menu You can access the Photo Edit Mode menu ...
... option . Press the Select button repeatedly to Auto Enhance shrink or expand the area of the print job for the selected photo. Specify whether or not the printer automatically adjusts the image. For more information, see a preview of interest box. For more information, see... Photo Print Settings Menu or Photo Default Settings Menu. Press the Select button to view the photo full-screen. Photo Edit Mode Menu You can access the Photo Edit Mode menu ...
User Guide
Page 49
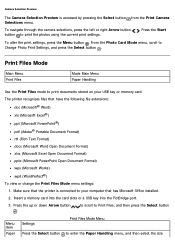
... settings, press the Menu button . Insert a memory card into the card slots or a USB key into the PictBridge port. 3. The printer recognizes files that has Microsoft Office installed. 2. Camera Selection Preview The Camera Selection Preview is connected to print documents stored on your computer that... Open Document Format) .wps (Microsoft Works) .wpd (WordPerfect®) To view or change the Print Files Mode menu settings: 1. From the Photo Card Mode menu, scroll to enter the Paper Handling menu, and then select the size Press the up or down Arrow button . to scroll ...
... settings, press the Menu button . Insert a memory card into the card slots or a USB key into the PictBridge port. 3. The printer recognizes files that has Microsoft Office installed. 2. Camera Selection Preview The Camera Selection Preview is connected to print documents stored on your computer that... Open Document Format) .wps (Microsoft Works) .wpd (WordPerfect®) To view or change the Print Files Mode menu settings: 1. From the Photo Card Mode menu, scroll to enter the Paper Handling menu, and then select the size Press the up or down Arrow button . to scroll ...
User Guide
Page 65
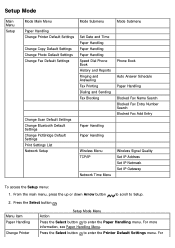
... Settings menu. Setup Mode Main Menu Setup Mode Main Menu Mode Submenu Mode Submenu Paper Handling Change Printer Default Settings Change Copy Default Settings Change Photo Default Settings Change Fax Default Settings Change Scan Default Settings Change Bluetooth Default Settings Change PictBridge Default Settings Print Settings List Network Setup Set Date ...
... Settings menu. Setup Mode Main Menu Setup Mode Main Menu Mode Submenu Mode Submenu Paper Handling Change Printer Default Settings Change Copy Default Settings Change Photo Default Settings Change Fax Default Settings Change Scan Default Settings Change Bluetooth Default Settings Change PictBridge Default Settings Print Settings List Network Setup Set Date ...

User Guide
Page 66
...A5 A6 L 2L Hagaki 3x5" Menu Settings item Paper Handling menu for printer with one input tray Size Specify the size of the options that were set using the operator panel. For more information, see Photo Default Settings Menu. For more information, see Copy Default Settings Menu. ...to enter the Scan Default Settings menu. For Default Settings more information, see PictBridge Default Settings Menu. For more information, see Printer Default Settings Menu. You can view or change the Paper Handling menu by selecting Paper Handling from the Paper Handling menu. Default...
...A5 A6 L 2L Hagaki 3x5" Menu Settings item Paper Handling menu for printer with one input tray Size Specify the size of the options that were set using the operator panel. For more information, see Photo Default Settings Menu. For more information, see Copy Default Settings Menu. ...to enter the Scan Default Settings menu. For Default Settings more information, see PictBridge Default Settings Menu. For more information, see Printer Default Settings Menu. You can view or change the Paper Handling menu by selecting Paper Handling from the Paper Handling menu. Default...
User Guide
Page 67
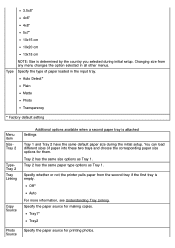
...trays and choose the corresponding paper size options for them. Specify whether or not the printer pulls paper from any menu changes the option selected in the input tray. Auto Detect* Plain Matte Photo Transparency * Factory default setting Menu item SizeTray 2 TypeTray 2 Tray Linking Copy Source ...tray is attached Settings Tray 1 and Tray 2 have the same default paper size during initial setup. Specify the paper source for printing photos. Tray1* Tray2 Photo Source Specify the paper source for making copies. Tray 2 has the same size options as Tray 1. 3.5x5" 4x6" 4x8" 5x7"...
...trays and choose the corresponding paper size options for them. Specify whether or not the printer pulls paper from any menu changes the option selected in the input tray. Auto Detect* Plain Matte Photo Transparency * Factory default setting Menu item SizeTray 2 TypeTray 2 Tray Linking Copy Source ...tray is attached Settings Tray 1 and Tray 2 have the same default paper size during initial setup. Specify the paper source for printing photos. Tray1* Tray2 Photo Source Specify the paper source for making copies. Tray 2 has the same size options as Tray 1. 3.5x5" 4x6" 4x8" 5x7"...
User Guide
Page 68
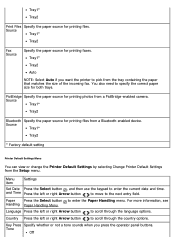
...then use the keypad to enter the Paper Handling menu. Tone Off Source Tray1* Tray2 Fax Source Specify the paper source for printing photos from a Bluetooth-enabled device. For more information, see Handling Paper Handling Menu. Country Press the left or right Arrow button to ... Auto if you press the operator panel buttons. Source Tray1* Tray2 * Factory default setting Printer Default Settings Menu You can view or change the Printer Default Settings by selecting Change Printer Default Settings from the tray containing the paper that matches the size of the incoming fax....
...then use the keypad to enter the Paper Handling menu. Tone Off Source Tray1* Tray2 Fax Source Specify the paper source for printing photos from a Bluetooth-enabled device. For more information, see Handling Paper Handling Menu. Country Press the left or right Arrow button to ... Auto if you press the operator panel buttons. Source Tray1* Tray2 * Factory default setting Printer Default Settings Menu You can view or change the Printer Default Settings by selecting Change Printer Default Settings from the tray containing the paper that matches the size of the incoming fax....
User Guide
Page 69
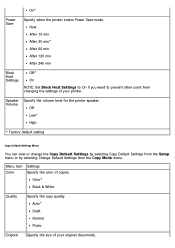
... Setup menu or by selecting Change Default Settings from changing the settings of your original documents. Menu item Settings Color Specify the color of your printer. Speaker Volume Specify the volume level for the printer speaker. Auto* Draft Normal Photo Original Specify the size of copies. On* Power Save Specify when the...
... Setup menu or by selecting Change Default Settings from changing the settings of your original documents. Menu item Settings Color Specify the color of your printer. Speaker Volume Specify the volume level for the printer speaker. Auto* Draft Normal Photo Original Specify the size of copies. On* Power Save Specify when the...
User Guide
Page 76
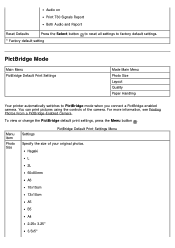
...print settings, press the Menu button . Hagaki L 2L 60x80mm A6 10x15cm 13x18cm A5 B5 A4 2.25x 3.25" 3.5x5" Menu item Photo Size Settings PictBridge Default Print Settings Menu Specify the size of the camera. Audio on Print T30 Signals Report Both Audio and Report Reset ...to PictBridge mode when you connect a PictBridge-enabled camera. PictBridge Mode Main Menu PictBridge Default Print Settings Mode Main Menu Photo Size Layout Quality Paper Handling Your printer automatically switches to factory default settings. You can print pictures using the controls of your original...
...print settings, press the Menu button . Hagaki L 2L 60x80mm A6 10x15cm 13x18cm A5 B5 A4 2.25x 3.25" 3.5x5" Menu item Photo Size Settings PictBridge Default Print Settings Menu Specify the size of the camera. Audio on Print T30 Signals Report Both Audio and Report Reset ...to PictBridge mode when you connect a PictBridge-enabled camera. PictBridge Mode Main Menu PictBridge Default Print Settings Mode Main Menu Photo Size Layout Quality Paper Handling Your printer automatically switches to factory default settings. You can print pictures using the controls of your original...
User Guide
Page 92
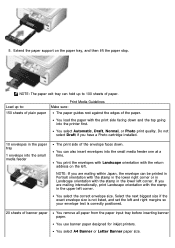
You select Automatic, Draft, Normal, or Photo print quality. You can hold up to 100 sheets of the envelope faces down and the top going into the small media feeder one at a time. If you are mailing within Japan, the envelope can be printed in Portrait orientation with the ...address on the paper tray, and then lift the paper stop. NOTE: If you have a Photo cartridge installed. 10 envelopes in the upper left corner. You use banner paper designed for inkjet printers. Do not select Draft if you are mailing internationally, print Landscape orientation with the stamp in ...
You select Automatic, Draft, Normal, or Photo print quality. You can hold up to 100 sheets of the envelope faces down and the top going into the small media feeder one at a time. If you are mailing within Japan, the envelope can be printed in Portrait orientation with the ...address on the paper tray, and then lift the paper stop. NOTE: If you have a Photo cartridge installed. 10 envelopes in the upper left corner. You use banner paper designed for inkjet printers. Do not select Draft if you are mailing internationally, print Landscape orientation with the stamp in ...


