User's Guide
Page 1
... Software Understanding the Operator Installing the Dell 966 Internal Panel Menus Wireless/Ethernet Adapter Loading Paper and Originals Maintenance Printing Troubleshooting Printing From a Memory Card or USB Key Specifications Copying Appendix Scanning Licensing Notice Notes, Notices, and Cautions NOTE: A NOTE indicates important information that helps you make sure you how to change without the written permission of data and tells you have the Dell printer Service Tag available. Microsoft and Windows are provided with RESTRICTED RIGHTS. Windows Server and Windows...
... Software Understanding the Operator Installing the Dell 966 Internal Panel Menus Wireless/Ethernet Adapter Loading Paper and Originals Maintenance Printing Troubleshooting Printing From a Memory Card or USB Key Specifications Copying Appendix Scanning Licensing Notice Notes, Notices, and Cautions NOTE: A NOTE indicates important information that helps you make sure you how to change without the written permission of data and tells you have the Dell printer Service Tag available. Microsoft and Windows are provided with RESTRICTED RIGHTS. Windows Server and Windows...
User's Guide
Page 5
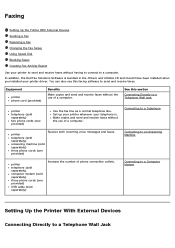
... copies and send and receive faxes without the use this section Connecting Directly to a Telephone Wall Jack printer telephone (sold separately) two phone cords (one provided) Receive both incoming voice messages and faxes. Set up your printer wherever your printer driver. Make copies and send and receive faxes without having to connect to a computer. Faxing Setting Up the Printer With External Devices Sending a Fax Receiving a Fax Changing the Fax Setup Using Speed Dial Blocking Faxes Creating Fax Activity Report Use your printer to send and receive faxes...
... copies and send and receive faxes without the use this section Connecting Directly to a Telephone Wall Jack printer telephone (sold separately) two phone cords (one provided) Receive both incoming voice messages and faxes. Set up your printer wherever your printer driver. Make copies and send and receive faxes without having to connect to a computer. Faxing Setting Up the Printer With External Devices Sending a Fax Receiving a Fax Changing the Fax Setup Using Speed Dial Blocking Faxes Creating Fax Activity Report Use your printer to send and receive faxes...
User's Guide
Page 10
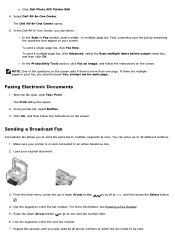
... Entering a Fax Number. 5. Use the keypad to multiple recipients at once. In the Dell All-In-One Center, you to send the same fax to enter the fax number. With the file open, click File® Print. In the printer list, select DellFax. 3. Sending a Broadcast Fax A broadcast fax allows you can enter up or down Arrow button to go to an active telephone line. 2. From the main menu, press the up to be sent. Click Dell Photo AIO Printer...
... Entering a Fax Number. 5. Use the keypad to multiple recipients at once. In the Dell All-In-One Center, you to send the same fax to enter the fax number. With the file open, click File® Print. In the printer list, select DellFax. 3. Sending a Broadcast Fax A broadcast fax allows you can enter up or down Arrow button to go to an active telephone line. 2. From the main menu, press the up to be sent. Click Dell Photo AIO Printer...

User's Guide
Page 17
... time. Speed Dial Cover Page Add to the Speed Dial List 1. to scroll to print a fax activity report. On this tab: Dialing and Sending You can hold up or down Arrow button . Set the dial volume. If an optional second paper tray is determined by the country or region you want to use two detection patterns, call your outgoing fax. Specify when to Fax, and then press the Select button 2. Choose whether to print a footer (date, time...
... time. Speed Dial Cover Page Add to the Speed Dial List 1. to scroll to print a fax activity report. On this tab: Dialing and Sending You can hold up or down Arrow button . Set the dial volume. If an optional second paper tray is determined by the country or region you want to use two detection patterns, call your outgoing fax. Specify when to Fax, and then press the Select button 2. Choose whether to print a footer (date, time...
User's Guide
Page 21
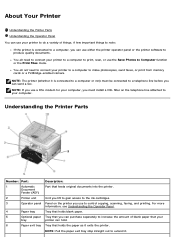
... a fax. Panel on the telephone line attached to your computer, you must be connected to Computer function or the Print Files mode. Tray that feeds original documents into the printer. For more information, see Understanding the Operator Panel. You do need to connect your printer to a computer to print, scan, or use to the ink cartridges. Tray that you can purchase separately to extend it. Understanding the Printer Parts Number: Part: 1 Automatic Document Feeder (ADF) 2 Printer unit 3 Operator panel 4 Paper tray 5 Optional paper tray 6 Paper exit tray...
... a fax. Panel on the telephone line attached to your computer, you must be connected to Computer function or the Print Files mode. Tray that feeds original documents into the printer. For more information, see Understanding the Operator Panel. You do need to connect your printer to a computer to print, scan, or use to the ink cartridges. Tray that you can purchase separately to extend it. Understanding the Printer Parts Number: Part: 1 Automatic Document Feeder (ADF) 2 Printer unit 3 Operator panel 4 Paper tray 5 Optional paper tray 6 Paper exit tray...

User's Guide
Page 23
... printed (in Photo mode). Increase or decrease the values when setting the date and time. Turn your computer. 16 Rear access door (beneath the optional duplex unit) Part that you can purchase separately to set up your printer from the printer, but remains plugged into a power outlet, an LED is removable. Understanding the Operator Panel Number Use the: 1 LCD display 2 Menu button 3 Arrow buttons 4 Start button 5 Select button 6 Power button To: Display scanning, copying, faxing, and printing options as well as status and error messages. Select an image...
... printed (in Photo mode). Increase or decrease the values when setting the date and time. Turn your computer. 16 Rear access door (beneath the optional duplex unit) Part that you can purchase separately to set up your printer from the printer, but remains plugged into a power outlet, an LED is removable. Understanding the Operator Panel Number Use the: 1 LCD display 2 Menu button 3 Arrow buttons 4 Start button 5 Select button 6 Power button To: Display scanning, copying, faxing, and printing options as well as status and error messages. Select an image...

User's Guide
Page 25
..., edit, print, and scan photos from your memory card or USB memory key to your computer. Access troubleshooting and maintenance information. Allows you want to : Scan, copy, fax, and use productivity tools. Select where you to send the scanned image. Memory Card Manager- Dell Ink Management System™- Understanding the Software Using the Dell All-In-One Center Using the Dell Fax Solutions Software Using Printing Preferences Using Memory Card Manager Dell Ink Management System Removing and Reinstalling Software The printer software includes: Dell All-In-One Center...
..., edit, print, and scan photos from your memory card or USB memory key to your computer. Access troubleshooting and maintenance information. Allows you want to : Scan, copy, fax, and use productivity tools. Select where you to send the scanned image. Memory Card Manager- Dell Ink Management System™- Understanding the Software Using the Dell All-In-One Center Using the Dell Fax Solutions Software Using Printing Preferences Using Memory Card Manager Dell Ink Management System Removing and Reinstalling Software The printer software includes: Dell All-In-One Center...

User's Guide
Page 29
... to save photos from Automatic, Manual, or Print Duplex. Advanced 2-sided printing - Select the size of the paper. Print your color images in black and white to print an envelope. Borderless - Copies - Layout - Automatic Image Sharpening - Dell Customer Experience Improvement Program - Select the check box if you want to access information about, and change your memory card or USB Select how the document is the fastest option but should not be selected if you to print borderless photos. Select this setting...
... to save photos from Automatic, Manual, or Print Duplex. Advanced 2-sided printing - Select the size of the paper. Print your color images in black and white to print an envelope. Borderless - Copies - Layout - Automatic Image Sharpening - Dell Customer Experience Improvement Program - Select the check box if you want to access information about, and change your memory card or USB Select how the document is the fastest option but should not be selected if you to print borderless photos. Select this setting...
User's Guide
Page 31
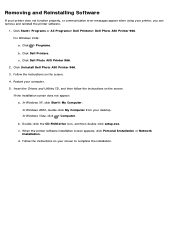
... Network Installation. Click ® Programs. b. Click Dell Photo AIO Printer 966. 2. In Windows Vista, click ® Computer. Click Dell Printers. d. In Windows XP, click Start® My Computer. Follow the instructions on the screen. Follow the instructions on your desktop. Restart your printer, you can remove and reinstall the printer software. 1. Removing and Reinstalling Software If your printer does not function properly, or communication error messages appear when using your computer. 5. Double-click the CD-ROM drive...
... Network Installation. Click ® Programs. b. Click Dell Photo AIO Printer 966. 2. In Windows Vista, click ® Computer. Click Dell Printers. d. In Windows XP, click Start® My Computer. Follow the instructions on the screen. Follow the instructions on your desktop. Restart your printer, you can remove and reinstall the printer software. 1. Removing and Reinstalling Software If your printer does not function properly, or communication error messages appear when using your computer. 5. Double-click the CD-ROM drive...

User's Guide
Page 36
.... Settings * Factory default settings Fax Mode To view or change the Print Files Mode menu settings: 1. NOTE: You cannot fax with a USB cable. Fax Options Menu Menu item Action Fax Number Use the keypad to enter the number to which you purchase a digital line filter. Print Files Mode Menu Menu item Settings Quality Auto* Draft Normal Photo Paper Press the Select button to enter the Paper Handling menu, and then select the size and type of the memory card or USB key while actively reading, writing, or printing from within an application, the printer must be connected...
.... Settings * Factory default settings Fax Mode To view or change the Print Files Mode menu settings: 1. NOTE: You cannot fax with a USB cable. Fax Options Menu Menu item Action Fax Number Use the keypad to enter the number to which you purchase a digital line filter. Print Files Mode Menu Menu item Settings Quality Auto* Draft Normal Photo Paper Press the Select button to enter the Paper Handling menu, and then select the size and type of the memory card or USB key while actively reading, writing, or printing from within an application, the printer must be connected...
User's Guide
Page 42
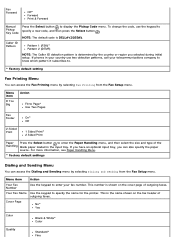
... an optional input tray, you selected during initial setup. This is DELL# (3355#). If phones in the input tray. To change the code, use two detection patterns, call your fax number. For more information, see Paper Handling Menu. * Factory default settings Dialing and Sending Menu You can access the Dialing and Sending menu by selecting Fax Printing from the Fax Setup menu. Fax Forward Off* Forward Print & Forward Manual Pickup Key Code Press the Select button to specify the name for the printer. Cover Page No* Yes Color Black & White* Color...
... an optional input tray, you selected during initial setup. This is DELL# (3355#). If phones in the input tray. To change the code, use two detection patterns, call your fax number. For more information, see Paper Handling Menu. * Factory default settings Dialing and Sending Menu You can access the Dialing and Sending menu by selecting Fax Printing from the Fax Setup menu. Fax Forward Off* Forward Print & Forward Manual Pickup Key Code Press the Select button to specify the name for the printer. Cover Page No* Yes Color Black & White* Color...
User's Guide
Page 46
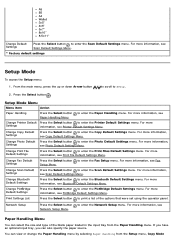
...information, see Fax Change Scan Default Settings Press the Select button to enter the Scan Default Settings menu. For more information, see Change Printer Default Press the Select button to print a list of the blank paper loaded in the input tray from the Setup menu, Copy Mode For more Settings information, see Printer Default Settings Menu. Print Settings List Press the Select button to enter the Printer Default Settings menu. to enter the Photo Default Settings menu. Change Photo Default Settings Press the Select button to enter the Network Setup menu. For...
...information, see Fax Change Scan Default Settings Press the Select button to enter the Scan Default Settings menu. For more information, see Change Printer Default Press the Select button to print a list of the blank paper loaded in the input tray from the Setup menu, Copy Mode For more Settings information, see Printer Default Settings Menu. Print Settings List Press the Select button to enter the Printer Default Settings menu. to enter the Photo Default Settings menu. Change Photo Default Settings Press the Select button to enter the Network Setup menu. For...

User's Guide
Page 49
... Type Text & Graphics* Photo Text Only Line Drawing 2-sided copies 1-Sided Original, 1-Sided Copy* 1-Sided Original, 2-Sided Copy 2-Sided Original, 1-Sided Copy 2-Sided Original, 2-Sided Copy Paper Handling Press the Select button Handling Menu. * Factory default setting to enter the current date. Menu item Action Current Time Use the keypad to enter the current time. For more information, see Paper Photo Default Settings Menu After 60 min Never Block Host Settings Off* On NOTE: Set Block Host Settings to On if you want to prevent other users from the Copy Mode menu...
... Type Text & Graphics* Photo Text Only Line Drawing 2-sided copies 1-Sided Original, 1-Sided Copy* 1-Sided Original, 2-Sided Copy 2-Sided Original, 1-Sided Copy 2-Sided Original, 2-Sided Copy Paper Handling Press the Select button Handling Menu. * Factory default setting to enter the current date. Menu item Action Current Time Use the keypad to enter the current time. For more information, see Paper Photo Default Settings Menu After 60 min Never Block Host Settings Off* On NOTE: Set Block Host Settings to On if you want to prevent other users from the Copy Mode menu...

User's Guide
Page 52
... change the value of Network Name. For more information, see TCP/IP Menu. Network Time Menu Press the Select button to view the current signal strength. Reflects the current SSID being used. One Photo Centered 1 per page 2 per page 3 per page 4 per page 6 per page 8 per page 16 per page Quality Auto* Draft Normal Photo Paper Handling Press the Select button Handling Menu. * Factory default setting to save the settings. TCP/IP Press the Select button to print a list of wireless network settings. Menu item Print Wireless Setup Page Network...
... change the value of Network Name. For more information, see TCP/IP Menu. Network Time Menu Press the Select button to view the current signal strength. Reflects the current SSID being used. One Photo Centered 1 per page 2 per page 3 per page 4 per page 6 per page 8 per page 16 per page Quality Auto* Draft Normal Photo Paper Handling Press the Select button Handling Menu. * Factory default setting to save the settings. TCP/IP Press the Select button to print a list of wireless network settings. Menu item Print Wireless Setup Page Network...

User's Guide
Page 59
... the Power button . 3. Connect the printer power cable to Work on the network, see Configuring the Adapter Using the Wireless Setup Utility. For more information about configuring your Drivers and Utilities CD, you can download the appropriate software from support.dell.com . 4. NOTE: If you do not have your Drivers and Utilities CD, you can download the appropriate software from support.dell.com . 3. Read the Firewall Exception information, and then click Next. 7. Setting up...
... the Power button . 3. Connect the printer power cable to Work on the network, see Configuring the Adapter Using the Wireless Setup Utility. For more information about configuring your Drivers and Utilities CD, you can download the appropriate software from support.dell.com . 4. NOTE: If you do not have your Drivers and Utilities CD, you can download the appropriate software from support.dell.com . 3. Read the Firewall Exception information, and then click Next. 7. Setting up...
User's Guide
Page 73
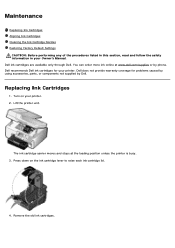
...Turn on the ink cartridge lever to raise each ink cartridge lid. 4. Remove the old ink cartridges. Lift the printer unit. The ink cartridge carrier moves and stops at www.dell.com/supplies or by Dell. Replacing Ink Cartridges 1. Dell does not provide warranty coverage for your printer. Press down on your Owner's Manual. Dell recommends Dell ink cartridges for problems caused by using accessories, parts, or components not supplied by phone. Maintenance Replacing Ink Cartridges Aligning Ink Cartridges Cleaning the Ink Cartridge Nozzles Restoring Factory Default...
...Turn on the ink cartridge lever to raise each ink cartridge lid. 4. Remove the old ink cartridges. Lift the printer unit. The ink cartridge carrier moves and stops at www.dell.com/supplies or by Dell. Replacing Ink Cartridges 1. Dell does not provide warranty coverage for your printer. Press down on your Owner's Manual. Dell recommends Dell ink cartridges for problems caused by using accessories, parts, or components not supplied by phone. Maintenance Replacing Ink Cartridges Aligning Ink Cartridges Cleaning the Ink Cartridge Nozzles Restoring Factory Default...
User's Guide
Page 86
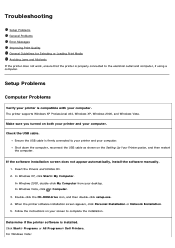
...; Programs or All Programs® Dell Printers. The printer supports Windows XP Professional x64, Windows XP, Windows 2000, and Windows Vista. Follow the instructions on your screen to the electrical outlet and computer, if using a computer. Troubleshooting Setup Problems General Problems Error Messages Improving Print Quality General Guidelines for Selecting or Loading Print Media Avoiding Jams and Misfeeds If the printer does not work, ensure that the printer is compatible with your computer. Check the USB cable. Insert the Drivers...
...; Programs or All Programs® Dell Printers. The printer supports Windows XP Professional x64, Windows XP, Windows 2000, and Windows Vista. Follow the instructions on your screen to the electrical outlet and computer, if using a computer. Troubleshooting Setup Problems General Problems Error Messages Improving Print Quality General Guidelines for Selecting or Loading Print Media Avoiding Jams and Misfeeds If the printer does not work, ensure that the printer is compatible with your computer. Check the USB cable. Insert the Drivers...
User's Guide
Page 98
... cartridge error. If the LCD displays Error followed by a four-digit number, an advanced error has occurred. Replace There is running low on . 1. Press the Select button to complete multiple copies. Unsupported Fax Mode The printer received incoming faxes, but the paper loaded is no plain paper loaded in the ADF. Unable to continue printing. Press the up or down Arrow button to scroll to Fax Setup, and then press the Select button . 3. Replace cartridge. cartridge carrier. Insert the black or photo cartridge...
... cartridge error. If the LCD displays Error followed by a four-digit number, an advanced error has occurred. Replace There is running low on . 1. Press the Select button to complete multiple copies. Unsupported Fax Mode The printer received incoming faxes, but the paper loaded is no plain paper loaded in the ADF. Unable to continue printing. Press the up or down Arrow button to scroll to Fax Setup, and then press the Select button . 3. Replace cartridge. cartridge carrier. Insert the black or photo cartridge...

User's Guide
Page 109
...selection, the copy is made in color by Using the Computer 1. For more information, see Loading Paper. 3. Press the Menu button to change copy settings. 5. NOTE: If you press the Start button default. Turn on the printer. 2. Load your original document. 4. Copying Copying Documents Collating Copies Copying Photos Copying a Two-sided Document Making a Duplex Copy Changing Copy Settings Copying Documents Using the Operator Panel 1. Turn on your computer and printer, and make sure they are connected. 2. Load your original document. The copy is printed in the...
...selection, the copy is made in color by Using the Computer 1. For more information, see Loading Paper. 3. Press the Menu button to change copy settings. 5. NOTE: If you press the Start button default. Turn on the printer. 2. Load your original document. 4. Copying Copying Documents Collating Copies Copying Photos Copying a Two-sided Document Making a Duplex Copy Changing Copy Settings Copying Documents Using the Operator Panel 1. Turn on your computer and printer, and make sure they are connected. 2. Load your original document. The copy is printed in the...
User's Guide
Page 121
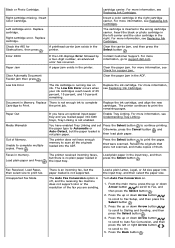
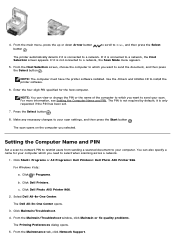
... restrict users from sending a scanned document to select when scanning across a network. 1. From the Maintenance tab, click Network Support. From the Host Selection screen, choose the computer to which you want to send your scan. c. From the main menu, press the up or down Arrow button button . NOTE: The computer must have the printer software installed. Click ® Programs. b. Click Dell Photo AIO Printer 966. 2. Click Maintain/Troubleshoot. 4. The Dell All-In-One Center opens. 3. The scan opens on...
... restrict users from sending a scanned document to select when scanning across a network. 1. From the Maintenance tab, click Network Support. From the Host Selection screen, choose the computer to which you want to send your scan. c. From the main menu, press the up or down Arrow button button . NOTE: The computer must have the printer software installed. Click ® Programs. b. Click Dell Photo AIO Printer 966. 2. Click Maintain/Troubleshoot. 4. The Dell All-In-One Center opens. 3. The scan opens on...


