Dell™ Photo Printer 540 Owner's Manual
Page 3
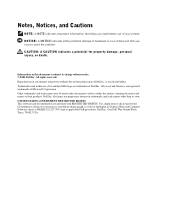
...Microsoft and Windows are trademarks of your printer. Model 540 October 2004 P/N 4J1412 Rev. A01 Reproduction in any proprietary interest in this document to refer to either potential damage to hardware or loss of data and tells you make better use of Dell Inc.; Dell Inc....CAUTION: A CAUTION indicates a potential for property damage, personal injury, or death. disclaims any manner whatsoever without notice. © 2004 Dell Inc. Trademarks used in this document is strictly forbidden. Notes, Notices, and Cautions NOTE: A NOTE indicates important information that helps you ...
...Microsoft and Windows are trademarks of your printer. Model 540 October 2004 P/N 4J1412 Rev. A01 Reproduction in any proprietary interest in this document to refer to either potential damage to hardware or loss of data and tells you make better use of Dell Inc.; Dell Inc....CAUTION: A CAUTION indicates a potential for property damage, personal injury, or death. disclaims any manner whatsoever without notice. © 2004 Dell Inc. Trademarks used in this document is strictly forbidden. Notes, Notices, and Cautions NOTE: A NOTE indicates important information that helps you ...
Dell™ Photo Printer 540 Owner's Manual
Page 6
Windows-Based Operating System Requirements 25 Printing From a Computer 26 Choosing a Color Mode 27 Canceling printing 27 Saving and Copying Photos to Your Computer 28 3 Care and Maintenance General Care of the Printer 29 Cleaning the Paper Feed Roller 30 Handling and Storing the Photo Paper and Photo Cartridge 30 4 Troubleshooting Setup Problems 31 General Problems 32 Error Messages 32 Printing Problems 33 36 More Troubleshooting Options 37 5 Contacting Dell Technical Assistance 39 Automated Order-Status Service 39 Contacting Dell 39 6 Contents
Windows-Based Operating System Requirements 25 Printing From a Computer 26 Choosing a Color Mode 27 Canceling printing 27 Saving and Copying Photos to Your Computer 28 3 Care and Maintenance General Care of the Printer 29 Cleaning the Paper Feed Roller 30 Handling and Storing the Photo Paper and Photo Cartridge 30 4 Troubleshooting Setup Problems 31 General Problems 32 Error Messages 32 Printing Problems 33 36 More Troubleshooting Options 37 5 Contacting Dell Technical Assistance 39 Automated Order-Status Service 39 Contacting Dell 39 6 Contents
Dell™ Photo Printer 540 Owner's Manual
Page 14
... Windows XP. Follow the instructions on the spool, then rotating the spool clockwise a maximum of photo cartridge in your printer with a computer). NOTE: Be careful not to install the hardware (and software, if using your printer. Loading the Photo Cartridge NOTE: Use only the photo cartridge from a Dell Photo Print Pack. Do not use any other type of one...
... Windows XP. Follow the instructions on the spool, then rotating the spool clockwise a maximum of photo cartridge in your printer with a computer). NOTE: Be careful not to install the hardware (and software, if using your printer. Loading the Photo Cartridge NOTE: Use only the photo cartridge from a Dell Photo Print Pack. Do not use any other type of one...
Dell™ Photo Printer 540 Owner's Manual
Page 25
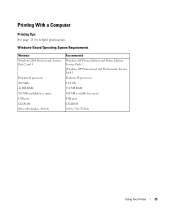
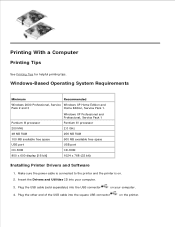
Windows-Based Operating System Requirements Minimum Windows 2000 Professional, Service Pack 2 and 3 Pentium II processor 200 MHz 48 MB RAM 100 MB available free space USB port CD-ROM 800 x 600 display [16 bit] Recommended Windows XP Home Edition and Home Edition, Service Pack 1. Windows XP Professional and Professional, Service Pack 1 Pentium IV processor 2.0 GHz 256 MB RAM 500 MB available free space USB port CD-ROM 1024 x 768 (32 bit) Using Your Printer 25 Printing With a Computer Printing Tips See page 21 for helpful printing tips.
Windows-Based Operating System Requirements Minimum Windows 2000 Professional, Service Pack 2 and 3 Pentium II processor 200 MHz 48 MB RAM 100 MB available free space USB port CD-ROM 800 x 600 display [16 bit] Recommended Windows XP Home Edition and Home Edition, Service Pack 1. Windows XP Professional and Professional, Service Pack 1 Pentium IV processor 2.0 GHz 256 MB RAM 500 MB available free space USB port CD-ROM 1024 x 768 (32 bit) Using Your Printer 25 Printing With a Computer Printing Tips See page 21 for helpful printing tips.
Dell™ Photo Printer 540 Owner's Manual
Page 28
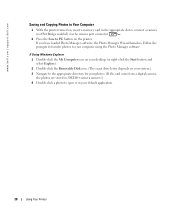
www.dell.com | support.dell.com Saving and Copying Photos to Your Computer 1 With the printer turned on, insert a memory card in your computer using the Photo Manager software. If Using Windows Explorer 1 Double-click the My Computer icon on your desktop (or right-click the Start button and select Explore). 2 Double-click the Removable Disk icon...
www.dell.com | support.dell.com Saving and Copying Photos to Your Computer 1 With the printer turned on, insert a memory card in your computer using the Photo Manager software. If Using Windows Explorer 1 Double-click the My Computer icon on your desktop (or right-click the Start button and select Explore). 2 Double-click the Removable Disk icon...
Dell™ Photo Printer 540 Owner's Manual
Page 31
... held in the tray. • Use an undamaged USB cable. • Check your printer status to make sure no check mark appears next to set your language as the default. Click Start → Settings → Printers (Windows 2000). • Double-click the Dell Photo Printer 540 icon, and then click Printer. • Click Printer, and make sure your...
... held in the tray. • Use an undamaged USB cable. • Check your printer status to make sure no check mark appears next to set your language as the default. Click Start → Settings → Printers (Windows 2000). • Double-click the Dell Photo Printer 540 icon, and then click Printer. • Click Printer, and make sure your...

Dell™ Photo Printer 540 Owner's Manual
Page 37
... computer (page 26). • If you are trying to transfer photos from the printer to support.dell.com for help. Install if necessary. • Uninstall, then reinstall Drivers and Utilities software (page 26). • Make sure your system if necessary. •... requirements (page 25). Troubleshooting 37 Transfer/communication problems NOTHING HAPPENS WHEN YOU TRY TO TRANSFER PHOTOS TO THE COMPUTER • Press the Save to PC button on the screen that may have been hidden by other windows. • Disconnect then reconnect the USB cable from a PictBridge-enabled camera (page 24),...
... computer (page 26). • If you are trying to transfer photos from the printer to support.dell.com for help. Install if necessary. • Uninstall, then reinstall Drivers and Utilities software (page 26). • Make sure your system if necessary. •... requirements (page 25). Troubleshooting 37 Transfer/communication problems NOTHING HAPPENS WHEN YOU TRY TO TRANSFER PHOTOS TO THE COMPUTER • Press the Save to PC button on the screen that may have been hidden by other windows. • Disconnect then reconnect the USB cable from a PictBridge-enabled camera (page 24),...

Dell™ Photo Printer 540 User's Guide
Page 1
...this document to refer to either potential damage to hardware or loss of your printer. CAUTION: A CAUTION indicates a potential for information on other than its own. A00 Dell Inc. Dell™ Photo Printer 540 User's Guide Click the links to the left for property damage, ...included with your printer, see Finding Information. See Express Service Code. All rights reserved. is subject to change without the written permission of Dell Inc.; Microsoft and Windows are trademarks of Dell Inc. To order supplies from Dell, double-click the (www.dell.com/supplies), or...
...this document to refer to either potential damage to hardware or loss of your printer. CAUTION: A CAUTION indicates a potential for information on other than its own. A00 Dell Inc. Dell™ Photo Printer 540 User's Guide Click the links to the left for property damage, ...included with your printer, see Finding Information. See Express Service Code. All rights reserved. is subject to change without the written permission of Dell Inc.; Microsoft and Windows are trademarks of Dell Inc. To order supplies from Dell, double-click the (www.dell.com/supplies), or...
Dell™ Photo Printer 540 User's Guide
Page 7
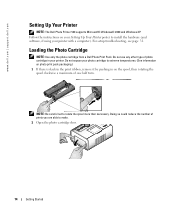
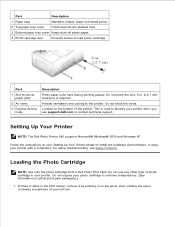
...is slack in the print ribbon, remove it by pushing in your printer when you use any other type of one half turn. This is used to load photo cartridge. Do not use support.dell.com or contact technical support. Do not block the vents. If there... software, if using your Setting Up Your Printer poster to the printer. Setting Up Your Printer NOTE: The Dell Photo Printer 540 supports Microsoft® Windows® 2000 and Windows XP. Follow the instructions on photo print pack packaging.) 1. Do not expose your photo cartridge to extreme temperatures. (See information on...
...is slack in the print ribbon, remove it by pushing in your printer when you use any other type of one half turn. This is used to load photo cartridge. Do not use support.dell.com or contact technical support. Do not block the vents. If there... software, if using your Setting Up Your Printer poster to the printer. Setting Up Your Printer NOTE: The Dell Photo Printer 540 supports Microsoft® Windows® 2000 and Windows XP. Follow the instructions on photo print pack packaging.) 1. Do not expose your photo cartridge to extreme temperatures. (See information on...
Dell™ Photo Printer 540 User's Guide
Page 18
... System Requirements Minimum Recommended Windows 2000 Professional, Service Windows XP Home Edition and Pack 2 and 3 Home Edition, Service Pack 1. Make sure the power cable is connected to the printer and the printer is on the printer. Plug the other end of the USB cable into your computer. 4. on . 2. Insert the ... tips. Pentium II processor 200 MHz 48 MB RAM 100 MB available free space USB port CD-ROM 800 x 600 display [16 bit] Windows XP Professional and Professional, Service Pack 1 Pentium IV processor 2.0 GHz 256 MB RAM 500 MB available free space USB port CD-ROM 1024 ...
... System Requirements Minimum Recommended Windows 2000 Professional, Service Windows XP Home Edition and Pack 2 and 3 Home Edition, Service Pack 1. Make sure the power cable is connected to the printer and the printer is on the printer. Plug the other end of the USB cable into your computer. 4. on . 2. Insert the ... tips. Pentium II processor 200 MHz 48 MB RAM 100 MB available free space USB port CD-ROM 800 x 600 display [16 bit] Windows XP Professional and Professional, Service Pack 1 Pentium IV processor 2.0 GHz 256 MB RAM 500 MB available free space USB port CD-ROM 1024 ...

Dell™ Photo Printer 540 User's Guide
Page 21
Double-click the My Computer icon on your computer using the Photo Manager software. Double-click a photo to your system.) 3. If Using Windows Explorer 1. Double-click the Removable Disk icon. (The exact drive letter depends on your default application. Follow the prompts to transfer photos to open it in /DCIM//.) 4. Navigate to the appropriate directory...
Double-click the My Computer icon on your computer using the Photo Manager software. Double-click a photo to your system.) 3. If Using Windows Explorer 1. Double-click the Removable Disk icon. (The exact drive letter depends on your default application. Follow the prompts to transfer photos to open it in /DCIM//.) 4. Navigate to the appropriate directory...

Dell™ Photo Printer 540 User's Guide
Page 24
... the proper slot). The Dell Photo Printer 540 supports Windows XP and 2000. Print a test page: Click Start All Programs (or Programs) Dell Printers Dell Photo Printer 540 Printing Preferences. Use an undamaged USB cable. To check printer status: Click Start Control Panel Printers and Other Hardware Printers and Faxes (Windows XP). Double-click the Dell Photo Printer 540 icon, and then click Printer. Use the navigation...
... the proper slot). The Dell Photo Printer 540 supports Windows XP and 2000. Print a test page: Click Start All Programs (or Programs) Dell Printers Dell Photo Printer 540 Printing Preferences. Use an undamaged USB cable. To check printer status: Click Start Control Panel Printers and Other Hardware Printers and Faxes (Windows XP). Double-click the Dell Photo Printer 540 icon, and then click Printer. Use the navigation...
Dell™ Photo Printer 540 User's Guide
Page 29
...then reconnect the USB cable from the printer to the computer (Make sure the power cable is connected to use your printer. Make sure your photo cartridge and photo paper supply synchronized, discard unused photo cartridge or photo paper when one or the other errors Gradual advancement of ...dirty (Air vents). Unable to keep your computer meets the minimum system requirements (Windows-Based Operating System Requirements). Reload photo paper if necessary (Loading the Photo Paper), then try again. Make sure photo paper is a paper error. Clear the jam if necessary, then try again...
...then reconnect the USB cable from the printer to the computer (Make sure the power cable is connected to use your printer. Make sure your photo cartridge and photo paper supply synchronized, discard unused photo cartridge or photo paper when one or the other errors Gradual advancement of ...dirty (Air vents). Unable to keep your computer meets the minimum system requirements (Windows-Based Operating System Requirements). Reload photo paper if necessary (Loading the Photo Paper), then try again. Make sure photo paper is a paper error. Clear the jam if necessary, then try again...
Dell™ Photo Printer 540 User's Guide
Page 30
... photos from a PictBridge-enabled camera (Printing From Your Pictbridge-enabled or Other Compatible Camera), check the USB connections between the printer and the camera. Close unnecessary software applications, and minimize remaining application windows. Disconnect then reconnect the USB cable from the printer to the computer (Make sure the power cable is connected to support.dell...
... photos from a PictBridge-enabled camera (Printing From Your Pictbridge-enabled or Other Compatible Camera), check the USB connections between the printer and the camera. Close unnecessary software applications, and minimize remaining application windows. Disconnect then reconnect the USB cable from the printer to the computer (Make sure the power cable is connected to support.dell...
21H0420.book
Page 3
...printer. CAUTION: A CAUTION indicates a potential for property damage, personal injury, or death. Microsoft and Windows are trademarks of Microsoft Corporation. Reproduction in any proprietary interest in this text: Dell and the DELL logo are registered trademarks of Dell...7013 and in subparagraph (c)(1)(ii) of Dell Inc. disclaims any manner whatsoever without notice. © 2004 Dell Inc. Use, duplication or disclosure ... indicates important information that helps you how to avoid the problem. Dell Inc. NOTICE: A NOTICE indicates either the entities claiming the marks...
...printer. CAUTION: A CAUTION indicates a potential for property damage, personal injury, or death. Microsoft and Windows are trademarks of Microsoft Corporation. Reproduction in any proprietary interest in this text: Dell and the DELL logo are registered trademarks of Dell...7013 and in subparagraph (c)(1)(ii) of Dell Inc. disclaims any manner whatsoever without notice. © 2004 Dell Inc. Use, duplication or disclosure ... indicates important information that helps you how to avoid the problem. Dell Inc. NOTICE: A NOTICE indicates either the entities claiming the marks...
21H0420.book
Page 14
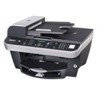
... using the Pictbridge connector does not require a computer. • You do a variety of things. Setting Up Your Printer NOTE: The Dell Photo All-In-One Printer 962 supports Microsoft® Windows® 2000 and Windows XP. However, printing photos from your printer is connected to a computer, you have a digital connection such as a telephone or answering machine can use either the...
... using the Pictbridge connector does not require a computer. • You do a variety of things. Setting Up Your Printer NOTE: The Dell Photo All-In-One Printer 962 supports Microsoft® Windows® 2000 and Windows XP. However, printing photos from your printer is connected to a computer, you have a digital connection such as a telephone or answering machine can use either the...
21H0420.book
Page 33
To turn off the automatic paper type sensor for all print jobs: 1 In Windows XP, click Start→ Control Panel→ Printers and Other Hardware→ Printers and Faxes. The Printing Preferences screen appears. 3 Click the Quality/Copies tab. 4 Click the Use my choice button. 5...your program or operating system). Unless you turn off the automatic paper type sensor, it always remains on. In Windows 2000, click Start→ Settings→ Printers. 2 Right-click the printer icon. 3 Click Printing Preferences. 4 Click the Quality/Copies tab, and then click Paper Type Sensor Options. ...
To turn off the automatic paper type sensor for all print jobs: 1 In Windows XP, click Start→ Control Panel→ Printers and Other Hardware→ Printers and Faxes. The Printing Preferences screen appears. 3 Click the Quality/Copies tab. 4 Click the Use my choice button. 5...your program or operating system). Unless you turn off the automatic paper type sensor, it always remains on. In Windows 2000, click Start→ Settings→ Printers. 2 Right-click the printer icon. 3 Click Printing Preferences. 4 Click the Quality/Copies tab, and then click Paper Type Sensor Options. ...
21H0420.book
Page 47
...: If the size of the scan (found in the lower right of the preview window) appears in the drop-down menu, select the photo program you are finished customizing your image, click Scan Now. The Dell All-In-One Center appears. 4 Click Preview Now to view your program to use is not listed... page 36 or "Placing Your Original Document on the Scanner Glass" on page 38. 3 Press Scan on the operator panel. Using the Printer 47 The Dell All-In-One Center appears on your scanned image. On the next screen, click Add to see "Placing Your Original Document on the Scanner Glass" on...
...: If the size of the scan (found in the lower right of the preview window) appears in the drop-down menu, select the photo program you are finished customizing your image, click Scan Now. The Dell All-In-One Center appears. 4 Click Preview Now to view your program to use is not listed... page 36 or "Placing Your Original Document on the Scanner Glass" on page 38. 3 Press Scan on the operator panel. Using the Printer 47 The Dell All-In-One Center appears on your scanned image. On the next screen, click Add to see "Placing Your Original Document on the Scanner Glass" on...
21H0420.book
Page 51
...window) appears in red, you do not have the system resources available to perform the scan at the resolution or size you have selected. For help , see "Load Plain Paper Into the Paper Support" on page 36. 3 Click Start→ Programs or All Programs→ Dell Printers→ Dell Photo AIO Printer 962→ Dell All-In-One... Center. If you are using the Dell All-In-One Center. To correct this , consult the Help for e-mail. 7 Click Attach ...
...window) appears in red, you do not have the system resources available to perform the scan at the resolution or size you have selected. For help , see "Load Plain Paper Into the Paper Support" on page 36. 3 Click Start→ Programs or All Programs→ Dell Printers→ Dell Photo AIO Printer 962→ Dell All-In-One... Center. If you are using the Dell All-In-One Center. To correct this , consult the Help for e-mail. 7 Click Attach ...
21H0420.book
Page 59
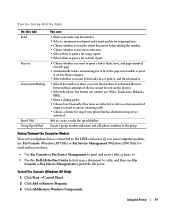
... Only) or Fax Service Management (Windows 2000 Only) to send and receive faxes: • Use Fax Console or Fax Service Management to print and receive files as faxes, or • Use the Dell All-In-One Center to first scan a document to a file, and then use (Pulse, Touch-tone, Behind a PBX). ...or Remove Programs. 3 Click Add/Remove Windows Components. Print er Set up Util ity Ta bs On this tab: Send Receive Connection/Dialing Speed Dial Group Speed Dial You can: • Enter your phone line has distinctive ring service activated. Using the Printer 59 Create a group number and name ...
... Only) or Fax Service Management (Windows 2000 Only) to send and receive faxes: • Use Fax Console or Fax Service Management to print and receive files as faxes, or • Use the Dell All-In-One Center to first scan a document to a file, and then use (Pulse, Touch-tone, Behind a PBX). ...or Remove Programs. 3 Click Add/Remove Windows Components. Print er Set up Util ity Ta bs On this tab: Send Receive Connection/Dialing Speed Dial Group Speed Dial You can: • Enter your phone line has distinctive ring service activated. Using the Printer 59 Create a group number and name ...


