
User Guide
Page 4
... INPUT SELECT 32 PICTURE (in PC Mode 33 PICTURE (in Video Mode 34 DISPLAY (in PC Mode 35 DISPLAY (in Video Mode 37 LAMP 38 SET UP 38 INFORMATION 41 OTHERS 41 Managing the Projector From Web Management . . . 48 Configuring the Network...
... INPUT SELECT 32 PICTURE (in PC Mode 33 PICTURE (in Video Mode 34 DISPLAY (in PC Mode 35 DISPLAY (in Video Mode 37 LAMP 38 SET UP 38 INFORMATION 41 OTHERS 41 Managing the Projector From Web Management . . . 48 Configuring the Network...
User Guide
Page 19
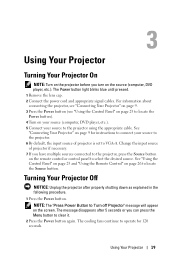
Change the input source of projector is set to locate the Source button. Turning Your Projector Off NOTICE: Unplug the projector after 5 seconds or you have multiple sources connected to the projector, press ...
Change the input source of projector is set to locate the Source button. Turning Your Projector Off NOTICE: Unplug the projector after 5 seconds or you have multiple sources connected to the projector, press ...
User Guide
Page 31
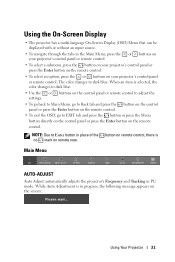
... control, there is selected, the color changes to dark blue. • Use the or buttons on the control panel or remote control to adjust the settings. • To go back to Main Menu, go to Back tab and press the button on the control panel or press the Enter button on...
... control, there is selected, the color changes to dark blue. • Use the or buttons on the control panel or remote control to adjust the settings. • To go back to Main Menu, go to Back tab and press the button on the control panel or press the Enter button on...
User Guide
Page 32
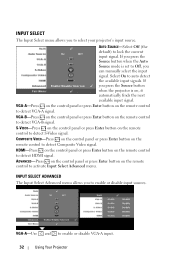
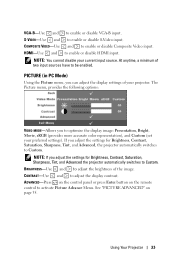
... control to enable or disable input sources. INPUT SELECT ADVANCED The Input Select Advanced menu allows you press the Source button when the projector is set to detect HDMI signal.
... control to enable or disable input sources. INPUT SELECT ADVANCED The Input Select Advanced menu allows you press the Source button when the projector is set to detect HDMI signal.
User Guide
Page 33
...sources have to enable or disable HDMI input. The Picture menu, provides the following options: VIDEO MODE-Allows you adjust the settings for Brightness, Contrast, Saturation, Sharpness, Tint, and Advanced the projector automatically switches to Custom. If you to adjust the ...Use and COMPOSITE VIDEO-Use HDMI-Use and to Custom. NOTE: You cannot disable your preferred settings). PICTURE (in PC Mode) Using the Picture menu, you adjust the settings for Brightness, Contrast, Saturation, Sharpness, Tint, and Advanced, the projector automatically switches to enable...
...sources have to enable or disable HDMI input. The Picture menu, provides the following options: VIDEO MODE-Allows you adjust the settings for Brightness, Contrast, Saturation, Sharpness, Tint, and Advanced the projector automatically switches to Custom. If you to adjust the ...Use and COMPOSITE VIDEO-Use HDMI-Use and to Custom. NOTE: You cannot disable your preferred settings). PICTURE (in PC Mode) Using the Picture menu, you adjust the settings for Brightness, Contrast, Saturation, Sharpness, Tint, and Advanced, the projector automatically switches to enable...
User Guide
Page 34
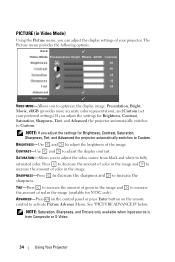
... the display image: Presentation, Bright, Movie, sRGB (provides more accurate color representation), and Custom (set your preferred settings).If you can adjust the display settings of the image. ADVANCED-Press on the control panel or press Enter button on the remote control to... See "PICTURE ADVANCED" below. SHARPNESS-Press to decrease the sharpness and to activate Picture Advance Menu. SATURATION-Allows you adjust the settings for Brightness, Contrast, Saturation, Sharpness, Tint, and Advanced the projector automatically switches to adjust the video source from Composite or ...
... the display image: Presentation, Bright, Movie, sRGB (provides more accurate color representation), and Custom (set your preferred settings).If you can adjust the display settings of the image. ADVANCED-Press on the control panel or press Enter button on the remote control to... See "PICTURE ADVANCED" below. SHARPNESS-Press to decrease the sharpness and to activate Picture Advance Menu. SATURATION-Allows you adjust the settings for Brightness, Contrast, Saturation, Sharpness, Tint, and Advanced the projector automatically switches to adjust the video source from Composite or ...
User Guide
Page 35
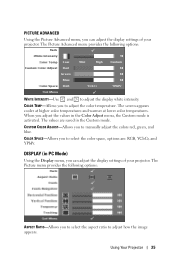
PICTURE ADVANCED Using the Picture Advanced menu, you can adjust the display settings of your projector. When you to select the aspect ratio to select the color space, options are saved in the Color Adjust menu, the Custom ... provides the following options: WHITE INTENSITY-Use and to manually adjust the colors red, green, and blue. COLOR SPACE-Allows you can adjust the display settings of your projector. DISPLAY (in PC Mode) Using the Display menu, you to adjust how the image appears. CUSTOM COLOR ADJUST-Allows you to adjust...
PICTURE ADVANCED Using the Picture Advanced menu, you can adjust the display settings of your projector. When you to select the aspect ratio to select the color space, options are saved in the Color Adjust menu, the Custom ... provides the following options: WHITE INTENSITY-Use and to manually adjust the colors red, green, and blue. COLOR SPACE-Allows you can adjust the display settings of your projector. DISPLAY (in PC Mode) Using the Display menu, you to adjust how the image appears. CUSTOM COLOR ADJUST-Allows you to adjust...
User Guide
Page 37
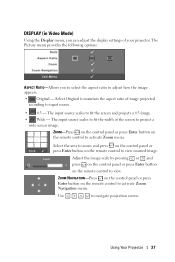
The Picture menu provides the following options: ASPECT RATIO-Allows you can adjust the display settings of your projector. Select the area to zoom and press on the control panel or press Enter button on the remote control to activate Zoom ...
The Picture menu provides the following options: ASPECT RATIO-Allows you can adjust the display settings of your projector. Select the area to zoom and press on the control panel or press Enter button on the remote control to activate Zoom ...
User Guide
Page 38
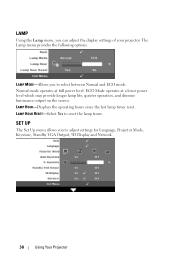
.... LAMP HOUR RESET-Select Yes to select between Normal and ECO mode. The Lamp menu provides the following options: LAMP MODE-Allows you to adjust settings for Language, Projector Mode, Keystone, Standby VGA Output, 3D Display and Network. 38 Using Your Projector Normal mode operates at a lower power level which ...provide longer lamp life, quieter operation, and dimmer luminance output on the screen. LAMP HOUR-Displays the operating hours since the last lamp timer reset. SET UP The Set Up menu allows you to reset the lamp timer. LAMP Using the Lamp menu, you can adjust the display...
.... LAMP HOUR RESET-Select Yes to select between Normal and ECO mode. The Lamp menu provides the following options: LAMP MODE-Allows you to adjust settings for Language, Projector Mode, Keystone, Standby VGA Output, 3D Display and Network. 38 Using Your Projector Normal mode operates at a lower power level which ...provide longer lamp life, quieter operation, and dimmer luminance output on the screen. LAMP HOUR-Displays the operating hours since the last lamp timer reset. SET UP The Set Up menu allows you to reset the lamp timer. LAMP Using the Lamp menu, you can adjust the display...
User Guide
Page 39
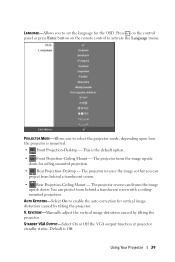
... menu. STANDBY VGA OUTPUT-Select On or Off the VGA output function at projector standby status. Using Your Projector 39 PROJECTOR MODE-Allows you to set the language for the OSD. This is Off. You can project from behind a translucent screen. • Rear Projection-Ceiling Mount - Default is the default option...
... menu. STANDBY VGA OUTPUT-Select On or Off the VGA output function at projector standby status. Using Your Projector 39 PROJECTOR MODE-Allows you to set the language for the OSD. This is Off. You can project from behind a translucent screen. • Rear Projection-Ceiling Mount - Default is the default option...

User Guide
Page 40
... PC/NB are ready. 3D Sync Invert-If you see a discrete or overlapping image while wearing DLP 3D goggles, you to configure the network connection settings. DHCP ADDRESS-If a DHCP server exists in Enter to confirm each number and then use to select the number of left/right image sequence to.../120Hz signal output graphic card supported on the remote control to which the projector is Off. Use to set the IP Address, Subnet Mask, and Gateway. Key in the network to configure Network settings. NETWORK The Network menu allows you may need to execute 'Invert' to get best match of IP ...
... PC/NB are ready. 3D Sync Invert-If you see a discrete or overlapping image while wearing DLP 3D goggles, you to configure the network connection settings. DHCP ADDRESS-If a DHCP server exists in Enter to confirm each number and then use to select the number of left/right image sequence to.../120Hz signal output graphic card supported on the remote control to which the projector is Off. Use to set the IP Address, Subnet Mask, and Gateway. Key in the network to configure Network settings. NETWORK The Network menu allows you may need to execute 'Invert' to get best match of IP ...
User Guide
Page 41
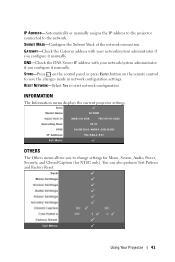
...the remote control to reset network configuration. RESET NETWORK-Select Yes to save the changes made in network configuration settings. INFORMATION The Information menu displays the current projector settings. OTHERS The Others menu allows you configure it manually. DNS-Check the DNS Server IP address with your ... if you configure it manually. IP ADDRESS-Automatically or manually assigns the IP address to the projector connected to change settings for Menu, Screen, Audio, Power, Security, and Closed Caption (for NTSC only). You can also perform Test Pattern and Factory Reset....
...the remote control to reset network configuration. RESET NETWORK-Select Yes to save the changes made in network configuration settings. INFORMATION The Information menu displays the current projector settings. OTHERS The Others menu allows you configure it manually. DNS-Check the DNS Server IP address with your ... if you configure it manually. IP ADDRESS-Automatically or manually assigns the IP address to the projector connected to change settings for Menu, Screen, Audio, Power, Security, and Closed Caption (for NTSC only). You can also perform Test Pattern and Factory Reset....
User Guide
Page 42
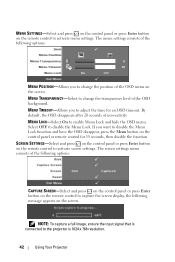
... hide the OSD menu. MENU LOCK-Select On to the projector is 1024 x 768 resolution. 42 Using Your Projector Select OFF to activate screen settings. SCREEN SETTINGS-Select and press on the control panel or press Enter button on the remote control to disable the Menu Lock. If you to change the... position of the OSD menu on the screen. MENU SETTINGS-Select and press on the control panel or press Enter button on the remote control to disable the Menu Lock function and have the OSD...
... hide the OSD menu. MENU LOCK-Select On to the projector is 1024 x 768 resolution. 42 Using Your Projector Select OFF to activate screen settings. SCREEN SETTINGS-Select and press on the control panel or press Enter button on the remote control to disable the Menu Lock. If you to change the... position of the OSD menu on the screen. MENU SETTINGS-Select and press on the control panel or press Enter button on the remote control to disable the Menu Lock function and have the OSD...
User Guide
Page 43
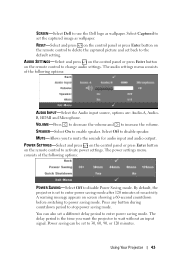
... minutes of the following options: POWER SAVING-Select Off to power saving mode. The delay period is set the captured image as wallpaper. SCREEN-Select Dell to increase the volume. AUDIO SETTINGS-Select and press on the control panel or press Enter button on screen showing a 60-second countdown ...before switching to disable Power Saving mode. The audio settings menu consists of no activity. VOLUME-Press to decrease the volume and to use the Dell logo as wallpaper. Select Off to 30, 60, 90, or 120 minutes. Power saving can...
... minutes of the following options: POWER SAVING-Select Off to power saving mode. The delay period is set the captured image as wallpaper. SCREEN-Select Dell to increase the volume. AUDIO SETTINGS-Select and press on the control panel or press Enter button on screen showing a 60-second countdown ...before switching to disable Power Saving mode. The audio settings menu consists of no activity. VOLUME-Press to decrease the volume and to use the Dell logo as wallpaper. Select Off to 30, 60, 90, or 120 minutes. Power saving can...
User Guide
Page 44
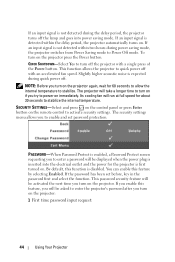
...Password Protect screen requesting you to power on the projector press the Power button. This password security feature will be asked to enable and set before, key in the password first and select the function. If you enable this feature, you to enter the projector's password after ...this feature by selecting Enabled. You can enable this function is disabled. QUICK SHUTDOWN-Select Yes to stabilize. If the password has been set password protection. Slightly higher acoustic noise is expected during quick power off the lamp and goes into the electrical outlet and the power for...
...Password Protect screen requesting you to power on the projector press the Power button. This password security feature will be asked to enable and set before, key in the password first and select the function. If you enable this feature, you to enter the projector's password after ...this feature by selecting Enabled. You can enable this function is disabled. QUICK SHUTDOWN-Select Yes to stabilize. If the password has been set password protection. Slightly higher acoustic noise is expected during quick power off the lamp and goes into the electrical outlet and the power for...
User Guide
Page 45
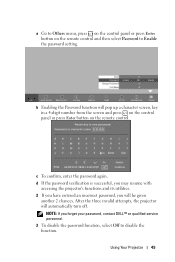
... projector's functions and its utilities. 2 If you have entered an incorrect password, you forget your password, contact DELL™ or qualified service personnel. 3 To disable the password function, select Off to Enable the password setting. a Go to Others menu, press on the control panel or press Enter button on the remote control...
... projector's functions and its utilities. 2 If you have entered an incorrect password, you forget your password, contact DELL™ or qualified service personnel. 3 To disable the password function, select Off to Enable the password setting. a Go to Others menu, press on the control panel or press Enter button on the remote control...

User Guide
Page 47
Test Pattern 1: Test Pattern 2: FACTORY RESET-Select and press on the control panel or press Enter button on the remote control to reset all settings to test focus and resolution. NOTE: Closed caption option is used to its factory default, the warning message below appears. You can also invoke ... by pressing and holding down and buttons on the control panel simultaneously for NTSC only. Reset items include both computer sources and video source settings. You can also invoke the Test Pattern 1 by selecting Off, 1 or 2. TEST PATTERN-Test Pattern is available for 2 seconds.
Test Pattern 1: Test Pattern 2: FACTORY RESET-Select and press on the control panel or press Enter button on the remote control to reset all settings to test focus and resolution. NOTE: Closed caption option is used to its factory default, the warning message below appears. You can also invoke ... by pressing and holding down and buttons on the control panel simultaneously for NTSC only. Reset items include both computer sources and video source settings. You can also invoke the Test Pattern 1 by selecting Off, 1 or 2. TEST PATTERN-Test Pattern is available for 2 seconds.

User Guide
Page 48
For configuring the network setting, refer to a network, you can now access Web Management and manage the projector from a remote location. 48 Using Your Projector You can access the projector using the network function, the IP address should be unique. Accessing Web Management Use Internet Explorer 5.0 and above or Firefox 1.5 and above and enter the IP address. Managing the Projector From Web Management Configuring the Network Setting If the projector is connected to "Network" on page 40. When using a web browser by configuring the network setting (TCP/IP).
For configuring the network setting, refer to a network, you can now access Web Management and manage the projector from a remote location. 48 Using Your Projector You can access the projector using the network function, the IP address should be unique. Accessing Web Management Use Internet Explorer 5.0 and above or Firefox 1.5 and above and enter the IP address. Managing the Projector From Web Management Configuring the Network Setting If the projector is connected to "Network" on page 40. When using a web browser by configuring the network setting (TCP/IP).

User Guide
Page 49
See "Network" on page 40. • Language: Allows you to set the language for web management. Managing Properties Home • Access the Web Management Home page by entering the projector's IP address at the web browser. Using Your Projector 49
See "Network" on page 40. • Language: Allows you to set the language for web management. Managing Properties Home • Access the Web Management Home page by entering the projector's IP address at the web browser. Using Your Projector 49

User Guide
Page 50
Press Save to store the settings. • Choose DHCP to assign an IP address to the projector from a DHCP server automatically, or Manual to 21 characters for each field). Network Settings See OSD section on page 40. • Set up the Model Name, Projector Name, Location and Contact information (up to assign an IP address manually. 50 Using Your Projector
Press Save to store the settings. • Choose DHCP to assign an IP address to the projector from a DHCP server automatically, or Manual to 21 characters for each field). Network Settings See OSD section on page 40. • Set up the Model Name, Projector Name, Location and Contact information (up to assign an IP address manually. 50 Using Your Projector


