User Guide
Page 2
...use of your projector. Reproduction of these materials in this text: Dell and the DELL...registered trademarks of Dell Inc.; disclaims any manner whatsoever without notice. © 2009 Dell Inc. Notes..., Notices, and Cautions NOTE: A NOTE indicates important information that helps you how to avoid the problem. CAUTION: A CAUTION indicates a potential for property damage, personal injury, or death. Other trademarks and trade names may be used... in the United States and/or other than its own. Trademarks used in trademarks and trade names other countries. Dell...
...use of your projector. Reproduction of these materials in this text: Dell and the DELL...registered trademarks of Dell Inc.; disclaims any manner whatsoever without notice. © 2009 Dell Inc. Notes..., Notices, and Cautions NOTE: A NOTE indicates important information that helps you how to avoid the problem. CAUTION: A CAUTION indicates a potential for property damage, personal injury, or death. Other trademarks and trade names may be used... in the United States and/or other than its own. Trademarks used in trademarks and trade names other countries. Dell...

User Guide
Page 3
... Dell Projector 6 About Your Projector 7 2 Connecting Your Projector 9 Connecting to a Computer 10 Connecting a Computer Using a VGA Cable . . . . 10 Monitor Loop-Through Connection Using VGA Cables 11 Connecting a Computer Using an RS232 cable . . . 12 Connecting a DVD Player 13 Connecting a DVD Player Using an S-video Cable . 13 Connecting a DVD Player Using a Composite Video Cable 14 Connecting a DVD Player Using...
... Dell Projector 6 About Your Projector 7 2 Connecting Your Projector 9 Connecting to a Computer 10 Connecting a Computer Using a VGA Cable . . . . 10 Monitor Loop-Through Connection Using VGA Cables 11 Connecting a Computer Using an RS232 cable . . . 12 Connecting a DVD Player 13 Connecting a DVD Player Using an S-video Cable . 13 Connecting a DVD Player Using a Composite Video Cable 14 Connecting a DVD Player Using...
User Guide
Page 4
... Projector Height 20 Adjusting the Projector Zoom and Focus 21 Adjusting Projection Image Size 22 Using the Control Panel 23 Using the Remote Control 26 Installing the Remote Control Batteries 29 Operating Range With Remote Control 30 Using the On-Screen Display 31 Main Menu 31 AUTO-ADJUST 31 INPUT SELECT 32 PICTURE...
... Projector Height 20 Adjusting the Projector Zoom and Focus 21 Adjusting Projection Image Size 22 Using the Control Panel 23 Using the Remote Control 26 Installing the Remote Control Batteries 29 Operating Range With Remote Control 30 Using the On-Screen Display 31 Main Menu 31 AUTO-ADJUST 31 INPUT SELECT 32 PICTURE...
User Guide
Page 7
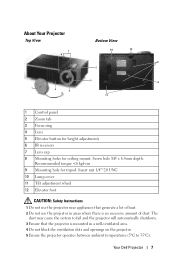
About Your Projector Top View 1 6 Bottom View 10 12 8 2 3 9 7 5 4 11 1 Control panel 2 Zoom tab 3 Focus ring 4 Lens 5 Elevator button for height adjustments 6 IR receivers 7 Lens cap 8 Mounting holes for ceiling mount: Screw hole M3 x 6.5mm depth. Recommended torque
About Your Projector Top View 1 6 Bottom View 10 12 8 2 3 9 7 5 4 11 1 Control panel 2 Zoom tab 3 Focus ring 4 Lens 5 Elevator button for height adjustments 6 IR receivers 7 Lens cap 8 Mounting holes for ceiling mount: Screw hole M3 x 6.5mm depth. Recommended torque
User Guide
Page 10
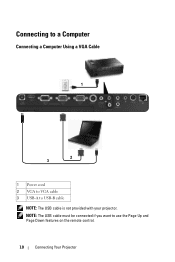
Connecting to a Computer Connecting a Computer Using a VGA Cable 1 2 3 1 Power cord 2 VGA to VGA cable 3 USB-A to use the Page Up and Page Down features on the remote control. 10 Connecting Your Projector NOTE: The USB cable must be connected if you want to USB-B cable NOTE: The USB cable is not provided with your projector.
Connecting to a Computer Connecting a Computer Using a VGA Cable 1 2 3 1 Power cord 2 VGA to VGA cable 3 USB-A to use the Page Up and Page Down features on the remote control. 10 Connecting Your Projector NOTE: The USB cable must be connected if you want to USB-B cable NOTE: The USB cable is not provided with your projector.
User Guide
Page 11
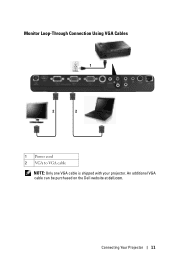
Connecting Your Projector 11 Monitor Loop-Through Connection Using VGA Cables 1 2 2 1 Power cord 2 VGA to VGA cable NOTE: Only one VGA cable is shipped with your projector. An additional VGA cable can be purchased on the Dell website at dell.com.
Connecting Your Projector 11 Monitor Loop-Through Connection Using VGA Cables 1 2 2 1 Power cord 2 VGA to VGA cable NOTE: Only one VGA cable is shipped with your projector. An additional VGA cable can be purchased on the Dell website at dell.com.
User Guide
Page 12
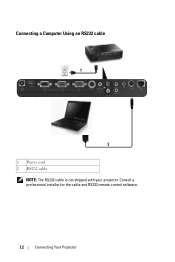
Consult a professional installer for the cable and RS232 remote control software. 12 Connecting Your Projector Connecting a Computer Using an RS232 cable 1 2 1 Power cord 2 RS232 cable NOTE: The RS232 cable is not shipped with your projector.
Consult a professional installer for the cable and RS232 remote control software. 12 Connecting Your Projector Connecting a Computer Using an RS232 cable 1 2 1 Power cord 2 RS232 cable NOTE: The RS232 cable is not shipped with your projector.
User Guide
Page 13
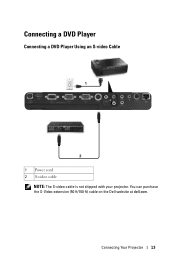
Connecting a DVD Player Connecting a DVD Player Using an S-video Cable 1 2 1 Power cord 2 S-video cable NOTE: The S-video cable is not shipped with your projector. You can purchase the S-Video extension (50 ft/100 ft) cable on the Dell website at dell.com. Connecting Your Projector 13
Connecting a DVD Player Connecting a DVD Player Using an S-video Cable 1 2 1 Power cord 2 S-video cable NOTE: The S-video cable is not shipped with your projector. You can purchase the S-Video extension (50 ft/100 ft) cable on the Dell website at dell.com. Connecting Your Projector 13
User Guide
Page 14
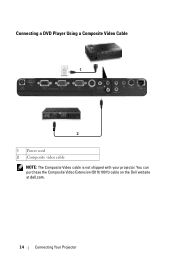
You can purchase the Composite Video Extension (50 ft/100 ft) cable on the Dell website at dell.com. 14 Connecting Your Projector Connecting a DVD Player Using a Composite Video Cable 1 2 1 Power cord 2 Composite video cable NOTE: The Composite Video cable is not shipped with your projector.
You can purchase the Composite Video Extension (50 ft/100 ft) cable on the Dell website at dell.com. 14 Connecting Your Projector Connecting a DVD Player Using a Composite Video Cable 1 2 1 Power cord 2 Composite video cable NOTE: The Composite Video cable is not shipped with your projector.
User Guide
Page 15
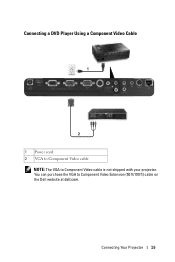
You can purchase the VGA to Component Video cable is not shipped with your projector. Connecting Your Projector 15 Connecting a DVD Player Using a Component Video Cable 1 2 1 Power cord 2 VGA to Component Video cable NOTE: The VGA to Component Video Extension (50 ft/100 ft) cable on the Dell website at dell.com.
You can purchase the VGA to Component Video cable is not shipped with your projector. Connecting Your Projector 15 Connecting a DVD Player Using a Component Video Cable 1 2 1 Power cord 2 VGA to Component Video cable NOTE: The VGA to Component Video Extension (50 ft/100 ft) cable on the Dell website at dell.com.

User Guide
Page 16
Connecting a DVD Player Using an HDMI Cable 1 2 1 Power cord 2 HDMI cable NOTE: The HDMI cable is not shipped with your projector. 16 Connecting Your Projector
Connecting a DVD Player Using an HDMI Cable 1 2 1 Power cord 2 HDMI cable NOTE: The HDMI cable is not shipped with your projector. 16 Connecting Your Projector
User Guide
Page 19
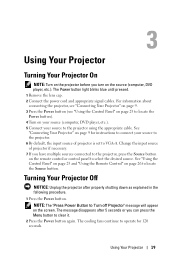
...continue to operate for instructions to connect your source to VGA-A. Change the input source of projector is set to the projector using the appropriate cable. 3 Using Your Projector Turning Your Projector On NOTE: Turn on the projector before you turn on the screen. The Power button light ...default, the input source of projector if necessary. 7 If you can press the Menu button to select the desired source. See "Using the Control Panel" on page 23 and "Using the Remote Control" on page 26 to Turn off Projector" message will appear on the source (computer, DVD player, etc.).
...continue to operate for instructions to connect your source to VGA-A. Change the input source of projector is set to the projector using the appropriate cable. 3 Using Your Projector Turning Your Projector On NOTE: Turn on the projector before you turn on the screen. The Power button light ...default, the input source of projector if necessary. 7 If you can press the Menu button to select the desired source. See "Using the Control Panel" on page 23 and "Using the Remote Control" on page 26 to Turn off Projector" message will appear on the source (computer, DVD player, etc.).
User Guide
Page 20
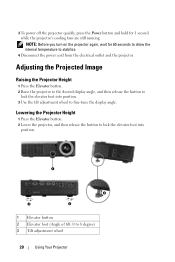
... quickly, press the Power button and hold for 60 seconds to allow the internal temperature to 8 degree) 3 Tilt adjustment wheel 20 Using Your Projector NOTE: Before you turn on the projector again, wait for 1 second while the projector's cooling fans are still running. Lowering the... Projector Height 1 Press the Elevator button. 2 Lower the projector, and then release the button to lock the elevator foot into position. 3 Use the tilt adjustment wheel to fine-tune the display angle. Adjusting the Projected Image Raising the Projector Height 1 Press the Elevator button. 2 Raise ...
... quickly, press the Power button and hold for 60 seconds to allow the internal temperature to 8 degree) 3 Tilt adjustment wheel 20 Using Your Projector NOTE: Before you turn on the projector again, wait for 1 second while the projector's cooling fans are still running. Lowering the... Projector Height 1 Press the Elevator button. 2 Lower the projector, and then release the button to lock the elevator foot into position. 3 Use the tilt adjustment wheel to fine-tune the display angle. Adjusting the Projected Image Raising the Projector Height 1 Press the Elevator button. 2 Raise ...
User Guide
Page 21
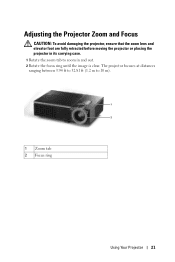
Adjusting the Projector Zoom and Focus CAUTION: To avoid damaging the projector, ensure that the zoom lens and elevator foot are fully retracted before moving the projector or placing the projector in and out. 2 Rotate the focus ring until the image is clear. The projector focuses at distances ranging between 3.94 ft to 32.81 ft (1.2 m to zoom in its carrying case. 1 Rotate the zoom tab to 10 m). 1 2 1 Zoom tab 2 Focus ring Using Your Projector 21
Adjusting the Projector Zoom and Focus CAUTION: To avoid damaging the projector, ensure that the zoom lens and elevator foot are fully retracted before moving the projector or placing the projector in and out. 2 Rotate the focus ring until the image is clear. The projector focuses at distances ranging between 3.94 ft to 32.81 ft (1.2 m to zoom in its carrying case. 1 Rotate the zoom tab to 10 m). 1 2 1 Zoom tab 2 Focus ring Using Your Projector 21

User Guide
Page 22
Adjusting Projection Image Size 362"(919.48 cm) Projector to screen distance 32.81'(10.0m) 29.53'(9.0m) 22.97'(7.0m) 16.40'(5.0m) 9.84'(3.0m) (736072.0"8 cm) 326"(828.04 cm) (629702.8"8 cm) 254"(645.16 cm) (523182.4"8 cm) 181"(459.74 cm) (318531.5"4 cm) (23911."14 cm) 109"(276.86 cm) 44"(111.76 cm) 36.3" (92.20 cm) 3.94'(1.2m) 22 Using Your Projector
Adjusting Projection Image Size 362"(919.48 cm) Projector to screen distance 32.81'(10.0m) 29.53'(9.0m) 22.97'(7.0m) 16.40'(5.0m) 9.84'(3.0m) (736072.0"8 cm) 326"(828.04 cm) (629702.8"8 cm) 254"(645.16 cm) (523182.4"8 cm) 181"(459.74 cm) (318531.5"4 cm) (23911."14 cm) 109"(276.86 cm) 44"(111.76 cm) 36.3" (92.20 cm) 3.94'(1.2m) 22 Using Your Projector

User Guide
Page 23
... Panel 1 2 3 10 9 8 4 5 6 7 Using Your Projector 23 Screen (Diagonal) Min. 44" 109" 181" 254" 326" 362" (111.76 cm) (276.86 cm) (459.74 cm) (645.16 cm) (828....
... Panel 1 2 3 10 9 8 4 5 6 7 Using Your Projector 23 Screen (Diagonal) Min. 44" 109" 181" 254" 326" 362" (111.76 cm) (276.86 cm) (459.74 cm) (645.16 cm) (828....
User Guide
Page 24
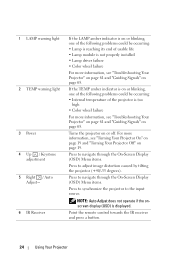
... if the onscreen display (OSD) is displayed. Turns the projector on or off. Point the remote control towards the IR receiver and press a button. 24 Using Your Projector 1 LAMP warning light 2 TEMP warning light 3 Power 4 Up / Keystone adjustment 5 Right / Auto Adjust~ 6 IR Receiver If the LAMP amber indicator is on or...
... if the onscreen display (OSD) is displayed. Turns the projector on or off. Point the remote control towards the IR receiver and press a button. 24 Using Your Projector 1 LAMP warning light 2 TEMP warning light 3 Power 4 Up / Keystone adjustment 5 Right / Auto Adjust~ 6 IR Receiver If the LAMP amber indicator is on or...

User Guide
Page 25
.... Press to toggle through Analog RGB, Composite, Component (YPbPr via VGA), HDMI, and S-video sources when multiple sources are connected to confirm the selection item. Use the directional keys and the Menu button to activate the OSD. Press to navigate through the On-Screen Display (OSD) Menu items. Press to adjust...
.... Press to toggle through Analog RGB, Composite, Component (YPbPr via VGA), HDMI, and S-video sources when multiple sources are connected to confirm the selection item. Use the directional keys and the Menu button to activate the OSD. Press to navigate through the On-Screen Display (OSD) Menu items. Press to adjust...
User Guide
Page 26
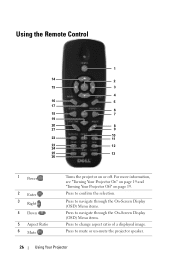
... to navigate through the On-Screen Display (OSD) Menu items. Press to mute or un-mute the projector speaker. 26 Using Your Projector Press to change aspect ratio of a displayed image. Using the Remote Control 1 14 2 15 3 4 16 5 17 6 18 7 19 20 8 21 9 10 22 11 23 12 24 25 13 26...
... to navigate through the On-Screen Display (OSD) Menu items. Press to mute or un-mute the projector speaker. 26 Using Your Projector Press to change aspect ratio of a displayed image. Using the Remote Control 1 14 2 15 3 4 16 5 17 6 18 7 19 20 8 21 9 10 22 11 23 12 24 25 13 26...

User Guide
Page 27
... etc.). Pressing the Video Mode button again will show the current display mode. NOTE: The USB cable must be connected if you want to use the Page Up feature. NOTE: The USB cable must be connected if you want to adjust image distortion caused by tilting the + projector (+...40/-35 degrees). 21 Keystone adjustment - Press to use the Page Down feature. 10 Freeze Press to pause the screen image. 11 Blank screen Press to hide/unhide the image. 12 Information Press ...
... etc.). Pressing the Video Mode button again will show the current display mode. NOTE: The USB cable must be connected if you want to use the Page Up feature. NOTE: The USB cable must be connected if you want to adjust image distortion caused by tilting the + projector (+...40/-35 degrees). 21 Keystone adjustment - Press to use the Page Down feature. 10 Freeze Press to pause the screen image. 11 Blank screen Press to hide/unhide the image. 12 Information Press ...


