User Guide
Page 9
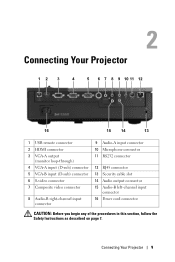
...) 4 VGA-A input (D-sub) connector 5 VGA-B input (D-sub) connector 6 S-video connector 7 Composite video connector 8 Audio-B right-channel input connector 9 Audio-A input connector 10 Microphone connector 11 RS232 connector 12 RJ45 connector 13 Security cable slot 14 Audio output connector 15 Audio-B left-channel input connector 16 Power cord connector CAUTION: Before you begin any of...
...) 4 VGA-A input (D-sub) connector 5 VGA-B input (D-sub) connector 6 S-video connector 7 Composite video connector 8 Audio-B right-channel input connector 9 Audio-A input connector 10 Microphone connector 11 RS232 connector 12 RJ45 connector 13 Security cable slot 14 Audio output connector 15 Audio-B left-channel input connector 16 Power cord connector CAUTION: Before you begin any of...
User Guide
Page 41
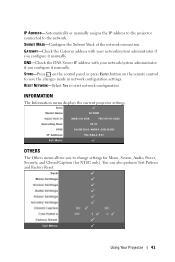
... the DNS Server IP address with your network/system administrator if you configure it manually. RESET NETWORK-Select Yes to change settings for Menu, Screen, Audio, Power, Security, and Closed Caption (for NTSC only). SUBNET MASK-Configure the Subnet Mask of the network connection.
... the DNS Server IP address with your network/system administrator if you configure it manually. RESET NETWORK-Select Yes to change settings for Menu, Screen, Audio, Power, Security, and Closed Caption (for NTSC only). SUBNET MASK-Configure the Subnet Mask of the network connection.
User Guide
Page 43
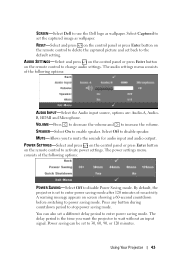
... options: POWER SAVING-Select Off to enter power saving mode. Press any button during countdown period to mute the sounds for audio input and audio output. Power saving can also set back to set the captured image as wallpaper. MUTE-Allows you want the projector to disable...menu consists of the following options: AUDIO INPUT-Select the Audio input source, options are: Audio-A, AudioB, HDMI and Microphone. RESET-Select and press on the control panel or press Enter button on screen showing a 60-second countdown before switching to use the Dell logo as wallpaper. You can be...
... options: POWER SAVING-Select Off to enter power saving mode. Press any button during countdown period to mute the sounds for audio input and audio output. Power saving can also set back to set the captured image as wallpaper. MUTE-Allows you want the projector to disable...menu consists of the following options: AUDIO INPUT-Select the Audio input source, options are: Audio-A, AudioB, HDMI and Microphone. RESET-Select and press on the control panel or press Enter button on screen showing a 60-second countdown before switching to use the Dell logo as wallpaper. You can be...
User Guide
Page 52
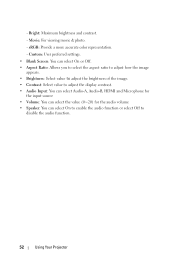
... how the image appears. • Brightness: Select value to adjust the brightness of the image. • Contrast: Select value to adjust the display contrast. • Audio Input: You can select Audio-A, Audio-B, HDMI and Microphone for the input source • Volume: You can select the value (0~20) for the...
... how the image appears. • Brightness: Select value to adjust the brightness of the image. • Contrast: Select value to adjust the display contrast. • Audio Input: You can select Audio-A, Audio-B, HDMI and Microphone for the input source • Volume: You can select the value (0~20) for the...

User Guide
Page 70
... inlet) VGA input: Two 15-pin D-sub connector (Blue), VGA-A & VGA-B, for supporting HDMI 1.3. HDCP compliant. Analog Audio input: One 3.5 mm stereo mini phone jack (Blue) & one pair of RCA connector (Red/White). 70 Specifications Audio Noise Level Weight Dimensions (W x H x D) 1 speaker x 8watt RMS 35 dB(A) Normal mode, 32 dB(A) Eco mode 5.2 lbs...
... inlet) VGA input: Two 15-pin D-sub connector (Blue), VGA-A & VGA-B, for supporting HDMI 1.3. HDCP compliant. Analog Audio input: One 3.5 mm stereo mini phone jack (Blue) & one pair of RCA connector (Red/White). 70 Specifications Audio Noise Level Weight Dimensions (W x H x D) 1 speaker x 8watt RMS 35 dB(A) Normal mode, 32 dB(A) Eco mode 5.2 lbs...
User Guide
Page 71
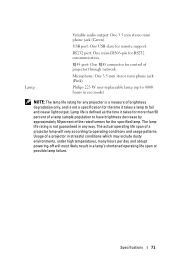
... output. Usage of a projector in eco mode) NOTE: The lamp life rating for any way. Microphone: One 3.5 mm stereo mini phone jack (Pink). Lamp Variable audio output: One 3.5 mm stereo mini phone jack (Green). RJ45 port: One RJ45 connector for RS232 communication. RS232 port: One mini-DIN 6-pin for control of...
... output. Usage of a projector in eco mode) NOTE: The lamp life rating for any way. Microphone: One 3.5 mm stereo mini phone jack (Pink). Lamp Variable audio output: One 3.5 mm stereo mini phone jack (Green). RJ45 port: One RJ45 connector for RS232 communication. RS232 port: One mini-DIN 6-pin for control of...

User Guide
Page 76
... known as per seconds of frequency. A specification developed by Texas Instruments, using small manipulated mirrors. HDMI carries both uncompressed high definition video along with digital audio and device control data in a fully darkened room. An internet service that will correct an image of the distortion (usually a wide-top narrow-bottom effect...
... known as per seconds of frequency. A specification developed by Texas Instruments, using small manipulated mirrors. HDMI carries both uncompressed high definition video along with digital audio and device control data in a fully darkened room. An internet service that will correct an image of the distortion (usually a wide-top narrow-bottom effect...
User Guide
Page 78
...20 Elevator foot 20 Tilt adjustment wheel 20 Adjusting the Projector Zoom and Focus 21 Focus ring 21 Zoom tab 21 Audio Input 43 Audio output connector 9 Audio Settings 43 C Capture Screen 42 Changing the Lamp 67 Closed Caption 46 Connecting the Projector Composite video cable 14 Connecting... 13 To Computer 10 USB to USB cable 10 VGA to VGA cable 10, 11 VGA to YPbPr cable 15 Connection Ports Audio input connector 9 Audio-B left-channel input connector 9 Audio-B right-channel input connector 9 HDMI connector 9 Microphone connector 9 Power cord connector 9 RS232 connector 9 Security cable slot 9 S-...
...20 Elevator foot 20 Tilt adjustment wheel 20 Adjusting the Projector Zoom and Focus 21 Focus ring 21 Zoom tab 21 Audio Input 43 Audio output connector 9 Audio Settings 43 C Capture Screen 42 Changing the Lamp 67 Closed Caption 46 Connecting the Projector Composite video cable 14 Connecting... 13 To Computer 10 USB to USB cable 10 VGA to VGA cable 10, 11 VGA to YPbPr cable 15 Connection Ports Audio input connector 9 Audio-B left-channel input connector 9 Audio-B right-channel input connector 9 HDMI connector 9 Microphone connector 9 Power cord connector 9 RS232 connector 9 Security cable slot 9 S-...
User Guide
Page 79
Control Panel 23 D Dell contacting 74 M Main Unit 7 Control panel 7 Elevator button 7 Focus ring 7 IR receiver 7 Lens 7 Zoom tab 7 Menu Position 42 Menu Settings 42 Menu Timeout 42 Menu ... 44 R Remote Control 26 IR receiver 24 Reset 43 Reset, Factory 47 RJ45 connector 9 S Screen 43 Screen Settings 42 Security Settings 44 Speaker 43 Specifications Audio 70 Brightness 69 Index 79
Control Panel 23 D Dell contacting 74 M Main Unit 7 Control panel 7 Elevator button 7 Focus ring 7 IR receiver 7 Lens 7 Zoom tab 7 Menu Position 42 Menu Settings 42 Menu Timeout 42 Menu ... 44 R Remote Control 26 IR receiver 24 Reset 43 Reset, Factory 47 RJ45 connector 9 S Screen 43 Screen Settings 42 Security Settings 44 Speaker 43 Specifications Audio 70 Brightness 69 Index 79
