Setup Guide
Page 5
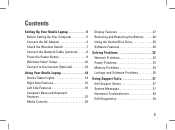
... the Wireless Switch 7 Connect the Network Cable (optional) . . . . . 8 Press the Power Button 9 Windows Vista® Setup 10 Connect to the Internet (Optional 10 Using Your Studio Laptop 14 Device Status Lights 14 Right Side Features 16 Left Side Features 18 Computer Base and Keyboard Features 22 Media Controls 26 Display Features 27... 29 Software Features 30 Solving Problems 32 Network Problems 32 Power Problems 33 Memory Problems 34 Lockups and Software Problems 35 Using Support Tools 37 Dell Support Center 37 System Messages 37 Hardware Troubleshooter 39...
... the Wireless Switch 7 Connect the Network Cable (optional) . . . . . 8 Press the Power Button 9 Windows Vista® Setup 10 Connect to the Internet (Optional 10 Using Your Studio Laptop 14 Device Status Lights 14 Right Side Features 16 Left Side Features 18 Computer Base and Keyboard Features 22 Media Controls 26 Display Features 27... 29 Software Features 30 Solving Problems 32 Network Problems 32 Power Problems 33 Memory Problems 34 Lockups and Software Problems 35 Using Support Tools 37 Dell Support Center 37 System Messages 37 Hardware Troubleshooter 39...
Setup Guide
Page 7
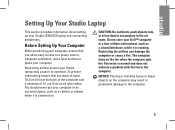
You should never put your Studio 1536/1537 laptop and connecting peripherals. The computer turns on all other sides. Fan noise is running. Setting Up Your Studio Laptop This section provides information about setting up your computer in an enclosed space, such as a closed briefcase, while it ... Setting Up Your Computer When positioning your computer. Restricting the airflow can damage the computer or cause a fire. Restricting airflow around your Dell™ computer in ) on the fan when the computer gets hot. To prevent overheating ensure that you leave at least 10.2 cm...
You should never put your Studio 1536/1537 laptop and connecting peripherals. The computer turns on all other sides. Fan noise is running. Setting Up Your Studio Laptop This section provides information about setting up your computer in an enclosed space, such as a closed briefcase, while it ... Setting Up Your Computer When positioning your computer. Restricting the airflow can damage the computer or cause a fire. Restricting airflow around your Dell™ computer in ) on the fan when the computer gets hot. To prevent overheating ensure that you leave at least 10.2 cm...
Setup Guide
Page 8
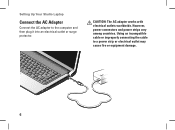
Setting Up Your Studio Laptop Connect the AC Adapter Connect the AC adapter to a power strip or electrical outlet may cause fire or equipment damage. 6 Using an incompatible cable or improperly connecting the cable to the computer and then plug it into an electrical outlet or surge protector. However, power connectors and power strips vary among countries. CAUTION: The AC adapter works with electrical outlets worldwide.
Setting Up Your Studio Laptop Connect the AC Adapter Connect the AC adapter to a power strip or electrical outlet may cause fire or equipment damage. 6 Using an incompatible cable or improperly connecting the cable to the computer and then plug it into an electrical outlet or surge protector. However, power connectors and power strips vary among countries. CAUTION: The AC adapter works with electrical outlets worldwide.
Setup Guide
Page 9
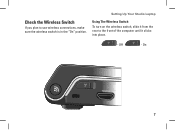
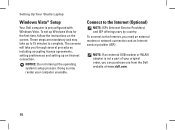
Off - Using The Wireless Switch To turn on the wireless switch, slide it from the rear to use wireless connections, make sure the wireless switch is in the "On" position. Setting Up Your Studio Laptop Check the Wireless Switch If you plan to the front of the computer until it clicks into place. - On 7
Off - Using The Wireless Switch To turn on the wireless switch, slide it from the rear to use wireless connections, make sure the wireless switch is in the "On" position. Setting Up Your Studio Laptop Check the Wireless Switch If you plan to the front of the computer until it clicks into place. - On 7
Setup Guide
Page 10
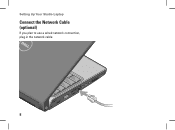
Setting Up Your Studio Laptop Connect the Network Cable (optional) If you plan to use a wired network connection, plug in the network cable. 8
Setting Up Your Studio Laptop Connect the Network Cable (optional) If you plan to use a wired network connection, plug in the network cable. 8

Setup Guide
Page 11
Press the Power Button Setting Up Your Studio Laptop 9
Press the Power Button Setting Up Your Studio Laptop 9
Setup Guide
Page 12
... steps are mandatory and may render your original order, you can purchase one from the Dell website at www.dell.com. 10 To set up to 15 minutes to complete. NOTE: If an external... USB modem or WLAN adapter is preconfigured with Windows Vista. The screens will take up Windows Vista for the first time, follow the instructions on the screen. Setting Up Your Studio Laptop... Windows Vista® Setup Your Dell computer is not a part of your computer unusable.
... steps are mandatory and may render your original order, you can purchase one from the Dell website at www.dell.com. 10 To set up to 15 minutes to complete. NOTE: If an external... USB modem or WLAN adapter is preconfigured with Windows Vista. The screens will take up Windows Vista for the first time, follow the instructions on the screen. Setting Up Your Studio Laptop... Windows Vista® Setup Your Dell computer is not a part of your computer unusable.
Setup Guide
Page 13
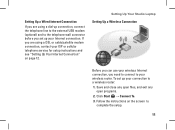
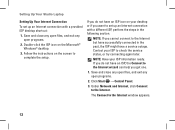
... If you are using a dial-up connection, connect the telephone line to the external USB modem (optional) and to your wireless router. Setting Up Your Studio Laptop Setting Up a Wireless Connection Before you can use your wireless Internet connection, you need to connect to the telephone wall connector before you are using...
... If you are using a dial-up connection, connect the telephone line to the external USB modem (optional) and to your wireless router. Setting Up Your Studio Laptop Setting Up a Wireless Connection Before you can use your wireless Internet connection, you need to connect to the telephone wall connector before you are using...
Setup Guide
Page 14
..., or try connecting again later. Click Start → Control Panel. 3. Under Network and Internet, click Connect to the Internet window appears. 12 Setting Up Your Studio Laptop Setting Up Your Internet Connection To set up an Internet connection with a different ISP, perform the steps in the past, the ISP might have a service...
..., or try connecting again later. Click Start → Control Panel. 3. Under Network and Internet, click Connect to the Internet window appears. 12 Setting Up Your Studio Laptop Setting Up Your Internet Connection To set up an Internet connection with a different ISP, perform the steps in the past, the ISP might have a service...
Setup Guide
Page 15
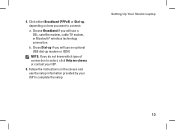
Chose Dial-up if you do not know which type of connection to complete the setup. b. NOTE: If you will use the setup information provided by your ISP to select, click Help me choose or contact your ISP. 5. Follow the instructions on how you will use an optional USB dial-up , depending on the screen and use a DSL, satellite modem, cable TV modem, or Bluetooth® wireless technology connection. Choose Broadband if you want to connect: a. Setting Up Your Studio Laptop 13 Click either Broadband (PPPoE) or Dial-up modem or ISDN. 4.
Chose Dial-up if you do not know which type of connection to complete the setup. b. NOTE: If you will use the setup information provided by your ISP to select, click Help me choose or contact your ISP. 5. Follow the instructions on how you will use an optional USB dial-up , depending on the screen and use a DSL, satellite modem, cable TV modem, or Bluetooth® wireless technology connection. Choose Broadband if you want to connect: a. Setting Up Your Studio Laptop 13 Click either Broadband (PPPoE) or Dial-up modem or ISDN. 4.
Setup Guide
Page 16
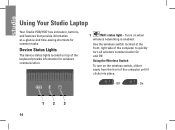
On 123 14 Use the wireless switch located at -a-glance and time-saving shortcuts for wireless communication. 1 WiFi status light - Off - Using Your Studio Laptop Your Studio 1536/1537 has indicators, buttons, and features that provide information at the front, right side of the computer to quickly turn on when wireless networking is enabled. ...
On 123 14 Use the wireless switch located at -a-glance and time-saving shortcuts for wireless communication. 1 WiFi status light - Off - Using Your Studio Laptop Your Studio 1536/1537 has indicators, buttons, and features that provide information at the front, right side of the computer to quickly turn on when wireless networking is enabled. ...
Setup Guide
Page 17
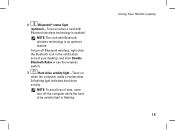
Turns on when the computer reads or writes data. A flashing light indicates hard drive activity. Using Your Studio Laptop 15 Turns on when a card with Bluetooth wireless technology is an optional feature. NOTE: The card with Bluetooth wireless technology is flashing. NOTE: To avoid ...
Turns on when the computer reads or writes data. A flashing light indicates hard drive activity. Using Your Studio Laptop 15 Turns on when a card with Bluetooth wireless technology is an optional feature. NOTE: The card with Bluetooth wireless technology is flashing. NOTE: To avoid ...
Setup Guide
Page 19
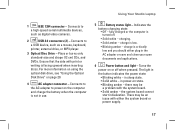
...) CDs, and DVDs. For more information on using the optical disk drive, see "Using the Optical Disk Drive" on state. • Blinking amber - Using Your Studio Laptop 1 IEEE 1394 connector - Connects to power on or off . • Solid white - Connects to a USB device, such as digital video cameras. 2 USB 2.0 connectors (2) - the system...
...) CDs, and DVDs. For more information on using the optical disk drive, see "Using the Optical Disk Drive" on state. • Blinking amber - Using Your Studio Laptop 1 IEEE 1394 connector - Connects to power on or off . • Solid white - Connects to a USB device, such as digital video cameras. 2 USB 2.0 connectors (2) - the system...
Setup Guide
Page 21
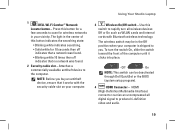
...be deactivated through Dell QuickSet or the BIOS (system setup program). 4 HDMI Connector - Attaches a commercially available antitheft device to you buy an antitheft device, ensure that no network was found. • Blinking white 10 times then off indicates that a network was found. 2 Security cable slot - Using Your Studio Laptop 3 Wireless On...; Blinking white indicates searching. • Solid white for wireless networks in the center of the computer until it works with Bluetooth wireless technology. 1 DELL Wi-Fi Catcher™ Network Locator button -
...be deactivated through Dell QuickSet or the BIOS (system setup program). 4 HDMI Connector - Attaches a commercially available antitheft device to you buy an antitheft device, ensure that no network was found. • Blinking white 10 times then off indicates that a network was found. 2 Security cable slot - Using Your Studio Laptop 3 Wireless On...; Blinking white indicates searching. • Solid white for wireless networks in the center of the computer until it works with Bluetooth wireless technology. 1 DELL Wi-Fi Catcher™ Network Locator button -

Setup Guide
Page 22
... signal for both connectors. 11 SD/MMC - xD 8-in-1 Media card reader - H) • Hi Speed-SD • Hi Density-SD 20 M and type - Using Your Studio Laptop 5 VGA connector - Connects to view and share digital photos, music, videos, and documents stored on the following digital memory cards: • Secure digital (SD) memory...
... signal for both connectors. 11 SD/MMC - xD 8-in-1 Media card reader - H) • Hi Speed-SD • Hi Density-SD 20 M and type - Using Your Studio Laptop 5 VGA connector - Connects to view and share digital photos, music, videos, and documents stored on the following digital memory cards: • Secure digital (SD) memory...

Setup Guide
Page 23
.... blanks from dust and other computers may not fit your computer. NOTE: Your computer ships with a plastic blank installed in the ExpressCard slot. Using Your Studio Laptop 21 blanks from dust and other computers may not fit your computer. 12 ExpressCard slot - Blanks protect unused slots from other particles.
.... blanks from dust and other computers may not fit your computer. NOTE: Your computer ships with a plastic blank installed in the ExpressCard slot. Using Your Studio Laptop 21 blanks from dust and other computers may not fit your computer. 12 ExpressCard slot - Blanks protect unused slots from other particles.

Setup Guide
Page 24
Using Your Studio Laptop Computer Base and Keyboard Features 1 2 3 4 22
Using Your Studio Laptop Computer Base and Keyboard Features 1 2 3 4 22

Setup Guide
Page 25
... speed. and right-click functions those on it. half keyboard/touch pad brightness c. To change the circular scrolling and zoom settings, double click the Dell Touch pad icon in the notification area of a mouse to toggle between the three lighting states (in the given order). The optional backlit keyboard provides... The three lighting states are: a. In the Scrolling tab, you can be personalized by bringing two fingers together). 4 Touch pad buttons - no lighting Using Your Studio Laptop 3 Touch pad - Provide left -click by illuminating all symbols on keyboard, see the...
... speed. and right-click functions those on it. half keyboard/touch pad brightness c. To change the circular scrolling and zoom settings, double click the Dell Touch pad icon in the notification area of a mouse to toggle between the three lighting states (in the given order). The optional backlit keyboard provides... The three lighting states are: a. In the Scrolling tab, you can be personalized by bringing two fingers together). 4 Touch pad buttons - no lighting Using Your Studio Laptop 3 Touch pad - Provide left -click by illuminating all symbols on keyboard, see the...
Setup Guide
Page 27
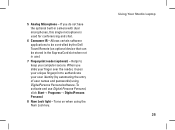
... not in camera with dual microphones, this single microphone is used for conferencing and chat. 6 Consumer IR - Using Your Studio Laptop 25 Allows certain software applications to authenticate your user identity (by the Dell Travel Remote (an optional device that can be controlled by automating the entry of user names and passwords) using...
... not in camera with dual microphones, this single microphone is used for conferencing and chat. 6 Consumer IR - Using Your Studio Laptop 25 Allows certain software applications to authenticate your user identity (by the Dell Travel Remote (an optional device that can be controlled by automating the entry of user names and passwords) using...

Setup Guide
Page 28
Using Your Studio Laptop Media Controls To use the media controls, lightly touch the symbol and then release. The control symbol will shine for 2 seconds to confirm your selection then fade away. Launch Dell MediaDirect Play the previous track or chapter Stop Play or pause Play the next track or chapter Mute the sound Turn down the volume Turn up the volume Eject the disc 26
Using Your Studio Laptop Media Controls To use the media controls, lightly touch the symbol and then release. The control symbol will shine for 2 seconds to confirm your selection then fade away. Launch Dell MediaDirect Play the previous track or chapter Stop Play or pause Play the next track or chapter Mute the sound Turn down the volume Turn up the volume Eject the disc 26


