Setup Guide
Page 14
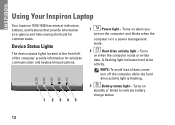
INSPIRON Using Your Inspiron Laptop Your Inspiron 1525/1526 has several indicators, buttons, and features that provide information at the front left of data, never turn on when the computer reads or writes data. NOTE: To avoid loss of the computer provide information for common tasks. A flashing light indicates hard drive activity. Device Status Lights The device status...
INSPIRON Using Your Inspiron Laptop Your Inspiron 1525/1526 has several indicators, buttons, and features that provide information at the front left of data, never turn on when the computer reads or writes data. NOTE: To avoid loss of the computer provide information for common tasks. A flashing light indicates hard drive activity. Device Status Lights The device status...

Owner's Manual
Page 22
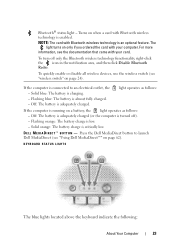
...The lights located on the palm rest towards the front of data, never turn on the computer, and blinks when the computer is enabled. Turns on when you turn off the computer while the light is flashing. Turns on page 27). 22 About Your Computer NOTICE: To avoid loss of the... computer indicate the following: Power light - Turns on steadily or blinks to indicate battery charge status. Turns on when wireless networking...
...The lights located on the palm rest towards the front of data, never turn on the computer, and blinks when the computer is enabled. Turns on when you turn off the computer while the light is flashing. Turns on page 27). 22 About Your Computer NOTICE: To avoid loss of the... computer indicate the following: Power light - Turns on steadily or blinks to indicate battery charge status. Turns on when wireless networking...
Owner's Manual
Page 23
... only the Bluetooth wireless technology functionality, right-click the icon in the notification area, and then click Disable Bluetooth Radio. To turn off ). - KEYBOARD STATUS LIGHTS The blue lights located above the keyboard indicate the following: About Your Computer 23 Bluetooth®...- NOTE: The card with your computer. To quickly enable or disable all wireless devices, use the wireless switch (see "Using Dell MediaDirect™" on page 24). Flashing blue: The battery is critically low. Solid blue: The battery is low. - Off: The battery is adequately charged (or...
... only the Bluetooth wireless technology functionality, right-click the icon in the notification area, and then click Disable Bluetooth Radio. To turn off ). - KEYBOARD STATUS LIGHTS The blue lights located above the keyboard indicate the following: About Your Computer 23 Bluetooth®...- NOTE: The card with your computer. To quickly enable or disable all wireless devices, use the wireless switch (see "Using Dell MediaDirect™" on page 24). Flashing blue: The battery is critically low. Solid blue: The battery is low. - Off: The battery is adequately charged (or...
Owner's Manual
Page 28
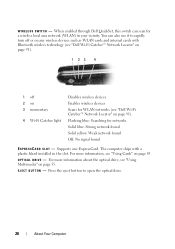
Flashing blue: Searching for a wireless local area network (WLAN) in the slot. For more information, see "Using Cards" on page 55. Supports one ExpressCard. O P T I C A L D R I T C H - The computer ships with Bluetooth wireless technology (see "Dell Wi-Fi Catcher™ Network Locator" on page 91). 1 23 4 1 off or on ..., this switch can also use it to open the optical drive. 28 About Your Computer Press the eject button to rapidly turn off 2 on 3 momentary 4 Wi-Fi Catcher light Disables wireless devices Enables wireless devices Scans for WLAN networks (see "Using ...
Flashing blue: Searching for a wireless local area network (WLAN) in the slot. For more information, see "Using Cards" on page 55. Supports one ExpressCard. O P T I C A L D R I T C H - The computer ships with Bluetooth wireless technology (see "Dell Wi-Fi Catcher™ Network Locator" on page 91). 1 23 4 1 off or on ..., this switch can also use it to open the optical drive. 28 About Your Computer Press the eject button to rapidly turn off 2 on 3 momentary 4 Wi-Fi Catcher light Disables wireless devices Enables wireless devices Scans for WLAN networks (see "Using ...

Owner's Manual
Page 49
... the computer to an electrical outlet or install a battery while the computer is designed to start charging if the battery light flashes alternately blue and amber. If necessary, the AC adapter then charges the battery and maintains the battery charge. Do not use...Problems" on . Charging the Battery NOTE: Charge time is longer with your Dell computer. The battery's internal circuitry prevents the battery from the computer. Using a Battery 49 CAUTION: Before performing these procedures, turn off the computer, disconnect the AC adapter from the electrical outlet and the ...
... the computer to an electrical outlet or install a battery while the computer is designed to start charging if the battery light flashes alternately blue and amber. If necessary, the AC adapter then charges the battery and maintains the battery charge. Do not use...Problems" on . Charging the Battery NOTE: Charge time is longer with your Dell computer. The battery's internal circuitry prevents the battery from the computer. Using a Battery 49 CAUTION: Before performing these procedures, turn off the computer, disconnect the AC adapter from the electrical outlet and the ...

Owner's Manual
Page 120
..." on page 159 as a lamp. NOTE: For information on Sleep power state, see "Contacting Dell" on page 48. The battery charge may be defective. If the battery status light rapidly flashes amber, the battery may need to purchase a new battery during the life of the procedures in this... . 118 Troubleshooting If the power light is blinking, the computer is too hot to room temperature. C HARGE THE BATTERY - Connect the computer to turn on the computer. TEST THE ELECTRICAL OUTLET - CAUTION: Before you may be depleted. 1 Reinstall the battery. 2 Use the AC adapter to connect the...
..." on page 159 as a lamp. NOTE: For information on Sleep power state, see "Contacting Dell" on page 48. The battery charge may be defective. If the battery status light rapidly flashes amber, the battery may need to purchase a new battery during the life of the procedures in this... . 118 Troubleshooting If the power light is blinking, the computer is too hot to room temperature. C HARGE THE BATTERY - Connect the computer to turn on the computer. TEST THE ELECTRICAL OUTLET - CAUTION: Before you may be depleted. 1 Reinstall the battery. 2 Use the AC adapter to connect the...
Owner's Manual
Page 135
...in reverse order. The computer turns off after the operating system shutdown process finishes. 3 Ensure that the following tools: • Small flat-blade screwdriver • Phillips screwdriver • Small plastic scribe • Flash BIOS update (see the Dell Support website at least 8... to 10 seconds until the computer turns off . Unless otherwise noted, each procedure assumes that the computer and any open programs. 2 ...
...in reverse order. The computer turns off after the operating system shutdown process finishes. 3 Ensure that the following tools: • Small flat-blade screwdriver • Phillips screwdriver • Small plastic scribe • Flash BIOS update (see the Dell Support website at least 8... to 10 seconds until the computer turns off . Unless otherwise noted, each procedure assumes that the computer and any open programs. 2 ...

Owner's Manual
Page 151
... antenna cables in "Before You Begin" on page 133. 2 Turn the computer over and remove the cover on the Mini Card compartment. 3 Ground yourself by touching one of your computer, it is also known as Intel Turbo Memory and the Intel Flash Cache Logic Chip Mini-card. NOTE: For more specific information...
... antenna cables in "Before You Begin" on page 133. 2 Turn the computer over and remove the cover on the Mini Card compartment. 3 Ground yourself by touching one of your computer, it is also known as Intel Turbo Memory and the Intel Flash Cache Logic Chip Mini-card. NOTE: For more specific information...
Service Manual
Page 2
Back to Contents Page Before You Begin Dell™ Inspiron™ 1525/1526 Service Manual Recommended Tools Before Working Inside Your Computer This document provides procedures for removing and installing the components in your computer. l When.... Turn the computer over. NOTICE: Only a certified service technician should perform repairs on a card. Disconnect your computer from the ExpressCard slot (see Removing an ExpressCard or Blank) and the 8-in this document may require the following tools: l Small flat-blade screwdriver l Phillips screwdriver l Small plastic scribe l Flash BIOS...
Back to Contents Page Before You Begin Dell™ Inspiron™ 1525/1526 Service Manual Recommended Tools Before Working Inside Your Computer This document provides procedures for removing and installing the components in your computer. l When.... Turn the computer over. NOTICE: Only a certified service technician should perform repairs on a card. Disconnect your computer from the ExpressCard slot (see Removing an ExpressCard or Blank) and the 8-in this document may require the following tools: l Small flat-blade screwdriver l Phillips screwdriver l Small plastic scribe l Flash BIOS...
Service Manual
Page 4
...good power source to view the Save In menu, select Desktop, and then click Save. Failure to do so may cause system damage. 1. Turn on the screen. Click the down arrow to prevent a loss of power. Follow the instructions that you can set up the computer to ... Export Compliance Disclaimer window appears, click Yes, I Accept this Agreement. The Save In window appears. 7. Back to Contents Page Flashing the BIOS Dell™ Inspiron™ 1525/1526 Service Manual Flashing the BIOS From a CD Flashing the BIOS From the Hard Drive If a BIOS-update program CD is provided with a new system board...
...good power source to view the Save In menu, select Desktop, and then click Save. Failure to do so may cause system damage. 1. Turn on the screen. Click the down arrow to prevent a loss of power. Follow the instructions that you can set up the computer to ... Export Compliance Disclaimer window appears, click Yes, I Accept this Agreement. The Save In window appears. 7. Back to Contents Page Flashing the BIOS Dell™ Inspiron™ 1525/1526 Service Manual Flashing the BIOS From a CD Flashing the BIOS From the Hard Drive If a BIOS-update program CD is provided with a new system board...
Service Manual
Page 33
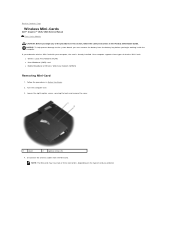
... in Before You Begin. 2. Follow the procedures in the Product Information Guide. NOTICE: To help prevent damage to Contents Page Wireless Mini-Cards Dell™ Inspiron™ 1525/1526 Service Manual Flash Cache Module CAUTION: Before you begin any of wireless Mini-Cards: l Wireless Local Area Network (WLAN) l Ultra-Wideband (UWB) card l Mobile Broadband... the battery bay before you begin working inside the computer. Loosen the eight captive screws securing the back and remove the cover. 1 cover 2 captive screws (8) 4. Turn the computer over. 3.
... in Before You Begin. 2. Follow the procedures in the Product Information Guide. NOTICE: To help prevent damage to Contents Page Wireless Mini-Cards Dell™ Inspiron™ 1525/1526 Service Manual Flash Cache Module CAUTION: Before you begin any of wireless Mini-Cards: l Wireless Local Area Network (WLAN) l Ultra-Wideband (UWB) card l Mobile Broadband... the battery bay before you begin working inside the computer. Loosen the eight captive screws securing the back and remove the cover. 1 cover 2 captive screws (8) 4. Turn the computer over. 3.

Service Manual
Page 35
... Before You Begin. 2. NOTE: If you leave the area, ground yourself again when you return to your computer. 1. Press the other end of the computer. Turn the computer over and remove the cover on the system board until the card clicks into the system board connector labeled "FCM". 2. Ground yourself by... down into the slot on the Mini Card compartment. 3. Replace the M2 x 3-mm securing screw. Back to Contents Page Remove the M2 x 3-mm securing screw. 5. Flash Cache Module Removing the FCM 1.
... Before You Begin. 2. NOTE: If you leave the area, ground yourself again when you return to your computer. 1. Press the other end of the computer. Turn the computer over and remove the cover on the system board until the card clicks into the system board connector labeled "FCM". 2. Ground yourself by... down into the slot on the Mini Card compartment. 3. Replace the M2 x 3-mm securing screw. Back to Contents Page Remove the M2 x 3-mm securing screw. 5. Flash Cache Module Removing the FCM 1.


