User's Guide
Page 4
Automatic Document Feeder (ADF 36 Operator Panel 36 Securing the Printer 36 Ordering Supplies 37 Setting Up Printer (Printer Setup 39 5 Removing Packaging Material 41 6 Connecting Your Printer 43 Connecting Printer to Computer or Network 44 Direct Connection 44... Network Connection 45 Turning On the Printer 47 Connecting the Telephone Line 48 7 Setting the IP Address 51 Setting Initial Settings on the Operator Panel . . . . . 51 Assigning an IP Address (for IPv4 Mode 53 The Operator Panel 54 The Tool Box 55 Verifying the...
Automatic Document Feeder (ADF 36 Operator Panel 36 Securing the Printer 36 Ordering Supplies 37 Setting Up Printer (Printer Setup 39 5 Removing Packaging Material 41 6 Connecting Your Printer 43 Connecting Printer to Computer or Network 44 Direct Connection 44... Network Connection 45 Turning On the Printer 47 Connecting the Telephone Line 48 7 Setting the IP Address 51 Setting Initial Settings on the Operator Panel . . . . . 51 Assigning an IP Address (for IPv4 Mode 53 The Operator Panel 54 The Tool Box 55 Verifying the...

User's Guide
Page 13
... Adjust BTR 337 Adjust Fuser 338 Registration Adjustment 338 Adjust Altitude 340 Reset Defaults 340 Non-Dell Toner 341 BTR Refresh Mode 341 Web Link Customization 342 TCP/IP Settings 342 Tray Settings 343 EWS (Embedded Web Server or Dell Printer Configuration Web Tool 345 Scan Defaults 345 Fax Defaults 347 Copy Defaults 348 Fax...
... Adjust BTR 337 Adjust Fuser 338 Registration Adjustment 338 Adjust Altitude 340 Reset Defaults 340 Non-Dell Toner 341 BTR Refresh Mode 341 Web Link Customization 342 TCP/IP Settings 342 Tray Settings 343 EWS (Embedded Web Server or Dell Printer Configuration Web Tool 345 Scan Defaults 345 Fax Defaults 347 Copy Defaults 348 Fax...
User's Guide
Page 53
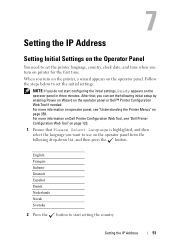
... For more information on operator panel, see "Dell Printer Configuration Web Tool" on page 123. 1 Ensure that , you can set the printer language, country, clock date, and time when you turn on printer for the first time. Setting the IP Address 51 After that Please Select Language is... the language you do not start setting the country. 7 Setting the IP Address Setting Initial Settings on the Operator Panel You need to use on the operator panel from the following initial setup by enabling Power on Wizard on the operator panel or Dell™ Printer Configuration Web Tool if...
... For more information on operator panel, see "Dell Printer Configuration Web Tool" on page 123. 1 Ensure that , you can set the printer language, country, clock date, and time when you turn on printer for the first time. Setting the IP Address 51 After that Please Select Language is... the language you do not start setting the country. 7 Setting the IP Address Setting Initial Settings on the Operator Panel You need to use on the operator panel from the following initial setup by enabling Power on Wizard on the operator panel or Dell™ Printer Configuration Web Tool if...
User's Guide
Page 54
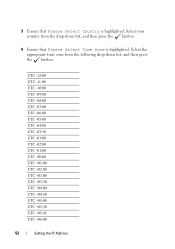
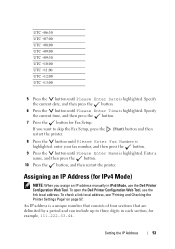
Select your country from the following drop-down list, and then press the button. 4 Ensure that Please Select Country is highlighted. Select the appropriate time zone from the drop-down list, and then press the button. 3 Ensure that Please Select Time Zone is highlighted. UTC -12:00 UTC -11:00 UTC -10:00 UTC -09:00 UTC -08:00 UTC -07:00 UTC -06:00 UTC -05:00 UTC -04:00 UTC -03:30 UTC -03:00 UTC -02:00 UTC -01:00 UTC 00:00 UTC +01:00 UTC +02:00 UTC +03:00 UTC +03:30 UTC +04:00 UTC +04:30 UTC +05:00 UTC +05:30 UTC +05:45 UTC +06:00 52 Setting the IP Address
Select your country from the following drop-down list, and then press the button. 4 Ensure that Please Select Country is highlighted. Select the appropriate time zone from the drop-down list, and then press the button. 3 Ensure that Please Select Time Zone is highlighted. UTC -12:00 UTC -11:00 UTC -10:00 UTC -09:00 UTC -08:00 UTC -07:00 UTC -06:00 UTC -05:00 UTC -04:00 UTC -03:30 UTC -03:00 UTC -02:00 UTC -01:00 UTC 00:00 UTC +01:00 UTC +02:00 UTC +03:00 UTC +03:30 UTC +04:00 UTC +04:30 UTC +05:00 UTC +05:30 UTC +05:45 UTC +06:00 52 Setting the IP Address
User's Guide
Page 55
...digits in IPv6 Mode, use the link local address. To check a link local address, see "Printing and Checking the Printer Settings Page" on page 57. An IP address is a unique number that consists of four sections that are delimited by a period and can include up to skip the... button and then restart the printer. 8 Press the button until Please Enter Date is highlighted. To open the Dell Printer Configuration Web Tool, use the Dell Printer Configuration Web Tool. Setting the IP Address 53 Specify the current time, and then press the button. 7 Press the button for example, 111.222...
...digits in IPv6 Mode, use the link local address. To check a link local address, see "Printing and Checking the Printer Settings Page" on page 57. An IP address is a unique number that consists of four sections that are delimited by a period and can include up to skip the... button and then restart the printer. 8 Press the button until Please Enter Date is highlighted. To open the Dell Printer Configuration Web Tool, use the Dell Printer Configuration Web Tool. Setting the IP Address 53 Specify the current time, and then press the button. 7 Press the button for example, 111.222...

User's Guide
Page 56
...Panel For more information on using the tool box. NOTE: Assigning an IP address is considered as an advanced function and is highlighted, and then press the button. 54 Setting the IP Address For assignment of the IP address assigned may be assigned. button until IPv4 is highlighted, and then... press the 8 Ensure that Get IP Address is highlighted, and then press the button. 9 Ensure that ...
...Panel For more information on using the tool box. NOTE: Assigning an IP address is considered as an advanced function and is highlighted, and then press the button. 54 Setting the IP Address For assignment of the IP address assigned may be assigned. button until IPv4 is highlighted, and then... press the 8 Ensure that Get IP Address is highlighted, and then press the button. 9 Ensure that ...
User's Guide
Page 57
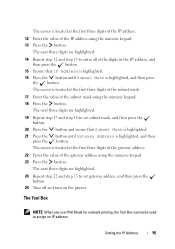
... highlighted, and then button. The next three digits are highlighted. 19 Repeat step 17 and step 18 to set subnet mask, and then press the button. 20 Press the button and ensure that IP Address is highlighted. 16 Press the button until Gateway Address is highlighted, and then press the button.... Setting the IP Address 55 The cursor is located at the first three digits of the IP address. 12 Enter the value of the IP address using the numeric keypad. 23 Press the button. The cursor is located at ...
... highlighted, and then button. The next three digits are highlighted. 19 Repeat step 17 and step 18 to set subnet mask, and then press the button. 20 Press the button and ensure that IP Address is highlighted. 16 Press the button until Gateway Address is highlighted, and then press the button.... Setting the IP Address 55 The cursor is located at the first three digits of the IP address. 12 Enter the value of the IP address using the numeric keypad. 23 Press the button. The cursor is located at ...
User's Guide
Page 58
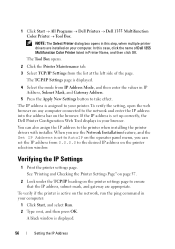
... Maintenance tab. 3 Select TCP/IP Settings from IP Address Mode, and then enter the values in this case, click the name of the page. The IP address is displayed. 56 Setting the IP Address 1 Click Start All Programs Dell Printers Dell 1355 Multifunction Color Printer ... Tool Box. If the IP address is displayed. 4 Select the mode from the...
... Maintenance tab. 3 Select TCP/IP Settings from IP Address Mode, and then enter the values in this case, click the name of the page. The IP address is displayed. 56 Setting the IP Address 1 Click Start All Programs Dell Printers Dell 1355 Multifunction Color Printer ... Tool Box. If the IP address is displayed. 4 Select the mode from the...
User's Guide
Page 59
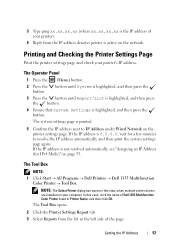
...; All Programs Dell Printers Dell 1355 Multifunction Color Printer Tool Box. The Tool Box opens. 2 Click the Printer Settings Report tab. 3 Select Reports from the list at the left side of your printer's IP address. Setting the IP Address 57 Printing and Checking the Printer Settings Page Print the printer settings page and check your...
...; All Programs Dell Printers Dell 1355 Multifunction Color Printer Tool Box. The Tool Box opens. 2 Click the Printer Settings Report tab. 3 Select Reports from the list at the left side of your printer's IP address. Setting the IP Address 57 Printing and Checking the Printer Settings Page Print the printer settings page and check your...
User's Guide
Page 60
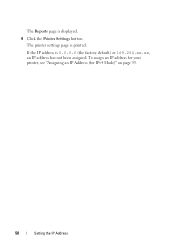
The Reports page is printed. The printer settings page is displayed. 4 Click the Printer Settings button. If the IP address is 0.0.0.0 (the factory default) or 169.254.xx.xx, an IP address has not been assigned. To assign an IP address for your printer, see "Assigning an IP Address (for IPv4 Mode)" on page 53. 58 Setting the IP Address
The Reports page is printed. The printer settings page is displayed. 4 Click the Printer Settings button. If the IP address is 0.0.0.0 (the factory default) or 169.254.xx.xx, an IP address has not been assigned. To assign an IP address for your printer, see "Assigning an IP Address (for IPv4 Mode)" on page 53. 58 Setting the IP Address
User's Guide
Page 71
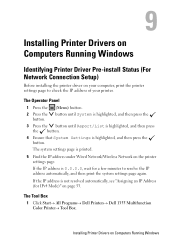
... not resolved automatically, see "Assigning an IP Address (for a few minutes to check the IP address of your computer, print the printer settings page to resolve the IP address automatically, and then print the system settings page again. The Tool Box 1 Click Start All Programs Dell Printers Dell 1355 Multifunction Color Printer Tool...
... not resolved automatically, see "Assigning an IP Address (for a few minutes to check the IP address of your computer, print the printer settings page to resolve the IP address automatically, and then print the system settings page again. The Tool Box 1 Click Start All Programs Dell Printers Dell 1355 Multifunction Color Printer Tool...
User's Guide
Page 72
...must disable the firewall before installing your computer, the Select Printer window opens. Enable the firewall after the installation of Dell 1355cnw Color MFP listed in Printer Name. The TCP/IP Settings page appears. NOTE: For Windows Server 2008 R2 and Windows 7 operating systems, if you must be installed. ...To assign one of the page. The Tool Box opens. 2 Select TCP/IP Settings from the list on the screen. NOTE:...
...must disable the firewall before installing your computer, the Select Printer window opens. Enable the firewall after the installation of Dell 1355cnw Color MFP listed in Printer Name. The TCP/IP Settings page appears. NOTE: For Windows Server 2008 R2 and Windows 7 operating systems, if you must be installed. ...To assign one of the page. The Tool Box opens. 2 Select TCP/IP Settings from the list on the screen. NOTE:...
User's Guide
Page 76
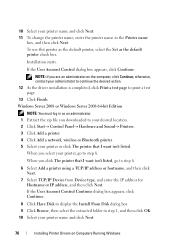
...printer to the list manually. NOTE: If you want to print a test page. You may specify the IP address and port name at this printer as the default printer, select the Set as the default printer check box. 14 Click Finish. 13 As the driver installation is displayed in the ...installer. Before you can continue, you have installed this printer on the server computer, select I am setting up this printer on Computers Running Windows NOTE: When using AutoIP, 0.0.0.0 is completed, click Print a test page to install from the printer list,...
...printer to the list manually. NOTE: If you want to print a test page. You may specify the IP address and port name at this printer as the default printer, select the Set as the default printer check box. 14 Click Finish. 13 As the driver installation is displayed in the ...installer. Before you can continue, you have installed this printer on the server computer, select I am setting up this printer on Computers Running Windows NOTE: When using AutoIP, 0.0.0.0 is completed, click Print a test page to install from the printer list,...

User's Guide
Page 77
...Continue; NOTE: If you want isn't listed. 6 Select Add a printer using a TCP/IP address or hostname, and then click Next. 7 Select TCP/IP Device for Device type, and enter the IP address for Hostname or IP address, and then click Next. otherwise, contact your desired location. 2 Click Start ... select the Set this printer with other users on the network to access this printer, select Share this printer as default check box. 6 Select the software and documentation you are an administrator on the network, and then enter a share name that I want to install the Dell software and ...
...Continue; NOTE: If you want isn't listed. 6 Select Add a printer using a TCP/IP address or hostname, and then click Next. 7 Select TCP/IP Device for Device type, and enter the IP address for Hostname or IP address, and then click Next. otherwise, contact your desired location. 2 Click Start ... select the Set this printer with other users on the network to access this printer, select Share this printer as default check box. 6 Select the software and documentation you are an administrator on the network, and then enter a share name that I want to install the Dell software and ...
User's Guide
Page 78
... change the printer name, enter the printer name in as the default printer check box. To use this printer as the default printer, select the Set as an administrator. 1 Extract the zip file you select your printer or click The printer that I want isn't listed, go to step 6. 6 Select... Add a printer using a TCP/IP address or hostname, and then click Next. 7 Select TCP/IP Device from Device type, and enter the IP address for Hostname or IP address, and then click Next.
... change the printer name, enter the printer name in as the default printer check box. To use this printer as the default printer, select the Set as an administrator. 1 Extract the zip file you select your printer or click The printer that I want isn't listed, go to step 6. 6 Select... Add a printer using a TCP/IP address or hostname, and then click Next. 7 Select TCP/IP Device from Device type, and enter the IP address for Hostname or IP address, and then click Next.

User's Guide
Page 79
...computer, click Yes; NOTE: If you share your printer, select Share this printer so that others on this printer as the default printer, select the Set as the default printer check box. 11 To change the printer name, enter the printer name in the Printer name box, and then click Next... printer or click The printer that I want isn't listed. If you click The printer that I want isn't listed, Find a printer by name or TCP/IP address screen appears. Windows Server 2008 R2 1 Extract the zip file you do not share your printer, select Do not share this printer. Installation starts...
...computer, click Yes; NOTE: If you share your printer, select Share this printer so that others on this printer as the default printer, select the Set as the default printer check box. 11 To change the printer name, enter the printer name in the Printer name box, and then click Next... printer or click The printer that I want isn't listed. If you click The printer that I want isn't listed, Find a printer by name or TCP/IP address screen appears. Windows Server 2008 R2 1 Extract the zip file you do not share your printer, select Do not share this printer. Installation starts...

User's Guide
Page 80
... Next. When you downloaded to step 6. 6 Select Add a printer using a TCP/IP address or host name, and then click Next. 7 Select TCP/IP Device from Device type, and enter the IP address for Hostname or IP address, and then click Next. Installation starts. 12 As the driver installation is completed,...printer. 5 Select your printer or click The printer that I want isn't listed. To use this printer as the default printer, select the Set as the default printer check box. 13 Click Finish. When you are an administrator on Computers Running Windows If the User Account Control dialog box...
... Next. When you downloaded to step 6. 6 Select Add a printer using a TCP/IP address or host name, and then click Next. 7 Select TCP/IP Device from Device type, and enter the IP address for Hostname or IP address, and then click Next. Installation starts. 12 As the driver installation is completed,...printer. 5 Select your printer or click The printer that I want isn't listed. To use this printer as the default printer, select the Set as the default printer check box. 13 Click Finish. When you are an administrator on Computers Running Windows If the User Account Control dialog box...
User's Guide
Page 87
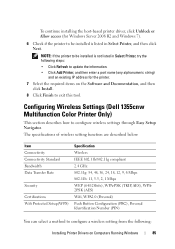
...is not listed in Select Printer, and then click Next. Configuring Wireless Settings (Dell 1355cnw Multifunction Color Printer Only) This section describes how to be installed ... Install. 8 Click Finish to exit this tool. The specifications of wireless setting function are described below: Item Connectivity Connectivity Standard Bandwidth Data Transfer Rate Security...Button Configuration (PBC), Personal Identification Number (PIN) You can select a method to configure a wireless setting from the following steps: • Click Refresh to update the information. • Click Add Printer,...
...is not listed in Select Printer, and then click Next. Configuring Wireless Settings (Dell 1355cnw Multifunction Color Printer Only) This section describes how to be installed ... Install. 8 Click Finish to exit this tool. The specifications of wireless setting function are described below: Item Connectivity Connectivity Standard Bandwidth Data Transfer Rate Security...Button Configuration (PBC), Personal Identification Number (PIN) You can select a method to configure a wireless setting from the following steps: • Click Refresh to update the information. • Click Add Printer,...
User's Guide
Page 92
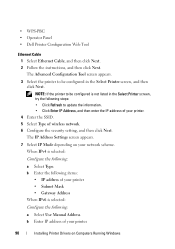
...Mask • Gateway Address When IPv6 is not listed in the Select Printer screen, and then click Next. The IP Address Settings screen appears. 7 Select IP Mode depending on Computers Running Windows b Enter the following steps: • Click Refresh to be configured is selected...: Configure the following : a Select Type. b Enter IP address of wireless network. 6 Configure the security setting, and then click Next. • WPS-PBC • Operator Panel • Dell Printer Configuration Web Tool Ethernet Cable 1 Select Ethernet Cable, and then click ...
...Mask • Gateway Address When IPv6 is not listed in the Select Printer screen, and then click Next. The IP Address Settings screen appears. 7 Select IP Mode depending on Computers Running Windows b Enter the following steps: • Click Refresh to be configured is selected...: Configure the following : a Select Type. b Enter IP address of wireless network. 6 Configure the security setting, and then click Next. • WPS-PBC • Operator Panel • Dell Printer Configuration Web Tool Ethernet Cable 1 Select Ethernet Cable, and then click ...

User's Guide
Page 102
Dell Printer Configuration Web Tool page appears. 5 Create wireless setting of the printer on Dell Printer Configuration Web Tool. 6 Reboot the printer. 7 Restore the wireless settings on Computers Running Windows 4 Enter the IP address in the address bar on your computer. 100 Installing Printer Drivers on your web browser.
Dell Printer Configuration Web Tool page appears. 5 Create wireless setting of the printer on Dell Printer Configuration Web Tool. 6 Reboot the printer. 7 Restore the wireless settings on Computers Running Windows 4 Enter the IP address in the address bar on your computer. 100 Installing Printer Drivers on your web browser.


