Manual
Page 2
Contents Package Contents iv Contents of Package iv System Requirements iv Introduction 1 External Features 3 Port Connectors 3 Rear Panel...4 Network Cable Connector 4 USB Port Connector 4 Parallel Port Connector 4 DC Power Connector 4 Front Panel ...5 LED Indicators 5 Setting up the DP-300U 6 Installing the Print Server 6 Power ON Self-Test 6 Getting Started 8 Using PS-Wizard 9 Auto-Run Installation 9 PS-Wizard 10 Installing PS-Wizard 10 Using PS-Wizard 14 Using the Web Configuration 20 Home...20 SETUP > Print Server Setup 22 i
Contents Package Contents iv Contents of Package iv System Requirements iv Introduction 1 External Features 3 Port Connectors 3 Rear Panel...4 Network Cable Connector 4 USB Port Connector 4 Parallel Port Connector 4 DC Power Connector 4 Front Panel ...5 LED Indicators 5 Setting up the DP-300U 6 Installing the Print Server 6 Power ON Self-Test 6 Getting Started 8 Using PS-Wizard 9 Auto-Run Installation 9 PS-Wizard 10 Installing PS-Wizard 10 Using PS-Wizard 14 Using the Web Configuration 20 Home...20 SETUP > Print Server Setup 22 i

Manual
Page 4
Adding a Printer 123 AppleTalk-enabled or Bonjour-enabled Printers 125 Setting up AppleTalk or LPR Printing in Mac OS X 135 Setting up AppleTalk Printing in Mac OS 9 140 Technical Specifications 145 Appendix: DP-300U Printer Compatibility List 146 iii
Adding a Printer 123 AppleTalk-enabled or Bonjour-enabled Printers 125 Setting up AppleTalk or LPR Printing in Mac OS X 135 Setting up AppleTalk Printing in Mac OS 9 140 Technical Specifications 145 Appendix: DP-300U Printer Compatibility List 146 iii
Manual
Page 5
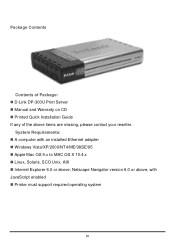
Netscape Navigator version 6.0 or above, with an installed Ethernet adapter „ Windows Vista/XP/2000/NT4/ME/98SE/95 „ Apple Mac OS 9.x to MAC OS X 10.4.x „ Linux, Solaris, SCO Unix, AIX „ Internet Explorer 6.0 or above items are missing, please contact your reseller. System Requirements: „ A computer with JavaScript enabled „ Printer must support required operating system iv Package Contents Contents of Package: „ D-Link DP-300U Print Server „ Manual and Warranty on CD „ Printed Quick Installation Guide If any of the above ;
Netscape Navigator version 6.0 or above, with an installed Ethernet adapter „ Windows Vista/XP/2000/NT4/ME/98SE/95 „ Apple Mac OS 9.x to MAC OS X 10.4.x „ Linux, Solaris, SCO Unix, AIX „ Internet Explorer 6.0 or above items are missing, please contact your reseller. System Requirements: „ A computer with JavaScript enabled „ Printer must support required operating system iv Package Contents Contents of Package: „ D-Link DP-300U Print Server „ Manual and Warranty on CD „ Printed Quick Installation Guide If any of the above ;
Manual
Page 6
... its USB printer port is print server that allows users to install on most Windows-based networks. Introduction The D-Link DP-300U Print Server is USB 2.0 port, which can transmit to high-speed laser printer much faster than a PC's parallel/USB printer port. The DP-300U includes easy-to-use software to easily configure and manage multiple print queues through TCP/IP. High-speed laser printer connected to locate printer services. This provides workload relief to your Ethernet/Fast Ethernet network anywhere you wish to the Print Server's parallel/USB port...
... its USB printer port is print server that allows users to install on most Windows-based networks. Introduction The D-Link DP-300U Print Server is USB 2.0 port, which can transmit to high-speed laser printer much faster than a PC's parallel/USB printer port. The DP-300U includes easy-to-use software to easily configure and manage multiple print queues through TCP/IP. High-speed laser printer connected to locate printer services. This provides workload relief to your Ethernet/Fast Ethernet network anywhere you wish to the Print Server's parallel/USB port...

Manual
Page 7
.... The print server also supports configuration and management via the Telnet protocol for the details. See also the "Using The PS-Wizard" chapter in this manual for networks without Windows-compatible machines. 2 PS-Wizard is very portable and inexpensive compared to a PC-based print server, and Print Server connects to users. The DP-300U offers extraordinary flexibility, operating with all major network operating systems and protocols: „ TCP/IP UNIX lpr/lpd...
.... The print server also supports configuration and management via the Telnet protocol for the details. See also the "Using The PS-Wizard" chapter in this manual for networks without Windows-compatible machines. 2 PS-Wizard is very portable and inexpensive compared to a PC-based print server, and Print Server connects to users. The DP-300U offers extraordinary flexibility, operating with all major network operating systems and protocols: „ TCP/IP UNIX lpr/lpd...
Manual
Page 8
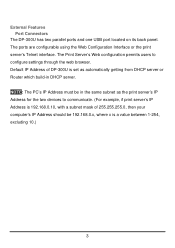
... the two devices to configure settings through the web browser. The Print Server's Web configuration permits users to communicate. (For example, if print server's IP Address is 192.168.0.10, with a subnet mask of DP-300U is a value between 1-254, excluding 10.) 3 NOTE: The PC's IP Address must be in DHCP server. External Features Port Connectors The DP-300U has two parallel ports and one USB port located on its back panel. The ports are configurable using the Web Configuration Interface or the print server's Telnet interface.
... the two devices to configure settings through the web browser. The Print Server's Web configuration permits users to communicate. (For example, if print server's IP Address is 192.168.0.10, with a subnet mask of DP-300U is a value between 1-254, excluding 10.) 3 NOTE: The PC's IP Address must be in DHCP server. External Features Port Connectors The DP-300U has two parallel ports and one USB port located on its back panel. The ports are configurable using the Web Configuration Interface or the print server's Telnet interface.
Manual
Page 9
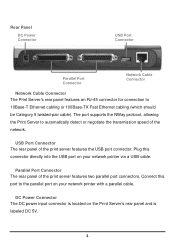
... Panel DC Power Connector USB Port Connector Parallel Port Connector Network Cable Connector Network Cable Connector The Print Server's rear panel features an RJ-45 connector for connection to automatically detect or negotiate the transmission speed of the network. The port supports the NWay protocol, allowing the Print Server to 10Base-T Ethernet cabling or 100Base-TX Fast Ethernet cabling (which should be Category 5 twisted-pair cable). Connect this connector directly into the USB port on the Print Server's rear...
... Panel DC Power Connector USB Port Connector Parallel Port Connector Network Cable Connector Network Cable Connector The Print Server's rear panel features an RJ-45 connector for connection to automatically detect or negotiate the transmission speed of the network. The port supports the NWay protocol, allowing the Print Server to 10Base-T Ethernet cabling or 100Base-TX Fast Ethernet cabling (which should be Category 5 twisted-pair cable). Connect this connector directly into the USB port on the Print Server's rear...
Manual
Page 11
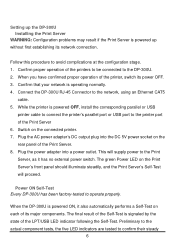
... of its major components. Follow this procedure to confirm their steady 6 Plug the AC power adapter's DC output plug into a power outlet. Setting up the DP-300U Installing the Print Server WARNING: Configuration problems may result if the Print Server is operating normally. 4. When the DP-300U is powered OFF, install the corresponding parallel or USB printer cable to connect the printer's parallel port or USB port to the DP-300U. 2. When you have confirmed proper operation of the...
... of its major components. Follow this procedure to confirm their steady 6 Plug the AC power adapter's DC output plug into a power outlet. Setting up the DP-300U Installing the Print Server WARNING: Configuration problems may result if the Print Server is operating normally. 4. When the DP-300U is powered OFF, install the corresponding parallel or USB printer cable to connect the printer's parallel port or USB port to the DP-300U. 2. When you have confirmed proper operation of the...
Manual
Page 14
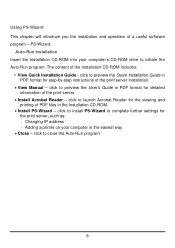
... close the Auto-Run program. 9 click to complete further settings for step-by-step instructions of the Installation CD-ROM includes: y View Quick Installation Guide - click to preview the User's Guide in PDF format for the viewing and printing of the print server. • Install Acrobat Reader - PS-Wizard. click to preview the Quick Installation Guide in the easiest way. • Close - click to initiate the Auto-Run program. Changing IP address - Using PS...
... close the Auto-Run program. 9 click to complete further settings for step-by-step instructions of the Installation CD-ROM includes: y View Quick Installation Guide - click to preview the User's Guide in PDF format for the viewing and printing of the print server. • Install Acrobat Reader - PS-Wizard. click to preview the Quick Installation Guide in the easiest way. • Close - click to initiate the Auto-Run program. Changing IP address - Using PS...
Manual
Page 15
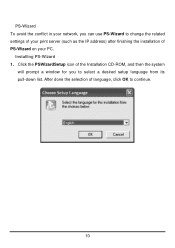
Click the PSWizardSetup icon of the Installation CD-ROM, and then the system will prompt a window for you can use PS-Wizard to change the related settings of your print server (such as the IP address) after finishing the installation of language, click OK to select a desired setup language from its pull-down list. PS-Wizard To avoid the conflict in your PC. Installing PS-Wizard 1. After done the selection of PS-Wizard on your network, you to continue. 10
Click the PSWizardSetup icon of the Installation CD-ROM, and then the system will prompt a window for you can use PS-Wizard to change the related settings of your print server (such as the IP address) after finishing the installation of language, click OK to select a desired setup language from its pull-down list. PS-Wizard To avoid the conflict in your PC. Installing PS-Wizard 1. After done the selection of PS-Wizard on your network, you to continue. 10
Manual
Page 21
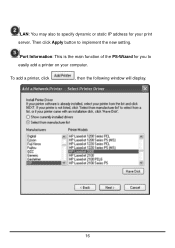
Then click Apply button to easily add a printer on your print server. To add a printer, click , then the following window will display. 16 LAN: You may also to specify dynamic or static IP address for you to implement the new setting. Port Information: This is the main function of the PS-Wizard for your computer.
Then click Apply button to easily add a printer on your print server. To add a printer, click , then the following window will display. 16 LAN: You may also to specify dynamic or static IP address for you to implement the new setting. Port Information: This is the main function of the PS-Wizard for your computer.
Manual
Page 22
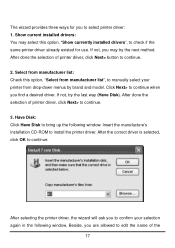
... from manufacturer list: Check this option, "Show currently installed drivers", to confirm your printer from drop-down menus by brand and model. After selecting the printer driver, the wizard will ask you are allowed to continue. 2. The wizard provides three ways for use. If not, try the next method. After done the selection of printer driver, click Next> button to edit...
... from manufacturer list: Check this option, "Show currently installed drivers", to confirm your printer from drop-down menus by brand and model. After selecting the printer driver, the wizard will ask you are allowed to continue. 2. The wizard provides three ways for use. If not, try the next method. After done the selection of printer driver, click Next> button to edit...

Manual
Page 29
... in manual or automatic method. Please note that this section is optional and you have changed the settings in each option, click Apply Settings to store the settings, or Cancel to get print server up and running. SETUP > LAN Setup The LAN Setup screen allows you to assign IP address in the following boxes, including IP Address, Subnet Mask, and Default Gateway. TCP/IP This field allows you configure the local network settings...
... in manual or automatic method. Please note that this section is optional and you have changed the settings in each option, click Apply Settings to store the settings, or Cancel to get print server up and running. SETUP > LAN Setup The LAN Setup screen allows you to assign IP address in the following boxes, including IP Address, Subnet Mask, and Default Gateway. TCP/IP This field allows you configure the local network settings...
Manual
Page 30
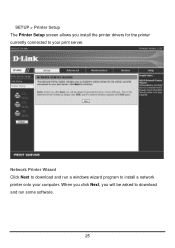
Network Printer Wizard Click Next to download and run some software. 25 When you click Next, you install the printer drivers for the printer currently connected to your computer. SETUP > Printer Setup The Printer Setup screen allows you will be asked to download and run a windows wizard program to install a network printer onto your print server.
Network Printer Wizard Click Next to download and run some software. 25 When you click Next, you install the printer drivers for the printer currently connected to your computer. SETUP > Printer Setup The Printer Setup screen allows you will be asked to download and run a windows wizard program to install a network printer onto your print server.
Manual
Page 113
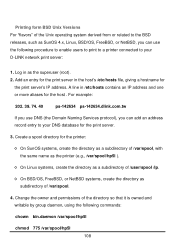
...-142634 ps-142634.dlink.com.tw If you can add an address record entry to your DNS database for the print server. 3. Change the owner and permissions of the directory so that it is owned and writable by group daemon, using the following procedure to enable users to print to a printer connected to your D-LINK network print server: 1. Printing form BSD Unix Versions For "flavors" of the...
...-142634 ps-142634.dlink.com.tw If you can add an address record entry to your DNS database for the print server. 3. Change the owner and permissions of the directory so that it is owned and writable by group daemon, using the following procedure to enable users to print to a printer connected to your D-LINK network print server: 1. Printing form BSD Unix Versions For "flavors" of the...
Manual
Page 117
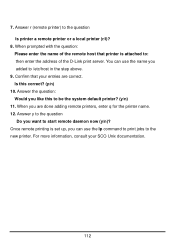
... printer is set up, you added to start remote daemon now (y/n)? When you are correct. Once remote printing is attached to the new printer. You can use the name you can use the lp command to print jobs to : then enter the address of the remote host that your SCO Unix documentation. 112 When prompted with the question: Please enter the name of the D-Link print server...
... printer is set up, you added to start remote daemon now (y/n)? When you are correct. Once remote printing is attached to the new printer. You can use the name you can use the lp command to print jobs to : then enter the address of the remote host that your SCO Unix documentation. 112 When prompted with the question: Please enter the name of the D-Link print server...
Manual
Page 140
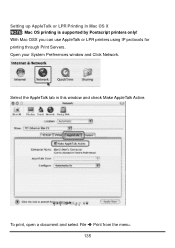
With Mac OSX you can use AppleTalk or LPR printers using IP protocols for printing through Print Servers. Select the AppleTalk tab in Mac OS X NOTE: Mac OS printing is supported by Postscript printers only! To print, open a document and select File Î Print from the menu. 135 Setting up AppleTalk or LPR Printing in this window and check Make AppleTalk Active. Open your System Preferences window and Click Network.
With Mac OSX you can use AppleTalk or LPR printers using IP protocols for printing through Print Servers. Select the AppleTalk tab in Mac OS X NOTE: Mac OS printing is supported by Postscript printers only! To print, open a document and select File Î Print from the menu. 135 Setting up AppleTalk or LPR Printing in this window and check Make AppleTalk Active. Open your System Preferences window and Click Network.
Manual
Page 144
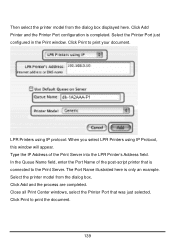
... Print window. Click Print to print the document. 139 LPR Printers using IP protocol: When you select LPR Printers using IP Protocol, this window will appear. Close all Print Center windows, select the Printer Port that is connected to the Print Server. The Port Name illustrated here is completed. Click Add and the process are completed. Type the IP Address of the post-script printer that was just selected. Select the printer model from the dialog box...
... Print window. Click Print to print the document. 139 LPR Printers using IP protocol: When you select LPR Printers using IP Protocol, this window will appear. Close all Print Center windows, select the Printer Port that is connected to the Print Server. The Port Name illustrated here is completed. Click Add and the process are completed. Type the IP Address of the post-script printer that was just selected. Select the printer model from the dialog box...

Manual
Page 145
... is supported by Postscript printers only! To set up AppleTalk Printing in your AppleTalk zone. NOTE: The Chooser name of a printer connected to make sure that it can be used with the Print Server's IP Address in this manual are examples only. You can be used for the two devices to communicate. „ Launch the browser and enter print server web interface, select the ADVANCED tab, click Advanced LAN button and...
... is supported by Postscript printers only! To set up AppleTalk Printing in your AppleTalk zone. NOTE: The Chooser name of a printer connected to make sure that it can be used with the Print Server's IP Address in this manual are examples only. You can be used for the two devices to communicate. „ Launch the browser and enter print server web interface, select the ADVANCED tab, click Advanced LAN button and...

Manual
Page 148
... set to print server as your MacOS workstation's default printer, open the Chooser by selecting Chooser from the Apple menu. Font Group: Select from the pull-down menu. In the following options, enter the related configuration, such as follow. Double-click the name of all networked PostScript printers will be displayed as the printer type. To choose a printer connected to Active. Printer Type: Enter the printer's type...
... set to print server as your MacOS workstation's default printer, open the Chooser by selecting Chooser from the Apple menu. Font Group: Select from the pull-down menu. In the following options, enter the related configuration, such as follow. Double-click the name of all networked PostScript printers will be displayed as the printer type. To choose a printer connected to Active. Printer Type: Enter the printer's type...


