Product Manual
Page 75
... not enable proxy/firewall in the Private IP box. D-Link Systems, Inc. 75 In most cases, you are having problems, please follow steps below: Step 1: Enter the IP Address of the computer you do I configure my router for example). Step 3: Click on the Kazaa software. Select ... (blank by default). Click Apply. Click Always under schedule or set a time range. DI-LB604 User's Manual Frequently Asked Questions 12 How do not have to configure anything on the router or on Advanced and then click Virtual Server. Step 4: Click Enabled and then enter a...
... not enable proxy/firewall in the Private IP box. D-Link Systems, Inc. 75 In most cases, you are having problems, please follow steps below: Step 1: Enter the IP Address of the computer you do I configure my router for example). Step 3: Click on the Kazaa software. Select ... (blank by default). Click Apply. Click Always under schedule or set a time range. DI-LB604 User's Manual Frequently Asked Questions 12 How do not have to configure anything on the router or on Advanced and then click Virtual Server. Step 4: Click Enabled and then enter a...
Quick Installation Guide
Page 1
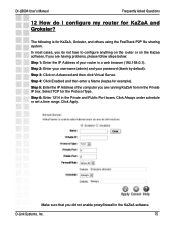
... are the property of this Quick Installation Guide or the Manual on your network. DI-604.040903 The DI-604 Router acts as a DHCP server and will damage and void the warranty for configuring the DI-604 router. If you purchased this product. ©2003 D-Link Systems, Inc. See Appendix at the end of their respective holders.
... are the property of this Quick Installation Guide or the Manual on your network. DI-604.040903 The DI-604 Router acts as a DHCP server and will damage and void the warranty for configuring the DI-604 router. If you purchased this product. ©2003 D-Link Systems, Inc. See Appendix at the end of their respective holders.
Quick Installation Guide
Page 2
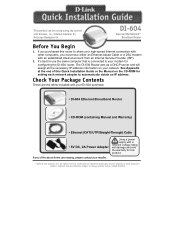
... one end of an Ethernet cable to LAN port 1 on the back panel of the DI-604 and the other end to an available Ethernet port on the back panel of the DI-604 and the other end of the power adapter to indicate proper connection. (Note: Some...Cable to Ethernet Port on your Ethernetenabled computers Restart Your Computer A. Connecting The DI-604 Broadband Router To Your Network A. Receptor for LAN Port 1 will illuminate to configure the DI-604. Reset Button Pressing this button restores the router to indicate proper operation. C. The LED light for Power Adapter The Power...
... one end of an Ethernet cable to LAN port 1 on the back panel of the DI-604 and the other end to an available Ethernet port on the back panel of the DI-604 and the other end of the power adapter to indicate proper connection. (Note: Some...Cable to Ethernet Port on your Ethernetenabled computers Restart Your Computer A. Connecting The DI-604 Broadband Router To Your Network A. Receptor for LAN Port 1 will illuminate to configure the DI-604. Reset Button Pressing this button restores the router to indicate proper operation. C. The LED light for Power Adapter The Power...
Quick Installation Guide
Page 12
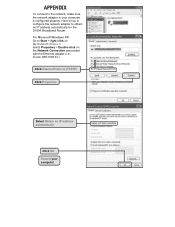
For Microsoft Windows XP: Go to obtain an IP address automatically for the DI-604 Broadband Router. Here's how to configure the network adapter to Start > right click on My Network Places > select Properties > Double-click on the Network Connection associated with the Ethernet adapter (i.e., D-Link DFE-530TX+). Click Internet Protocol (TCP/IP) Click Properties Select Obtain an IP address automatically Click OK Restart your computer is configured properly. APPENDIX To connect to the network, make sure the network adapter in your computer
For Microsoft Windows XP: Go to obtain an IP address automatically for the DI-604 Broadband Router. Here's how to configure the network adapter to Start > right click on My Network Places > select Properties > Double-click on the Network Connection associated with the Ethernet adapter (i.e., D-Link DFE-530TX+). Click Internet Protocol (TCP/IP) Click Properties Select Obtain an IP address automatically Click OK Restart your computer is configured properly. APPENDIX To connect to the network, make sure the network adapter in your computer
Quick Installation Guide
Page 13
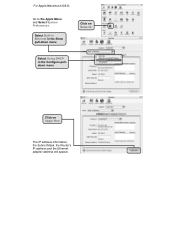
For Apple Macintosh OS X: Go to the Apple Menu and Select System Preferences. Select Built-in Ethernet in the Show pull-down menu Click on Network Select Using DHCP in the Configure pulldown menu Click on Apply Now The IP address information, the Subnet Mask, the Router's IP address and the Ethernet adapter address will appear.
For Apple Macintosh OS X: Go to the Apple Menu and Select System Preferences. Select Built-in Ethernet in the Show pull-down menu Click on Network Select Using DHCP in the Configure pulldown menu Click on Apply Now The IP address information, the Subnet Mask, the Router's IP address and the Ethernet adapter address will appear.

