
User Guide
Page 3
... 5 The Port 5 The Cable 6 Chapter 4: Setting Up and Connecting the Wireless-G Bridge for Phone Adapters 7 Starting the Setup Wizard 7 Running the Setup Wizard 7 Appendix A: Troubleshooting 17 Common Problems and Solutions 17 Frequently Asked Questions 18 Appendix B: Wireless Security 21 Security Precautions 21 Security Threats Facing Wireless Networks 21 Appendix C: Upgrading Firmware 24 Appendix D: Windows Help 29...
... 5 The Port 5 The Cable 6 Chapter 4: Setting Up and Connecting the Wireless-G Bridge for Phone Adapters 7 Starting the Setup Wizard 7 Running the Setup Wizard 7 Appendix A: Troubleshooting 17 Common Problems and Solutions 17 Frequently Asked Questions 18 Appendix B: Wireless Security 21 Security Precautions 21 Security Threats Facing Wireless Networks 21 Appendix C: Upgrading Firmware 24 Appendix D: Windows Help 29...

User Guide
Page 5
... the Power from the Phone Adapter Screen 14 Figure 4-18: Connect the Attached Bridge Power Cable to a Router Screen 9 Figure 4-7: Wireless-G Bridge Setup Screen 10 Figure 4-8: Choose a Wireless Network Screen 10 Figure 4-9: Security Settings - Browse Targets 26 Figure C-8: Browsed Devices on the Bridge Screen 9 Figure 4-6: Connecting the Network Cable to the Phone Adapter Screen 15 Figure...
... the Power from the Phone Adapter Screen 14 Figure 4-18: Connect the Attached Bridge Power Cable to a Router Screen 9 Figure 4-7: Wireless-G Bridge Setup Screen 10 Figure 4-8: Choose a Wireless Network Screen 10 Figure 4-9: Security Settings - Browse Targets 26 Figure C-8: Browsed Devices on the Bridge Screen 9 Figure 4-6: Connecting the Network Cable to the Phone Adapter Screen 15 Figure...

User Guide
Page 7
... with WEP or industrial-strength, Wi-Fi Protected Access (WPA/WPA2) security. The included Setup Wizard walks you run the Setup Wizard. Wireless-G Bridge for the purpose of data sharing, storage, and/or transmission between users. PCs equipped with wireless cards and adapters can also be limited to the phone adapter or IP phone. adapter...
... with WEP or industrial-strength, Wi-Fi Protected Access (WPA/WPA2) security. The included Setup Wizard walks you run the Setup Wizard. Wireless-G Bridge for the purpose of data sharing, storage, and/or transmission between users. PCs equipped with wireless cards and adapters can also be limited to the phone adapter or IP phone. adapter...

User Guide
Page 12
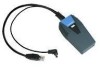
.... One power adapter will use the Ethernet network cable to connect the Bridge to Know the Wireless-G Bridge for Phone Adapters The Cable The Bridge has a combination Ethernet network and power cable. After setup, you will connect this cable to connect the Bridge to the Power port of the Linksys phone adapter or IP phone. Figure...
.... One power adapter will use the Ethernet network cable to connect the Bridge to Know the Wireless-G Bridge for Phone Adapters The Cable The Bridge has a combination Ethernet network and power cable. After setup, you will connect this cable to connect the Bridge to the Power port of the Linksys phone adapter or IP phone. Figure...

User Guide
Page 13
...CD-ROM drive. User Guide - To install the Bridge, click the Click Here to exit the Setup Wizard. Chapter 4: Setting Up and Connecting the Wireless-G Bridge for Phone Adapters IMPORTANT: Do not connect the Bridge until you are instructed to end the installation. Click...: Click Here to open this User Guide. Wireless-G Bridge for Phone Adapters Chapter 4: Setting Up and Connecting the Wireless-G Bridge for Phone Adapters Starting the Setup Wizard Figure 4-1: Welcome Screen Figure 4-2: License Agreement Screen 7 The Setup Wizard should run automatically, and the Welcome screen...
...CD-ROM drive. User Guide - To install the Bridge, click the Click Here to exit the Setup Wizard. Chapter 4: Setting Up and Connecting the Wireless-G Bridge for Phone Adapters IMPORTANT: Do not connect the Bridge until you are instructed to end the installation. Click...: Click Here to open this User Guide. Wireless-G Bridge for Phone Adapters Chapter 4: Setting Up and Connecting the Wireless-G Bridge for Phone Adapters Starting the Setup Wizard Figure 4-1: Welcome Screen Figure 4-2: License Agreement Screen 7 The Setup Wizard should run automatically, and the Welcome screen...

User Guide
Page 14
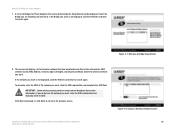
... to proceed, or click Back to return to the previous screen. Click Next to proceed with the Bridge. Disconnect the power jack from the Phone Adapter or IP Phone Screen 8 Running the Setup Wizard Figure 4-4: Disconnect the Power from the back of the Linksys phone adapter or IP phone. (... click Back to return to the previous screen. Wireless-G Bridge for Phone Adapters 3. This screen will use this power adapter to set up the Bridge. Move the power adapter and Bridge to the room where your network router or this Setup Wizard to power the Bridge.) If your router or PC is listed on-...
... to proceed, or click Back to return to the previous screen. Click Next to proceed with the Bridge. Disconnect the power jack from the Phone Adapter or IP Phone Screen 8 Running the Setup Wizard Figure 4-4: Disconnect the Power from the back of the Linksys phone adapter or IP phone. (... click Back to return to the previous screen. Wireless-G Bridge for Phone Adapters 3. This screen will use this power adapter to set up the Bridge. Move the power adapter and Bridge to the room where your network router or this Setup Wizard to power the Bridge.) If your router or PC is listed on-...

User Guide
Page 15
... to proceed with the installation process, or click Back to return to the previous screen. Figure 4-5: Power on the Bridge Screen Chapter 4: Setting Up and Connecting the Wireless-G Bridge for Phone Adapters 5. Wireless-G Bridge for Phone Adapters Running the Setup Wizard Figure 4-6: Connecting the Network Cable to a Router Screen 9 Connect the Ethernet network cable of the...
... to proceed with the installation process, or click Back to return to the previous screen. Figure 4-5: Power on the Bridge Screen Chapter 4: Setting Up and Connecting the Wireless-G Bridge for Phone Adapters 5. Wireless-G Bridge for Phone Adapters Running the Setup Wizard Figure 4-6: Connecting the Network Cable to a Router Screen 9 Connect the Ethernet network cable of the...
User Guide
Page 16
... Next to proceed, or click Back to return to search again. If you want , click the SSID radio button and complete the SSID field. Figure 4-7: Wireless-G Bridge Setup Screen 8. If the network you do not broadcast their status information: SSID (network name), MAC Address, Channel, Signal (strength), and Security (method). A list of the...
... Next to proceed, or click Back to return to search again. If you want , click the SSID radio button and complete the SSID field. Figure 4-7: Wireless-G Bridge Setup Screen 8. If the network you do not broadcast their status information: SSID (network name), MAC Address, Channel, Signal (strength), and Security (method). A list of the...

User Guide
Page 17
... step 10. Enter a Passphrase, also called a pre-shared key, of 8-63 characters in the Passphrase field. Wireless-G Bridge for Phone Adapters Running the Setup Wizard Figure 4-10: Security Settings - Enter a passphrase on this screen. Enter a passphrase on a wireless network. The longer and more complex your Passphrase is , the more secure your network will be...
... step 10. Enter a Passphrase, also called a pre-shared key, of 8-63 characters in the Passphrase field. Wireless-G Bridge for Phone Adapters Running the Setup Wizard Figure 4-10: Security Settings - Enter a passphrase on this screen. Enter a passphrase on a wireless network. The longer and more complex your Passphrase is , the more secure your network will be...

User Guide
Page 18
Wireless-G Bridge for Phone Adapters Running the Setup Wizard Figure 4-12: Security Settings - Passphrase - Enter a passphrase in the Passphrase field and click Next. If you entered a Passphrase, the WEP key(s) will use from ... enter a WEP key, leave the Passphrase field blank and click Next. WEP Keys Screen 12 WEP (64-Bit) Screen Chapter 4: Setting Up and Connecting the Wireless-G Bridge for Phone Adapters WEP (128-Bit) or WEP (64-Bit) Enter a passphrase in the Passphrase field, so a WEP key is 1. Valid hexadecimal characters are "0" to...
Wireless-G Bridge for Phone Adapters Running the Setup Wizard Figure 4-12: Security Settings - Passphrase - Enter a passphrase in the Passphrase field and click Next. If you entered a Passphrase, the WEP key(s) will use from ... enter a WEP key, leave the Passphrase field blank and click Next. WEP Keys Screen 12 WEP (64-Bit) Screen Chapter 4: Setting Up and Connecting the Wireless-G Bridge for Phone Adapters WEP (128-Bit) or WEP (64-Bit) Enter a passphrase in the Passphrase field, so a WEP key is 1. Valid hexadecimal characters are "0" to...

User Guide
Page 19
... 13 Figure 4-13: Confirmation Screen Figure 4-14: If the Bridge Does Not Connect... If the attempt succeeds, proceed to the wireless network using the new settings. Screen Chapter 4: Setting Up and Connecting the Wireless-G Bridge for Phone Adapters 10. If the attempt fails, you proceed....return to the Choose a Wireless Network screen and reconfigure the settings. 12. Review them before you have two options offered by a pop-up screen. The new settings will attempt to connect to step 12. Wireless-G Bridge for Phone Adapters Running the Setup Wizard Figure 4-15: Disconnect ...
... 13 Figure 4-13: Confirmation Screen Figure 4-14: If the Bridge Does Not Connect... If the attempt succeeds, proceed to the wireless network using the new settings. Screen Chapter 4: Setting Up and Connecting the Wireless-G Bridge for Phone Adapters 10. If the attempt fails, you proceed....return to the Choose a Wireless Network screen and reconfigure the settings. 12. Review them before you have two options offered by a pop-up screen. The new settings will attempt to connect to step 12. Wireless-G Bridge for Phone Adapters Running the Setup Wizard Figure 4-15: Disconnect ...

User Guide
Page 20
Click Next to proceed, or click Back to return to the phone adapter or IP phone. Chapter 4: Setting Up and Connecting the Wireless-G Bridge for Phone Adapters 13. If the phone adapter or IP phone is in a different room, disconnect the power adapter from the ...phone adapter or IP phone. Disconnect the Ethernet network cable from the electrical outlet. Wireless-G Bridge for Phone Adapters Running the Setup Wizard Figure 4-17: Disconnect the Network Cable from the Phone Adapter Screen 14 Connect the Ethernet network cable of the phone ...
Click Next to proceed, or click Back to return to the phone adapter or IP phone. Chapter 4: Setting Up and Connecting the Wireless-G Bridge for Phone Adapters 13. If the phone adapter or IP phone is in a different room, disconnect the power adapter from the ...phone adapter or IP phone. Disconnect the Ethernet network cable from the electrical outlet. Wireless-G Bridge for Phone Adapters Running the Setup Wizard Figure 4-17: Disconnect the Network Cable from the Phone Adapter Screen 14 Connect the Ethernet network cable of the phone ...

User Guide
Page 21
... Phone Adapter Screen Chapter 4: Setting Up and Connecting the Wireless-G Bridge for Phone Adapters 15. Then connect the power adapter to the previous screen. Wireless-G Bridge for Phone Adapters Running the Setup Wizard Figure 4-19: Wireless is Now Active Screen 15 Connect the power cable of the Bridge to the previous screen. 16. Click Next to proceed...
... Phone Adapter Screen Chapter 4: Setting Up and Connecting the Wireless-G Bridge for Phone Adapters 15. Then connect the power adapter to the previous screen. Wireless-G Bridge for Phone Adapters Running the Setup Wizard Figure 4-19: Wireless is Now Active Screen 15 Connect the power cable of the Bridge to the previous screen. 16. Click Next to proceed...

User Guide
Page 22
Figure 4-20: Congratulations Screen Chapter 4: Setting Up and Connecting the Wireless-G Bridge for Phone Adapters 17. Setup is complete. Congratulations! Click Exit to exit the Setup Wizard, or click Online Registration to register the Bridge at www.linksys.com/registration. The Congratulations screen will appear. Wireless-G Bridge for Phone Adapters 16 Running the Setup Wizard
Figure 4-20: Congratulations Screen Chapter 4: Setting Up and Connecting the Wireless-G Bridge for Phone Adapters 17. Setup is complete. Congratulations! Click Exit to exit the Setup Wizard, or click Online Registration to register the Bridge at www.linksys.com/registration. The Congratulations screen will appear. Wireless-G Bridge for Phone Adapters 16 Running the Setup Wizard

User Guide
Page 23
... at a time. 3. This problem does not involve the Bridge (the Bridge only provides a connection between your wireless environment, then the speed will drop. Wireless-G Bridge for Phone Adapters Appendix A: Troubleshooting This appendix consists of the wireless connection is very slow. The Setup Wizard cannot detect the Wireless-G Bridge for the Bridge. Also, some electrical and electronic devices generate interference. The...
... at a time. 3. This problem does not involve the Bridge (the Bridge only provides a connection between your wireless environment, then the speed will drop. Wireless-G Bridge for Phone Adapters Appendix A: Troubleshooting This appendix consists of the wireless connection is very slow. The Setup Wizard cannot detect the Wireless-G Bridge for the Bridge. Also, some electrical and electronic devices generate interference. The...

User Guide
Page 30
... the upgrade application (WBP54G Upgrade Application.zip) and the latest firmware from Linksys's website at www.linksys.com. 2. Figure C-1: Icons Figure C-2: Security Warning for Phone Adapters Appendix C: Upgrading Firmware To upgrade the Bridge's firmware, follow these instructions: 1. If your computer. Wireless-G Bridge for Windows XP Appendix C: Upgrading Firmware Figure C-3: Upgrade Utility Setup Welcome 24 Click...
... the upgrade application (WBP54G Upgrade Application.zip) and the latest firmware from Linksys's website at www.linksys.com. 2. Figure C-1: Icons Figure C-2: Security Warning for Phone Adapters Appendix C: Upgrading Firmware To upgrade the Bridge's firmware, follow these instructions: 1. If your computer. Wireless-G Bridge for Windows XP Appendix C: Upgrading Firmware Figure C-3: Upgrade Utility Setup Welcome 24 Click...

User Guide
Page 31
... an Ethernet network (LAN) port of your desktop. Disconnect the Bridge's combination Ethernet network and power cable from the electrical outlet. If necessary, plug the power adapter into an electrical outlet. 9. Figure C-4: Choose Destination Location Figure C-5: Setup is in step 9. Wireless-G Broadband Router 5. You will appear. When the utility has been installed, a pop...
... an Ethernet network (LAN) port of your desktop. Disconnect the Bridge's combination Ethernet network and power cable from the electrical outlet. If necessary, plug the power adapter into an electrical outlet. 9. Figure C-4: Choose Destination Location Figure C-5: Setup is in step 9. Wireless-G Broadband Router 5. You will appear. When the utility has been installed, a pop...


