User Guide
Page 3
Front Panel 2 LEDs 2 Ports 2 SRW2008P/SRW2008MP - Front Panel 2 LEDs 2 Ports 2 Back Panel 3 Chapter 3: Installation 4 Overview 4 Positioning the Switch 4 Placement Options 4 Desktop Placement 4 Rack-Mount Placement 5 Wall-Mount Placement 6 Chapter 4: Configuration Using the Console Interface 8 Overview 8 Configuring the HyperTerminal Application 8 Connecting to the Switch through a Telnet Session 8 Configuring the Switch through the Console Interface 9 Switch Main Menu 9 System Configuration...
Front Panel 2 LEDs 2 Ports 2 SRW2008P/SRW2008MP - Front Panel 2 LEDs 2 Ports 2 Back Panel 3 Chapter 3: Installation 4 Overview 4 Positioning the Switch 4 Placement Options 4 Desktop Placement 4 Rack-Mount Placement 5 Wall-Mount Placement 6 Chapter 4: Configuration Using the Console Interface 8 Overview 8 Configuring the HyperTerminal Application 8 Connecting to the Switch through a Telnet Session 8 Configuring the Switch through the Console Interface 9 Switch Main Menu 9 System Configuration...
User Guide
Page 4
... Contents SNTP Servers 19 Port Management > Port Settings 19 Port Configuration Detail 20 Port Management > Link Aggregation 21 Link Aggregation Detail 21 Port Management > LACP 22 Port Management > PoE Power Settings 22 VLAN Management > Create VLAN 23 Single VLAN 23 VLAN Range 23 VLAN Table 23 VLAN Management > Port Settings 23 VLAN Management > Ports to VLAN 24 VLAN Management > VLAN to Ports 24 Join VLAN Detail 25...
... Contents SNTP Servers 19 Port Management > Port Settings 19 Port Configuration Detail 20 Port Management > Link Aggregation 21 Link Aggregation Detail 21 Port Management > LACP 22 Port Management > PoE Power Settings 22 VLAN Management > Create VLAN 23 Single VLAN 23 VLAN Range 23 VLAN Table 23 VLAN Management > Port Settings 23 VLAN Management > Ports to VLAN 24 VLAN Management > VLAN to Ports 24 Join VLAN Detail 25...

User Guide
Page 5
...40 Spanning Tree > STP Status 40 Spanning Tree > Global STP 41 Global Setting 41 Bridge Settings 41 Spanning Tree > STP Port Settings 42 Spanning Tree > RSTP Port Settings 42 Spanning Tree > MSTP Properties 43 Spanning Tree > MSTP Instance Settings 44 Spanning Tree > MSTP Interface Settings 44 ...Recipient 50 Admin > User Authentication 51 Admin > Static Address 51 Query 52 Admin > Dynamic Address 52 Query 52 Admin > Logging 52 Admin > Port Mirroring 53 Admin > Cable Test 53 Admin > Save Configuration 54 Via TFTP 54 Via HTTP 54 Backup 54 Admin > Firmware Upgrade 54 Admin >...
...40 Spanning Tree > STP Status 40 Spanning Tree > Global STP 41 Global Setting 41 Bridge Settings 41 Spanning Tree > STP Port Settings 42 Spanning Tree > RSTP Port Settings 42 Spanning Tree > MSTP Properties 43 Spanning Tree > MSTP Instance Settings 44 Spanning Tree > MSTP Interface Settings 44 ...Recipient 50 Admin > User Authentication 51 Admin > Static Address 51 Query 52 Admin > Dynamic Address 52 Query 52 Admin > Logging 52 Admin > Port Mirroring 53 Admin > Cable Test 53 Admin > Save Configuration 54 Via TFTP 54 Via HTTP 54 Backup 54 Admin > Firmware Upgrade 54 Admin >...
User Guide
Page 6
... 71 Avis d' Industrie Canada 71 User Information for Consumer Products Covered by EU Directive 2002/96/EC on Waste Electric and Electronic Equipment (WEEE 72 8-Port 10/100/1000 Gigabit Switch with Webview v
... 71 Avis d' Industrie Canada 71 User Information for Consumer Products Covered by EU Directive 2002/96/EC on Waste Electric and Electronic Equipment (WEEE 72 8-Port 10/100/1000 Gigabit Switch with Webview v
User Guide
Page 7
...-T/TX ports. Individual users or applications can also be prioritized above others using SSL for web access. Incoming traffic can be shaped allowing you to meet their QoS needs. The Linksys WebView Managed switch allows you to flexibly integrate and manage these... RJ-45 ports and 2 shared MiniGBIC slots. •• SRW2008P 8-port 10/100/1000 Ethernet Switch with WebView. Intelligent Broadcast, and Multicast storm control minimizes and contain the effect of switches. The SRW2008P and SRW2008MP support Automatic Load Sensing - Configuration of the Switch is specific to...
...-T/TX ports. Individual users or applications can also be prioritized above others using SSL for web access. Incoming traffic can be shaped allowing you to meet their QoS needs. The Linksys WebView Managed switch allows you to flexibly integrate and manage these... RJ-45 ports and 2 shared MiniGBIC slots. •• SRW2008P 8-port 10/100/1000 Ethernet Switch with WebView. Intelligent Broadcast, and Multicast storm control minimizes and contain the effect of switches. The SRW2008P and SRW2008MP support Automatic Load Sensing - Configuration of the Switch is specific to...
User Guide
Page 8
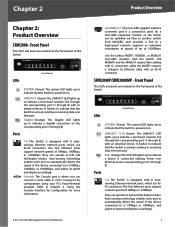
... point for configuration using your PC's HyperTerminal program. The Fast Ethernet ports support network speeds of 10Mbps or 100Mbps. Refer to indicate a Gigabit connection on . SRW2008P/SRW2008MP - LEDs Front Panel SYSTEM (Green) The system LED lights up to indicate that the Switch is equipped with an attached device. Chapter 2 Product Overview Chapter 2: Product...
... point for configuration using your PC's HyperTerminal program. The Fast Ethernet ports support network speeds of 10Mbps or 100Mbps. Refer to indicate a Gigabit connection on . SRW2008P/SRW2008MP - LEDs Front Panel SYSTEM (Green) The system LED lights up to indicate that the Switch is equipped with an attached device. Chapter 2 Product Overview Chapter 2: Product...
User Guide
Page 9
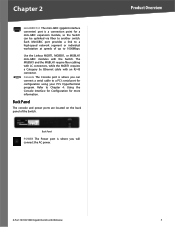
... MGBSX1, or MGBLH1 mini-GBIC modules with an RJ-45 connector. Back Panel POWER The Power port is where you can be uplinked via fiber to another switch. The MGBSX1 and the MGBLH1 require fiber cabling with LC connectors, while the MGBT1 requires a Category... 5e Ethernet cable with the Switch. Each MiniGBIC port provides a link to a high-speed network segment or individual workstation at speeds of the Switch. Product Overview 8-Port 10/100/1000 Gigabit Switch with Webview 3 Chapter 2 miniGBIC1/2 The mini-GBIC (gigabit interface converter) port is a connection point for a ...
... MGBSX1, or MGBLH1 mini-GBIC modules with an RJ-45 connector. Back Panel POWER The Power port is where you can be uplinked via fiber to another switch. The MGBSX1 and the MGBLH1 require fiber cabling with LC connectors, while the MGBT1 requires a Category... 5e Ethernet cable with the Switch. Each MiniGBIC port provides a link to a high-speed network segment or individual workstation at speeds of the Switch. Product Overview 8-Port 10/100/1000 Gigabit Switch with Webview 3 Chapter 2 miniGBIC1/2 The mini-GBIC (gigabit interface converter) port is a connection point for a ...
User Guide
Page 10
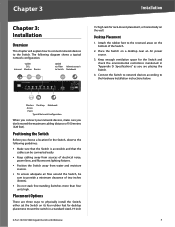
... explain how to connect network devices to the Hardware Installation instructions below. Keep enough ventilation space for desktop placement, mount the switch in "Appendix D: Specifications" as you are three ways to provide a minimum clearance of electrical noise, power lines, and fluorescent... Switch, be sure to physically install the Switch, either set the Switch on a desktop near an AC power source. 3. Place the Switch on its four rubber feet for the Switch and check the environmental restrictions mentioned in a standard-sized, 19-inch 8-Port 10/100/1000 Gigabit Switch...
... explain how to connect network devices to the Hardware Installation instructions below. Keep enough ventilation space for desktop placement, mount the switch in "Appendix D: Specifications" as you are three ways to provide a minimum clearance of electrical noise, power lines, and fluorescent... Switch, be sure to physically install the Switch, either set the Switch on a desktop near an AC power source. 3. Place the Switch on its four rubber feet for the Switch and check the environmental restrictions mentioned in a standard-sized, 19-inch 8-Port 10/100/1000 Gigabit Switch...
User Guide
Page 11
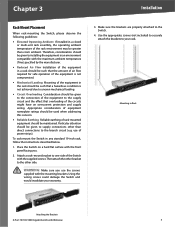
...screws (not included) to securely attach the brackets to your warranty. 3. Chapter 3 Installation Rack-Mount Placement When rack-mounting the Switch, please observe the following guidelines: •• Elevated Operating Ambient If installed in the rack should be such that a hazardous ...the operating ambient temperature of the rack environment may be greater than direct connections to the Switch. 4. To rack-mount the Switch in Rack Attaching the Brackets 8-Port 10/100/1000 Gigabit Switch with Webview 5 WARNING: Make sure you . 2. Mounting in any standard 19-inch ...
...screws (not included) to securely attach the brackets to your warranty. 3. Chapter 3 Installation Rack-Mount Placement When rack-mounting the Switch, please observe the following guidelines: •• Elevated Operating Ambient If installed in the rack should be such that a hazardous ...the operating ambient temperature of the rack environment may be greater than direct connections to the Switch. 4. To rack-mount the Switch in Rack Attaching the Brackets 8-Port 10/100/1000 Gigabit Switch with Webview 5 WARNING: Make sure you . 2. Mounting in any standard 19-inch ...
User Guide
Page 12
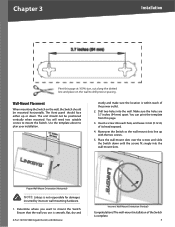
... page at 100% size, cut along the dotted line and place on the wall, the Switch should face either up with Webview Incorrect Wall-Mount Orientation (Vertical) Congratulations! Maneuver the Switch so the wall-mount slots line up or down until the screws fit snugly into each hole...Make sure the holes are 3.7 inches (94 mm) apart. Use the template above to mount the Switch. Proper Wall-Mount Orientation (Horizontal) NOTE: Linksys is smooth, flat, dry and 8-Port 10/100/1000 Gigabit Switch with the two screws. 5. The wall-mount installation of the power outlet. 2. Insert a screw ...
... page at 100% size, cut along the dotted line and place on the wall, the Switch should face either up with Webview Incorrect Wall-Mount Orientation (Vertical) Congratulations! Maneuver the Switch so the wall-mount slots line up or down until the screws fit snugly into each hole...Make sure the holes are 3.7 inches (94 mm) apart. Use the template above to mount the Switch. Proper Wall-Mount Orientation (Horizontal) NOTE: Linksys is smooth, flat, dry and 8-Port 10/100/1000 Gigabit Switch with the two screws. 5. The wall-mount installation of the power outlet. 2. Insert a screw ...
User Guide
Page 13
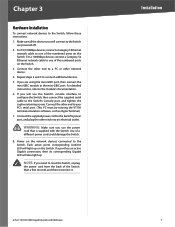
...Ethernet network cable to one of a different power cord could damage the Switch. 8. Repeat steps 2 and 3 to the Switch, follow these instructions: 1. If you are powered off. 2. For detailed instructions, refer to the Switch's power port, and plug the other end into an electrical outlet. If you need... to the Switch's Console port, and tighten the captive retaining screws. Power on the Switch. Wait a few seconds and then reconnect it. 8-Port 10/100/1000 Gigabit Switch with the Switch. Connect the other end to a PC or other end to the Switch. If a port has an active ...
...Ethernet network cable to one of a different power cord could damage the Switch. 8. Repeat steps 2 and 3 to the Switch, follow these instructions: 1. If you are powered off. 2. For detailed instructions, refer to the Switch's power port, and plug the other end into an electrical outlet. If you need... to the Switch's Console port, and tighten the captive retaining screws. Power on the Switch. Wait a few seconds and then reconnect it. 8-Port 10/100/1000 Gigabit Switch with the Switch. Connect the other end to a PC or other end to the Switch. If a port has an active ...
User Guide
Page 14
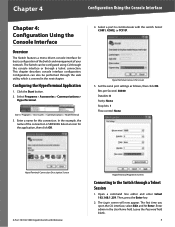
...: None Stop bits: 1 Flow control: None HyperTerminal Connection Description Screen 8-Port 10/100/1000 Gigabit Switch with Webview HyperTerminal Properties Screen Connecting to communicate with the switch. This chapter describes console interface configuration. Select an icon for basic configuration of the Switch and management of the connection is covered in the User Name field. The...
...: None Stop bits: 1 Flow control: None HyperTerminal Connection Description Screen 8-Port 10/100/1000 Gigabit Switch with Webview HyperTerminal Properties Screen Connecting to communicate with the switch. This chapter describes console interface configuration. Select an icon for basic configuration of the Switch and management of the connection is covered in the User Name field. The...
User Guide
Page 15
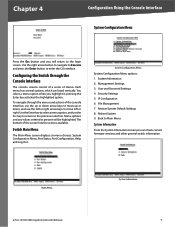
Switch Main Menu The Main Menu screen displays six menu choices: System Configuration Menu, Port Status, Port Configuration, Help, and Log Out. Security Settings 5. Management Settings 3. Chapter 4 Configuration Using the Console Interface System Configuration Menu Press the Esc ...IP Configuration 6. The bottom of menus. Back to enter the CLI interface. File Management 7. pressing the Enter key activates the highlighted option. Main Menu 8-Port 10/100/1000 Gigabit Switch with Webview System Information 9 User and Password Settings 4. Use the right arrow button...
Switch Main Menu The Main Menu screen displays six menu choices: System Configuration Menu, Port Status, Port Configuration, Help, and Log Out. Security Settings 5. Management Settings 3. Chapter 4 Configuration Using the Console Interface System Configuration Menu Press the Esc ...IP Configuration 6. The bottom of menus. Back to enter the CLI interface. File Management 7. pressing the Enter key activates the highlighted option. Main Menu 8-Port 10/100/1000 Gigabit Switch with Webview System Information 9 User and Password Settings 4. Use the right arrow button...
User Guide
Page 16
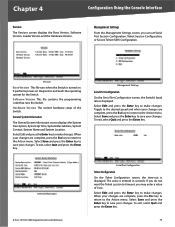
... press the Esc key to return to make changes. Management Settings From the Management Settings screen, you may enter a value of the Switch. Management Settings Serial Port Configuration On the Serial Port Configuration screen, the Switch's baud rate is turned on diagnostics and loads the ...operating system for the Switch. To exit, select Quit and press the Enter key....
... press the Esc key to return to make changes. Management Settings From the Management Settings screen, you may enter a value of the Switch. Management Settings Serial Port Configuration On the Serial Port Configuration screen, the Switch's baud rate is turned on diagnostics and loads the ...operating system for the Switch. To exit, select Quit and press the Enter key....
User Guide
Page 17
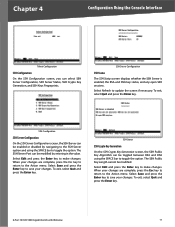
... Server Configuration On the SSH Server Configuration screen, the SSH Server can be enabled or disabled by entering in the value. The SSH Server Port can be modified by navigating to the SSH Server option and using the SPACE bar to the Action menu. Select Save and press the Enter...option. Select Edit and press the Enter key to make changes. When your changes. To exit, select Quit and press the Enter key. 8-Port 10/100/1000 Gigabit Switch with Webview 11 Select Edit and press the Enter key to make changes. To exit, select Quit and press the Enter key. SSH...
... Server Configuration On the SSH Server Configuration screen, the SSH Server can be enabled or disabled by entering in the value. The SSH Server Port can be modified by navigating to the SSH Server option and using the SPACE bar to the Action menu. Select Save and press the Enter...option. Select Edit and press the Enter key to make changes. When your changes. To exit, select Quit and press the Enter key. 8-Port 10/100/1000 Gigabit Switch with Webview 11 Select Edit and press the Enter key to make changes. To exit, select Quit and press the Enter key. SSH...
User Guide
Page 18
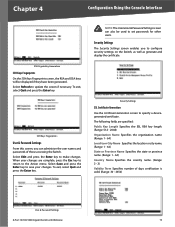
...screen can administer the user names and passwords of days certification is valid. (Range: 30 - 3650) User & Password Settings 8-Port 10/100/1000 Gigabit Switch with Webview 12 SSH Keys Fingerprints User & Password Settings From this screen, you to the Action menu. Security Settings SSL Certificate Generation... been generated. When your changes. The following fields are complete, press the Esc key to return to configure security settings on the Switch, as well as generate and display the certificate. To exit, select Quit and press the Enter key. Chapter 4 Configuration Using the...
...screen can administer the user names and passwords of days certification is valid. (Range: 30 - 3650) User & Password Settings 8-Port 10/100/1000 Gigabit Switch with Webview 12 SSH Keys Fingerprints User & Password Settings From this screen, you to the Action menu. Security Settings SSL Certificate Generation... been generated. When your changes. The following fields are complete, press the Esc key to return to configure security settings on the Switch, as well as generate and display the certificate. To exit, select Quit and press the Enter key. Chapter 4 Configuration Using the...
User Guide
Page 19
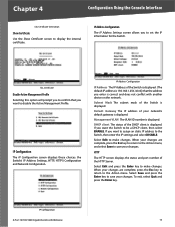
... Esc key to return to disable the Active Management Profile. When your changes. Select Edit and press the Enter key to the Switch, then enter the IP settings and select DISABLE. IP Configuration 8-Port 10/100/1000 Gigabit Switch with another device on the network. Default Gateway...13 SSL Certificate Disable Active Management Profile Selecting this option will prompt you to confirm that the address you want to the Action menu. If you enter is displayed. HTTP The HTTP screen displays the status and port number of the Switch is displayed. Chapter 4 ...
... Esc key to return to disable the Active Management Profile. When your changes. Select Edit and press the Enter key to the Switch, then enter the IP settings and select DISABLE. IP Configuration 8-Port 10/100/1000 Gigabit Switch with another device on the network. Default Gateway...13 SSL Certificate Disable Active Management Profile Selecting this option will prompt you to confirm that the address you want to the Action menu. If you enter is displayed. HTTP The HTTP screen displays the status and port number of the Switch is displayed. Chapter 4 ...
User Guide
Page 20
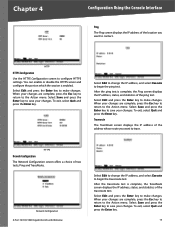
You can enable or disable the HTTPS server and configure the port on which the session is complete, the Ping screen displays the IP address, status, and statistics of the ping test. When your changes. Select Edit ... Quit and press the Enter key. Select Edit to change the IP address, and select Execute to begin the ping test. Network Configuration 8-Port 10/100/1000 Gigabit Switch with Webview Select Edit to change the IP address, and select Execute to begin the traceroute test. Select Save and press the Enter...
You can enable or disable the HTTPS server and configure the port on which the session is complete, the Ping screen displays the IP address, status, and statistics of the ping test. When your changes. Select Edit ... Quit and press the Enter key. Select Edit to change the IP address, and select Execute to begin the ping test. Network Configuration 8-Port 10/100/1000 Gigabit Switch with Webview Select Edit to change the IP address, and select Execute to begin the traceroute test. Select Save and press the Enter...
User Guide
Page 21
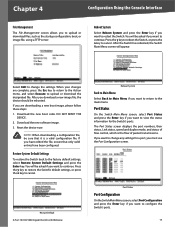
... main menu. NOTE: When downloading a configuration file, be asked if you must use the Port Configuration screen. Chapter 4 Configuration Using the Console Interface File Management The File Management screen allows you want to continue. Press the y key to reboot the Switch, or press the n key to cancel. After you download a new image file, the...
... main menu. NOTE: When downloading a configuration file, be asked if you must use the Port Configuration screen. Chapter 4 Configuration Using the Console Interface File Management The File Management screen allows you want to continue. Press the y key to reboot the Switch, or press the n key to cancel. After you download a new image file, the...
User Guide
Page 22
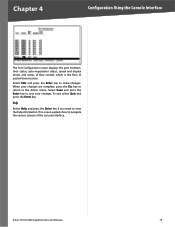
..., their status, auto-negotiation status, speed and duplex mode, and status of flow control, which is the flow of the console interface. 8-Port 10/100/1000 Gigabit Switch with Webview 16 To exit, select Quit and press the Enter key. This screen explains how to the Action menu. Select Edit and press...
..., their status, auto-negotiation status, speed and duplex mode, and status of flow control, which is the flow of the console interface. 8-Port 10/100/1000 Gigabit Switch with Webview 16 To exit, select Quit and press the Enter key. This screen explains how to the Action menu. Select Edit and press...


