User Guide
Page 3
... Interface 8 Overview 8 Configuring the HyperTerminal Application 8 Connecting to the Switch through a Telnet Session 8 Configuring the Switch through the Console Interface 9 Switch Main Menu 9 System Configuration Menu 9 Port Status 15 Port Configuration 15 Chapter 5: Advanced Configuration 17 Overview 17 Accessing the Web...19 Set Time 19 Local Time 19 Daylight Saving 19 8-Port 10/100/1000 Gigabit Switch with Webview ii Table of Contents Chapter 1: Introduction 1 Welcome 1 Chapter 2: Product Overview 2 SRW2008 - Front Panel 2 LEDs 2 Ports 2 SRW2008P/SRW2008MP -
... Interface 8 Overview 8 Configuring the HyperTerminal Application 8 Connecting to the Switch through a Telnet Session 8 Configuring the Switch through the Console Interface 9 Switch Main Menu 9 System Configuration Menu 9 Port Status 15 Port Configuration 15 Chapter 5: Advanced Configuration 17 Overview 17 Accessing the Web...19 Set Time 19 Local Time 19 Daylight Saving 19 8-Port 10/100/1000 Gigabit Switch with Webview ii Table of Contents Chapter 1: Introduction 1 Welcome 1 Chapter 2: Product Overview 2 SRW2008 - Front Panel 2 LEDs 2 Ports 2 SRW2008P/SRW2008MP -
User Guide
Page 4
... 33 Security > 802.1x Settings 34 Setting Timer 34 Security > Ports Security 34 Security > Multiple Hosts 35 Security > Storm Control 36 QoS 36 QoS > CoS Settings 36 CoS Default 37 QoS > Queue Settings 37 QoS > DSCP Settings 37 QoS > Bandwidth 37 QoS > Basic Mode 38 8-Port 10/100/1000 Gigabit Switch with Webview iii
... 33 Security > 802.1x Settings 34 Setting Timer 34 Security > Ports Security 34 Security > Multiple Hosts 35 Security > Storm Control 36 QoS 36 QoS > CoS Settings 36 CoS Default 37 QoS > Queue Settings 37 QoS > DSCP Settings 37 QoS > Bandwidth 37 QoS > Basic Mode 38 8-Port 10/100/1000 Gigabit Switch with Webview iii
User Guide
Page 5
...40 Spanning Tree > STP Status 40 Spanning Tree > Global STP 41 Global Setting 41 Bridge Settings 41 Spanning Tree > STP Port Settings 42 Spanning Tree > RSTP Port Settings 42 Spanning Tree > MSTP Properties 43 Spanning Tree > MSTP Instance Settings 44 Spanning Tree > MSTP Interface Settings 44 ... 52 Admin > Logging 52 Admin > Port Mirroring 53 Admin > Cable Test 53 Admin > Save Configuration 54 Via TFTP 54 Via HTTP 54 Backup 54 Admin > Firmware Upgrade 54 Admin > Reboot 55 Admin > Factory Defaults 55 Admin > Server Logs 55 8-Port 10/100/1000 Gigabit Switch with Webview iv
...40 Spanning Tree > STP Status 40 Spanning Tree > Global STP 41 Global Setting 41 Bridge Settings 41 Spanning Tree > STP Port Settings 42 Spanning Tree > RSTP Port Settings 42 Spanning Tree > MSTP Properties 43 Spanning Tree > MSTP Instance Settings 44 Spanning Tree > MSTP Interface Settings 44 ... 52 Admin > Logging 52 Admin > Port Mirroring 53 Admin > Cable Test 53 Admin > Save Configuration 54 Via TFTP 54 Via HTTP 54 Backup 54 Admin > Firmware Upgrade 54 Admin > Reboot 55 Admin > Factory Defaults 55 Admin > Server Logs 55 8-Port 10/100/1000 Gigabit Switch with Webview iv
User Guide
Page 6
Table of Contents Admin > Memory Logs 56 Admin > Flash Logs 56 Appendix A: About Gigabit Ethernet and Fiber Optic Cabling 57 Gigabit Ethernet 57 Fiber Optic Cabling 57 Appendix B: Introduction 58 Startup Menu Procedures 58 Appendix C: Glossary 60 Appendix D: Specifications 64 Appendix E: Warranty Information 69 Exclusions and ... 71 Avis d' Industrie Canada 71 User Information for Consumer Products Covered by EU Directive 2002/96/EC on Waste Electric and Electronic Equipment (WEEE 72 8-Port 10/100/1000 Gigabit Switch with Webview v
Table of Contents Admin > Memory Logs 56 Admin > Flash Logs 56 Appendix A: About Gigabit Ethernet and Fiber Optic Cabling 57 Gigabit Ethernet 57 Fiber Optic Cabling 57 Appendix B: Introduction 58 Startup Menu Procedures 58 Appendix C: Glossary 60 Appendix D: Specifications 64 Appendix E: Warranty Information 69 Exclusions and ... 71 Avis d' Industrie Canada 71 User Information for Consumer Products Covered by EU Directive 2002/96/EC on Waste Electric and Electronic Equipment (WEEE 72 8-Port 10/100/1000 Gigabit Switch with Webview v
User Guide
Page 7
... traffic can provide maximum output power per PoE port up to build a mesh of switches increasing the availability of the system. 8-Port 10/100/1000 Gigabit Switch with the Weighted Round Robin and Strict Priority ...ports simultaneously or 8 ports at half power. 1 The Linksys WebView Managed switch allows you to all users. Power feeding of the links break. User control is secured using a RADIUS authentication mechanism and can provide maximum output power on 8 ports simultaneously. This also provides a level of reliability in your network securely. The SRW2008P...
... traffic can provide maximum output power per PoE port up to build a mesh of switches increasing the availability of the system. 8-Port 10/100/1000 Gigabit Switch with the Weighted Round Robin and Strict Priority ...ports simultaneously or 8 ports at half power. 1 The Linksys WebView Managed switch allows you to all users. Power feeding of the links break. User control is secured using a RADIUS authentication mechanism and can provide maximum output power on 8 ports simultaneously. This also provides a level of reliability in your network securely. The SRW2008P...
User Guide
Page 8
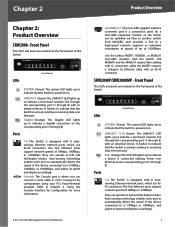
... Power over Ethernet on . Ports 1-8 The Switch is equipped with Webview miniGBIC1/2 The mini-GBIC (gigabit interface converter) port is actively sending or receiving data over that port. Chapter 2 Product Overview Chapter 2: Product Overview SRW2008 - SRW2008P/SRW2008MP - It flashes to indicate that the Switch is a connection point for more information. 8-Port 10/100/1000 Gigabit Switch with 8 autosensing, Ethernet network...
... Power over Ethernet on . Ports 1-8 The Switch is equipped with Webview miniGBIC1/2 The mini-GBIC (gigabit interface converter) port is actively sending or receiving data over that port. Chapter 2 Product Overview Chapter 2: Product Overview SRW2008 - SRW2008P/SRW2008MP - It flashes to indicate that the Switch is a connection point for more information. 8-Port 10/100/1000 Gigabit Switch with 8 autosensing, Ethernet network...
User Guide
Page 9
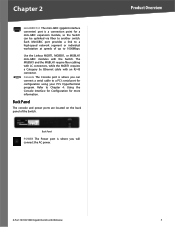
... the Console Interface for Configuration for a mini-GBIC expansion module, so the Switch can connect a serial cable to 1000Mbps. Use the Linksys MGBT1, MGBSX1, or MGBLH1 mini-GBIC modules with an RJ-45 connector. Product Overview 8-Port 10/100/1000 Gigabit Switch with Webview 3 Refer to a high-speed network segment or individual workstation at...
... the Console Interface for Configuration for a mini-GBIC expansion module, so the Switch can connect a serial cable to 1000Mbps. Use the Linksys MGBT1, MGBSX1, or MGBLH1 mini-GBIC modules with an RJ-45 connector. Product Overview 8-Port 10/100/1000 Gigabit Switch with Webview 3 Refer to a high-speed network segment or individual workstation at...
User Guide
Page 10
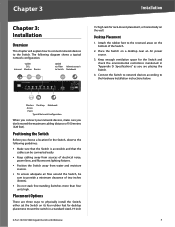
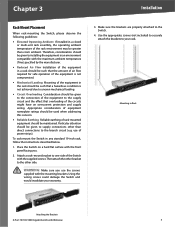
...feet to provide a minimum clearance of two inches (50mm). •• Do not stack free-standing Switches more than four units high. Wireless Desktop Notebook Access Point Typical Network Configuration When you connect your network devices...Switch. 2. Chapter 3 Installation Chapter 3: Installation Overview This chapter will explain how to connect network devices to the Hardware Installation instructions below. Place the Switch on its four rubber feet for the Switch and check the environmental restrictions mentioned in a standard-sized, 19-inch 8-Port 10/100/1000 Gigabit Switch...
...feet to provide a minimum clearance of two inches (50mm). •• Do not stack free-standing Switches more than four units high. Wireless Desktop Notebook Access Point Typical Network Configuration When you connect your network devices...Switch. 2. Chapter 3 Installation Chapter 3: Installation Overview This chapter will explain how to connect network devices to the Hardware Installation instructions below. Place the Switch on its four rubber feet for the Switch and check the environmental restrictions mentioned in a standard-sized, 19-inch 8-Port 10/100/1000 Gigabit Switch...
User Guide
Page 11
use the screws supplied with Webview 5 WARNING: Make sure you . 2. Mounting in Rack Attaching the Brackets 8-Port 10/100/1000 Gigabit Switch with the mounting brackets. Make sure the brackets are properly attached to your warranty. 3. Particular attention should be greater than direct connections to supply connections ...
use the screws supplied with Webview 5 WARNING: Make sure you . 2. Mounting in Rack Attaching the Brackets 8-Port 10/100/1000 Gigabit Switch with the mounting brackets. Make sure the brackets are properly attached to your warranty. 3. Particular attention should be greater than direct connections to supply connections ...
User Guide
Page 12
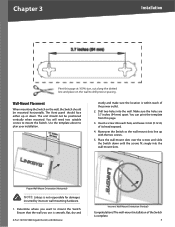
... should not be mounted horizontally. sturdy and make sure the location is smooth, flat, dry and 8-Port 10/100/1000 Gigabit Switch with the two screws. 5. Place the wall-mount slots over the screws and slide the Switch down . Ensure that the wall you want to drill precise spacing. You will need two suitable...
... should not be mounted horizontally. sturdy and make sure the location is smooth, flat, dry and 8-Port 10/100/1000 Gigabit Switch with the two screws. 5. Place the wall-mount slots over the screws and slide the Switch down . Ensure that the wall you want to drill precise spacing. You will need two suitable...
User Guide
Page 13
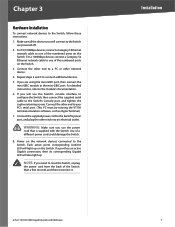
... 5 Ethernet network cable to connect additional devices. 5. Repeat steps 2 and 3 to one of the numbered ports on the Switch. 3. Connect the other end to the mini-GBIC port. Wait a few seconds and then reconnect it. 8-Port 10/100/1000 Gigabit Switch with the Switch. For a 1000Mbps device, connect a Category 5e Ethernet network cable to your PC's serial...
... 5 Ethernet network cable to connect additional devices. 5. Repeat steps 2 and 3 to one of the numbered ports on the Switch. 3. Connect the other end to the mini-GBIC port. Wait a few seconds and then reconnect it. 8-Port 10/100/1000 Gigabit Switch with the Switch. For a 1000Mbps device, connect a Category 5e Ethernet network cable to your PC's serial...
User Guide
Page 14
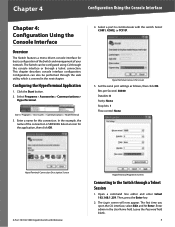
...Enter key. 2. Chapter 4 Configuration Using the Console Interface Chapter 4: Configuration Using the Console Interface Overview The Switch features a menu-driven console interface for basic configuration of the Switch and management of the connection is covered in the User Name field. Configuration can be performed through a telnet connection.... of your network. Bits per Second: 38400 Databits: 8 Parity: None Stop bits: 1 Flow control: None HyperTerminal Connection Description Screen 8-Port 10/100/1000 Gigabit Switch with the switch. Enter admin in the next chapter.
...Enter key. 2. Chapter 4 Configuration Using the Console Interface Chapter 4: Configuration Using the Console Interface Overview The Switch features a menu-driven console interface for basic configuration of the Switch and management of the connection is covered in the User Name field. Configuration can be performed through a telnet connection.... of your network. Bits per Second: 38400 Databits: 8 Parity: None Stop bits: 1 Flow control: None HyperTerminal Connection Description Screen 8-Port 10/100/1000 Gigabit Switch with the switch. Enter admin in the next chapter.
User Guide
Page 15
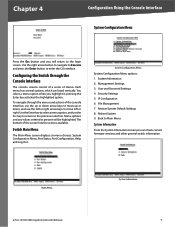
...the Enter button to Main Menu. pressing the Enter key activates the highlighted option. System Information 2. Security Settings 5. File Management 7. Each menu has several options, which are listed vertically. You select a menu option when you will be highlighted. .... IP Configuration 6. Back to enter the CLI interface. Restore System Default Settings 8. Main Menu 8-Port 10/100/1000 Gigabit Switch with Webview System Information 9 Configuring the Switch through the menus and actions of the screen lists the actions available. Reboot System 0. Chapter 4 ...
...the Enter button to Main Menu. pressing the Enter key activates the highlighted option. System Information 2. Security Settings 5. File Management 7. Each menu has several options, which are listed vertically. You select a menu option when you will be highlighted. .... IP Configuration 6. Back to enter the CLI interface. Restore System Default Settings 8. Main Menu 8-Port 10/100/1000 Gigabit Switch with Webview System Information 9 Configuring the Switch through the menus and actions of the screen lists the actions available. Reboot System 0. Chapter 4 ...
User Guide
Page 16
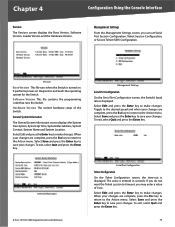
...you do not want the Telnet session to the Action menu. Management Settings From the Management Settings screen, you may enter a value of the Switch. Versions Boot Version This file runs when the Switch is displayed. General System Information The General System Information screen ...Hardware Version. It performs power-on . Hardware Version The current hardware setup of 0 sec. General Information 8-Port 10/100/1000 Gigabit Switch with Webview Serial Port Configuration Telnet Configuration On the Telnet Configuration screen, the time-out is turned on diagnostics and loads the ...
...you do not want the Telnet session to the Action menu. Management Settings From the Management Settings screen, you may enter a value of the Switch. Versions Boot Version This file runs when the Switch is displayed. General System Information The General System Information screen ...Hardware Version. It performs power-on . Hardware Version The current hardware setup of 0 sec. General Information 8-Port 10/100/1000 Gigabit Switch with Webview Serial Port Configuration Telnet Configuration On the Telnet Configuration screen, the time-out is turned on diagnostics and loads the ...
User Guide
Page 17
...to make changes. Select Edit and press the Enter key to the Action menu. To exit, select Quit and press the Enter key. 8-Port 10/100/1000 Gigabit Switch with Webview 11 To exit, select Quit and press the Enter key. When your changes are complete, press the Esc key to return to... The SSH Status screen displays whether the SSH Server is enabled, the RSA and DSA key status, and any open SSH sessions. The SSH Server Port can select SSH Server Configuration, SSH Server Status, SSH Crypto Key Generation, and SSH Keys Fingerprints. When your changes are complete, press the Esc...
...to make changes. Select Edit and press the Enter key to the Action menu. To exit, select Quit and press the Enter key. 8-Port 10/100/1000 Gigabit Switch with Webview 11 To exit, select Quit and press the Enter key. When your changes are complete, press the Esc key to return to... The SSH Status screen displays whether the SSH Server is enabled, the RSA and DSA key status, and any open SSH sessions. The SSH Server Port can select SSH Server Configuration, SSH Server Status, SSH Crypto Key Generation, and SSH Keys Fingerprints. When your changes are complete, press the Esc...
User Guide
Page 18
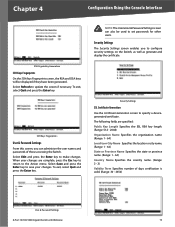
...: The Username & Password Settings screen can administer the user names and passwords of days certification is valid. (Range: 30 - 3650) User & Password Settings 8-Port 10/100/1000 Gigabit Switch with Webview 12 Select Save and press the Enter key to set passwords for other users. Chapter 4 Configuration Using the Console Interface SSH Crypto... Province Name Specifies the state or province name. (Range: 1 - 64) Country Name Specifies the country name. (Range: 2 - 2) Validity Term Specifies number of those accessing the Switch. When your changes.
...: The Username & Password Settings screen can administer the user names and passwords of days certification is valid. (Range: 30 - 3650) User & Password Settings 8-Port 10/100/1000 Gigabit Switch with Webview 12 Select Save and press the Enter key to set passwords for other users. Chapter 4 Configuration Using the Console Interface SSH Crypto... Province Name Specifies the state or province name. (Range: 1 - 64) Country Name Specifies the country name. (Range: 2 - 2) Validity Term Specifies number of those accessing the Switch. When your changes.
User Guide
Page 19
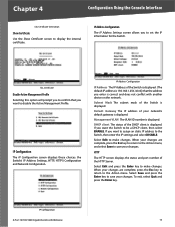
... Configuration 8-Port 10/100/1000 Gigabit Switch with another device on the network. If you want to set the IP information for the Switch. HTTP The HTTP screen displays the status and port number of the Switch is displayed. (The default IP address is 192.168.1.254.) Verify that you to disable the Active Management Profile. Select...
... Configuration 8-Port 10/100/1000 Gigabit Switch with another device on the network. If you want to set the IP information for the Switch. HTTP The HTTP screen displays the status and port number of the Switch is displayed. (The default IP address is 192.168.1.254.) Verify that you to disable the Active Management Profile. Select...
User Guide
Page 20
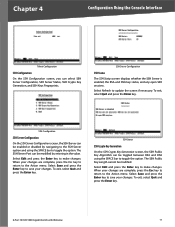
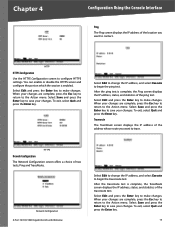
... test. When your changes. HTTPS Nework Configuration The Network Configuration screen offers a choice of two tests, Ping and TraceRoute. Network Configuration 8-Port 10/100/1000 Gigabit Switch with Webview Select Edit to change the IP address, and select Execute to begin the traceroute test. Select Edit and press the Enter key... your changes. Select Edit and press the Enter key to the Action menu. You can enable or disable the HTTPS server and configure the port on which the session is enabled. To exit, select Quit and press the Enter key. 14 To exit, select Quit and press the ...
... test. When your changes. HTTPS Nework Configuration The Network Configuration screen offers a choice of two tests, Ping and TraceRoute. Network Configuration 8-Port 10/100/1000 Gigabit Switch with Webview Select Edit to change the IP address, and select Execute to begin the traceroute test. Select Edit and press the Enter key... your changes. Select Edit and press the Enter key to the Action menu. You can enable or disable the HTTPS server and configure the port on which the session is enabled. To exit, select Quit and press the Enter key. 14 To exit, select Quit and press the ...
User Guide
Page 21
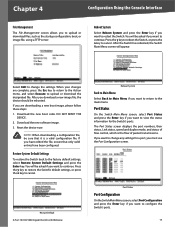
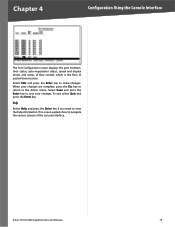
... and press the Enter key. Restore Default 8-Port 10/100/1000 Gigabit Switch with Webview Reboot System Back to Main Menu Select Back to Main Menu if you want to restart the Switch. Port Status On the Switch Main Menu screen, select Port Status and press the Enter key if you ...Action menu, and select Execute to upload or download the designated file. Press the y key to restore the Switch's default settings, or press the n key to cancel. Chapter 4 Configuration Using the Console Interface File Management The File Management screen allows you want to view the status information for...
... and press the Enter key. Restore Default 8-Port 10/100/1000 Gigabit Switch with Webview Reboot System Back to Main Menu Select Back to Main Menu if you want to restart the Switch. Port Status On the Switch Main Menu screen, select Port Status and press the Enter key if you ...Action menu, and select Execute to upload or download the designated file. Press the y key to restore the Switch's default settings, or press the n key to cancel. Chapter 4 Configuration Using the Console Interface File Management The File Management screen allows you want to view the status information for...
User Guide
Page 22
..., their status, auto-negotiation status, speed and duplex mode, and status of flow control, which is the flow of the console interface. 8-Port 10/100/1000 Gigabit Switch with Webview 16 Help Select Help and press the Enter key if you want to make changes. Select Edit and press the Enter key to...
..., their status, auto-negotiation status, speed and duplex mode, and status of flow control, which is the flow of the console interface. 8-Port 10/100/1000 Gigabit Switch with Webview 16 Help Select Help and press the Enter key if you want to make changes. Select Edit and press the Enter key to...


