User Guide
Page 3
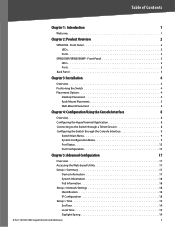
... Switch through a Telnet Session 8 Configuring the Switch through the Console Interface 9 Switch Main Menu 9 System Configuration Menu 9 Port Status 15 Port ...Configuration 15 Chapter 5: Advanced Configuration 17 Overview 17 Accessing the Web-based Utility 17 Setup > Summary 17 Device Information 17 System Information 18 PoE Information 18 Setup > Network Settings 18 Identification 18 IP Configuration 18 Setup > Time 19 Set Time 19 Local Time 19 Daylight Saving 19 8-Port... 10/100/1000 Gigabit Switch with Webview ii Table of Contents Chapter...
... Switch through a Telnet Session 8 Configuring the Switch through the Console Interface 9 Switch Main Menu 9 System Configuration Menu 9 Port Status 15 Port ...Configuration 15 Chapter 5: Advanced Configuration 17 Overview 17 Accessing the Web-based Utility 17 Setup > Summary 17 Device Information 17 System Information 18 PoE Information 18 Setup > Network Settings 18 Identification 18 IP Configuration 18 Setup > Time 19 Set Time 19 Local Time 19 Daylight Saving 19 8-Port... 10/100/1000 Gigabit Switch with Webview ii Table of Contents Chapter...
User Guide
Page 4
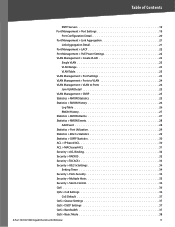
... Contents SNTP Servers 19 Port Management > Port Settings 19 Port Configuration Detail 20 Port Management > Link Aggregation 21 Link Aggregation Detail 21 Port Management > LACP 22 Port Management > PoE Power Settings 22 VLAN Management > Create VLAN 23 Single VLAN 23 VLAN Range 23 VLAN Table 23 VLAN Management > Port Settings 23 VLAN Management > Ports to VLAN 24 VLAN Management > VLAN to Ports 24 Join VLAN Detail 25...
... Contents SNTP Servers 19 Port Management > Port Settings 19 Port Configuration Detail 20 Port Management > Link Aggregation 21 Link Aggregation Detail 21 Port Management > LACP 22 Port Management > PoE Power Settings 22 VLAN Management > Create VLAN 23 Single VLAN 23 VLAN Range 23 VLAN Table 23 VLAN Management > Port Settings 23 VLAN Management > Ports to VLAN 24 VLAN Management > VLAN to Ports 24 Join VLAN Detail 25...

User Guide
Page 5
...40 Spanning Tree > STP Status 40 Spanning Tree > Global STP 41 Global Setting 41 Bridge Settings 41 Spanning Tree > STP Port Settings 42 Spanning Tree > RSTP Port Settings 42 Spanning Tree > MSTP Properties 43 Spanning Tree > MSTP Instance Settings 44 Spanning Tree > MSTP Interface Settings 44 ...Recipient 50 Admin > User Authentication 51 Admin > Static Address 51 Query 52 Admin > Dynamic Address 52 Query 52 Admin > Logging 52 Admin > Port Mirroring 53 Admin > Cable Test 53 Admin > Save Configuration 54 Via TFTP 54 Via HTTP 54 Backup 54 Admin > Firmware Upgrade 54 Admin >...
...40 Spanning Tree > STP Status 40 Spanning Tree > Global STP 41 Global Setting 41 Bridge Settings 41 Spanning Tree > STP Port Settings 42 Spanning Tree > RSTP Port Settings 42 Spanning Tree > MSTP Properties 43 Spanning Tree > MSTP Instance Settings 44 Spanning Tree > MSTP Interface Settings 44 ...Recipient 50 Admin > User Authentication 51 Admin > Static Address 51 Query 52 Admin > Dynamic Address 52 Query 52 Admin > Logging 52 Admin > Port Mirroring 53 Admin > Cable Test 53 Admin > Save Configuration 54 Via TFTP 54 Via HTTP 54 Backup 54 Admin > Firmware Upgrade 54 Admin >...
User Guide
Page 6
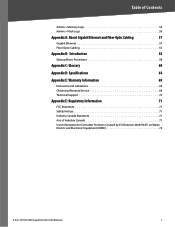
... 71 Avis d' Industrie Canada 71 User Information for Consumer Products Covered by EU Directive 2002/96/EC on Waste Electric and Electronic Equipment (WEEE 72 8-Port 10/100/1000 Gigabit Switch with Webview v
... 71 Avis d' Industrie Canada 71 User Information for Consumer Products Covered by EU Directive 2002/96/EC on Waste Electric and Electronic Equipment (WEEE 72 8-Port 10/100/1000 Gigabit Switch with Webview v
User Guide
Page 7
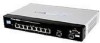
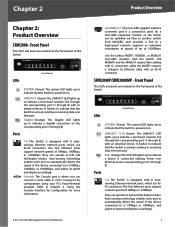
... control circuitry automatically detects Power over Ethernet) Includes 8 10/100/1000 RJ-45 ports and 2 shared MiniGBIC slots. •• SRW2008P 8-port 10/100/1000 Ethernet Switch with data traffic allowing them each to meet their QoS needs. The Linksys WebView Managed switch allows you to control network access and traffic flow. User control is secured...
... control circuitry automatically detects Power over Ethernet) Includes 8 10/100/1000 RJ-45 ports and 2 shared MiniGBIC slots. •• SRW2008P 8-port 10/100/1000 Ethernet Switch with data traffic allowing them each to meet their QoS needs. The Linksys WebView Managed switch allows you to control network access and traffic flow. User control is secured...
User Guide
Page 8
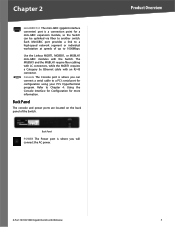
... PoE LED lights up to indicate that the Switch is actively sending or receiving data over that the Switch is powered on the corresponding port (1 through 8) with 8 autosensing, Ethernet network ports, which use RJ-45 connectors. Ports 1-8 The Switch is a connection point for a mini-GBIC ... of up to Chapter 4: Using the Console Interface for Configuration for configuration using your PC's HyperTerminal program. SRW2008P/SRW2008MP - The Fast Ethernet ports support network speeds of 10Mbps, 100Mbps, or 1000Mbps. They can operate in half and full-duplex modes. ...
... PoE LED lights up to indicate that the Switch is actively sending or receiving data over that the Switch is powered on the corresponding port (1 through 8) with 8 autosensing, Ethernet network ports, which use RJ-45 connectors. Ports 1-8 The Switch is a connection point for a mini-GBIC ... of up to Chapter 4: Using the Console Interface for Configuration for configuration using your PC's HyperTerminal program. SRW2008P/SRW2008MP - The Fast Ethernet ports support network speeds of 10Mbps, 100Mbps, or 1000Mbps. They can operate in half and full-duplex modes. ...
User Guide
Page 9
... will connect the AC power. Back Panel POWER The Power port is where you can be uplinked via fiber to another switch. Product Overview 8-Port 10/100/1000 Gigabit Switch with the Switch. Back Panel The console and power ports are located on the back panel of up to 1000Mbps....4: Using the Console Interface for Configuration for configuration using your PC's HyperTerminal program. Each MiniGBIC port provides a link to a high-speed network segment or individual workstation at speeds of the Switch. Use the Linksys MGBT1, MGBSX1, or MGBLH1 mini-GBIC modules with Webview 3 The MGBSX1 ...
... will connect the AC power. Back Panel POWER The Power port is where you can be uplinked via fiber to another switch. Product Overview 8-Port 10/100/1000 Gigabit Switch with the Switch. Back Panel The console and power ports are located on the back panel of up to 1000Mbps....4: Using the Console Interface for Configuration for configuration using your PC's HyperTerminal program. Each MiniGBIC port provides a link to a high-speed network segment or individual workstation at speeds of the Switch. Use the Linksys MGBT1, MGBSX1, or MGBLH1 mini-GBIC modules with Webview 3 The MGBSX1 ...
User Guide
Page 10
... devices, make sure you choose a location for the Switch and check the environmental restrictions mentioned in a standard-sized, 19-inch 8-Port 10/100/1000 Gigabit Switch with Webview 4 Keep enough ventilation space for the Switch, observe the following diagram shows a typical network configuration. Place the Switch on the bottom of electrical noise, power lines, and...
... devices, make sure you choose a location for the Switch and check the environmental restrictions mentioned in a standard-sized, 19-inch 8-Port 10/100/1000 Gigabit Switch with Webview 4 Keep enough ventilation space for the Switch, observe the following diagram shows a typical network configuration. Place the Switch on the bottom of electrical noise, power lines, and...
User Guide
Page 11
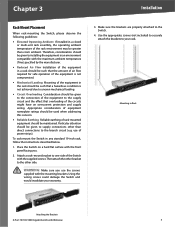
... overloading of the equipment to the supply circuit and the effect that a hazardous condition is not achieved due to the Switch. 4. Mounting in Rack Attaching the Brackets 8-Port 10/100/1000 Gigabit Switch with the supplied screws. use the screws supplied with the front panel facing you use of power strips). Place the...
... overloading of the equipment to the supply circuit and the effect that a hazardous condition is not achieved due to the Switch. 4. Mounting in Rack Attaching the Brackets 8-Port 10/100/1000 Gigabit Switch with the supplied screws. use the screws supplied with the front panel facing you use of power strips). Place the...
User Guide
Page 12
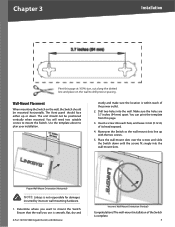
...is complete. 6 Ensure that the wall you want to drill precise spacing. The wall-mount installation of the Switch is smooth, flat, dry and 8-Port 10/100/1000 Gigabit Switch with the two screws. 5. The unit should be positioned vertically when mounted. You will need two suitable ...screws to plan your installation. Place the wall-mount slots over the screws and slide the Switch down . Proper Wall-Mount Orientation...
...is complete. 6 Ensure that the wall you want to drill precise spacing. The wall-mount installation of the Switch is smooth, flat, dry and 8-Port 10/100/1000 Gigabit Switch with the two screws. 5. The unit should be positioned vertically when mounted. You will need two suitable ...screws to plan your installation. Place the wall-mount slots over the screws and slide the Switch down . Proper Wall-Mount Orientation...
User Guide
Page 13
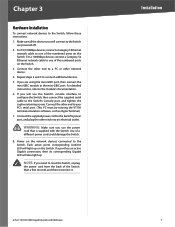
... other end into an electrical outlet. Each active port's corresponding Link/Act LED will connect to one of the numbered ports on the Switch. Wait a few seconds and then reconnect it. 8-Port 10/100/1000 Gigabit Switch with the Switch. Connect the supplied power cord to the Switch's power port, and plug the other end to the mini...
... other end into an electrical outlet. Each active port's corresponding Link/Act LED will connect to one of the numbered ports on the Switch. Wait a few seconds and then reconnect it. 8-Port 10/100/1000 Gigabit Switch with the Switch. Connect the supplied power cord to the Switch's power port, and plug the other end to the mini...
User Guide
Page 14
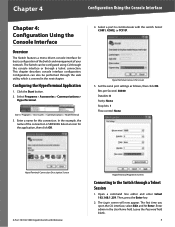
... can be performed through the web utility, which is SRW2008. Start > Programs > Accessories > Communications > HyperTerminal 3. Select a port to the Switch through a telnet connection. Open a command line editor and enter telnet 192.168.1.254. Chapter 4 Configuration Using the Console Interface...the Switch and management of the connection is covered in the User Name field. Configuring the HyperTerminal Application 1. Select Programs > Accessories > Communications > HyperTerminal. Select an icon for this connection. Select COM1, COM2, or TCP/IP. Set the serial port ...
... can be performed through the web utility, which is SRW2008. Start > Programs > Accessories > Communications > HyperTerminal 3. Select a port to the Switch through a telnet connection. Open a command line editor and enter telnet 192.168.1.254. Chapter 4 Configuration Using the Console Interface...the Switch and management of the connection is covered in the User Name field. Configuring the HyperTerminal Application 1. Select Programs > Accessories > Communications > HyperTerminal. Select an icon for this connection. Select COM1, COM2, or TCP/IP. Set the serial port ...
User Guide
Page 15
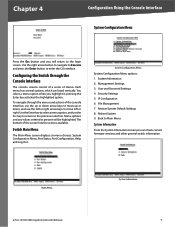
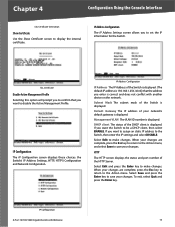
...or down, and use the Esc key to return to move left or right. Security Settings 5. Back to enter the CLI interface. File Management 7. The bottom of the console interface, use the up or down arrow keys to the previous selection. IP Configuration 6. Chapter 4 Configuration ...Using the Console Interface System Configuration Menu Press the Esc button and you will be highlighted. System Information 2. Main Menu 8-Port 10/100/1000 Gigabit Switch with Webview System Information 9 Use the right arrow button to navigate to Execute and press the Enter button to Main Menu. ...
...or down, and use the Esc key to return to move left or right. Security Settings 5. Back to enter the CLI interface. File Management 7. The bottom of the console interface, use the up or down arrow keys to the previous selection. IP Configuration 6. Chapter 4 Configuration ...Using the Console Interface System Configuration Menu Press the Esc button and you will be highlighted. System Information 2. Main Menu 8-Port 10/100/1000 Gigabit Switch with Webview System Information 9 Use the right arrow button to navigate to Execute and press the Enter button to Main Menu. ...
User Guide
Page 16
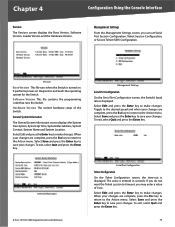
... make changes. Select Edit and press the Enter key to make changes. Management Settings Serial Port Configuration On the Serial Port Configuration screen, the Switch's baud rate is entered in seconds. Management Settings From the Management Settings screen, you may enter a value of the Switch. Hardware Version The current hardware setup of 0 sec. The value is displayed...
... make changes. Select Edit and press the Enter key to make changes. Management Settings Serial Port Configuration On the Serial Port Configuration screen, the Switch's baud rate is entered in seconds. Management Settings From the Management Settings screen, you may enter a value of the Switch. Hardware Version The current hardware setup of 0 sec. The value is displayed...
User Guide
Page 17
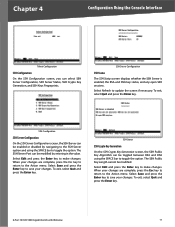
... be enabled or disabled by entering in the value. To exit, select Quit and press the Enter key. 8-Port 10/100/1000 Gigabit Switch with Webview 11 Select Save and press the Enter key to save your changes. The SSH Public Key Length cannot be modified. SSH Server Configuration ...
... be enabled or disabled by entering in the value. To exit, select Quit and press the Enter key. 8-Port 10/100/1000 Gigabit Switch with Webview 11 Select Save and press the Enter key to save your changes. The SSH Public Key Length cannot be modified. SSH Server Configuration ...
User Guide
Page 18
...Range: 1 - 64) Country Name Specifies the country name. (Range: 2 - 2) Validity Term Specifies number of those accessing the Switch. Security Settings The Security Settings screen enables you can also be displayed if they have been generated. Security Settings SSL Certificate Generation Use ...administer the user names and passwords of days certification is valid. (Range: 30 - 3650) User & Password Settings 8-Port 10/100/1000 Gigabit Switch with Webview 12 Chapter 4 Configuration Using the Console Interface SSH Crypto Key Generation SSH Keys Fingerprints On the SSH Keys Fingerprints...
...Range: 1 - 64) Country Name Specifies the country name. (Range: 2 - 2) Validity Term Specifies number of those accessing the Switch. Security Settings The Security Settings screen enables you can also be displayed if they have been generated. Security Settings SSL Certificate Generation Use ...administer the user names and passwords of days certification is valid. (Range: 30 - 3650) User & Password Settings 8-Port 10/100/1000 Gigabit Switch with Webview 12 Chapter 4 Configuration Using the Console Interface SSH Crypto Key Generation SSH Keys Fingerprints On the SSH Keys Fingerprints...
User Guide
Page 19
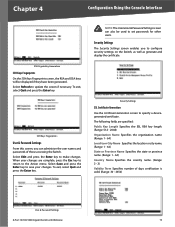
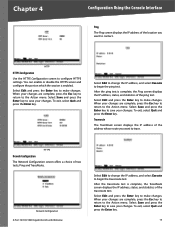
... Mask The subnet mask of the Switch is displayed. Select Edit to disable the Active Management Profile. IP Address Configuration The IP Address Settings screen allows you want to make changes. IP Configuration 8-Port 10/100/1000 Gigabit Switch with another device on the network.... SSL Certificate Disable Active Management Profile Selecting this option will prompt you to be a DHCP client, then select ENABLE...
... Mask The subnet mask of the Switch is displayed. Select Edit to disable the Active Management Profile. IP Address Configuration The IP Address Settings screen allows you want to make changes. IP Configuration 8-Port 10/100/1000 Gigabit Switch with another device on the network.... SSL Certificate Disable Active Management Profile Selecting this option will prompt you to be a DHCP client, then select ENABLE...
User Guide
Page 20
... address, status, and statistics of the traceroute test. HTTPS Nework Configuration The Network Configuration screen offers a choice of the ping test. Network Configuration 8-Port 10/100/1000 Gigabit Switch with Webview Select Edit to change the IP address, and select Execute to begin the traceroute test. Select Save and press the Enter...
... address, status, and statistics of the traceroute test. HTTPS Nework Configuration The Network Configuration screen offers a choice of the ping test. Network Configuration 8-Port 10/100/1000 Gigabit Switch with Webview Select Edit to change the IP address, and select Execute to begin the traceroute test. Select Save and press the Enter...
User Guide
Page 21
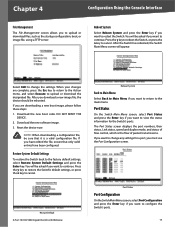
... Enter key. Press the y key to restore the Switch's default settings, or press the n key to restart the Switch. Chapter 4 Configuration Using the Console Interface File Management The File Management screen allows you want to view the status information for a port, you want to configure the Switch's ports. 15 Reboot System Select Reboot System and press the...
... Enter key. Press the y key to restore the Switch's default settings, or press the n key to restart the Switch. Chapter 4 Configuration Using the Console Interface File Management The File Management screen allows you want to view the status information for a port, you want to configure the Switch's ports. 15 Reboot System Select Reboot System and press the...
User Guide
Page 22
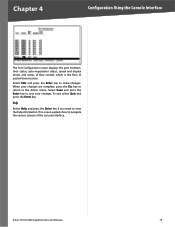
... return to the Action menu. To exit, select Quit and press the Enter key. Chapter 4 Configuration Using the Console Interface The Port Configuration screen displays the port numbers, their status, auto-negotiation status, speed and duplex mode, and status of flow control, which is the flow of the ...console interface. 8-Port 10/100/1000 Gigabit Switch with Webview 16 Select Save and press the Enter key to make changes. This screen explains how to view the help information. Help...
... return to the Action menu. To exit, select Quit and press the Enter key. Chapter 4 Configuration Using the Console Interface The Port Configuration screen displays the port numbers, their status, auto-negotiation status, speed and duplex mode, and status of flow control, which is the flow of the ...console interface. 8-Port 10/100/1000 Gigabit Switch with Webview 16 Select Save and press the Enter key to make changes. This screen explains how to view the help information. Help...


