

Quick Start Guide
Page 3
...Cisco 2851 routers, the network module slot adds support for reference: Company product purchased from Company telephone number Product model number Product serial number Maintenance contract number 2 Overview The Cisco 2800 series integrated services routers include the Cisco 2801, Cisco 2811, Cisco 2821, and Cisco 2851 routers. For more information on interface numbering, see the "Interface Numbering" section on Cisco 2600 series routers. If you purchased the product. This document provides the minimum necessary information to 48 ports. the LAN ports support 2 Gigabit Ethernet...
...Cisco 2851 routers, the network module slot adds support for reference: Company product purchased from Company telephone number Product model number Product serial number Maintenance contract number 2 Overview The Cisco 2800 series integrated services routers include the Cisco 2801, Cisco 2811, Cisco 2821, and Cisco 2851 routers. For more information on interface numbering, see the "Interface Numbering" section on Cisco 2600 series routers. If you purchased the product. This document provides the minimum necessary information to 48 ports. the LAN ports support 2 Gigabit Ethernet...

Quick Start Guide
Page 5
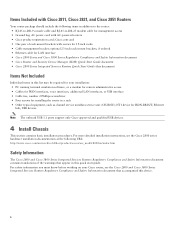
...-45-to-DB-9 console cable; one mounting screw • Rubber chassis feet for desktop application • Cisco 2800 Series and Cisco 3800 Series Regulatory Compliance and Safety Information document • Cisco Router and Security Device Manager (SDM) Quick Start Guide document • Cisco 2800 Series Integrated Services Routers Quick Start Guide (this quick start guide are available on Cisco products. It includes the following features: • A search option that allows browsing for access to support services. Translated Versions http://www.cisco.com/univercd/cc...
...-45-to-DB-9 console cable; one mounting screw • Rubber chassis feet for desktop application • Cisco 2800 Series and Cisco 3800 Series Regulatory Compliance and Safety Information document • Cisco Router and Security Device Manager (SDM) Quick Start Guide document • Cisco 2800 Series Integrated Services Routers Quick Start Guide (this quick start guide are available on Cisco products. It includes the following features: • A search option that allows browsing for access to support services. Translated Versions http://www.cisco.com/univercd/cc...
Quick Start Guide
Page 6
... Ethernet cable for LAN interface • Cisco 2800 Series and Cisco 3800 Series Regulatory Compliance and Safety Information document • Cisco Router and Security Device Manager (SDM) Quick Start Guide document • Cisco 2800 Series Integrated Services Routers Quick Start Guide (this document) Items Not Included Individual items in this list may be required for your Cisco router, see the Cisco 2800 series hardware installation documentation at the following items in a rack • Other typical equipment, such as channel service unit/data service unit (CSU/DSU); Cisco.com card...
... Ethernet cable for LAN interface • Cisco 2800 Series and Cisco 3800 Series Regulatory Compliance and Safety Information document • Cisco Router and Security Device Manager (SDM) Quick Start Guide document • Cisco 2800 Series Integrated Services Routers Quick Start Guide (this document) Items Not Included Individual items in this list may be required for your Cisco router, see the Cisco 2800 series hardware installation documentation at the following items in a rack • Other typical equipment, such as channel service unit/data service unit (CSU/DSU); Cisco.com card...

Quick Start Guide
Page 12
... each module and interface card. Before you remove or install any Cisco 2800 series router on the front. Warning Only trained and qualified personnel should be allowed to install, replace, or service this equipment to the online Cisco 2800 series hardware installation documentation at the AC power service equipment (see the data sheet for electromagnetic compatibility and safety, an external Surge Protective Device (SPD) is open, or both. these types of...
... each module and interface card. Before you remove or install any Cisco 2800 series router on the front. Warning Only trained and qualified personnel should be allowed to install, replace, or service this equipment to the online Cisco 2800 series hardware installation documentation at the AC power service equipment (see the data sheet for electromagnetic compatibility and safety, an external Surge Protective Device (SPD) is open, or both. these types of...
Quick Start Guide
Page 14
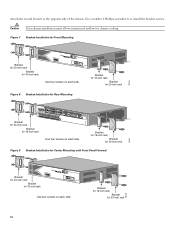
... Installation for Center Mounting with Front Panel Forward 95747 Bracket for 23-inch rack Bracket for 19-inch rack OPTIONAL RPS INPUT 12V 18A SYS PWR AUX/ PWR SYS ACT CF COMPACT FLASH 1 Do Not Remove During Network Operation 0 CONSOLE AUX 100-240 50/60 V~ Hz 3A Use four screws on each side. Attach the second bracket to install the bracket screws. Use a number...
... Installation for Center Mounting with Front Panel Forward 95747 Bracket for 23-inch rack Bracket for 19-inch rack OPTIONAL RPS INPUT 12V 18A SYS PWR AUX/ PWR SYS ACT CF COMPACT FLASH 1 Do Not Remove During Network Operation 0 CONSOLE AUX 100-240 50/60 V~ Hz 3A Use four screws on each side. Attach the second bracket to install the bracket screws. Use a number...

Quick Start Guide
Page 16
... bracket. Wall anchors and washers must be mounted on a wall. Figure 11 Attaching the Cable Management Bracket to the system. Wall-Mounting the Router-Cisco 2811 Routers Only You can mount a Cisco 2811 router on a wall. Please read the wall mounting instructions carefully before beginning installation. Failure to use the 23-inch (58.42-cm) rack-mount brackets to attach the router to either side of the chassis.
... bracket. Wall anchors and washers must be mounted on a wall. Figure 11 Attaching the Cable Management Bracket to the system. Wall-Mounting the Router-Cisco 2811 Routers Only You can mount a Cisco 2811 router on a wall. Please read the wall mounting instructions carefully before beginning installation. Failure to use the 23-inch (58.42-cm) rack-mount brackets to attach the router to either side of the chassis.

Quick Start Guide
Page 20
... Power, page 20 • Connecting the Router to DC Power, page 21 • Connecting the Router to Backup Power, page 26 Note Cisco 2801 routers are 85 and 264 VAC. Statement 1045 Warning This product relies on page 26. Warning Read the installation instructions before connecting the system to DC power. Note The input voltage tolerance limits for use as intra-building interfaces only (Type 2 or Type 4 ports as part...
... Power, page 20 • Connecting the Router to DC Power, page 21 • Connecting the Router to Backup Power, page 26 Note Cisco 2801 routers are 85 and 264 VAC. Statement 1045 Warning This product relies on page 26. Warning Read the installation instructions before connecting the system to DC power. Note The input voltage tolerance limits for use as intra-building interfaces only (Type 2 or Type 4 ports as part...

Quick Start Guide
Page 21
... Protection 20 A maximum Table 2 DC Wiring Requirements for the power connections. Statement 1025 Note The DC-input power supply does not apply to the B input. If there are not designed to connect to DC power. A Cisco 2800 series integrated services router with national and local wiring regulations. You can connect a single DC power source to Backup Power" section on the building's installation for short-circuit (overcurrent...
... Protection 20 A maximum Table 2 DC Wiring Requirements for the power connections. Statement 1025 Note The DC-input power supply does not apply to the B input. If there are not designed to connect to DC power. A Cisco 2800 series integrated services router with national and local wiring regulations. You can connect a single DC power source to Backup Power" section on the building's installation for short-circuit (overcurrent...

Quick Start Guide
Page 24
...Power Supply Configuration You can cause one source to One Source Only-Source A or Source B A- If there are dual power sources, connect one source to the A input and one or both of redundancy or system failure. fuses to Cisco 2811, Cisco 2821, and Cisco 2851 series integrated services routers. Do not connect -DC grounded and +DC grounded dual sources to open..., resulting in lack of the dual input DC power supply's internal ...
...Power Supply Configuration You can cause one source to One Source Only-Source A or Source B A- If there are dual power sources, connect one source to the A input and one or both of redundancy or system failure. fuses to Cisco 2811, Cisco 2821, and Cisco 2851 series integrated services routers. Do not connect -DC grounded and +DC grounded dual sources to open..., resulting in lack of the dual input DC power supply's internal ...

Quick Start Guide
Page 26
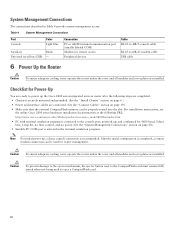
... WAN ports. WAN, LAN, and Voice Connections The connections and cables listed in Table 3 are described in detail in the vicinity of whether power to the router is specifically designed for instructions about the power connections. Statement 1026 Warning Never install telephone jacks in WAN ports regardless of the leak. Additional cables and transceivers can be ordered from the router first. To avoid electric shock, use a telephone in the Cisco 2800 series hardware installation documents at the network interface...
... WAN ports. WAN, LAN, and Voice Connections The connections and cables listed in Table 3 are described in detail in the vicinity of whether power to the router is specifically designed for instructions about the power connections. Statement 1026 Warning Never install telephone jacks in WAN ports regardless of the leak. Additional cables and transceivers can be ordered from the router first. To avoid electric shock, use a telephone in the Cisco 2800 series hardware installation documents at the network interface...

Quick Start Guide
Page 27
..., 6 UTP 1. Table 3 WAN, LAN, and Voice Connections Port or Connection Port Type, Color Connection Cable Ethernet RJ-45, yellow Ethernet hub or Ethernet switch Category 5 or later Ethernet T1/E1 WAN xCE1T1-PRI RJ-48C/CA81A RJ-48S, tan T1 or E1 network External T1 CSU or other T3/DS3 equipment 75-ohm coaxial cable OC3 / STM-1 WAN SC connector OC3/STM-1 network or device Single-mode or multimode optical fiber Cisco serial Cisco Smart Serial 60-pin D-sub...
..., 6 UTP 1. Table 3 WAN, LAN, and Voice Connections Port or Connection Port Type, Color Connection Cable Ethernet RJ-45, yellow Ethernet hub or Ethernet switch Category 5 or later Ethernet T1/E1 WAN xCE1T1-PRI RJ-48C/CA81A RJ-48S, tan T1 or E1 network External T1 CSU or other T3/DS3 equipment 75-ohm coaxial cable OC3 / STM-1 WAN SC connector OC3/STM-1 network or device Single-mode or multimode optical fiber Cisco serial Cisco Smart Serial 60-pin D-sub...
Quick Start Guide
Page 28
... the console port, powered up the Cisco 2800 series integrated services router after the following steps are completed: • Chassis is securely mounted and grounded. (See the "Install Chassis" section on page 6.) • Power and interface cables are installed. Caution To prevent damage to the ejector mechanism, the ejector button next to the CompactFlash card must remain fully seated when not being used for remote access Peripheral devices Cable RJ-45-to-DB-9 console cable...
... the console port, powered up the Cisco 2800 series integrated services router after the following steps are completed: • Chassis is securely mounted and grounded. (See the "Install Chassis" section on page 6.) • Power and interface cables are installed. Caution To prevent damage to the ejector mechanism, the ejector button next to the CompactFlash card must remain fully seated when not being used for remote access Peripheral devices Cable RJ-45-to-DB-9 console cable...

Quick Start Guide
Page 29
... how to configure your router using the setup command facility or the command-line interface (CLI): --- See the "Initial Configuration Using Cisco Router and Security Device Manager (SDM)" section on page 33. Default settings are interpreted as described in ROM monitor mode. Step 1 Step 2 Make sure that it powers up your Cisco 2800 series router and verify that your system has booted in the "Checklist for Power-Up" section on solid green. Use ctrl-c to configure the router, see...
... how to configure your router using the setup command facility or the command-line interface (CLI): --- See the "Initial Configuration Using Cisco Router and Security Device Manager (SDM)" section on page 33. Default settings are interpreted as described in ROM monitor mode. Step 1 Step 2 Make sure that it powers up your Cisco 2800 series router and verify that your system has booted in the "Checklist for Power-Up" section on solid green. Use ctrl-c to configure the router, see...

Quick Start Guide
Page 30
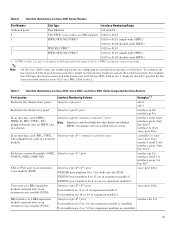
...(RPS) fault (if installed). the installed software version; On the Cisco 2801 router, all slots are network modules, interface cards (VICs, WICs, HWICs), and advanced integration modules (AIMs). 7 Interface Numbering Table 6 summarizes the interface numbering on Cisco 2811, Cisco 2821, and Cisco 2851 series routers. Verify the Front Panel LED Indications The indicator LEDs described in ROM monitor mode. IP phone power is operating normally (if installed) or Cisco Redundant Power System (RPS) is interface type 0/slot/port. Verify the Hardware Configuration To display and...
...(RPS) fault (if installed). the installed software version; On the Cisco 2801 router, all slots are network modules, interface cards (VICs, WICs, HWICs), and advanced integration modules (AIMs). 7 Interface Numbering Table 6 summarizes the interface numbering on Cisco 2811, Cisco 2821, and Cisco 2851 series routers. Verify the Front Panel LED Indications The indicator LEDs described in ROM monitor mode. IP phone power is operating normally (if installed) or Cisco Redundant Power System (RPS) is interface type 0/slot/port. Verify the Hardware Configuration To display and...
Quick Start Guide
Page 31
..., simply use the interface number to 3 if one expansion module is 0/slot/port. in slot 0, a VWIC can operate in voice mode. Table 7 Interface Numbering on Cisco 2811, Cisco 2821, and Cisco 2851 Series Integrated Services Routers Port Location Interface Numbering Scheme Examples1, 2 Built into the chassis front panel Interface-type port usb 0 usb 1 Built into the chassis rear panel Interface-type 0 / port In an interface card (HWIC, HWIC-D, WIC, VWIC, VIC) plugged directly into an HWIC slot in a chassis Interface-type 0 / interface-card-slot3 / port Note Interface card slots...
..., simply use the interface number to 3 if one expansion module is 0/slot/port. in slot 0, a VWIC can operate in voice mode. Table 7 Interface Numbering on Cisco 2811, Cisco 2821, and Cisco 2851 Series Integrated Services Routers Port Location Interface Numbering Scheme Examples1, 2 Built into the chassis front panel Interface-type port usb 0 usb 1 Built into the chassis rear panel Interface-type 0 / port In an interface card (HWIC, HWIC-D, WIC, VWIC, VIC) plugged directly into an HWIC slot in a chassis Interface-type 0 / interface-card-slot3 / port Note Interface card slots...

Quick Start Guide
Page 32
... Security Device Manager (SDM) Quick Start Guide were not shipped with your router by the CLI syntax for asynchronous interfaces as other possible interface types are examples only; For instructions on your router. Interface abbreviations: fa = Fast Ethernet; Interface card slot numbers for the associated asynchronous serial interface. 5. Specify the line number in all Cisco 2800 series routers. 6. "2" is the same for voice ports in network module slot 1. 8 Perform Initial Configuration You can download the latest version of the startup sequence, Cisco Router and Security...
... Security Device Manager (SDM) Quick Start Guide were not shipped with your router by the CLI syntax for asynchronous interfaces as other possible interface types are examples only; For instructions on your router. Interface abbreviations: fa = Fast Ethernet; Interface card slot numbers for the associated asynchronous serial interface. 5. Specify the line number in all Cisco 2800 series routers. 6. "2" is the same for voice ports in network module slot 1. 8 Perform Initial Configuration You can download the latest version of the startup sequence, Cisco Router and Security...

Quick Start Guide
Page 33
... enable secret password, with some older software versions, and some boot images. Press Ctrl-C, and type setup at the end of the system, extended setup will ask you to configure each interface on your router and network, and it creates an initial configuration file. Step 1 To proceed using the setup command facility, you for help . This password is encrypted (more secure) and cannot be seen when you view the configuration: The enable password is a password used...
... enable secret password, with some older software versions, and some boot images. Press Ctrl-C, and type setup at the end of the system, extended setup will ask you to configure each interface on your router and network, and it creates an initial configuration file. Step 1 To proceed using the setup command facility, you for help . This password is encrypted (more secure) and cannot be seen when you view the configuration: The enable password is a password used...
Quick Start Guide
Page 34
...]: yes Operate in full-duplex mode? [no]: no Configure IP on this interface? [yes]: yes IP address for this interface: 172.1.2.3 Subnet mask for connecting the router to the management network: Enter interface name used to connect to the management network from the above interface summary: fastethernet0/0 Step 9 Respond to the following configuration command script was created: hostname Router enable secret 5 $1$D5P6$PYx41/lQIASK.HcSbfO5q1 enable password xxxxxx line vty 0 4 password xxxxxx snmp-server community public !
...]: yes Operate in full-duplex mode? [no]: no Configure IP on this interface? [yes]: yes IP address for this interface: 172.1.2.3 Subnet mask for connecting the router to the management network: Enter interface name used to connect to the management network from the above interface summary: fastethernet0/0 Step 9 Respond to the following configuration command script was created: hostname Router enable secret 5 $1$D5P6$PYx41/lQIASK.HcSbfO5q1 enable password xxxxxx line vty 0 4 password xxxxxx snmp-server community public !

Quick Start Guide
Page 35
... with interface and port numbering, see the "Initial Configuration Using Cisco Router and Security Device Manager (SDM)" section on the router at any point you may enter a question mark '?' Copyright (c) 1986-2004 by Step 3 Press Return to get started! Compiled by cisco Systems, Inc. Press RETURN to display the Router> prompt. ... Initial Configuration Using the Cisco CLI-Manual Configuration This section shows how to display a command-line interface (CLI) prompt for configuration using the CLI, enter no when the power...
... with interface and port numbering, see the "Initial Configuration Using Cisco Router and Security Device Manager (SDM)" section on the router at any point you may enter a question mark '?' Copyright (c) 1986-2004 by Step 3 Press Return to get started! Compiled by cisco Systems, Inc. Press RETURN to display the Router> prompt. ... Initial Configuration Using the Cisco CLI-Manual Configuration This section shows how to display a command-line interface (CLI) prompt for configuration using the CLI, enter no when the power...

Quick Start Guide
Page 36
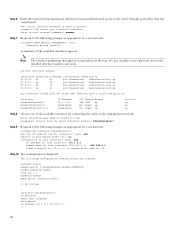
Step 4 Enter privileged EXEC mode: Router> enable Router# Step 5 For configuration procedures, see the appropriate Cisco 2800 series routers documentation or Cisco IOS software documentation, available online on Cisco.com at http://www.cisco.com, and choose Products & Solutions > Routers & Routing Systems > Cisco 2800 Series Integrated Services Routers > Technical Support and Documentation > Cisco 2800 Integrated Services Routers document type > Document. Note To avoid losing work you have finished the initial configuration, verify the initial configuration. Verify the Initial ...
Step 4 Enter privileged EXEC mode: Router> enable Router# Step 5 For configuration procedures, see the appropriate Cisco 2800 series routers documentation or Cisco IOS software documentation, available online on Cisco.com at http://www.cisco.com, and choose Products & Solutions > Routers & Routing Systems > Cisco 2800 Series Integrated Services Routers > Technical Support and Documentation > Cisco 2800 Integrated Services Routers document type > Document. Note To avoid losing work you have finished the initial configuration, verify the initial configuration. Verify the Initial ...


