Setup Guide
Page 1
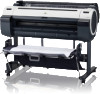
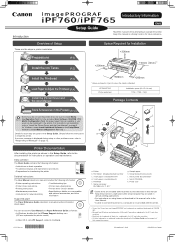
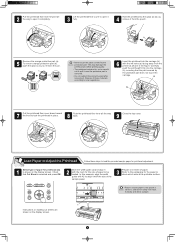
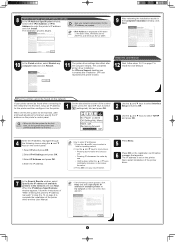
...Reference Guide (electronic manual) provides information about paper. Printer b. Power cord • Some items are included with the printer. • Canon, the Canon logo, and imagePROGRAF are trademarks or registered trademarks of CANON INC. • Microsoft and Windows are trademarks ...consumables and optional accessories, and other problems occur, refer to "Responding to a computer is a trademark of CD-ROMs k. If an error message is attached. iPF760/iPF765 Printer and stand Installation space (W x D x H mm) 1704 × 1700 × 1362 Package Contents i g j c d e f a k h...
...Reference Guide (electronic manual) provides information about paper. Printer b. Power cord • Some items are included with the printer. • Canon, the Canon logo, and imagePROGRAF are trademarks or registered trademarks of CANON INC. • Microsoft and Windows are trademarks ...consumables and optional accessories, and other problems occur, refer to "Responding to a computer is a trademark of CD-ROMs k. If an error message is attached. iPF760/iPF765 Printer and stand Installation space (W x D x H mm) 1704 × 1700 × 1362 Package Contents i g j c d e f a k h...
Setup Guide
Page 2
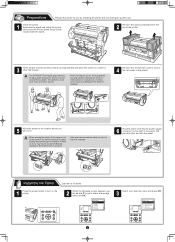
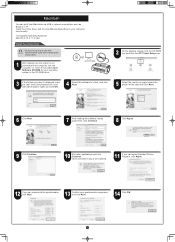
...press OK. a 6 Plug the power cord into the power supply connector on the right of the printer. 3 Three people should hold the printer's carrying handles and place the printer on the printer. 2 When the following screen appears, use the ▲ and ▼ keys to turn on ...2 Assemble the stand and install the printer referring to the position (a) before closing the output stacker and unlocking the 4 casters. Moving the printer requires at location. • The iPF760/iPF765 weighs approximately Caution 52 kg by installing the printer and connecting the power cord. 1 ...
...press OK. a 6 Plug the power cord into the power supply connector on the right of the printer. 3 Three people should hold the printer's carrying handles and place the printer on the printer. 2 When the following screen appears, use the ▲ and ▼ keys to turn on ...2 Assemble the stand and install the printer referring to the position (a) before closing the output stacker and unlocking the 4 casters. Moving the printer requires at location. • The iPF760/iPF765 weighs approximately Caution 52 kg by installing the printer and connecting the power cord. 1 ...
Setup Guide
Page 3
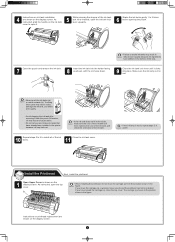
... (a) from the pouch.Otherwise, ink may leak and cause stains. • Do not remove and shake ink tanks that have already been installed in the printer because ink may cause stains, damage the ink tank, and affect print quality. Instructions on printhead replacement are shown on the bottom of the ink...
... (a) from the pouch.Otherwise, ink may leak and cause stains. • Do not remove and shake ink tanks that have already been installed in the printer because ink may cause stains, damage the ink tank, and affect print quality. Instructions on printhead replacement are shown on the bottom of the ink...
Setup Guide
Page 4
... the mark for the size of paper for printhead adj. a b 7 Pull the printhead fixer cover down toward the front to align it from the printer as shown in , and store it . is the printable surface. • Return unused paper to local regulations. a Instructions on loading cut sheets are shown on...
... the mark for the size of paper for printhead adj. a b 7 Pull the printhead fixer cover down toward the front to align it from the printer as shown in , and store it . is the printable surface. • Return unused paper to local regulations. a Instructions on loading cut sheets are shown on...
Setup Guide
Page 5
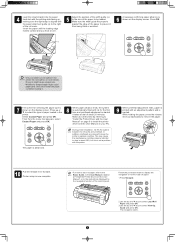
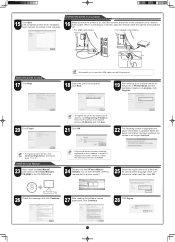
... the ▲ and ▼ keys to select Load Roll Paper and press OK. 3.Use the ▲ and ▼ keys to be loaded in the printer. a 10 Pull the release lever forward. a a • Only one sheet can be loaded. Guide and press OK. Insert the paper until the leading...load two or more sheets. This may cause the maintenance cartridge capacity indicator to drop to the right of this is not a problem with the printer. 9 When printhead adjustment ends, paper is printed with an adjustment pattern and is ejected. Then from being tilted or wrinkled. 6 A message ...
... the ▲ and ▼ keys to select Load Roll Paper and press OK. 3.Use the ▲ and ▼ keys to be loaded in the printer. a 10 Pull the release lever forward. a a • Only one sheet can be loaded. Guide and press OK. Insert the paper until the leading...load two or more sheets. This may cause the maintenance cartridge capacity indicator to drop to the right of this is not a problem with the printer. 9 When printhead adjustment ends, paper is printed with an adjustment pattern and is ejected. Then from being tilted or wrinkled. 6 A message ...
Setup Guide
Page 6
...as those of Service Pack. Be sure to log on -screen instructions during installation depending on the security settings of the printer driver. Install the printer driver and the User Manual by following screen may not be displayed MEMO during installation of your computer. • Select Deactivate.... Insert the provided User Software CD-ROM for your operating system in the CD-ROM drive. 2 In the Setup Menu window, click Install Printer Driver. • To choose a different language, click MEMO Language. 3 Select the software to install in the Installation List window, and then...
...as those of Service Pack. Be sure to log on -screen instructions during installation depending on the security settings of the printer driver. Install the printer driver and the User Manual by following screen may not be displayed MEMO during installation of your computer. • Select Deactivate.... Insert the provided User Software CD-ROM for your operating system in the CD-ROM drive. 2 In the Setup Menu window, click Install Printer Driver. • To choose a different language, click MEMO Language. 3 Select the software to install in the Installation List window, and then...
Setup Guide
Page 7
... clicking the Paper Reference Guide button, the Paper Reference Guide will be opened. Install the User Manual 14 The printer driver settings take effect after installation. (iPFxxxx represents the printer model.) Next, install the User Manual. 15 When the Install User Manual dialog box is displayed, insert the ... select Install with USB Connection, and click Next. 11 When the following dialog box is displayed, make sure the printer is on and use the USB cable to connect the printer to the computer. • If a warning message is displayed, click MEMO Retry to try again. 12 After ...
... clicking the Paper Reference Guide button, the Paper Reference Guide will be opened. Install the User Manual 14 The printer driver settings take effect after installation. (iPFxxxx represents the printer model.) Next, install the User Manual. 15 When the Install User Manual dialog box is displayed, insert the ... select Install with USB Connection, and click Next. 11 When the following dialog box is displayed, make sure the printer is on and use the USB cable to connect the printer to the computer. • If a warning message is displayed, click MEMO Retry to try again. 12 After ...

Setup Guide
Page 8
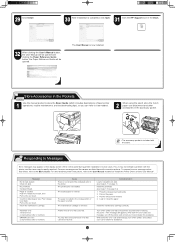
... The LED on the bottom connection lights green. 100Base-TX The LED on the top lights connection orange. 10Base-T The LED on . Select a printer from the list on either their IPv4 Devices or IPv6 Devices tabs and click Next. • The IPv6 Devices tab is displayed in Windows 7, ... Status is on the back of Configuring IP Addresses. Also enter your operating system in Printer Location under Method of the printer to the printer. Proceed to step 6. 2 Make sure the printer is Available, and then click Next to Configure, as desired. The installation process begins....
... The LED on the bottom connection lights green. 100Base-TX The LED on the top lights connection orange. 10Base-T The LED on . Select a printer from the list on either their IPv4 Devices or IPv6 Devices tabs and click Next. • The IPv6 Devices tab is displayed in Windows 7, ... Status is on the back of Configuring IP Addresses. Also enter your operating system in Printer Location under Method of the printer to the printer. Proceed to step 6. 2 Make sure the printer is Available, and then click Next to Configure, as desired. The installation process begins....
Setup Guide
Page 9
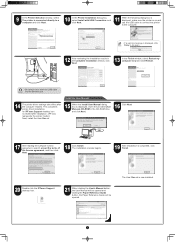
...iPFxxxx Support desktop icon is created after the computer restarts. Menu Maint. Press OK once you have finished. 5 Press Menu. 6 Press OK on the printer's control panel. • When ink fills the system for the IP address, as needed. Remaining Amount 㪈㪇㪇㩼 2 Use the ...; Pressing ▼ decreases the value by one. • Holding down either IPv4 Address or IPv6 Address to enter the printer's IP address • Ask your printer cannot be found on the control panel. 1.Select IPv4 and press OK. 2.Select IPv4 Settings and press OK. 3.Select ...
...iPFxxxx Support desktop icon is created after the computer restarts. Menu Maint. Press OK once you have finished. 5 Press Menu. 6 Press OK on the printer's control panel. • When ink fills the system for the IP address, as needed. Remaining Amount 㪈㪇㪇㩼 2 Use the ...; Pressing ▼ decreases the value by one. • Holding down either IPv4 Address or IPv6 Address to enter the printer's IP address • Ask your printer cannot be found on the control panel. 1.Select IPv4 and press OK. 2.Select IPv4 Settings and press OK. 3.Select ...
Setup Guide
Page 10
...computer on your operating system in the CD-ROM drive. 2 On the desktop, double-click the CD-ROM icon and then the iPF Printer Setup icon. 3 If the following screen is displayed, enter the user name and password of a user with administrative rights when installing the...connections such as a user with administrative rights and click OK. 4 Select the software to install, and click Next. 5 Select the country or region where the printer will be used and click Next. 6 Click Next. 7 After reading the software license agreement, click Continue. 8 Click Agree. 9 Click Continue. 10 Exit ...
...computer on your operating system in the CD-ROM drive. 2 On the desktop, double-click the CD-ROM icon and then the iPF Printer Setup icon. 3 If the following screen is displayed, enter the user name and password of a user with administrative rights when installing the...connections such as a user with administrative rights and click OK. 4 Select the software to install, and click Next. 5 Select the country or region where the printer will be used and click Next. 6 Click Next. 7 After reading the software license agreement, click Continue. 8 Click Agree. 9 Click Continue. 10 Exit ...
Setup Guide
Page 11
... and click Next. 21 Click OK. 22 The following screen is displayed and paper information is already MEMO registered on , and then connect the printer to install, and then click OK. 26 Check the message and click Continue. 27 After reading the software license agreement, click Continue. 28 Click... Agree. 11 Install the User Manual 23 Next, install the User Manual. Connect the printer to setup 17 Click Next. a • Be careful not to 19. When the paper information has been updated, the screen is displayed for the...
... and click Next. 21 Click OK. 22 The following screen is displayed and paper information is already MEMO registered on , and then connect the printer to install, and then click OK. 26 Check the message and click Continue. 27 After reading the software license agreement, click Continue. 28 Click... Agree. 11 Install the User Manual 23 Next, install the User Manual. Connect the printer to setup 17 Click Next. a • Be careful not to 19. When the paper information has been updated, the screen is displayed for the...
Setup Guide
Page 12
... Reference Guide will be easily resolved. Pull the release lever forward. 4. Write down the error code and message, turn off the printer, and contact your Canon dealer for assistance. No printhead Install printhead. Push release lever back, Pull out the cut sheet. Pull out the paper. 3. ...3-4) 1. Load or reload the paper. If the message still appears, write down the error code and message, turn off the printer, and contact your Canon dealer for assistance. 12 29 Click Install. 30 After installation is completed, click Quit. 31 Click the iPF Support icon in ...
... Reference Guide will be easily resolved. Pull the release lever forward. 4. Write down the error code and message, turn off the printer, and contact your Canon dealer for assistance. No printhead Install printhead. Push release lever back, Pull out the cut sheet. Pull out the paper. 3. ...3-4) 1. Load or reload the paper. If the message still appears, write down the error code and message, turn off the printer, and contact your Canon dealer for assistance. 12 29 Click Install. 30 After installation is completed, click Quit. 31 Click the iPF Support icon in ...


