Setup Guide
Page 1
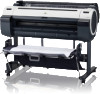
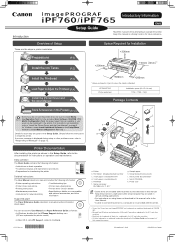
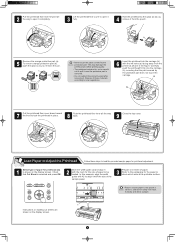
...click the iPFxxxx Support desktop icon. (iPFxxxx represents the printer model.) • In Mac OS X, click iPF Support, added to the printer. iPF760/iPF765 Printer and stand Installation space (W x D x H mm) 1704 × 1700 × 1362 Package Contents i g j c d e ...ink tanks: Bk, MBk (x 2), C, M, Y g. Simply follow the instructions to printer c. 3-inch paper core attachment R d. 3-inch paper core attachment L e. Set of CD-ROMs k. Set of printer documentation j. Power cord • Some items are included with the printer. • Canon, the Canon logo, and imagePROGRAF...
...click the iPFxxxx Support desktop icon. (iPFxxxx represents the printer model.) • In Mac OS X, click iPF Support, added to the printer. iPF760/iPF765 Printer and stand Installation space (W x D x H mm) 1704 × 1700 × 1362 Package Contents i g j c d e ...ink tanks: Bk, MBk (x 2), C, M, Y g. Simply follow the instructions to printer c. 3-inch paper core attachment R d. 3-inch paper core attachment L e. Set of CD-ROMs k. Set of printer documentation j. Power cord • Some items are included with the printer. • Canon, the Canon logo, and imagePROGRAF...
Setup Guide
Page 2
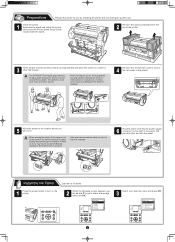
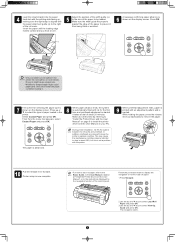
Assemble the stand and install the printer referring to avoid back strain and other flat location. • The iPF760/iPF765 weighs approximately Caution 52 kg by installing the printer and connecting the power cord. 1 Install the printer. Be careful to the Printer Stand...the position (a) before closing the output stacker and unlocking the 4 casters. Holding the printer at least three people. OFF ON Install the Ink Tanks Load all six ink tanks. 1 Press the power button to turn on the right of the printer. 3 Three people should hold the printer's carrying handles and...
Assemble the stand and install the printer referring to avoid back strain and other flat location. • The iPF760/iPF765 weighs approximately Caution 52 kg by installing the printer and connecting the power cord. 1 Install the printer. Be careful to the Printer Stand...the position (a) before closing the output stacker and unlocking the 4 casters. Holding the printer at least three people. OFF ON Install the Ink Tanks Load all six ink tanks. 1 Press the power button to turn on the right of the printer. 3 Three people should hold the printer's carrying handles and...
Setup Guide
Page 3
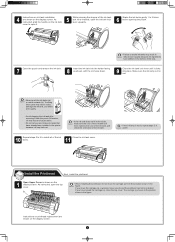
.... Instructions on printhead replacement are shown on the display screen. a b • Avoid dropping the ink tank after removing it clicks into the holder facing as shown, with the ink holes down. 9 Close the ink tank lock lever until it from the position shown in red. • Never touch the...into place. Touching these parts may leak out. • If the ink tank does not fit in reduced print quality because ink ingredients have settled on the bottom of the ink tanks. 11 Close the ink tank cover. • If the ink lamp is not lit, repeat steps 5, 8, and 9. If you...
.... Instructions on printhead replacement are shown on the display screen. a b • Avoid dropping the ink tank after removing it clicks into the holder facing as shown, with the ink holes down. 9 Close the ink tank lock lever until it from the position shown in red. • Never touch the...into place. Touching these parts may leak out. • If the ink tank does not fit in reduced print quality because ink ingredients have settled on the bottom of the ink tanks. 11 Close the ink tank cover. • If the ink lamp is not lit, repeat steps 5, 8, and 9. If you...
Setup Guide
Page 4
... pouch it came in, and store it away from the pouch. In this example, align the width guide with A2 to align it with the ink holes (a) facing away from the printer as shown in place. 8 Push the printhead fixer lever all the way to open it completely. 3 Lift the... loaded. a Instructions on loading cut sheets are shown on the display screen. This may damage the printhead and affect printing quality. • The printhead contains ink, so be careful not to spill it once the protective part is selected and press OK. 2 Slide the width guide (a) and align it with the...
... pouch it came in, and store it away from the pouch. In this example, align the width guide with A2 to align it with the ink holes (a) facing away from the printer as shown in place. 8 Push the printhead fixer lever all the way to open it completely. 3 Lift the... loaded. a Instructions on loading cut sheets are shown on the display screen. This may damage the printhead and affect printing quality. • The printhead contains ink, so be careful not to spill it once the protective part is selected and press OK. 2 Slide the width guide (a) and align it with the...
Setup Guide
Page 5
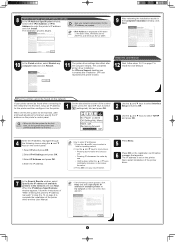
... from the menu that appears, select Coated Paper and press OK. 8 When paper advance ends, the system is automatically filled with ink for selecting the paper type is started. Make use of this is not a problem with the printer. 9 When printhead adjustment ends, paper... from being tilted or wrinkled. 6 A message confirming paper advance is shown on your PC. During printer installation, ink fills the system MEMO between the ink tanks and printhead. Printer setup is advanced. Guide and press OK. The navigation starts. 5 The paper is now complete. ...
... from the menu that appears, select Coated Paper and press OK. 8 When paper advance ends, the system is automatically filled with ink for selecting the paper type is started. Make use of this is not a problem with the printer. 9 When printhead adjustment ends, paper... from being tilted or wrinkled. 6 A message confirming paper advance is shown on your PC. During printer installation, ink fills the system MEMO between the ink tanks and printhead. Printer setup is advanced. Guide and press OK. The navigation starts. 5 The paper is now complete. ...
Setup Guide
Page 9
...the registration confirmation message that appears. 9 Press OK once you have finished. 5 Press Menu. 6 Press OK on the printer. 1 When ink fills the system for inputting values. 2. cart. tab) and press OK. Menu Maint. 8 When entering the printer's IP address manually In ...printer driver settings take effect after printhead adjustment is finished, specify the IP address on the printer's control panel. • When ink fills the system for the first time, do not operate the printer until printhead adjustment is displayed in Windows MEMO 7, Windows Vista, Windows ...
...the registration confirmation message that appears. 9 Press OK once you have finished. 5 Press Menu. 6 Press OK on the printer. 1 When ink fills the system for inputting values. 2. cart. tab) and press OK. Menu Maint. 8 When entering the printer's IP address manually In ...printer driver settings take effect after printhead adjustment is finished, specify the IP address on the printer's control panel. • When ink fills the system for the first time, do not operate the printer until printhead adjustment is displayed in Windows MEMO 7, Windows Vista, Windows ...
Setup Guide
Page 12
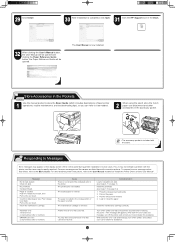
... clicking the Paper Reference Guide button, the Paper Reference Guide will be resolved. The maintenance cartridge is now installed. Corrective Action Load or reload the ink tank. (see steps 4-11 on page 3) Install the printhead. (see steps 1-9 on the display screen of the indicated color in the printer. Write ...), so you can refer to store the Basic Guide (which includes descriptions of error has occurred. Turn off the printer, and contact your Canon dealer for assistance. 12 If the message still appears, write down the error code and message, turn off the printer, and contact your...
... clicking the Paper Reference Guide button, the Paper Reference Guide will be resolved. The maintenance cartridge is now installed. Corrective Action Load or reload the ink tank. (see steps 4-11 on page 3) Install the printhead. (see steps 1-9 on the display screen of the indicated color in the printer. Write ...), so you can refer to store the Basic Guide (which includes descriptions of error has occurred. Turn off the printer, and contact your Canon dealer for assistance. 12 If the message still appears, write down the error code and message, turn off the printer, and contact your...


