
ZR Instruction Manual
Page 1
...the FCC Rules. If such changes or modifications should be made, you could be required to constitute a risk of FCC Rules. Canon U.S.A. Tel No. (516)328-5600 Important Warning CAUTION RISK OF ELECTRIC SHOCK DO NOT OPEN CAUTION: TO REDUCE THE RISK OF... to radio communications. NO USER SERVICEABLE PARTS INSIDE. One Canon Plaza, Lake Success, NY 11042, U.S.A. If this device must accept any changes or modifications to comply with the instructions, may cause undesired operation. Digital Video Camcorder, ZR This device complies with class B limits in a residential...
...the FCC Rules. If such changes or modifications should be made, you could be required to constitute a risk of FCC Rules. Canon U.S.A. Tel No. (516)328-5600 Important Warning CAUTION RISK OF ELECTRIC SHOCK DO NOT OPEN CAUTION: TO REDUCE THE RISK OF... to radio communications. NO USER SERVICEABLE PARTS INSIDE. One Canon Plaza, Lake Success, NY 11042, U.S.A. If this device must accept any changes or modifications to comply with the instructions, may cause undesired operation. Digital Video Camcorder, ZR This device complies with class B limits in a residential...

ZR Instruction Manual
Page 2
...-600A Compact Power Adapter is grounded so as battery power, refer to provide some protection against them. If you are not likely to the Canon Digital Video Camcorder ZR and all its accessories. They may fall, causing serious injury to a child or adult, and serious damage to overturn. 11. Power Cord Protection - IMPORTANT...
...-600A Compact Power Adapter is grounded so as battery power, refer to provide some protection against them. If you are not likely to the Canon Digital Video Camcorder ZR and all its accessories. They may fall, causing serious injury to a child or adult, and serious damage to overturn. 11. Power Cord Protection - IMPORTANT...

ZR Instruction Manual
Page 4
... Digital Effects 40 Important Safety Instructions 3 Audio Recording 44 Thank you for Choosing a Canon ......... 6 Setting the Self-Timer 46 Introducing the ZR 7 Mastering the Basics ~ When Making Manual Adjustments ...~ Adjusting Exposure Manually 47 Adjusting Focus Manually 49 Powering Your Camcorder 8 Setting the White Balance 50 Loading a Cassette 11 Basic Recording 13 Zooming 16...
... Digital Effects 40 Important Safety Instructions 3 Audio Recording 44 Thank you for Choosing a Canon ......... 6 Setting the Self-Timer 46 Introducing the ZR 7 Mastering the Basics ~ When Making Manual Adjustments ...~ Adjusting Exposure Manually 47 Adjusting Focus Manually 49 Powering Your Camcorder 8 Setting the White Balance 50 Loading a Cassette 11 Basic Recording 13 Zooming 16...
ZR Instruction Manual
Page 5
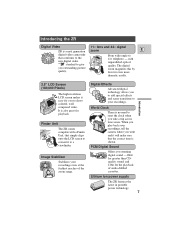
... you will soon be making high-quality videos which will give you WL-D67 Wireless Controller Two AA batteries pleasure for Your camcorder is supplied with the E purchasing this manual thoroughly - CA-600 Compact Power Adapter DC-600 DC Coupler STV-150 Stereo ...Case 6 in the menus and buttons labeled on to your way around the camcorder (p. 75) • Screen displays (p. 78) • Troubleshooting - Thank you for choosing a Canon First, we suggest that you read this Canon camcorder. Its following accessories: advanced technology makes it very easy to : •...
... you will soon be making high-quality videos which will give you WL-D67 Wireless Controller Two AA batteries pleasure for Your camcorder is supplied with the E purchasing this manual thoroughly - CA-600 Compact Power Adapter DC-600 DC Coupler STV-150 Stereo ...Case 6 in the menus and buttons labeled on to your way around the camcorder (p. 75) • Screen displays (p. 78) • Troubleshooting - Thank you for choosing a Canon First, we suggest that you read this Canon camcorder. Its following accessories: advanced technology makes it very easy to : •...
ZR Instruction Manual
Page 6
... the latest in portable power technology. 7 From wide-angle to a viewfinder. Introducing the ZR Digital Video 11× lens and 44× digital ZR is a next generation zoom E digital video camcorder that conforms to the new digital video Mini standard to give you went and it will make sure that simply clips onto...
... the latest in portable power technology. 7 From wide-angle to a viewfinder. Introducing the ZR Digital Video 11× lens and 44× digital ZR is a next generation zoom E digital video camcorder that conforms to the new digital video Mini standard to give you went and it will make sure that simply clips onto...
ZR Instruction Manual
Page 7
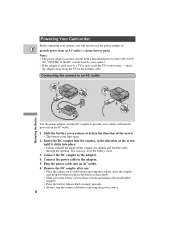
... the arrow. • The battery cover flips open. 2. Connect the DC coupler to provide your camera with instant power from an AC outlet. 1. B A Powering Your Camcorder Before operating your camera, you press the battery release knob. • Slide across the battery cover release switch (and replace the small rubber stopper). •...
... the arrow. • The battery cover flips open. 2. Connect the DC coupler to provide your camera with instant power from an AC outlet. 1. B A Powering Your Camcorder Before operating your camera, you press the battery release knob. • Slide across the battery cover release switch (and replace the small rubber stopper). •...
ZR Instruction Manual
Page 8
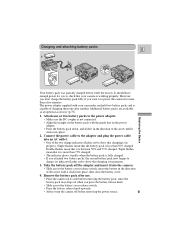
... and attaching battery packs E 1 Mastering the Basics 2 3 4 Your battery pack was partially charged before it to power the camera for you to check that your camcorder can hold two battery packs and is capable of charging them one or two battery packs to the power adapter. • Make sure the DC...
... and attaching battery packs E 1 Mastering the Basics 2 3 4 Your battery pack was partially charged before it to power the camera for you to check that your camcorder can hold two battery packs and is capable of charging them one or two battery packs to the power adapter. • Make sure the DC...
ZR Instruction Manual
Page 9
... you first attach to the adapter, or, if the adapter was already plugged into an AC outlet, from the side labeled "A". • When powering your camcorder from either side, A or B. If you attach two battery packs, charging begins from the battery you remove the DC coupler from the adapter. • You...
... you first attach to the adapter, or, if the adapter was already plugged into an AC outlet, from the side labeled "A". • When powering your camcorder from either side, A or B. If you attach two battery packs, charging begins from the battery you remove the DC coupler from the adapter. • You...
ZR Instruction Manual
Page 11
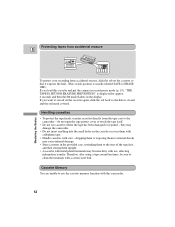
...for approx. 4 seconds and then the v mark flashes in the display. they may damage the camcorder. • Do not insert anything into the small holes on the cassette or cover them to the camcorder - dropping them or exposing them to external shocks may cause internal damage. • Store cassettes in..., after using a tape around ten times, be sure to use cassettes where the tape has been damaged or rejoined - If you load this camcorder. 12 Protecting tapes from accidental erasure E REC SAVE REC SAVE Mastering the Basics To protect your recording from the tape case to the start of...
...for approx. 4 seconds and then the v mark flashes in the display. they may damage the camcorder. • Do not insert anything into the small holes on the cassette or cover them to the camcorder - dropping them or exposing them to external shocks may cause internal damage. • Store cassettes in..., after using a tape around ten times, be sure to use cassettes where the tape has been damaged or rejoined - If you load this camcorder. 12 Protecting tapes from accidental erasure E REC SAVE REC SAVE Mastering the Basics To protect your recording from the tape case to the start of...
ZR Instruction Manual
Page 14
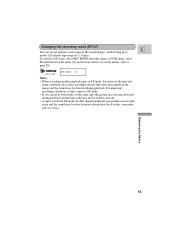
... menus, refer to LP mode, select REC MODE from the camera or VCR menu, select LP and then close the menu (for instructions on this camcorder, and vice versa. For important recordings, therefore, set the camera to SP mode. • If you record in SP (standard play) and LP (long play...
... menus, refer to LP mode, select REC MODE from the camera or VCR menu, select LP and then close the menu (for instructions on this camcorder, and vice versa. For important recordings, therefore, set the camera to SP mode. • If you record in SP (standard play) and LP (long play...
ZR Instruction Manual
Page 16
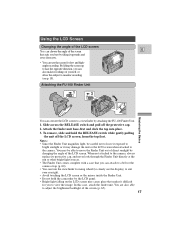
... damage the unit or the LCD screen when attached to adjust the brightness/backlight of the screen (p. 65). 17 To remove, slide and hold the camcorder by changing the angle of the LCD screen. In this case, attach the finder unit. RELEASE Using the LCD Screen Changing the angle of the...
... damage the unit or the LCD screen when attached to adjust the brightness/backlight of the screen (p. 65). 17 To remove, slide and hold the camcorder by changing the angle of the LCD screen. In this case, attach the finder unit. RELEASE Using the LCD Screen Changing the angle of the...
ZR Instruction Manual
Page 17
... The tape has reached the end Condensation warning The battery pack is a high precision product. About the LCD Screen E The LCD screen built into this camcorder is exhausted Self-Timer countdown Photo mode AF/AE mark However, small black dots or bright points of the LCD screen and they are not...
... The tape has reached the end Condensation warning The battery pack is a high precision product. About the LCD Screen E The LCD screen built into this camcorder is exhausted Self-Timer countdown Photo mode AF/AE mark However, small black dots or bright points of the LCD screen and they are not...
ZR Instruction Manual
Page 19
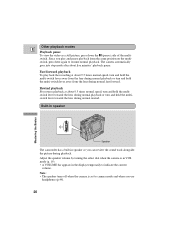
Rewind playback For reverse playback at about five minutes' playback pause. Built-in speaker Speaker The camcorder has a built-in the display temporarily to resume normal playback. Mastering the Basics Other playback modes E Playback pause To view the video as a still picture, ...
Rewind playback For reverse playback at about five minutes' playback pause. Built-in speaker Speaker The camcorder has a built-in the display temporarily to resume normal playback. Mastering the Basics Other playback modes E Playback pause To view the video as a still picture, ...
ZR Instruction Manual
Page 29
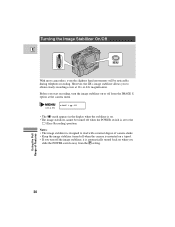
However, the ZR's image stabilizer allows you slide the POWER switch away from the IMAGE S. i •OFF • The i mark appears in the display when the stabilizer is on when you to the [ (Easy Recording) position. Turning the Image Stabilizer On/Off E MENU With most camcorders, even the slightest hand movements will be...
However, the ZR's image stabilizer allows you slide the POWER switch away from the IMAGE S. i •OFF • The i mark appears in the display when the stabilizer is on when you to the [ (Easy Recording) position. Turning the Image Stabilizer On/Off E MENU With most camcorders, even the slightest hand movements will be...
ZR Instruction Manual
Page 32
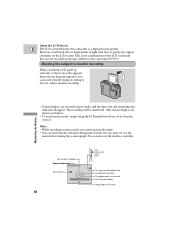
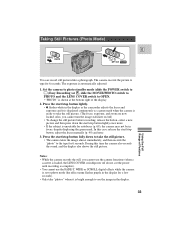
... the subject is unsuitable for a few seconds). • Only take "photos" where it is bright enough to see the image in the display as the camcorder adjusts the focus and exposure and it is displayed continuously as a green mark when the camera is set to the tape for 6 seconds. During this...
... the subject is unsuitable for a few seconds). • Only take "photos" where it is bright enough to see the image in the display as the camcorder adjusts the focus and exposure and it is displayed continuously as a green mark when the camera is set to the tape for 6 seconds. During this...
ZR Instruction Manual
Page 43
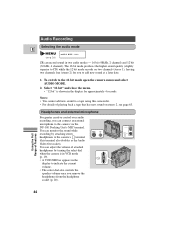
... mode produces the higher sound quality (slightly superior to CD) while the 12 bit mode records on stereo 2, see p. 28) AUDIO MODE••16bit ZR can connect an external microphone to a tape using this terminal also doubles as the Audio Video Out socket). Headphones and external microphone For greater creative... turning the select dial when the camera is shown in the display for you can record sound in the display to the camera's terminal (this camcorder. • For details of Features 44 To switch to add new sound at a later date. 1.
... mode produces the higher sound quality (slightly superior to CD) while the 12 bit mode records on stereo 2, see p. 28) AUDIO MODE••16bit ZR can connect an external microphone to a tape using this terminal also doubles as the Audio Video Out socket). Headphones and external microphone For greater creative... turning the select dial when the camera is shown in the display for you can record sound in the display to the camera's terminal (this camcorder. • For details of Features 44 To switch to add new sound at a later date. 1.
ZR Instruction Manual
Page 51
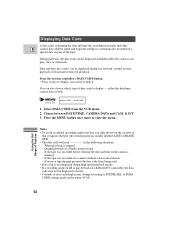
... to D/TIME SEL. Select DATA CODE from being read "- - -" in the following situations: - When playback is automatically recorded on a different DV camcorder, the data code may change according to close the menu. During playback, the date code can be displayed or hidden while the camera is played...see p. 28) DATA CODE•••DATE/TIME 1. Notes: • To avoid accidental recording, make sure that you slide the tab on ZR is in the camera's memory. - You can be displayed correctly. • Contents of data code display may not be displayed during high speed ...
... to D/TIME SEL. Select DATA CODE from being read "- - -" in the following situations: - When playback is automatically recorded on a different DV camcorder, the data code may change according to close the menu. During playback, the date code can be displayed or hidden while the camera is played...see p. 28) DATA CODE•••DATE/TIME 1. Notes: • To avoid accidental recording, make sure that you slide the tab on ZR is in the camera's memory. - You can be displayed correctly. • Contents of data code display may not be displayed during high speed ...

ZR Instruction Manual
Page 56
... on the VCR. Prepare the TV and VCR. • Turn on the VCR, and set it back while you want to copy appears on the camcorder. Basic Recording 1. Slide the camera's POWER switch to create your own video productions. Pause the VCR at the end of Features By connecting the camera...
... on the VCR. Prepare the TV and VCR. • Turn on the VCR, and set it back while you want to copy appears on the camcorder. Basic Recording 1. Slide the camera's POWER switch to create your own video productions. Pause the VCR at the end of Features By connecting the camera...
ZR Instruction Manual
Page 57
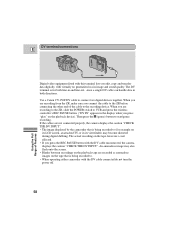
...THE DV INPUT". • The image displayed by the camcorder that is being recorded to (for both directions. If the cables are recording from the ZR, make sure you connect the cable to the ZR before connecting the other end of Features Use a Canon CV-150F DV cable to the recording device. When ...you are recorded as anomalous images on the tape that is being recorded to . • When operating either camcorder with the DV cable connected do not...
...THE DV INPUT". • The image displayed by the camcorder that is being recorded to (for both directions. If the cables are recording from the ZR, make sure you connect the cable to the ZR before connecting the other end of Features Use a Canon CV-150F DV cable to the recording device. When ...you are recorded as anomalous images on the tape that is being recorded to . • When operating either camcorder with the DV cable connected do not...
ZR Instruction Manual
Page 60
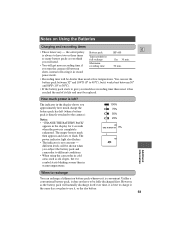
... between Time needed for 4 seconds when the power is best to charge it the same day you subject the battery pack and camcorder to different conditions. • When using the camcorder in cold areas such as ski slopes, the k symbol starts blinking sooner than in record pause mode. • Recording time will...
... between Time needed for 4 seconds when the power is best to charge it the same day you subject the battery pack and camcorder to different conditions. • When using the camcorder in cold areas such as ski slopes, the k symbol starts blinking sooner than in record pause mode. • Recording time will...


