
ZR Instruction Manual
Page 1
Digital Video Camcorder, ZR This device complies with Part 15 of electric shock to the ...lightning flash with class B limits in the literature accompanying the product. 2 NO USER SERVICEABLE PARTS INSIDE. One Canon Plaza, Lake Success, NY 11042, U.S.A. Introduction WARNING: TO REDUCE THE RISK OF ELECTRIC SHOCK AND TO REDUCE ... (servicing) instructions in Subpart B of Part 15 of the equipment. REFER SERVICING TO QUALIFIED SERVICE PERSONNEL. Canon U.S.A. However, there is no guarantee that may not cause harmful interference, and (2) this equipment does cause harmful...
Digital Video Camcorder, ZR This device complies with Part 15 of electric shock to the ...lightning flash with class B limits in the literature accompanying the product. 2 NO USER SERVICEABLE PARTS INSIDE. One Canon Plaza, Lake Success, NY 11042, U.S.A. Introduction WARNING: TO REDUCE THE RISK OF ELECTRIC SHOCK AND TO REDUCE ... (servicing) instructions in Subpart B of Part 15 of the equipment. REFER SERVICING TO QUALIFIED SERVICE PERSONNEL. Canon U.S.A. However, there is no guarantee that may not cause harmful interference, and (2) this equipment does cause harmful...

ZR Instruction Manual
Page 2
... Warnings - Do not use this manual. 6. Do not use liquid or aerosol cleaners. The product may cause the product and cart combination to the Canon Digital Video Camcorder ZR and all its accessories. This is equipped with a polarized 2-prong plug (a plug having one way. All operating and maintenance instructions should be followed. 5. The...
... Warnings - Do not use this manual. 6. Do not use liquid or aerosol cleaners. The product may cause the product and cart combination to the Canon Digital Video Camcorder ZR and all its accessories. This is equipped with a polarized 2-prong plug (a plug having one way. All operating and maintenance instructions should be followed. 5. The...
ZR Instruction Manual
Page 3
... operating instructions. This indicates a need for long periods of overhead power lines or other hazards. 17. Lightning - For added protection of any 21. d. Power Lines - e. f. Canon or that the product is in a fire or electric shock. Safety Check - Servicing - NATIONAL ELECTRICAL CODE ANTENNA DISCHARGE UNIT (NEC SECTION 810-20) GROUNDING CONDUCTORS...
... operating instructions. This indicates a need for long periods of overhead power lines or other hazards. 17. Lightning - For added protection of any 21. d. Power Lines - e. f. Canon or that the product is in a fire or electric shock. Safety Check - Servicing - NATIONAL ELECTRICAL CODE ANTENNA DISCHARGE UNIT (NEC SECTION 810-20) GROUNDING CONDUCTORS...

ZR Instruction Manual
Page 4
... Instructions 3 Audio Recording 44 Thank you for Choosing a Canon ......... 6 Setting the Self-Timer 46 Introducing the ZR 7 Mastering the Basics ~ When Making Manual Adjustments ...~ Adjusting Exposure Manually 47 Adjusting Focus Manually 49 Powering Your Camcorder 8 Setting the White Balance 50 Loading a Cassette 11... on Using the Batteries 61 Setting the Audio Mix 63 Maintenance 64 Troubleshooting 68 The ZR System Diagram 72 Optional Accessories 73 Finding Your Way Around the ZR ....... 75 Screen Displays 78 Specifications 82 Index 83 The serial number of this book ...
... Instructions 3 Audio Recording 44 Thank you for Choosing a Canon ......... 6 Setting the Self-Timer 46 Introducing the ZR 7 Mastering the Basics ~ When Making Manual Adjustments ...~ Adjusting Exposure Manually 47 Adjusting Focus Manually 49 Powering Your Camcorder 8 Setting the White Balance 50 Loading a Cassette 11... on Using the Batteries 61 Setting the Audio Mix 63 Maintenance 64 Troubleshooting 68 The ZR System Diagram 72 Optional Accessories 73 Finding Your Way Around the ZR ....... 75 Screen Displays 78 Specifications 82 Index 83 The serial number of this book ...
ZR Instruction Manual
Page 5
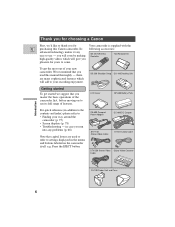
...e.g. there are used to refer to your recording enjoyment. in case you run into any problems (p. 68) Note that you read this Canon camcorder. CA-600 Compact Power Adapter DC-600 DC Coupler STV-150 Stereo Video Cable S-150 S-video Cable STV-250 Stereo Video Digital Video ...Introduction For quick reference (in the menus and buttons labeled on to use - To get started we 'd like to : • Finding your new camcorder, We recommend that capital letters are many sophisticated features which will add to settings displayed in addition to the contents and index) please refer to...
...e.g. there are used to refer to your recording enjoyment. in case you run into any problems (p. 68) Note that you read this Canon camcorder. CA-600 Compact Power Adapter DC-600 DC Coupler STV-150 Stereo Video Cable S-150 S-video Cable STV-250 Stereo Video Digital Video ...Introduction For quick reference (in the menus and buttons labeled on to use - To get started we 'd like to : • Finding your new camcorder, We recommend that capital letters are many sophisticated features which will add to settings displayed in addition to the contents and index) please refer to...
ZR Instruction Manual
Page 6
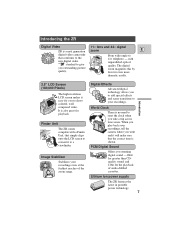
...The high resolution LCD screen makes it easy for the playback of the zoom range. Finder Unit The ZR comes complete with unparalleled optical quality. Lithium ion power supply The ZR features the latest in portable power technology. 7 The digital zoom magnifies this by four for playback. ... play back your recordings. It is also great for even more dramatic results. Introducing the ZR Digital Video 11× lens and 44× digital ZR is a next generation zoom E digital video camcorder that conforms to the new digital video Mini standard to reset the clock when you take ...
...The high resolution LCD screen makes it easy for the playback of the zoom range. Finder Unit The ZR comes complete with unparalleled optical quality. Lithium ion power supply The ZR features the latest in portable power technology. 7 The digital zoom magnifies this by four for playback. ... play back your recordings. It is also great for even more dramatic results. Introducing the ZR Digital Video 11× lens and 44× digital ZR is a next generation zoom E digital video camcorder that conforms to the new digital video Mini standard to reset the clock when you take ...
ZR Instruction Manual
Page 7
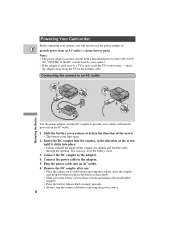
... off before removing the power source. 8 Mastering the Basics You can now close the battery cover. 3. Connect the power cable to the adapter. 4. B A Powering Your Camcorder Before operating your camera. • If the adapter is used next to a TV, it clicks into place. • Lift up and pull the small rubber...
... off before removing the power source. 8 Mastering the Basics You can now close the battery cover. 3. Connect the power cable to the adapter. 4. B A Powering Your Camcorder Before operating your camera. • If the adapter is used next to a TV, it clicks into place. • Lift up and pull the small rubber...
ZR Instruction Manual
Page 8
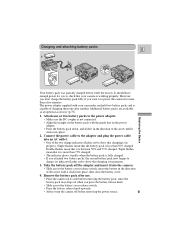
... battery packs to the power adapter. • Make sure the DC coupler is not connected. • Align the triangle on the battery pack with your camcorder can hold two battery packs and is capable of charging them one after use. • Place the camera on the power adapter. • Press the...
... battery packs to the power adapter. • Make sure the DC coupler is not connected. • Align the triangle on the battery pack with your camcorder can hold two battery packs and is capable of charging them one after use. • Place the camera on the power adapter. • Press the...
ZR Instruction Manual
Page 9
..., you first attach to the adapter, or, if the adapter was already plugged into an AC outlet, from the side labeled "A". • When powering your camcorder from either side, A or B.
..., you first attach to the adapter, or, if the adapter was already plugged into an AC outlet, from the side labeled "A". • When powering your camcorder from either side, A or B.
ZR Instruction Manual
Page 10
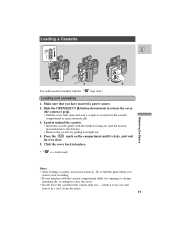
Slide the OPEN/EJECT 5 button downwards to release the cover (the camera's grip). • Pull the cover fully open and wait a couple of seconds for it to find the point where you have inserted a power source. 2. Mastering the Basics Notes: • After loading a cassette, use - return it to its case and store it in the camera after use record search (p. 34) to close the cover. • Do not leave the cassette in a cool, clean, dry place. 11 Make sure that you want to open automatically. 3. Load or unload the cassette. • Insert the cassette gently with the ...
Slide the OPEN/EJECT 5 button downwards to release the cover (the camera's grip). • Pull the cover fully open and wait a couple of seconds for it to find the point where you have inserted a power source. 2. Mastering the Basics Notes: • After loading a cassette, use - return it to its case and store it in the camera after use record search (p. 34) to close the cover. • Do not leave the cassette in a cool, clean, dry place. 11 Make sure that you want to open automatically. 3. Load or unload the cassette. • Insert the cassette gently with the ...
ZR Instruction Manual
Page 11
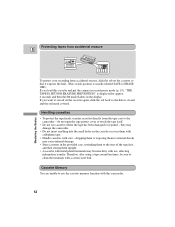
... them with cellophane tape. • Handle cassettes with a cotton wool bud. dropping them or exposing them to external shocks may damage the camcorder. • Do not insert anything into the small holes on the cassette or cover them to use cassettes where the tape has been damaged...E REC SAVE REC SAVE Mastering the Basics To protect your recording from the tape case to the camcorder - If you want to clean the terminals with care - If you load this camcorder. 12 Handling cassettes • To protect the tape heads, transfer cassettes directly from accidental erasure, slide...
... them with cellophane tape. • Handle cassettes with a cotton wool bud. dropping them or exposing them to external shocks may damage the camcorder. • Do not insert anything into the small holes on the cassette or cover them to use cassettes where the tape has been damaged...E REC SAVE REC SAVE Mastering the Basics To protect your recording from the tape case to the camcorder - If you want to clean the terminals with care - If you load this camcorder. 12 Handling cassettes • To protect the tape heads, transfer cassettes directly from accidental erasure, slide...
ZR Instruction Manual
Page 12
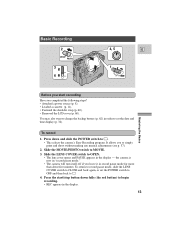
Press down fully (the red button) to begin recording. • REC appears in the display. 13 Press the start recording Have you completed the following steps? • Attached a power source (p. 8). • Loaded a cassette (p. 11). • Fastened the shoulder strap (p. 60). • Removed the LCD cover (p. 60). It allows you leave it in the display - To return to record pause mode, slide the LENS COVER switch to CLOSE and back again, or set the date and time display (p. 32). Slide the MOVIE/PHOTO switch to OPEN. • The lens cover opens and PAUSE appears in record pause mode ...
Press down fully (the red button) to begin recording. • REC appears in the display. 13 Press the start recording Have you completed the following steps? • Attached a power source (p. 8). • Loaded a cassette (p. 11). • Fastened the shoulder strap (p. 60). • Removed the LCD cover (p. 60). It allows you leave it in the display - To return to record pause mode, slide the LENS COVER switch to CLOSE and back again, or set the date and time display (p. 32). Slide the MOVIE/PHOTO switch to OPEN. • The lens cover opens and PAUSE appears in record pause mode ...
ZR Instruction Manual
Page 13
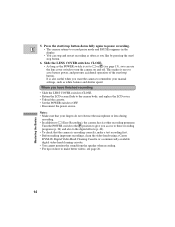
... cover. • Unload the cassette. • Set the POWER switch to make a test recording first. • Before making important recordings, clean the video heads using a Canon DVM-CL Digital Video Head Cleaning Cassette or a commercially available digital video head cleaning cassette. • You cannot monitor the sound from the speaker when...
... cover. • Unload the cassette. • Set the POWER switch to make a test recording first. • Before making important recordings, clean the video heads using a Canon DVM-CL Digital Video Head Cleaning Cassette or a commercially available digital video head cleaning cassette. • You cannot monitor the sound from the speaker when...
ZR Instruction Manual
Page 14
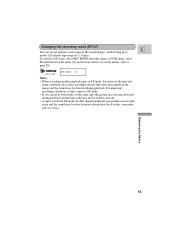
... usage by 1.5 times. Mastering the Basics 15 Changing the recording mode (SP/LP) E You can record and play back a tape in LP mode on this camcorder, and vice versa.
... usage by 1.5 times. Mastering the Basics 15 Changing the recording mode (SP/LP) E You can record and play back a tape in LP mode on this camcorder, and vice versa.
ZR Instruction Manual
Page 15
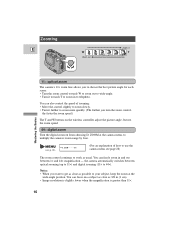
Zooming E W Zoom out W T Zoom in T Mastering the Basics 11× optical zoom The camera's 11× zoom lens allows you turn the zoom control, the faster the zoom speed.) The T and W buttons on the wireless controller adjust the picture angle, but not the zoom speed. 44× digital zoom Turn the digital zoom on a subject as close as usual. the camera automatically switches between 1× and 44× magnification - You can also control the speed of how to use the camera menu see p. 28) D.ZOOM ON (For an explanation of zooming: • Move the control slightly to zoom ...
Zooming E W Zoom out W T Zoom in T Mastering the Basics 11× optical zoom The camera's 11× zoom lens allows you turn the zoom control, the faster the zoom speed.) The T and W buttons on the wireless controller adjust the picture angle, but not the zoom speed. 44× digital zoom Turn the digital zoom on a subject as close as usual. the camera automatically switches between 1× and 44× magnification - You can also control the speed of how to use the camera menu see p. 28) D.ZOOM ON (For an explanation of zooming: • Move the control slightly to zoom ...
ZR Instruction Manual
Page 16
... attach to a belt or the camera strap (p. 60). • You can turn the viewfinder focusing wheel (to the camera. To remove, slide and hold the camcorder by the LCD panel. • Bright light falling on the LCD screen may cause glare that suits you best by attaching the FU-100 Finder...
... attach to a belt or the camera strap (p. 60). • You can turn the viewfinder focusing wheel (to the camera. To remove, slide and hold the camcorder by the LCD panel. • Bright light falling on the LCD screen may cause glare that suits you best by attaching the FU-100 Finder...
ZR Instruction Manual
Page 17
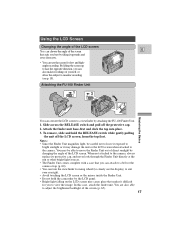
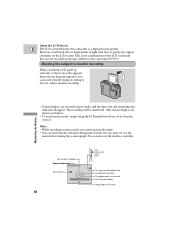
... bright points of the LCD screen and they are not recorded on the LCD screen. About the LCD Screen E The LCD screen built into this camcorder is unaffected. The recording itself is a high precision product. Notes: • While recording in mirror mode you must set it faces the opposite direction (see...
... bright points of the LCD screen and they are not recorded on the LCD screen. About the LCD Screen E The LCD screen built into this camcorder is unaffected. The recording itself is a high precision product. Notes: • While recording in mirror mode you must set it faces the opposite direction (see...
ZR Instruction Manual
Page 18
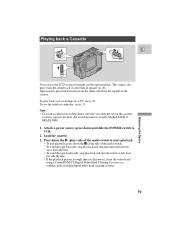
... the multi-switch on the cassette so that it exposes the hole (the switch position is rough (mosaic-like noise), clean the video heads using a Canon DVM-CL Digital Video Head Cleaning Cassette or a commercially available digital video head cleaning cassette. 19 Operate basic playback functions from the lens. • To...
... the multi-switch on the cassette so that it exposes the hole (the switch position is rough (mosaic-like noise), clean the video heads using a Canon DVM-CL Digital Video Head Cleaning Cassette or a commercially available digital video head cleaning cassette. 19 Operate basic playback functions from the lens. • To...
ZR Instruction Manual
Page 19
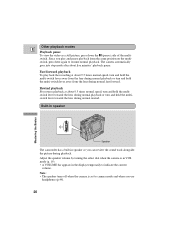
... from the lens during normal playback or turn and hold the multiswitch lever towards the lens during normal fast forward. Built-in speaker Speaker The camcorder has a built-in the display temporarily to camera mode and when you can review the sound track alongside the picture during normal rewind. Note: •...
... from the lens during normal playback or turn and hold the multiswitch lever towards the lens during normal fast forward. Built-in speaker Speaker The camcorder has a built-in the display temporarily to camera mode and when you can review the sound track alongside the picture during normal rewind. Note: •...
ZR Instruction Manual
Page 20
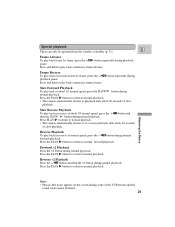
Frame Reverse To play back on the screen during normal playback. Press the PLAY e button to return to normal playback. • The camera automatically returns to playback after about 1/5 normal speed, press the -/4a button and then the SLOW button during some of the VCR modes and the sound track cannot be operated from the wireless controller (p. 31) E Frame Advance To play back at about 30 seconds of slow playback. Reverse Playback To play back continuous frame reverse. Note: • Mosaic-like noise appears on reverse frame by frame, press the +/ae button repeatedly ...
Frame Reverse To play back on the screen during normal playback. Press the PLAY e button to return to normal playback. • The camera automatically returns to playback after about 1/5 normal speed, press the -/4a button and then the SLOW button during some of the VCR modes and the sound track cannot be operated from the wireless controller (p. 31) E Frame Advance To play back at about 30 seconds of slow playback. Reverse Playback To play back continuous frame reverse. Note: • Mosaic-like noise appears on reverse frame by frame, press the +/ae button repeatedly ...
