
ZR Instruction Manual
Page 1
... equipment and receiver. • Connect the equipment into an outlet on , the user is intended to alert the user to the equipment unless otherwise specified in a residential installation. Canon U.S.A. Do not make any interference received, including interference that interference will not occur in a particular installation. Digital Video Camcorder, ZR This device complies with the...
... equipment and receiver. • Connect the equipment into an outlet on , the user is intended to alert the user to the equipment unless otherwise specified in a residential installation. Canon U.S.A. Do not make any interference received, including interference that interference will not occur in a particular installation. Digital Video Camcorder, ZR This device complies with the...

ZR Instruction Manual
Page 2
...plug still fails to fit, contact your electrician to grounding electrodes, and requirements for future reference. Section 810 of antenna discharge unit, connection to replace your product dealer or local power company. 2. See figure 1. 3 Introduction 3. All warnings on or pinched by items.... 13. Unplug this product near water or in wire to the product. Polarization - Pay particular attention to the Canon Digital Video Camcorder ZR and all its accessories. If an outside antenna is equipped with respect to proper grounding of the mast and supporting structure...
...plug still fails to fit, contact your electrician to grounding electrodes, and requirements for future reference. Section 810 of antenna discharge unit, connection to replace your product dealer or local power company. 2. See figure 1. 3 Introduction 3. All warnings on or pinched by items.... 13. Unplug this product near water or in wire to the product. Polarization - Pay particular attention to the Canon Digital Video Camcorder ZR and all its accessories. If an outside antenna is equipped with respect to proper grounding of the mast and supporting structure...

ZR Instruction Manual
Page 4
...Recording 44 Thank you for Choosing a Canon ......... 6 Setting the Self-Timer 46 Introducing the ZR 7 Mastering the Basics ~ When Making Manual Adjustments ...~ Adjusting Exposure Manually 47 Adjusting Focus Manually 49 Powering Your Camcorder 8 Setting the White Balance 50 ...Loading a Cassette 11 Basic Recording 13 Zooming 16 Using the LCD Screen 17 Playing back a Cassette 19 Connections...
...Recording 44 Thank you for Choosing a Canon ......... 6 Setting the Self-Timer 46 Introducing the ZR 7 Mastering the Basics ~ When Making Manual Adjustments ...~ Adjusting Exposure Manually 47 Adjusting Focus Manually 49 Powering Your Camcorder 8 Setting the White Balance 50 ...Loading a Cassette 11 Basic Recording 13 Zooming 16 Using the LCD Screen 17 Playing back a Cassette 19 Connections...
ZR Instruction Manual
Page 7
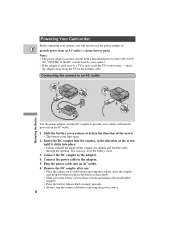
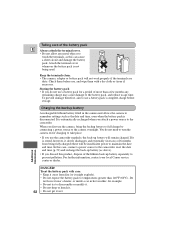
move the adapter away from an AC outlet. 1. Connecting the camera to an AC outlet 1 2 6 5 4 3 Use the power adapter and the DC coupler to provide ... side before removing the power source. 8 Mastering the Basics You can now close the battery cover. 3. Connect the DC coupler to the adapter. 5. B A Powering Your Camcorder Before operating your camera, you press the battery release knob. • Slide across the battery cover release...Slide the battery cover release switch in the direction of the arrow. • The battery cover flips open. 2. Connect the power cable to the adapter. 4.
move the adapter away from an AC outlet. 1. Connecting the camera to an AC outlet 1 2 6 5 4 3 Use the power adapter and the DC coupler to provide ... side before removing the power source. 8 Mastering the Basics You can now close the battery cover. 3. Connect the DC coupler to the adapter. 5. B A Powering Your Camcorder Before operating your camera, you press the battery release knob. • Slide across the battery cover release...Slide the battery cover release switch in the direction of the arrow. • The battery cover flips open. 2. Connect the power cable to the adapter. 4.
ZR Instruction Manual
Page 8
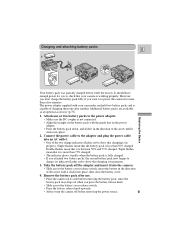
Remove the battery pack after another. Connect the power cable to the adapter and plug the power cable into an AC outlet. • One of the two charge indicators flashes red to ... DC coupler is capable of the arrow until it clicks into place. 2. Single flashes mean that it to check that your camcorder can hold two battery packs and is not connected. • Align the triangle on the battery pack with your camera is less than a few minutes. Double flashes mean that charging...
Remove the battery pack after another. Connect the power cable to the adapter and plug the power cable into an AC outlet. • One of the two charge indicators flashes red to ... DC coupler is capable of the arrow until it clicks into place. 2. Single flashes mean that it to check that your camcorder can hold two battery packs and is not connected. • Align the triangle on the battery pack with your camera is less than a few minutes. Double flashes mean that charging...
ZR Instruction Manual
Page 21
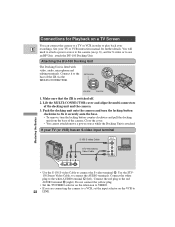
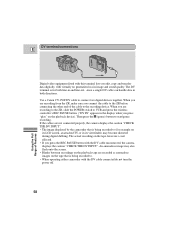
... of the camera. Push the docking unit onto the camera and turn the locking button clockwise to fix it to the base of the ZR via the MULTI-CONNECTOR. Connections for Playback on the VCR to 22 LINE. You will need to attach a power source to play back your E recordings... while the Docking Unit is fitted with video, audio, microphone and editing terminals. Make sure that the ZR is switched off. 2. Use the STV150 Stereo Video Cable, to the red AUDIO terminal 9 (right). Connect it securely onto the base. • To remove, turn the locking button counter-clockwise and pull the...
... of the camera. Push the docking unit onto the camera and turn the locking button clockwise to fix it to the base of the ZR via the MULTI-CONNECTOR. Connections for Playback on the VCR to 22 LINE. You will need to attach a power source to play back your E recordings... while the Docking Unit is fitted with video, audio, microphone and editing terminals. Make sure that the ZR is switched off. 2. Use the STV150 Stereo Video Cable, to the red AUDIO terminal 9 (right). Connect it securely onto the base. • To remove, turn the locking button counter-clockwise and pull the...
ZR Instruction Manual
Page 22
... docking unit. Mastering the Basics 23 When using the STV-250 Stereo Video Cable. This will be produced. • If you are connected. Notes: • You can connect the camera to the red audio terminal 9 (right). Follow the instructions on the VCR to the white audio terminal 7 (left and..., via its L and R audio terminals and V video terminal. • If cables are inserted to the S-video or Video terminals of the TV. Connect the red plug to the VCR instead of an attached Docking Unit, there will deliver a combined mono output from the AUDIO VIDEO OUT terminal of...
... docking unit. Mastering the Basics 23 When using the STV-250 Stereo Video Cable. This will be produced. • If you are connected. Notes: • You can connect the camera to the red audio terminal 9 (right). Follow the instructions on the VCR to the white audio terminal 7 (left and..., via its L and R audio terminals and V video terminal. • If cables are inserted to the S-video or Video terminals of the TV. Connect the red plug to the VCR instead of an attached Docking Unit, there will deliver a combined mono output from the AUDIO VIDEO OUT terminal of...

ZR Instruction Manual
Page 23
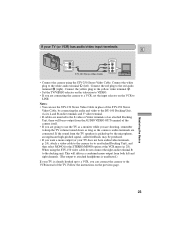
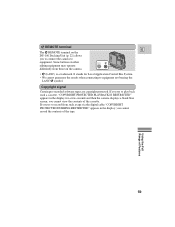
... the VCR menu. • See the note on the TV. • Use the coaxial cable with F-connectors. Connect the antenna cable to the camera, via the DU-100 Docking Unit. • The RF unit is available optionally.... Unit Mastering the Basics 2 V L R 300-75 ohm adapter 3 VHF 75-300 ohm adapter To connect the camera directly to a TV which does not have audio/video terminals, you will need to use the 75-300... ohm adapter. 24 Connect the TO TV terminal on the RF unit to the antenna input on page 23. 3. terminal on...
... the VCR menu. • See the note on the TV. • Use the coaxial cable with F-connectors. Connect the antenna cable to the camera, via the DU-100 Docking Unit. • The RF unit is available optionally.... Unit Mastering the Basics 2 V L R 300-75 ohm adapter 3 VHF 75-300 ohm adapter To connect the camera directly to a TV which does not have audio/video terminals, you will need to use the 75-300... ohm adapter. 24 Connect the TO TV terminal on the RF unit to the antenna input on page 23. 3. terminal on...

ZR Instruction Manual
Page 28
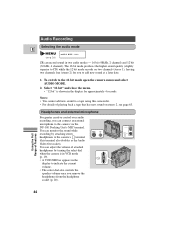
... to return to close the menu. Press in the select dial to select your chosen option from the menu. • Your selected option remains on a connected TV screen using the wireless controller's TV SCREEN button. Turn the select dial up or down to open the menu. 2.
... to return to close the menu. Press in the select dial to select your chosen option from the menu. • Your selected option remains on a connected TV screen using the wireless controller's TV SCREEN button. Turn the select dial up or down to open the menu. 2.
ZR Instruction Manual
Page 43
...Video Out socket). DV/OUT You can adjust the volume of attached headphones by attaching stereo VIDEO OUT headphones to the camera's terminal (this camcorder. • For details of Features 44 Headphones and external microphone For greater creative control over audio recording, you to add new sound at ... sound quality (slightly superior to CD) while the 12 bit mode records on stereo 2, see p. 28) AUDIO MODE••16bit ZR can connect an external microphone to the camera via the DU-100 Docking Unit's MIC terminal. To switch to the 12 bit mode open the camera...
...Video Out socket). DV/OUT You can adjust the volume of attached headphones by attaching stereo VIDEO OUT headphones to the camera's terminal (this camcorder. • For details of Features 44 Headphones and external microphone For greater creative control over audio recording, you to add new sound at ... sound quality (slightly superior to CD) while the 12 bit mode records on stereo 2, see p. 28) AUDIO MODE••16bit ZR can connect an external microphone to the camera via the DU-100 Docking Unit's MIC terminal. To switch to the 12 bit mode open the camera...

ZR Instruction Manual
Page 56
...as the section you want to copy. 2. Repeat steps 1 to copy appears on p. 22. 2. Start to the VCR. • See "Connections for details. 3. Connect the camera to play it to the video channel, or set the TV/VIDEO selector to VIDEO. • Turn on the VCR, and set...LINE. Basic Recording 1. S-150 S-video Cable STV-150 Stereo Video Cable V L R S INPUT S-VIDEO E VIDEO AUDIO L R Record the scenes you want on the camcorder. Load a blank cassette, and put the VCR in order to create your recorded cassette slightly ahead of the original. 57 Editing to a VCR Playback the...
...as the section you want to copy. 2. Repeat steps 1 to copy appears on p. 22. 2. Start to the VCR. • See "Connections for details. 3. Connect the camera to play it to the video channel, or set the TV/VIDEO selector to VIDEO. • Turn on the VCR, and set...LINE. Basic Recording 1. S-150 S-video Cable STV-150 Stereo Video Cable V L R S INPUT S-VIDEO E VIDEO AUDIO L R Record the scenes you want on the camcorder. Load a blank cassette, and put the VCR in order to create your recorded cassette slightly ahead of the original. 57 Editing to a VCR Playback the...
ZR Instruction Manual
Page 57
... viewfinder) may also flash onto the screen. • Blanks between recordings on the playback device). Use a Canon CV-150F DV cable to start/pause recording. DV terminal/connections E Digital video equipment fitted with this terminal lets you edit, copy and transfer data digitally, with virtually no... the caution "CHECK THE DV INPUT". If the cables are not connected properly, the camera displays the caution "CHECK THE DV INPUT". • The image displayed by the camcorder that is not affected. • If you connect the cable to the ZR before connecting the other end of Features
... viewfinder) may also flash onto the screen. • Blanks between recordings on the playback device). Use a Canon CV-150F DV cable to start/pause recording. DV terminal/connections E Digital video equipment fitted with this terminal lets you edit, copy and transfer data digitally, with virtually no... the caution "CHECK THE DV INPUT". If the cables are not connected properly, the camera displays the caution "CHECK THE DV INPUT". • The image displayed by the camcorder that is not affected. • If you connect the cable to the ZR before connecting the other end of Features
ZR Instruction Manual
Page 58
... the Full Range of the cassette. m REMOTE terminal E The m REMOTE terminal on the DU-100 Docking Unit (p. 22) allows you to connect the camera to equipment not bearing the LANC m symbol. It stands for a few seconds and then the camera displays a blank blue screen; If...cable "COPYRIGHT PROTECTED DUBBING RESTRICTED" appears in the display for Local Application Control Bus System. • We cannot guarantee the results when connecting to equipment. Copyright signal Certain pre-recorded software tapes are copyright protected. you cannot record the contents of the tape. you cannot ...
... the Full Range of the cassette. m REMOTE terminal E The m REMOTE terminal on the DU-100 Docking Unit (p. 22) allows you to connect the camera to equipment not bearing the LANC m symbol. It stands for a few seconds and then the camera displays a blank blue screen; If...cable "COPYRIGHT PROTECTED DUBBING RESTRICTED" appears in the display for Local Application Control Bus System. • We cannot guarantee the results when connecting to equipment. Copyright signal Certain pre-recorded software tapes are copyright protected. you cannot record the contents of the tape. you cannot ...
ZR Instruction Manual
Page 61
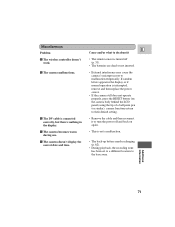
... • If you use , and wipe them with care. • Keep it away from being used. For further information, contact your local Canon service center or dealer. Check them before storage. Charging the backup battery A rechargeable lithium battery fitted in hot weather, for a period of more than...damage the battery pack. Keep the terminals clean. • The camera, adapter or battery pack will remain charged. In this case, connect a power source to the camcorder, reset the date and time (p. 52) and recharge the back-up battery (as this product, dispose of the lithium back-up ...
... • If you use , and wipe them with care. • Keep it away from being used. For further information, contact your local Canon service center or dealer. Check them before storage. Charging the backup battery A rechargeable lithium battery fitted in hot weather, for a period of more than...damage the battery pack. Keep the terminals clean. • The camera, adapter or battery pack will remain charged. In this case, connect a power source to the camcorder, reset the date and time (p. 52) and recharge the back-up battery (as this product, dispose of the lithium back-up ...

ZR Instruction Manual
Page 65
... you can always play back your recordings on the LCD screen, your camera can use the compact power adapter to TVs which use . Contact your Canon dealer for information about plug adapters for overseas use its NTSC system. This TV system is between 100 and 240 V AC, 50/60 Hz. ...Using the camera abroad E Power sources • You can only be connected to operate your camera and charge battery packs in any country where the electricity supply is used in the following countries: American Samoa, Bahama, Barbados...
... you can always play back your recordings on the LCD screen, your camera can use the compact power adapter to TVs which use . Contact your Canon dealer for information about plug adapters for overseas use its NTSC system. This TV system is between 100 and 240 V AC, 50/60 Hz. ...Using the camera abroad E Power sources • You can only be connected to operate your camera and charge battery packs in any country where the electricity supply is used in the following countries: American Samoa, Bahama, Barbados...
ZR Instruction Manual
Page 67
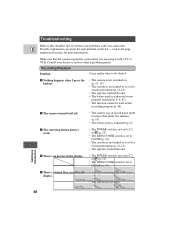
Troubleshooting Refer to do about five minutes (p. 13). • The battery pack is properly connected if you have any problems with a TV or VCR. The start/stop button doesn't work. • The POWER switch is not set to [ or P (p. 13). &#... Problem Cause and/or what to this checklist first if you are badly contaminated (p. 65).F32 1/2000 F32 12:00AM 1/2000 JAN. 1,1998 Consult your camcorder. The camera turned itself off. • The camera was in brackets for more information. turn to CLOSE (p. 13). Nothing happens when I press the buttons •...
Troubleshooting Refer to do about five minutes (p. 13). • The battery pack is properly connected if you have any problems with a TV or VCR. The start/stop button doesn't work. • The POWER switch is not set to [ or P (p. 13). &#... Problem Cause and/or what to this checklist first if you are badly contaminated (p. 65).F32 1/2000 F32 12:00AM 1/2000 JAN. 1,1998 Consult your camcorder. The camera turned itself off. • The camera was in brackets for more information. turn to CLOSE (p. 13). Nothing happens when I press the buttons •...
ZR Instruction Manual
Page 69
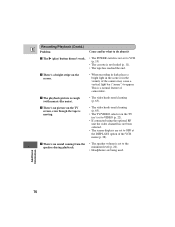
... • The video heads need cleaning (p. 65). • The TV/VIDEO selector on the TV isn't set to VIDEO (p. 22). • If connected using the optional RF unit the video channel has not been selected. • The screen displays are being used. There's no picture on the screen.... • When recording in dark places a bright light in the scene or in the vicinity of camcorders. ? The e (play) button doesn't work. • The POWER switch is not loaded (p. 11). • The tape has reached the end. ? Additional ...
... • The video heads need cleaning (p. 65). • The TV/VIDEO selector on the TV isn't set to VIDEO (p. 22). • If connected using the optional RF unit the video channel has not been selected. • The screen displays are being used. There's no picture on the screen.... • When recording in dark places a bright light in the scene or in the vicinity of camcorders. ? The e (play) button doesn't work. • The POWER switch is not loaded (p. 11). • The tape has reached the end. ? Additional ...
ZR Instruction Manual
Page 70
... not inserted. • External interference may cause the camera's microprocessor to the base zone. If random letters appear in the display. ? The DV cable is connected correctly, but there's nothing in the display or if normal operation is interrupted, remove and then replace the power source. • If the camera still...
... not inserted. • External interference may cause the camera's microprocessor to the base zone. If random letters appear in the display. ? The DV cable is connected correctly, but there's nothing in the display or if normal operation is interrupted, remove and then replace the power source. • If the camera still...
ZR Instruction Manual
Page 72
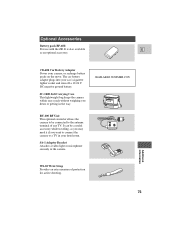
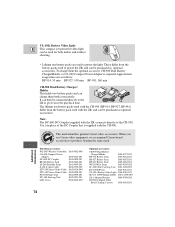
... any TV. Additional Information 73 SC-1000 Soft Carrying Case This lightweight bag keeps the camera within easy reach without weighing you want to connect the camera to be a useful accessory while traveling, as an optional accessory. SA-1 Adapter Bracket Attaches a video light or microphone securely ...to the antenna terminal of protection for active shooting. Optional Accessories Battery pack BP-608 For use with the ZR. CB-600 Car Battery Adapter Power your car's cigarette lighter socket and runs off a 12-24 V DC negative ground battery. It can...
... any TV. Additional Information 73 SC-1000 Soft Carrying Case This lightweight bag keeps the camera within easy reach without weighing you want to connect the camera to be a useful accessory while traveling, as an optional accessory. SA-1 Adapter Bracket Attaches a video light or microphone securely ...to the antenna terminal of protection for active shooting. Optional Accessories Battery pack BP-608 For use with the ZR. CB-600 Car Battery Adapter Power your car's cigarette lighter socket and runs off a 12-24 V DC negative ground battery. It can...
ZR Instruction Manual
Page 73
... differ from the battery pack used with the CH-900. It can then be connected directly to the ZR to power the ZR, and can be purchased as optional accessories. When you use Canon video equipment, we recommend Canon-brand accessories or products bearing the same mark. SORY CA NON GEN UINE VIDE...Video Light E This compact yet powerful video light can be used for both consectively. Note: The DC-600 DC Coupler (supplied with the ZR) connects directly to power the light. O ACCES Provided accessories: WL-D67 Wireless Controller CA-600 Compact Power Adapter DC-600 DC Coupler BP-608 Battery...
... differ from the battery pack used with the CH-900. It can then be connected directly to the ZR to power the ZR, and can be purchased as optional accessories. When you use Canon video equipment, we recommend Canon-brand accessories or products bearing the same mark. SORY CA NON GEN UINE VIDE...Video Light E This compact yet powerful video light can be used for both consectively. Note: The DC-600 DC Coupler (supplied with the ZR) connects directly to power the light. O ACCES Provided accessories: WL-D67 Wireless Controller CA-600 Compact Power Adapter DC-600 DC Coupler BP-608 Battery...


