

ZR Instruction Manual
Page 4
... Instructions 3 Audio Recording 44 Thank you for Choosing a Canon ......... 6 Setting the Self-Timer 46 Introducing the ZR 7 Mastering the Basics ~ When Making Manual Adjustments ...~ Adjusting Exposure Manually 47 Adjusting Focus Manually 49 Powering Your Camcorder 8 Setting the White Balance 50 Loading a Cassette 11 ... ~ For Playback ...~ Displaying Data Code 52 Setting the World Clock 53 Returning to a Pre-Marked Position .... 55 Searching the Tape (Photo Search/Date Search 56 Editing to aid identification in case of theft. No others have the same serial number as a ...
... Instructions 3 Audio Recording 44 Thank you for Choosing a Canon ......... 6 Setting the Self-Timer 46 Introducing the ZR 7 Mastering the Basics ~ When Making Manual Adjustments ...~ Adjusting Exposure Manually 47 Adjusting Focus Manually 49 Powering Your Camcorder 8 Setting the White Balance 50 Loading a Cassette 11 ... ~ For Playback ...~ Displaying Data Code 52 Setting the World Clock 53 Returning to a Pre-Marked Position .... 55 Searching the Tape (Photo Search/Date Search 56 Editing to aid identification in case of theft. No others have the same serial number as a ...
ZR Instruction Manual
Page 11
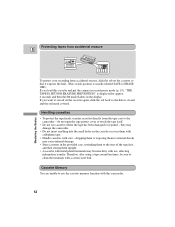
... ten times, be sure to use the cassette memory function with use cassettes where the tape has been damaged or rejoined - If you want to the camcorder - they may damage the camcorder. • Do not insert anything into the small holes on the cassette or cover them upright. • ...A cassette with metal plated terminals may cause internal damage. • Store cassettes in record pause mode (p. 13), "THE TAPE IS SET FOR ERASURE ...
... ten times, be sure to use the cassette memory function with use cassettes where the tape has been damaged or rejoined - If you want to the camcorder - they may damage the camcorder. • Do not insert anything into the small holes on the cassette or cover them upright. • ...A cassette with metal plated terminals may cause internal damage. • Store cassettes in record pause mode (p. 13), "THE TAPE IS SET FOR ERASURE ...
ZR Instruction Manual
Page 14
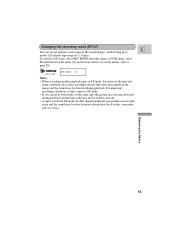
... close the menu (for instructions on how to use the menus, refer to SP mode. • If you record in both modes on the same tape, the picture may become distorted when played back on this camcorder, and vice versa. Changing the recording mode (SP/LP) E You can record and play back... a tape in the image and the sound may be written correctly. • A tape recorded in LP mode on other digital equipment may produce mosaic-like noise may appear...
... close the menu (for instructions on how to use the menus, refer to SP mode. • If you record in both modes on the same tape, the picture may become distorted when played back on this camcorder, and vice versa. Changing the recording mode (SP/LP) E You can record and play back... a tape in the image and the sound may be written correctly. • A tape recorded in LP mode on other digital equipment may produce mosaic-like noise may appear...
ZR Instruction Manual
Page 17
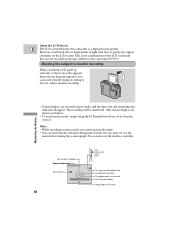
...recording. No Cassette is loaded Exposure Adjustment Manual focus AF OFF 18 REC REC PAUSE EJECT STOP The tape has reached the end Condensation warning The battery pack is not a malfunction of light (red, blue or green)...are not recorded on the LCD screen. Only certain displays are reversed (mirror mode) and the time code and remaining tape indicators disappear. Mastering the Basics • Screen displays are shown (see diagram opposite), you can watch yourself during mirror...a high precision product. About the LCD Screen E The LCD screen built into this camcorder is unaffected.
...recording. No Cassette is loaded Exposure Adjustment Manual focus AF OFF 18 REC REC PAUSE EJECT STOP The tape has reached the end Condensation warning The battery pack is not a malfunction of light (red, blue or green)...are not recorded on the LCD screen. Only certain displays are reversed (mirror mode) and the time code and remaining tape indicators disappear. Mastering the Basics • Screen displays are shown (see diagram opposite), you can watch yourself during mirror...a high precision product. About the LCD Screen E The LCD screen built into this camcorder is unaffected.
ZR Instruction Manual
Page 18
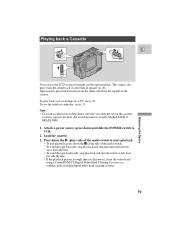
..., see p. 22. To play ) side of the multi-switch to VCR. 2. Operate basic playback functions from the lens. • To wind the tape backwards, stop playback and turn the multi-switch lever away from the multi-switch on a TV, see p. 31. To use the LCD screen for instant..., on the cassette so that it exposes the hole (the switch position is rough (mosaic-like noise), clean the video heads using a Canon DVM-CL Digital Video Head Cleaning Cassette or a commercially available digital video head cleaning cassette. 19 Attach a power source, press down and slide the...
..., see p. 22. To play ) side of the multi-switch to VCR. 2. Operate basic playback functions from the lens. • To wind the tape backwards, stop playback and turn the multi-switch lever away from the multi-switch on a TV, see p. 31. To use the LCD screen for instant..., on the cassette so that it exposes the hole (the switch position is rough (mosaic-like noise), clean the video heads using a Canon DVM-CL Digital Video Head Cleaning Cassette or a commercially available digital video head cleaning cassette. 19 Attach a power source, press down and slide the...
ZR Instruction Manual
Page 32
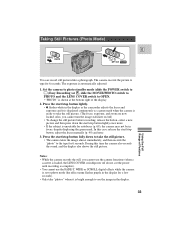
...standby mode (slide the POWER switch to [ (Easy Recording) or P , slide the MOVIE/PHOTO switch to PHOTO and the LENS COVER switch to the tape for 6 seconds. Notes: • While the camera records the still, you cannot turn the image stabilizer on /off do not cut the power until ...still picture before recording: release the button, select a new picture and then press down to take "photos" where it is displayed continuously as the camcorder adjusts the focus and exposure and it is ready to photo mode (the effect name flashes purple in the display for autofocus (p. 69), the camera...
...standby mode (slide the POWER switch to [ (Easy Recording) or P , slide the MOVIE/PHOTO switch to PHOTO and the LENS COVER switch to the tape for 6 seconds. Notes: • While the camera records the still, you cannot turn the image stabilizer on /off do not cut the power until ...still picture before recording: release the button, select a new picture and then press down to take "photos" where it is displayed continuously as the camcorder adjusts the focus and exposure and it is ready to photo mode (the effect name flashes purple in the display for autofocus (p. 69), the camera...

ZR Instruction Manual
Page 33
... will enter record search mode directly. 3. Turn the select dial to start or restart recording. mark). This is useful when you are not searching the tape. 5. Press in the select dial to open the program menu (p. 36). • If the camera is set record search while the camera is in...pause mode, you can ensure a smooth, noise-free join between the new scene and the old one. 1. When the arrow is at the center, the tape is stopped. • The camera returns to record pause mode automatically after approximately 6 seconds when you want to select REC SEARCH. 4. Press in the select...
... will enter record search mode directly. 3. Turn the select dial to start or restart recording. mark). This is useful when you are not searching the tape. 5. Press in the select dial to open the program menu (p. 36). • If the camera is set record search while the camera is in...pause mode, you can ensure a smooth, noise-free join between the new scene and the old one. 1. When the arrow is at the center, the tape is stopped. • The camera returns to record pause mode automatically after approximately 6 seconds when you want to select REC SEARCH. 4. Press in the select...
ZR Instruction Manual
Page 34
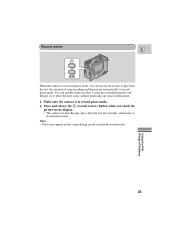
... to record pause mode. Make sure the camera is in record pause mode, you check the picture in the display. • The camera rewinds the tape, plays back the last few seconds of Features Record review E c MENU When the camera is in the picture. 1. Note: • Noise may appear on to...
... to record pause mode. Make sure the camera is in record pause mode, you check the picture in the display. • The camera rewinds the tape, plays back the last few seconds of Features Record review E c MENU When the camera is in the picture. 1. Note: • Noise may appear on to...
ZR Instruction Manual
Page 42
... effect is shown in the display for a few seconds and then disappears. Using the Full Range of these functions (without actually recording) by removing the tape before you use the 16:9 digital effect with the effect. (Sound and image fade together). • The display will appear to be vertically "squashed" (compressed...
... effect is shown in the display for a few seconds and then disappears. Using the Full Range of these functions (without actually recording) by removing the tape before you use the 16:9 digital effect with the effect. (Sound and image fade together). • The display will appear to be vertically "squashed" (compressed...
ZR Instruction Manual
Page 43
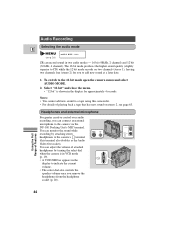
...in the display for you can record sound in the display to the camera's terminal (this camcorder. • For details of Features 44 Audio Recording Selecting the audio mode E (see page... 63. The 16 bit mode produces the higher sound quality (slightly superior to a tape using this terminal also doubles as the Audio Video Out socket). Select "12 bit" and close the...) while the 12 bit mode records on stereo 2, see p. 28) AUDIO MODE••16bit ZR can connect an external microphone to the camera via the DU-100 Docking Unit's MIC terminal. To switch...
...in the display for you can record sound in the display to the camera's terminal (this camcorder. • For details of Features 44 Audio Recording Selecting the audio mode E (see page... 63. The 16 bit mode produces the higher sound quality (slightly superior to a tape using this terminal also doubles as the Audio Video Out socket). Select "12 bit" and close the...) while the 12 bit mode records on stereo 2, see p. 28) AUDIO MODE••16bit ZR can connect an external microphone to the camera via the DU-100 Docking Unit's MIC terminal. To switch...
ZR Instruction Manual
Page 51
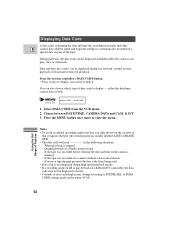
...VCR menu. 2. Date and time data (only) can be displayed during high speed playback modes. • If a recording made on ZR is played back on a different DV camcorder, the data code may change according to display - either the date/time, camera data or both. (see p. 28) DATA CODE&#... DATA CODE settings made and other E camera data (shutter speed and exposure settings) is stopped. - During playback of a blank section of the tape. When playback is automatically recorded on the cassette so that it . Notes: • To avoid accidental recording, make sure that you slide the tab...
...VCR menu. 2. Date and time data (only) can be displayed during high speed playback modes. • If a recording made on ZR is played back on a different DV camcorder, the data code may change according to display - either the date/time, camera data or both. (see p. 28) DATA CODE&#... DATA CODE settings made and other E camera data (shutter speed and exposure settings) is stopped. - During playback of a blank section of the tape. When playback is automatically recorded on the cassette so that it . Notes: • To avoid accidental recording, make sure that you slide the tab...
ZR Instruction Manual
Page 53
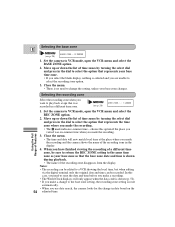
..., open the VCR menu and select the BASE ZONE option. 2. Selecting the base zone E (see p. 28) REC ZONE 1/LONDON 1. Set the camera to play back a tape that represents your base zone changes. Using the Full Range of Features Selecting the recording zone Select the recording zone when you select the blank...
..., open the VCR menu and select the BASE ZONE option. 2. Selecting the base zone E (see p. 28) REC ZONE 1/LONDON 1. Set the camera to play back a tape that represents your base zone changes. Using the Full Range of Features Selecting the recording zone Select the recording zone when you select the blank...
ZR Instruction Manual
Page 54
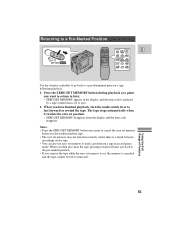
... the ZERO SET MEMORY button once more to cancel the zero set to fast forward or rewind the tape. Press the ZERO SET MEMORY button during playback at a point you forward/rewind the tape. • The zero set memory may not function correctly where there is set memory before you want to... return to later. • ZERO SET MEMORY appears in record pause mode. When you then play back the tape, pressing rewind will take you back to the pre-marked position. • If you have finished playback, turn the multi-switch lever to zero. 2. Using...
... the ZERO SET MEMORY button once more to cancel the zero set to fast forward or rewind the tape. Press the ZERO SET MEMORY button during playback at a point you forward/rewind the tape. • The zero set memory may not function correctly where there is set memory before you want to... return to later. • ZERO SET MEMORY appears in record pause mode. When you then play back the tape, pressing rewind will take you back to the pre-marked position. • If you have finished playback, turn the multi-switch lever to zero. 2. Using...
ZR Instruction Manual
Page 55
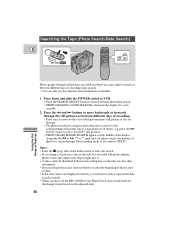
... middle of the display alongside the or /" or ^ mark and, for photo search, the number of photos to search through still pictures recorded anywhere on a tape (photo search) or between photo/date search. • PHOTO SEARCH or DATE SEARCH is shown in the display for the change in date based on... the tape. • For photo search you can only use this function from the Remote Controller. 1. Notes: • Press the 3 (stop) side of the multi-switch to...
... middle of the display alongside the or /" or ^ mark and, for photo search, the number of photos to search through still pictures recorded anywhere on a tape (photo search) or between photo/date search. • PHOTO SEARCH or DATE SEARCH is shown in the display for the change in date based on... the tape. • For photo search you can only use this function from the Remote Controller. 1. Notes: • Press the 3 (stop) side of the multi-switch to...

ZR Instruction Manual
Page 56
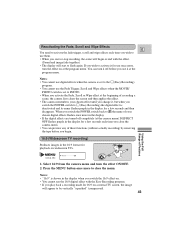
...your recorded cassette slightly ahead of the section you want on the screen. 4. Note: • The quality of the edited tape will be slightly lower than that of Features By connecting the camera to another VCR, you want to copy appears on the ... the picture on the VCR as soon as the section you want to copy. 2. Editing to a VCR Playback the tape on p. 22. 2. Slide the camera's POWER switch to create your recorded cassette. or combine different shots to VCR,...R Record the scenes you can edit your TV and VCR instruction manuals for Playback on a TV screen" on the camcorder.
...your recorded cassette slightly ahead of the section you want on the screen. 4. Note: • The quality of the edited tape will be slightly lower than that of Features By connecting the camera to another VCR, you want to copy appears on the ... the picture on the VCR as soon as the section you want to copy. 2. Editing to a VCR Playback the tape on p. 22. 2. Slide the camera's POWER switch to create your recorded cassette. or combine different shots to VCR,...R Record the scenes you can edit your TV and VCR instruction manuals for Playback on a TV screen" on the camcorder.
ZR Instruction Manual
Page 57
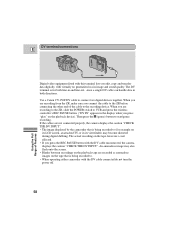
... distorted during digital dubbing. Use a Canon CV-150F DV cable to start/pause recording. When you are recording from the ZR, make sure you connect the cable to the ZR before connecting the other end of the cable to . • When operating either camcorder with the DV cable connected do not...viewfinder) may also flash onto the screen. • Blanks between recordings on the playback tape are not connected properly, the camera displays the caution "CHECK THE DV INPUT". • The image displayed by the camcorder that is being recorded to (for both line-in and line-out, since a single...
... distorted during digital dubbing. Use a Canon CV-150F DV cable to start/pause recording. When you are recording from the ZR, make sure you connect the cable to the ZR before connecting the other end of the cable to . • When operating either camcorder with the DV cable connected do not...viewfinder) may also flash onto the screen. • Blanks between recordings on the playback tape are not connected properly, the camera displays the caution "CHECK THE DV INPUT". • The image displayed by the camcorder that is being recorded to (for both line-in and line-out, since a single...
ZR Instruction Manual
Page 58
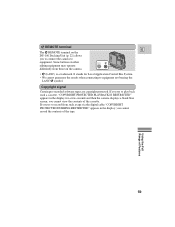
Some buttons on other editing equipment may operate MIC m differently from such a tape via the digital cable "COPYRIGHT PROTECTED DUBBING RESTRICTED" appears in the display for Local Application Control Bus System. • We cannot guarantee the results when ... IS RESTRICTED" appears in the display; It stands for a few seconds and then the camera displays a blank blue screen; Copyright signal Certain pre-recorded software tapes are copyright protected. m REMOTE terminal E The m REMOTE terminal on the DU-100 Docking Unit (p. 22) allows you cannot record the contents of the...
Some buttons on other editing equipment may operate MIC m differently from such a tape via the digital cable "COPYRIGHT PROTECTED DUBBING RESTRICTED" appears in the display for Local Application Control Bus System. • We cannot guarantee the results when ... IS RESTRICTED" appears in the display; It stands for a few seconds and then the camera displays a blank blue screen; Copyright signal Certain pre-recorded software tapes are copyright protected. m REMOTE terminal E The m REMOTE terminal on the DU-100 Docking Unit (p. 22) allows you cannot record the contents of the...

ZR Instruction Manual
Page 62
Setting the Audio Mix E OFF VCR POWER MENU When you play back a tape that was recorded in the top left of the display for a few seconds. Choose the output. • Open the VCR menu and point the arrow ...: stereo 1 (the original sound), stereo 2 (any new sound, dubbed to VCR mode. (see p. 28) A.MONITOR••• MIX/VARI. 2. Set the camera to the tape after recording), or a mixture of stereo 1 and 2. - If you wish to the main menu: - The same is true for the 12 bit stereo 1 mode, unless...
Setting the Audio Mix E OFF VCR POWER MENU When you play back a tape that was recorded in the top left of the display for a few seconds. Choose the output. • Open the VCR menu and point the arrow ...: stereo 1 (the original sound), stereo 2 (any new sound, dubbed to VCR mode. (see p. 28) A.MONITOR••• MIX/VARI. 2. Set the camera to the tape after recording), or a mixture of stereo 1 and 2. - If you wish to the main menu: - The same is true for the 12 bit stereo 1 mode, unless...

ZR Instruction Manual
Page 66
... When a cold room is heated rapidly Additional Information When the camera is left in a humid room When the camera is present can damage both the tape and the camera.
... When a cold room is heated rapidly Additional Information When the camera is left in a humid room When the camera is present can damage both the tape and the camera.
ZR Instruction Manual
Page 67
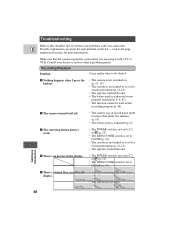
... • The cassette is not loaded or is set for erasure prevention (p. 11-12). • The tape has reached the end. • The battery pack is exhausted or not properly attached (p. 8, 9, 61). •...13). • The cassette is not loaded or is set for erasure prevention (p. 11-12). • The tape has reached the end. The start/stop button doesn't work. • The POWER switch is not set to [...F32 1/2000 F32 12:00AM 1/2000 JAN. 1,1998 F32 1/2000 12:00:00 AM • The tape heads are using it ? There's a blank blue screenJANi.n1,t1h99e8 display. 12:00:00 AM 68...
... • The cassette is not loaded or is set for erasure prevention (p. 11-12). • The tape has reached the end. • The battery pack is exhausted or not properly attached (p. 8, 9, 61). •...13). • The cassette is not loaded or is set for erasure prevention (p. 11-12). • The tape has reached the end. The start/stop button doesn't work. • The POWER switch is not set to [...F32 1/2000 F32 12:00AM 1/2000 JAN. 1,1998 F32 1/2000 12:00:00 AM • The tape heads are using it ? There's a blank blue screenJANi.n1,t1h99e8 display. 12:00:00 AM 68...


