CONSOLE_V1-1_ENG.pdf
Page 2
...Connection, Launch, Activation) Installing the Software and Drivers 1-6 Installing CONSOLE and the Canon Virtual VCR Driver 1-6 Installing the AV/C Camera Storage Subunit-WIA Driver 1-7 Connecting the Camcorder 1-8 Connecting the Camcorder to the Computer 1-8 Launching CONSOLE 1-9 Changing the Software Event Setting 1-9 Starting ... License Key 1-10 CONSOLE Windows Main Panel 2-13 Menu Bar ...2-13 Camcorder Status 2-14 Toolbar...2-14 Work Space 2-15 Camcorder Screen 2-15 Various Settings and [Performance Check] Video Folder and Recording Settings 3-17 [General] Tab ...3-17 [DV Rec]...
...Connection, Launch, Activation) Installing the Software and Drivers 1-6 Installing CONSOLE and the Canon Virtual VCR Driver 1-6 Installing the AV/C Camera Storage Subunit-WIA Driver 1-7 Connecting the Camcorder 1-8 Connecting the Camcorder to the Computer 1-8 Launching CONSOLE 1-9 Changing the Software Event Setting 1-9 Starting ... License Key 1-10 CONSOLE Windows Main Panel 2-13 Menu Bar ...2-13 Camcorder Status 2-14 Toolbar...2-14 Work Space 2-15 Camcorder Screen 2-15 Various Settings and [Performance Check] Video Folder and Recording Settings 3-17 [General] Tab ...3-17 [DV Rec]...
CONSOLE_V1-1_ENG.pdf
Page 9
.... ( 1-8) 2 Right-click on [Canon Camera Storage Device] icon in the [Events] tab and click [OK]. Click on ... you start CONSOLE. If you set the video folder to change the user account while running software that automatically prompts you to choose an application when you connect the camcorder to the computer (set to "Take no...the Windows program that displays the time at [Select an event] and select [Take no action"). 1 Set the camcorder's recording program to EXT.CONT. 1-9 Preparation (Installation, Connection, Launch, Activation) Launching CONSOLE Changing the Software Event...
.... ( 1-8) 2 Right-click on [Canon Camera Storage Device] icon in the [Events] tab and click [OK]. Click on ... you start CONSOLE. If you set the video folder to change the user account while running software that automatically prompts you to choose an application when you connect the camcorder to the computer (set to "Take no...the Windows program that displays the time at [Select an event] and select [Take no action"). 1 Set the camcorder's recording program to EXT.CONT. 1-9 Preparation (Installation, Connection, Launch, Activation) Launching CONSOLE Changing the Software Event...
CONSOLE_V1-1_ENG.pdf
Page 15
...129; To choose the registered work space, select [View] [Work Space] and the name of the camcorder. When XL2 is connected to switch the work space. Check the setting of the video folder. If [ ] is not displayed, activate the DV CONTROL function of the registered work... space. CONSOLE Windows Various Settings and [Performance Check] Camera and Picture Control Recording onto the Hard Disk Playback the Recorded...
...129; To choose the registered work space, select [View] [Work Space] and the name of the camcorder. When XL2 is connected to switch the work space. Check the setting of the video folder. If [ ] is not displayed, activate the DV CONTROL function of the registered work... space. CONSOLE Windows Various Settings and [Performance Check] Camera and Picture Control Recording onto the Hard Disk Playback the Recorded...
CONSOLE_V1-1_ENG.pdf
Page 17
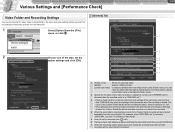
...video folder each time you start the recording the camcorder pictures onto the hard disk. [General] Tab 1 Select [Option] from the recording file. You can name the folder after the specified prefix (e.g."CNSL0001.avi"). 3 • Place a check mark to 9999999) will be automatically terminated. CONSOLE Windows Various Settings and [Performance Check] Camera... only when you started the recording. 4 When the camcorder's sound setting is started. A sequence number (up to record the Custom Preset settings of the video recording. For example, when "DVPC0001.avi" is recorded...
...video folder each time you start the recording the camcorder pictures onto the hard disk. [General] Tab 1 Select [Option] from the recording file. You can name the folder after the specified prefix (e.g."CNSL0001.avi"). 3 • Place a check mark to 9999999) will be automatically terminated. CONSOLE Windows Various Settings and [Performance Check] Camera... only when you started the recording. 4 When the camcorder's sound setting is started. A sequence number (up to record the Custom Preset settings of the video recording. For example, when "DVPC0001.avi" is recorded...
CONSOLE_V1-1_ENG.pdf
Page 19
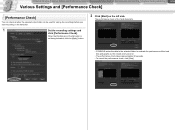
..., click the [Apply] button. 2 Click [Start] on the hard disk. 1 Set the recording settings and click [Performance Check]. CONSOLE Windows Various Settings and [Performance Check] Camera and Picture Control Recording onto the Hard Disk Playback the Recorded Files 3-19 Various Settings and [Performance Check] [Performance Check] You can check whether the...
..., click the [Apply] button. 2 Click [Start] on the hard disk. 1 Set the recording settings and click [Performance Check]. CONSOLE Windows Various Settings and [Performance Check] Camera and Picture Control Recording onto the Hard Disk Playback the Recorded Files 3-19 Various Settings and [Performance Check] [Performance Check] You can check whether the...

CONSOLE_V1-1_ENG.pdf
Page 30
...panel and right clicking the mouse turns the pointer to the right; CONSOLE Windows Various Settings and [Performance Check] Camera and Picture Control Recording onto the Hard Disk Playback the Recorded Files Camera and Picture Control 4-30 2 [IRIS] You can set an aperture value. 3 [SHUTTER] You can set the... cursor on the keyboard after clicking the slider with mouse. When you are using a manual video lens and selecting [Manual], you set the camcorder's frame rate to 24F or 30F (NTSC) or 25F (PAL) the camcorder's gain setting can adjust the gain level by moving the slider.
...panel and right clicking the mouse turns the pointer to the right; CONSOLE Windows Various Settings and [Performance Check] Camera and Picture Control Recording onto the Hard Disk Playback the Recorded Files Camera and Picture Control 4-30 2 [IRIS] You can set an aperture value. 3 [SHUTTER] You can set the... cursor on the keyboard after clicking the slider with mouse. When you are using a manual video lens and selecting [Manual], you set the camcorder's frame rate to 24F or 30F (NTSC) or 25F (PAL) the camcorder's gain setting can adjust the gain level by moving the slider.
CONSOLE_V1-1_ENG.pdf
Page 31
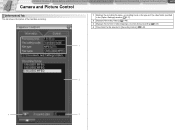
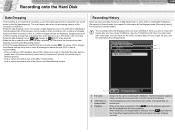
CONSOLE Windows Various Settings and [Performance Check] Camera and Picture Control Recording onto the Hard Disk Playback the Recorded Files Camera and Picture Control 4-31 [Information] Tab This tab shows information of the hard disk recording. 1 Displays the recording file name, a recording mode, a file type and the video folder specified in the [Option Settings] window ( 3-17). 2 Displays [Recording history] ( 5-48). 3 Displays the number of data droppings occurred during recording ( 5-48). 4 Plays back the file selected in [Recording history] ( 5-48). 1 2 4 3
CONSOLE Windows Various Settings and [Performance Check] Camera and Picture Control Recording onto the Hard Disk Playback the Recorded Files Camera and Picture Control 4-31 [Information] Tab This tab shows information of the hard disk recording. 1 Displays the recording file name, a recording mode, a file type and the video folder specified in the [Option Settings] window ( 3-17). 2 Displays [Recording history] ( 5-48). 3 Displays the number of data droppings occurred during recording ( 5-48). 4 Plays back the file selected in [Recording history] ( 5-48). 1 2 4 3
CONSOLE_V1-1_ENG.pdf
Page 44
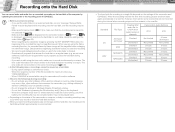
...the hard disk and tape. When you wish to edit using the time code, make sure that the recording can record video and audio from a connected camcorder on the hard disk of the computer by pressing the Windows key and [L] key on the keyboard. - If [ ] or... Check] Camera and Picture Control Recording onto the Hard Disk Playback the Recorded Files 5-44 Recording onto the Hard Disk You can be saved to the selected video folder. - as well. When CONSOLE is 4 channels Checked Unchecked Checked Unchecked Checked Unchecked Checked Unchecked Camcorder's Audio Settings...
...the hard disk and tape. When you wish to edit using the time code, make sure that the recording can record video and audio from a connected camcorder on the hard disk of the computer by pressing the Windows key and [L] key on the keyboard. - If [ ] or... Check] Camera and Picture Control Recording onto the Hard Disk Playback the Recorded Files 5-44 Recording onto the Hard Disk You can be saved to the selected video folder. - as well. When CONSOLE is 4 channels Checked Unchecked Checked Unchecked Checked Unchecked Checked Unchecked Camcorder's Audio Settings...

CONSOLE_V1-1_ENG.pdf
Page 45
...same folder as the video folder. CONSOLE Windows Various Settings and [Performance Check] Camera and Picture Control Recording onto the Hard Disk Playback the Recorded Files 5-45 Recording onto the Hard Disk Recording a Movie File By Operating the Camcorder 1 Press the start/stop button on the camcorder. • Recording ...8226; When [Save custom preset file when recording start /stop button on both the tape in the camcorder and the hard disk. • When XL2 is the same as the video folder. The name of the Custom Preset file is connected to record on the tape, and CONSOLE ...
...same folder as the video folder. CONSOLE Windows Various Settings and [Performance Check] Camera and Picture Control Recording onto the Hard Disk Playback the Recorded Files 5-45 Recording onto the Hard Disk Recording a Movie File By Operating the Camcorder 1 Press the start/stop button on the camcorder. • Recording ...8226; When [Save custom preset file when recording start /stop button on both the tape in the camcorder and the hard disk. • When XL2 is the same as the video folder. The name of the Custom Preset file is connected to record on the tape, and CONSOLE ...
CONSOLE_V1-1_ENG.pdf
Page 48
... You can check the scenes where data dropping occurred under [Recording history] in the video folder with CONSOLE. When information on dropped data is selected: Clicking plays back the file...and/or select [I picture and P picture] or [I picture only] in the [Information] tab of the [Camera Control] window. The recording history will be displayed under [Recording history]. • If the [CPU usage] displayed... Clicking starts the playback panel and the file is played back from the camcorder may happen also when the processing capacity of the computer is insufficient. •...
... You can check the scenes where data dropping occurred under [Recording history] in the video folder with CONSOLE. When information on dropped data is selected: Clicking plays back the file...and/or select [I picture and P picture] or [I picture only] in the [Information] tab of the [Camera Control] window. The recording history will be displayed under [Recording history]. • If the [CPU usage] displayed... Clicking starts the playback panel and the file is played back from the camcorder may happen also when the processing capacity of the computer is insufficient. •...
CONSOLE_V1-1_ENG.pdf
Page 51
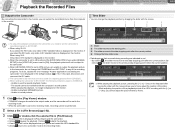
...CONSOLE changes its mode to the output mode, and the camcorder will not be displayed in [File Browser]. • The playback file is accessing the camcorder." if you select the SD mode, only video in HDV standard video is displayed on the keyboard after the current position. The.... - CONSOLE Windows Various Settings and [Performance Check] Camera and Picture Control Recording onto the Hard Disk Playback the Recorded Files 6-51 Playback the Recorded Files Output to the Camcorder Time Slider By connecting the camcorder to the monitor, you can output the recorded pictures ...
...CONSOLE changes its mode to the output mode, and the camcorder will not be displayed in [File Browser]. • The playback file is accessing the camcorder." if you select the SD mode, only video in HDV standard video is displayed on the keyboard after the current position. The.... - CONSOLE Windows Various Settings and [Performance Check] Camera and Picture Control Recording onto the Hard Disk Playback the Recorded Files 6-51 Playback the Recorded Files Output to the Camcorder Time Slider By connecting the camcorder to the monitor, you can output the recorded pictures ...
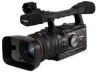
XH G1 XH A1 Instruction Manual
Page 3
...- Refer all its accessories. 1. IMPORTANT SAFETY INSTRUCTIONS In these safety instructions the word "product" refers to the Canon HD Video Camera Recorder XH G1 A/XH A1 A and all servicing to qualified service personnel. 3 All operating and maintenance instructions should be read before cleaning. ...- Read Instructions - Follow Instructions - Quick stops, excessive force, and uneven surfaces may cause picture interference, or permanently damage the camera. 8. If the plug still fails to fit, contact your electrician to overturn. 10. Outdoor Antenna Grounding - Power Lines - ...
...- Refer all its accessories. 1. IMPORTANT SAFETY INSTRUCTIONS In these safety instructions the word "product" refers to the Canon HD Video Camera Recorder XH G1 A/XH A1 A and all servicing to qualified service personnel. 3 All operating and maintenance instructions should be read before cleaning. ...- Read Instructions - Follow Instructions - Quick stops, excessive force, and uneven surfaces may cause picture interference, or permanently damage the camera. 8. If the plug still fails to fit, contact your electrician to overturn. 10. Outdoor Antenna Grounding - Power Lines - ...
XH G1 XH A1 Instruction Manual
Page 5
...when you use E the camcorder and retain it for future reference. Should your time zone and press the dial. To adjust for purchasing the Canon XH G1/XH A1. The time zone setting ...1. Please read this Manual Thank you for daylight saving time, select the time zone with a still camera. : Option or feature that complement the basic operating procedures. : Reference page ... CONSUMER PERSONAL USE IN ANY MANNER THAT COMPLIES WITH THE MPEG-2 STANDARD FOR ENCODING VIDEO INFORMATION FOR PACKAGED MEDIA IS EXPRESSLY PROHIBITED WITHOUT A LICENSE UNDER APPLICABLE PATENTS IN THE...
...when you use E the camcorder and retain it for future reference. Should your time zone and press the dial. To adjust for purchasing the Canon XH G1/XH A1. The time zone setting ...1. Please read this Manual Thank you for daylight saving time, select the time zone with a still camera. : Option or feature that complement the basic operating procedures. : Reference page ... CONSUMER PERSONAL USE IN ANY MANNER THAT COMPLIES WITH THE MPEG-2 STANDARD FOR ENCODING VIDEO INFORMATION FOR PACKAGED MEDIA IS EXPRESSLY PROHIBITED WITHOUT A LICENSE UNDER APPLICABLE PATENTS IN THE...
XH G1 XH A1 Instruction Manual
Page 6
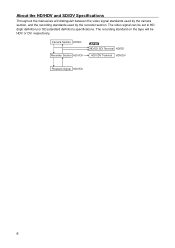
The recording standard on the tape will distinguish between the video signal standards used by the camera section, and the recording standards used by the recorder section. The video signal can be HDV or DV, respectively. Camera Section HD/SD Recorder Section HDV/DV HD/SD SDI Terminal HD/SD HDV/DV Terminal HDV/DV Playback Signal HDV/DV 6 About the HD/HDV and SD/DV Specifications Throughout the manual we will be set to HD (high definition) or SD (standard definition) specifications.
The recording standard on the tape will distinguish between the video signal standards used by the camera section, and the recording standards used by the recorder section. The video signal can be HDV or DV, respectively. Camera Section HD/SD Recorder Section HDV/DV HD/SD SDI Terminal HD/SD HDV/DV Terminal HDV/DV Playback Signal HDV/DV 6 About the HD/HDV and SD/DV Specifications Throughout the manual we will be set to HD (high definition) or SD (standard definition) specifications.
XH G1 XH A1 Instruction Manual
Page 28
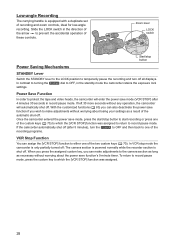
... power save function if you can make adjustments without worrying about the power save mode (VCR STOP) after 5 minutes), turn off : The camera section is powered normally while the recorder section is equipped with a duplicate set of the two custom keys ( 70). With the customized functions ...pause mode, press the custom key to protect the tape and video heads, the camcorder will automatically shut off (after 4 minutes 30 seconds in record pause mode. Slide the LOCK switch in the standby mode the camcorder retains the exposure lock settings. Zoom lever LOCK switch Start/...
... power save function if you can make adjustments without worrying about the power save mode (VCR STOP) after 5 minutes), turn off : The camera section is powered normally while the recorder section is equipped with a duplicate set of the two custom keys ( 70). With the customized functions ...pause mode, press the custom key to protect the tape and video heads, the camcorder will automatically shut off (after 4 minutes 30 seconds in record pause mode. Slide the LOCK switch in the standby mode the camcorder retains the exposure lock settings. Zoom lever LOCK switch Start/...
XH G1 XH A1 Instruction Manual
Page 40
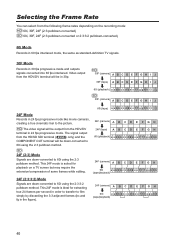
...30F (camera) A B C D E F G H I J 30F (tape) A B C D E F G H I J 60i (playback) a a b b c c d d e e f f g g h h i i j j SD 30F (camera) A B C D E F G H I J 60i (tape) a a b b c c d d e e f f g g h h i i j j 24F Mode Records in 24 fps progressive mode like movie cameras, creating a true cinematic feel to the picture. 24F (camera) A B C D E F G H HD The video signal will...Mode Records in 60 fps interlaced mode, the same as standard-definition TV signals. 30F Mode Records in the figure). 24F (camera) A B C D E F G H 60i aabbbcccddee f f f ggghh (tape/playback) 40 This 24F mode is suited...
...30F (camera) A B C D E F G H I J 30F (tape) A B C D E F G H I J 60i (playback) a a b b c c d d e e f f g g h h i i j j SD 30F (camera) A B C D E F G H I J 60i (tape) a a b b c c d d e e f f g g h h i i j j 24F Mode Records in 24 fps progressive mode like movie cameras, creating a true cinematic feel to the picture. 24F (camera) A B C D E F G H HD The video signal will...Mode Records in 60 fps interlaced mode, the same as standard-definition TV signals. 30F Mode Records in the figure). 24F (camera) A B C D E F G H 60i aabbbcccddee f f f ggghh (tape/playback) 40 This 24F mode is suited...
XH G1 XH A1 Instruction Manual
Page 41
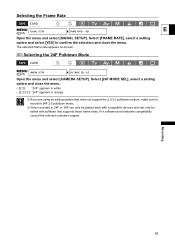
... SETUP]. The selected frame rate appears on-screen. Recording 41 SD Selecting the 24F Pulldown Mode MENU ( 25) CAMERA SETUP 24F MODE SEL•2:3 Open the menu and select [CAMERA SETUP]. Select [24F MODE SEL], select a setting option and close the menu. For software and hardware compatibility consult...If you are using an editing system that does not support the 2:3:3:2 pulldown method, make sure to record in 24F 2:3 pulldown mode. Video recorded in 24F or 30F can only be played back with compatible devices and can only be edited with software that supports these frame rates.
... SETUP]. The selected frame rate appears on-screen. Recording 41 SD Selecting the 24F Pulldown Mode MENU ( 25) CAMERA SETUP 24F MODE SEL•2:3 Open the menu and select [CAMERA SETUP]. Select [24F MODE SEL], select a setting option and close the menu. For software and hardware compatibility consult...If you are using an editing system that does not support the 2:3:3:2 pulldown method, make sure to record in 24F 2:3 pulldown mode. Video recorded in 24F or 30F can only be played back with compatible devices and can only be edited with software that supports these frame rates.

XH G1 XH A1 Instruction Manual
Page 60
...or low-light scenes. You can select from automatic gain control or of the video signal generated depending on the lighting and shooting conditions. Set the dial to the GAIN Switch Positions MENU ( 25) CAMERA SETUP GAIN SETTING GAIN L•••±0dB GAIN M•••...to +36 dB ( ) or +18 dB ( ). Select the [GAIN SETTING] submenu and then one of field. * only. Open the menu and select [CAMERA SETUP]. After the adjustment you can be assigned to each GAIN switch position * -3 dB For the lowest noise recording for indoor, low light or low...
...or low-light scenes. You can select from automatic gain control or of the video signal generated depending on the lighting and shooting conditions. Set the dial to the GAIN Switch Positions MENU ( 25) CAMERA SETUP GAIN SETTING GAIN L•••±0dB GAIN M•••...to +36 dB ( ) or +18 dB ( ). Select the [GAIN SETTING] submenu and then one of field. * only. Open the menu and select [CAMERA SETUP]. After the adjustment you can be assigned to each GAIN switch position * -3 dB For the lowest noise recording for indoor, low light or low...
XH G1 XH A1 Instruction Manual
Page 71
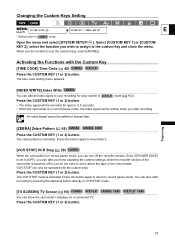
... [SYSTEM SETUP/ ]. Select [CUSTOM KEY 1] or [CUSTOM KEY 2], select the function you do not wish to your time adjusting the camera settings, while the recorder section of the camcorder is in record pause mode, the index signal will be written when you can take your recording for approx. 6.5 seconds. • When... on a connected TV. Press the button again to deactivate it. [VCR STOP] VCR Stop ( 28) When the camcorder is set to worry about the tape or the video heads. VCR STOP can only be added or erased later. You can also start recording by pressing the start recording. Press the ...
... [SYSTEM SETUP/ ]. Select [CUSTOM KEY 1] or [CUSTOM KEY 2], select the function you do not wish to your time adjusting the camera settings, while the recorder section of the camcorder is in record pause mode, the index signal will be written when you can take your recording for approx. 6.5 seconds. • When... on a connected TV. Press the button again to deactivate it. [VCR STOP] VCR Stop ( 28) When the camcorder is set to worry about the tape or the video heads. VCR STOP can only be added or erased later. You can also start recording by pressing the start recording. Press the ...
XH G1 XH A1 Instruction Manual
Page 155
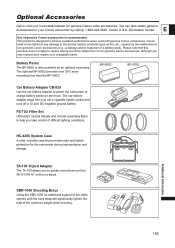
...Canon camcorder by the malfunction of non-genuine Canon accessories (e.g., a leakage and/or explosion of a battery pack). This product is also available as fire, etc., caused by calling: 1-800-828-4040, Canon U.S.A. Please note that provides safe and stylish protection for additional support of the video camera with genuine Canon...the load of non-genuine Canon accessories, although you take control of genuine Canon accessories is recommended. FS-72U Filter Set Ultraviolet, neutral density and circular polarizing filters to quickly mount/unmount the XH G1/XH A1 on the move. Additional...
...Canon camcorder by the malfunction of non-genuine Canon accessories (e.g., a leakage and/or explosion of a battery pack). This product is also available as fire, etc., caused by calling: 1-800-828-4040, Canon U.S.A. Please note that provides safe and stylish protection for additional support of the video camera with genuine Canon...the load of non-genuine Canon accessories, although you take control of genuine Canon accessories is recommended. FS-72U Filter Set Ultraviolet, neutral density and circular polarizing filters to quickly mount/unmount the XH G1/XH A1 on the move. Additional...


