CONSOLE_V1-1_ENG.pdf
Page 3
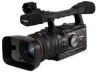
XH G1 XH A1 XL H1* *Unable to use some functions XL2* Required Accessories Canon digital camcorder compatible with the recordings in any errors or omissions. Select [Always On] in the [Power Options Properties] window. ( Appx-60) When the computer enters stand-by mode or hangs up while running CONSOLE, proper operation is not guaranteed after recovering. When dealing with HDV recordings, regardless of...
XH G1 XH A1 XL H1* *Unable to use some functions XL2* Required Accessories Canon digital camcorder compatible with the recordings in any errors or omissions. Select [Always On] in the [Power Options Properties] window. ( Appx-60) When the computer enters stand-by mode or hangs up while running CONSOLE, proper operation is not guaranteed after recovering. When dealing with HDV recordings, regardless of...
CONSOLE_V1-1_ENG.pdf
Page 4
...; Copying files from CONSOLE 1.0 • Supports XH G1 and XH A1 • New plug in: Color Correction, Skin Detail and Sky Detail • Allowed to save the Custom Preset settings of a camcorder from a computer and to compose the image you will be able to: • Record the camcorder image onto the computer's hard disk. • Output the image recorded on the connected camcorder and the camcorder mode. • EXT.CONT. You can be used . - mode ( ): This mode...
...; Copying files from CONSOLE 1.0 • Supports XH G1 and XH A1 • New plug in: Color Correction, Skin Detail and Sky Detail • Allowed to save the Custom Preset settings of a camcorder from a computer and to compose the image you will be able to: • Record the camcorder image onto the computer's hard disk. • Output the image recorded on the connected camcorder and the camcorder mode. • EXT.CONT. You can be used . - mode ( ): This mode...
CONSOLE_V1-1_ENG.pdf
Page 7
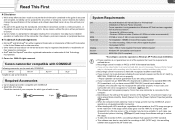
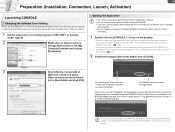
... time you connect the camcorder, the driver will be installed. You need to connect the camcorder to choose the software may be displayed. Uninstall ( 7-54) and reinstall the driver. If a warning message regarding the installation appears, click [Continue Anyway]. • Installation of the driver starts automatically. • Depending on the setting of the driver. 1 Turn the camcorder's power on and activate the DV CONTROL function. 2 Set the camcorder's recording program to EXT.CONT. 3 Connect the camcorder...
... time you connect the camcorder, the driver will be installed. You need to connect the camcorder to choose the software may be displayed. Uninstall ( 7-54) and reinstall the driver. If a warning message regarding the installation appears, click [Continue Anyway]. • Installation of the driver starts automatically. • Depending on the setting of the driver. 1 Turn the camcorder's power on and activate the DV CONTROL function. 2 Set the camcorder's recording program to EXT.CONT. 3 Connect the camcorder...
CONSOLE_V1-1_ENG.pdf
Page 9
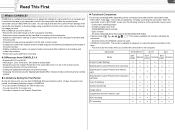
.... Click on [Canon Camera Storage Device] icon in Windows [Display Properties] window while launching CONSOLE. 1 Double-click the [CONSOLE 1.1] icon on [Register] when you proceed to an external hard disk, an error message "Delayed Write Failed" may be displayed while recording onto the hard disk, and the recording may not display texts properly. Do not change window will not appear next time the target folder. you set the video folder to...
.... Click on [Canon Camera Storage Device] icon in Windows [Display Properties] window while launching CONSOLE. 1 Double-click the [CONSOLE 1.1] icon on [Register] when you proceed to an external hard disk, an error message "Delayed Write Failed" may be displayed while recording onto the hard disk, and the recording may not display texts properly. Do not change window will not appear next time the target folder. you set the video folder to...
CONSOLE_V1-1_ENG.pdf
Page 17
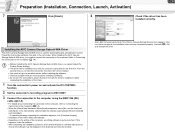
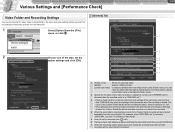
... Preset file will be recorded only when you started the recording. 4 When the camcorder's sound setting is started. CONSOLE Windows Various Settings and [Performance Check] Camera and Picture Control Recording onto the Hard Disk Playback the Recorded Files 3-17 Various Settings and [Performance Check] Video Folder and Recording Settings You need to specify the video folder (a target folder), file name and other settings before you start CONSOLE. 7 When the remaining battery power goes down below the specified level, the hard disk recording will...
... Preset file will be recorded only when you started the recording. 4 When the camcorder's sound setting is started. CONSOLE Windows Various Settings and [Performance Check] Camera and Picture Control Recording onto the Hard Disk Playback the Recorded Files 3-17 Various Settings and [Performance Check] Video Folder and Recording Settings You need to specify the video folder (a target folder), file name and other settings before you start CONSOLE. 7 When the remaining battery power goes down below the specified level, the hard disk recording will...
CONSOLE_V1-1_ENG.pdf
Page 29
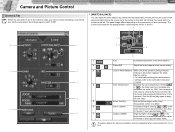
... the Kelvin text box increases/decreases the value in 9 levels (1 level: approximately 100K). 5 7 Outdoor (5600K) Bright sunlight. CONSOLE Windows Various Settings and [Performance Check] Camera and Picture Control Recording onto the Hard Disk Playback the Recorded Files Camera and Picture Control 4-29 [Control] Tab When the camcorder is being selected, clicking on this button registers the white balance setting. - The screen shot below will be adjusted when connecting the XL H1 or XL2. Click the [Enter...
... the Kelvin text box increases/decreases the value in 9 levels (1 level: approximately 100K). 5 7 Outdoor (5600K) Bright sunlight. CONSOLE Windows Various Settings and [Performance Check] Camera and Picture Control Recording onto the Hard Disk Playback the Recorded Files Camera and Picture Control 4-29 [Control] Tab When the camcorder is being selected, clicking on this button registers the white balance setting. - The screen shot below will be adjusted when connecting the XL H1 or XL2. Click the [Enter...
CONSOLE_V1-1_ENG.pdf
Page 59
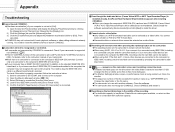
... the button. ÎWhen using XH G1, XH A1 or XL H1: If you have more disk space. ÎThe [Option Settings] window is open, or performance check is being carried out. Delete files to install the driver. Appendix Appx-59 Troubleshooting Cannot launch CONSOLE. Î[Hardware acceleration] of your computer is not set to [OFF]. You need to plug the IEEE1394 (DV) cable to [Full]. Set the DV CONTROL function to free...
... the button. ÎWhen using XH G1, XH A1 or XL H1: If you have more disk space. ÎThe [Option Settings] window is open, or performance check is being carried out. Delete files to install the driver. Appendix Appx-59 Troubleshooting Cannot launch CONSOLE. Î[Hardware acceleration] of your computer is not set to [OFF]. You need to plug the IEEE1394 (DV) cable to [Full]. Set the DV CONTROL function to free...
XH G1 XH A1 Instruction Manual
Page 3
... the Canon HD Video Camera Recorder XH G1 A/XH A1 A and all servicing to overturn. 10. Power Cord Protection - If an outside antenna system, extreme care should be followed. 5. When installing an outside antenna is left unattended and unused for the grounding electrode. Do not overload wall outlets and extension cords as contact with respect to proper grounding of the mast and supporting...
... the Canon HD Video Camera Recorder XH G1 A/XH A1 A and all servicing to overturn. 10. Power Cord Protection - If an outside antenna system, extreme care should be followed. 5. When installing an outside antenna is left unattended and unused for the grounding electrode. Do not overload wall outlets and extension cords as contact with respect to proper grounding of the mast and supporting...
XH G1 XH A1 Instruction Manual
Page 7
... Important Usage Instructions...2 E Important Safety Instructions...3 About this Manual...5 Checking the Supplied Accessories ...9 Components Guide...10 Preparations Preparing the Power Supply...15 Preparing the Camcorder ...18 Using the Wireless Controller ...22 Loading/Removing a Cassette ...23 Inserting/Removing a Memory Card...24 Changing Settings with the MENU Button...25 Setting the Time Zone, Date and Time...26 Recording Introduction Recording ...27 Selecting the Signal Standard and Aspect Ratio 31 Locating the End of the Last Scene ...32 Zooming ...33 Adjusting...
... Important Usage Instructions...2 E Important Safety Instructions...3 About this Manual...5 Checking the Supplied Accessories ...9 Components Guide...10 Preparations Preparing the Power Supply...15 Preparing the Camcorder ...18 Using the Wireless Controller ...22 Loading/Removing a Cassette ...23 Inserting/Removing a Memory Card...24 Changing Settings with the MENU Button...25 Setting the Time Zone, Date and Time...26 Recording Introduction Recording ...27 Selecting the Signal Standard and Aspect Ratio 31 Locating the End of the Last Scene ...32 Zooming ...33 Adjusting...

XH G1 XH A1 Instruction Manual
Page 35
...-light surroundings. MENU ( 25) CAMERA SETUP AF MODE ••• INSTANT AF Open the menu and select [CAMERA SETUP]. Select [AF MODE], select a setting option and close the menu. [INSTANT AF]: The focus is useful even when recording in this mode making it easier to change the direction of the lens barrel) to . Only the TTL system is used for use of the Peaking and Magnifying display functions ( 37). * The Instant AF function...
...-light surroundings. MENU ( 25) CAMERA SETUP AF MODE ••• INSTANT AF Open the menu and select [CAMERA SETUP]. Select [AF MODE], select a setting option and close the menu. [INSTANT AF]: The focus is useful even when recording in this mode making it easier to change the direction of the lens barrel) to . Only the TTL system is used for use of the Peaking and Magnifying display functions ( 37). * The Instant AF function...
XH G1 XH A1 Instruction Manual
Page 44
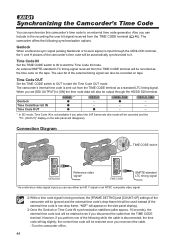
... start the Time Code IN mode. Time Code OUT Set the TIME CODE switch to OUT to it. Connection Diagram TIME CODE switch GENLOCK Reference video signal* TIME CODE SMPTE-standard LTC timing signal * As a reference video signal input you perform one of the external timing signal can use either an HD Y signal or an NTSC composite video signal. While a time code signal is being received, the [FRAME SETTNG] and [COUNT-UP] settings of the camcorder's time code will...
... start the Time Code IN mode. Time Code OUT Set the TIME CODE switch to OUT to it. Connection Diagram TIME CODE switch GENLOCK Reference video signal* TIME CODE SMPTE-standard LTC timing signal * As a reference video signal input you perform one of the external timing signal can use either an HD Y signal or an NTSC composite video signal. While a time code signal is being received, the [FRAME SETTNG] and [COUNT-UP] settings of the camcorder's time code will...
XH G1 XH A1 Instruction Manual
Page 49
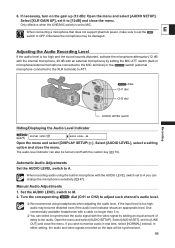
... Audio Level Indicator MENU ( 25) DISPLAY SETUP/ AUDIO LEVEL••ON Open the menu and select [DISPLAY SETUP/ ]. Automatic Audio Adjustments Set the AUDIO LEVEL switch to M. 2. In either setting, the audio and video signals recorded on the tape will be damaged. If necessary, turn on /off with the AUDIO LEVEL switch set it to [LINE OUT] and close the menu. Adjusting the Audio Recording Level If the audio level is too high and the sound sounds distorted, activate the microphone attenuator (12 dB with the internal microphone...
... Audio Level Indicator MENU ( 25) DISPLAY SETUP/ AUDIO LEVEL••ON Open the menu and select [DISPLAY SETUP/ ]. Automatic Audio Adjustments Set the AUDIO LEVEL switch to M. 2. In either setting, the audio and video signals recorded on the tape will be damaged. If necessary, turn on /off with the AUDIO LEVEL switch set it to [LINE OUT] and close the menu. Adjusting the Audio Recording Level If the audio level is too high and the sound sounds distorted, activate the microphone attenuator (12 dB with the internal microphone...
XH G1 XH A1 Instruction Manual
Page 74
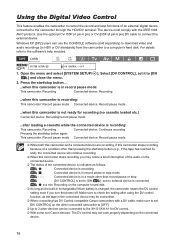
... /stop button again: This camcorder: Record pause mode Connected device: Record pause mode While both this camcorder and a connected device are recording, if this camcorder is in record pause or stop functions of the connected device is charged, the camcorder retains the DV control setting even if you turn the power off. Use the optional CV-150F (4 pin-4 pin) or CV-250F (4 pin-6 pin) DV cable to the XH G1/XH A1 for recording (no external device is connected xxx min Recording on the connected device. 74 MENU ( 25) SYSTEM SETUP...
... /stop button again: This camcorder: Record pause mode Connected device: Record pause mode While both this camcorder and a connected device are recording, if this camcorder is in record pause or stop functions of the connected device is charged, the camcorder retains the DV control setting even if you turn the power off. Use the optional CV-150F (4 pin-4 pin) or CV-250F (4 pin-6 pin) DV cable to the XH G1/XH A1 for recording (no external device is connected xxx min Recording on the connected device. 74 MENU ( 25) SYSTEM SETUP...
XH G1 XH A1 Instruction Manual
Page 101
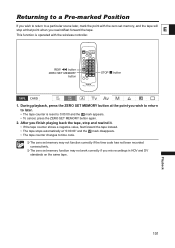
... work correctly if you mix recordings in HDV and DV standards on the same tape. E This function is reset to later. • The tape counter is operated with the zero set memory function may not function correctly if the time code has not been recorded consecutively. The zero set memory, and the tape will stop at the point you rewind/fast forward the tape. During playback, press the ZERO SET MEMORY button...
... work correctly if you mix recordings in HDV and DV standards on the same tape. E This function is reset to later. • The tape counter is operated with the zero set memory function may not function correctly if the time code has not been recorded consecutively. The zero set memory, and the tape will stop at the point you rewind/fast forward the tape. During playback, press the ZERO SET MEMORY button...
XH G1 XH A1 Instruction Manual
Page 115
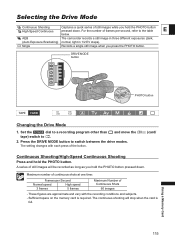
... / (card/ tape) switch to switch between the drive modes. Continuous Shooting/High-Speed Continuous Shooting Press and hold the PHOTO button. Maximum number of continuous shots at one time: Frames per second, refer to the table E below. Single Records a single still image when you press the PHOTO button. AEB The camcorder records a still image in three different exposures (dark, (Auto Exposure Bracketing) normal, light in 1/2 EV steps). Press the DRIVE MODE button to . 2. For the number...
... / (card/ tape) switch to switch between the drive modes. Continuous Shooting/High-Speed Continuous Shooting Press and hold the PHOTO button. Maximum number of continuous shots at one time: Frames per second, refer to the table E below. Single Records a single still image when you press the PHOTO button. AEB The camcorder records a still image in three different exposures (dark, (Auto Exposure Bracketing) normal, light in 1/2 EV steps). Press the DRIVE MODE button to . 2. For the number...

XH G1 XH A1 Instruction Manual
Page 145
... the connected digital device is exhausted. HEADS DIRTY, USE CLEANING CASSETTE Video heads are recorded on the memory card. The error may be temporary. If the message disappears after 4 seconds an - If " " changes to play back the image. Replace the card or change the position of the protect switch. 24 INCORRECT TAPE You attempted to play back a tape recorded in recording, or during analog line-in a standard different than the one SPECIFICATION PLAYBACK to INCOMPATIBLE VIDEO INPUT input a video signal in the camcorder...
... the connected digital device is exhausted. HEADS DIRTY, USE CLEANING CASSETTE Video heads are recorded on the memory card. The error may be temporary. If the message disappears after 4 seconds an - If " " changes to play back the image. Replace the card or change the position of the protect switch. 24 INCORRECT TAPE You attempted to play back a tape recorded in recording, or during analog line-in a standard different than the one SPECIFICATION PLAYBACK to INCOMPATIBLE VIDEO INPUT input a video signal in the camcorder...
XH G1 XH A1 Instruction Manual
Page 153
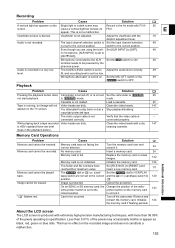
...a tape recorded Video heads are using the built- Memory Card Operations Additional Information Problem Cause Solution Memory card cannot be powered by the phantom power. tape) switch are not set too low. switch to OFF. Audio is recorded in the playback picture. copyright protected tape. The video output cable is not Verify that the video cable is protected. in HDV standard there are dirty. Image is - Cancel the protection. Turn off , or is set Set the camcorder to Adjust the audio level correctly. 49 level. Microphone connected...
...a tape recorded Video heads are using the built- Memory Card Operations Additional Information Problem Cause Solution Memory card cannot be powered by the phantom power. tape) switch are not set too low. switch to OFF. Audio is recorded in the playback picture. copyright protected tape. The video output cable is not Verify that the video cable is protected. in HDV standard there are dirty. Image is - Cancel the protection. Turn off , or is set Set the camcorder to Adjust the audio level correctly. 49 level. Microphone connected...
XH G1 XH A1 Instruction Manual
Page 155
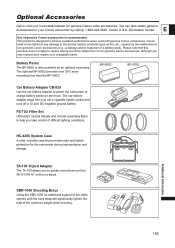
... provides over 35% more recording time than the BP-950G. FS-72U Filter Set Ultraviolet, neutral density and circular polarizing filters to quickly mount/unmount the XH G1/XH A1 on a chargeable basis. Additional Information TA-100 Tripod Adapter The TA-100 allows you to help you may request such repairs on /from a tripod. E Use of difficult lighting conditions. Please note that...
... provides over 35% more recording time than the BP-950G. FS-72U Filter Set Ultraviolet, neutral density and circular polarizing filters to quickly mount/unmount the XH G1/XH A1 on a chargeable basis. Additional Information TA-100 Tripod Adapter The TA-100 allows you to help you may request such repairs on /from a tripod. E Use of difficult lighting conditions. Please note that...
XH G1 XH A1 Instruction Manual
Page 158
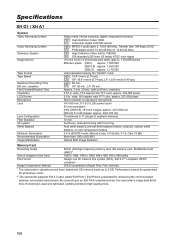
... prints. 158 cassette) 0.57 in . Specifications XH G1 / XH A1 System Video Recording System Audio Recording System Television System Image Sensor Tape Format Tape Speed Maximum Recording Time (60 min. wide, 16:9 aspect ratio TFT color, approx. 269,000 pixels 2.8 in . cassette) Fast Forward/Rewind Time Viewfinder LCD Screen Microphone Lens Lens Configuration Filter Diameter AF system White Balance Minimum Illumination Recommended Illumination Image Stabilization Rotary head, helical scanning, digital component recording HDV High Definition Video 1080i DV Consumer digital VCR SD system...
... prints. 158 cassette) 0.57 in . Specifications XH G1 / XH A1 System Video Recording System Audio Recording System Television System Image Sensor Tape Format Tape Speed Maximum Recording Time (60 min. wide, 16:9 aspect ratio TFT color, approx. 269,000 pixels 2.8 in . cassette) Fast Forward/Rewind Time Viewfinder LCD Screen Microphone Lens Lens Configuration Filter Diameter AF system White Balance Minimum Illumination Recommended Illumination Image Stabilization Rotary head, helical scanning, digital component recording HDV High Definition Video 1080i DV Consumer digital VCR SD system...
XH G1 XH A1 Instruction Manual
Page 161
... Screen markers 30 SD memory card 24 Setup level 77 Sharpness 77 Shoulder strap 20 Shutter speed 55 Signal standard 31 Simultaneous recording (tape/memory card 113 Skin detail 67 Sky detail 68 Slideshow 120 Specifications 158 Spotlight (recording program 53 Still image quality 110 Still image review 119 Still image size 110 T E Tape protection 150 Temporary autofocus 36 Time code 42 Time code synchronization 44 Troubleshooting 152 Tv (recording program 55 U User bit 46 V VCR Stop 28 Video heads, cleaning...
... Screen markers 30 SD memory card 24 Setup level 77 Sharpness 77 Shoulder strap 20 Shutter speed 55 Signal standard 31 Simultaneous recording (tape/memory card 113 Skin detail 67 Sky detail 68 Slideshow 120 Specifications 158 Spotlight (recording program 53 Still image quality 110 Still image review 119 Still image size 110 T E Tape protection 150 Temporary autofocus 36 Time code 42 Time code synchronization 44 Troubleshooting 152 Tv (recording program 55 U User bit 46 V VCR Stop 28 Video heads, cleaning...


